How to Use AI for Home Design: A Complete Beginner's Guide
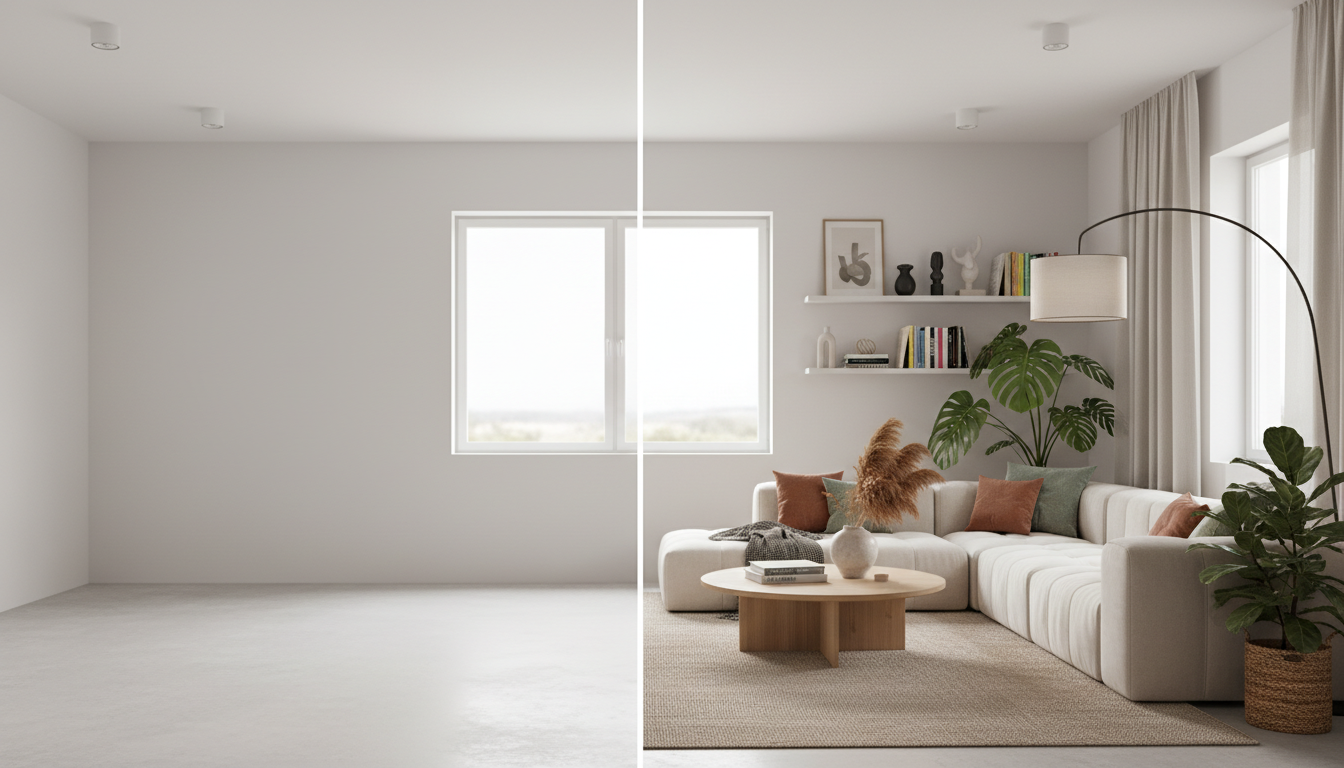
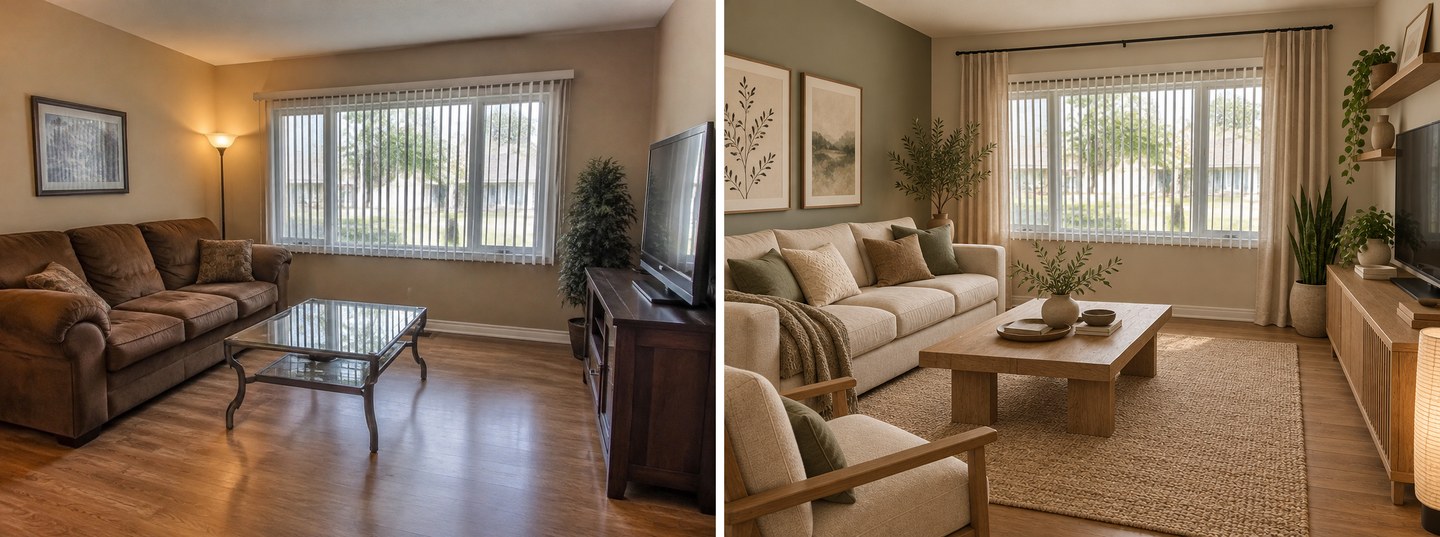
AI home design tools have changed a fundamental equation. Before, seeing your room in a different style required either hiring an interior designer ($200-500 for an initial consultation) or spending hours with mood boards and guesswork. Now you can upload a photo of any room and see it transformed into about 20 interior styles — photorealistic, detailed, spatially accurate — in about 30 seconds.
This guide walks you through everything: how the technology works, how to take the right photos, how to choose styles, how to iterate toward your ideal result, and — critically — how to turn an AI render into a real renovation plan.
No design background required. No software to learn. Just your phone and a room.
What Is AI Home Design?
AI home design uses machine learning models trained on millions of interior and exterior photographs to understand what different design styles look like — and then apply those styles to your specific room.
Here is what happens when you upload a photo:
-
Room analysis. The AI identifies the room's structure: walls, floor, ceiling, windows, doors, and existing furniture. It builds an understanding of the 3D space from your 2D photo.
-
Style application. Based on the style you select, the AI replaces furniture, changes materials (wood floors, tile, carpet), adjusts wall colors and textures, modifies lighting, and adds style-appropriate decor. All while preserving your room's actual geometry — ceiling height, window positions, room proportions.
-
Rendering. The AI generates a photorealistic image of your room in the new style. Modern tools produce output that is often indistinguishable from a professional interior photograph.
The result is not a sketch or a rough concept. It is a detailed, realistic image of your actual room redesigned in the style you chose. You can see exactly how Scandinavian would look in your living room, whether modern farmhouse suits your kitchen, or if your bedroom would benefit from a Japandi makeover.
The key insight: AI does not show you someone else's room in a style. It shows you YOUR room. Your ceiling height, your window placement, your room shape — in a new style. That specificity is what makes AI design tools genuinely useful for renovation planning, not just entertainment.
Who uses these tools? The audience is broader than you might expect. Homeowners planning renovations (the obvious use case). Renters exploring what non-permanent changes could improve their space. Real estate agents staging empty properties. Interior designers creating quick concept visualizations for clients. Home stagers preparing houses for sale. Airbnb hosts optimizing their listing photos. Architecture students visualizing projects. Even therapists redesigning office spaces for patient comfort. The tools are genuinely general-purpose — anyone with a room and a preference about how it looks can benefit.
Step-by-Step: Your First AI Room Redesign
Let's walk through the entire process using GenRoom, which handles interiors, exteriors, and yards in a single tool.
Step 1: Take the Right Photo
The quality of your AI result depends heavily on the quality of your input photo. Good news: you do not need a professional camera. An iPhone or any modern smartphone works perfectly. Here is what matters:
Lighting. Natural daylight is ideal. Take the photo during the day with curtains or blinds open. The goal is even, neutral lighting without harsh shadows. Avoid photographing at night with only artificial lighting — the AI may interpret warm lamp light as the room's actual color temperature and produce inaccurate renders.
Angle. Stand in a corner of the room and aim across to the opposite corner. This captures two walls, the floor, and some ceiling — giving the AI maximum spatial context. The more of the room visible in the photo, the more accurate and realistic the output.
Orientation. Hold your phone horizontally (landscape mode). AI design tools are optimized for landscape images. Portrait-format photos get cropped or produce suboptimal results.
Camera height. Hold your phone at roughly chest height and keep it level with the horizon. No dramatic upward or downward angles. A level, neutral perspective produces the most architecturally accurate results.
Room condition. Here is what surprises most people: you do not need to clean up, declutter, or stage your room before uploading. The AI replaces all furniture and decor with the new style. Upload your room exactly as it is right now. Dirty dishes in the sink, toys on the floor, mismatched furniture — none of it matters. The AI starts fresh.
Step 2: Upload to GenRoom
Go to genroom.io/generate and upload your photo. Then pick a mode (for example, furnish an empty room or a designer makeover) or go straight to a style, and click "Create design" — you can refine the result with words or a brush afterwards.
GenRoom gives you 6 free credits — no credit card, just a free account. That is enough for three designs: one room in three different styles, or three rooms in one style each.
Step 3: Choose a Style
This is the fun part — and the part where AI tools deliver the most value. Instead of choosing a style in the abstract and hoping it works, you can see multiple styles applied to your actual room and compare them directly.
GenRoom offers about 20 interior styles. Here are the most popular starting points:
Scandinavian — Clean lines, light wood, white walls, warm textiles. Calm and functional. Works beautifully in rooms with good natural light. The most universally appealing style in our experience — very few rooms look bad in Scandinavian.
Modern — Sleek, architectural, low-profile furniture, neutral palette with bold accents. Best for rooms with good proportions and strong structural features (high ceilings, large windows).
Japandi — Japanese minimalism meets Scandinavian warmth. Natural materials, intentional simplicity, warm neutrals. For people who like the idea of minimalism but find pure minimal too cold.
Minimalist — Pared down to essentials. Open space, clean surfaces, monochromatic palette. Best for rooms that feel cluttered or small — minimalist styling can make a small room feel significantly larger.
Farmhouse — Rustic charm, reclaimed wood, vintage elements, comfortable and lived-in. Great for older homes with character.
Industrial — Exposed brick, steel, raw materials, urban loft aesthetic. Best for high-ceiling spaces and converted buildings.
Bohemian — Layered, global, plants, textiles, maximalist warmth. The opposite of minimalism. For people who want their home to feel rich and personal.
Mid-Century Modern — 1950s-60s revival. Organic shapes, warm wood tones, statement furniture pieces. Timeless without feeling dated.
Coastal — Beach-inspired calm. White and blue palette, natural textures (rattan, linen, driftwood), airy and relaxed. Best for rooms with good light and homes in warm climates, though it works anywhere you want a vacation feeling.
Art Deco — Bold geometric patterns, rich jewel tones, metallic accents, luxurious materials. Best for those who want drama and personality in their space. Works particularly well in rooms with strong architectural features.
Transitional — The bridge between traditional and contemporary. Clean lines but warm materials, neutral palette with texture variation, comfortable and timeless. Often the safest choice for resale value.
Pro tip: Start by trying three very different styles. If you go Scandinavian, Industrial, and Bohemian on the same room, you will quickly feel which direction resonates — even if none of the three is your final choice. That directional clarity is the biggest value AI provides.
Step 4: Review and Iterate
Your first render might not be perfect — and that is completely fine. The power of AI design is speed. What would take a human designer days takes 30 seconds, so you can iterate freely.
Compare side by side. Save each render and compare them. Most people find that after seeing 4-5 styles on their actual room, a clear preference emerges that they did not expect. We have seen homeowners who were certain they wanted Modern discover that Japandi or Scandinavian suited their space far better.
Try variations within a direction. Once you know you like the Scandinavian direction, try related styles: Nordic, Hygge, Scandi-Boho. Each has subtle differences in material palette and furniture style that might click more precisely with your taste.
Test different rooms. If you like a style in your living room, try it in your kitchen and bedroom too. Consistency across rooms matters for a cohesive home — and AI lets you verify that a style works everywhere before you commit.
Step 5: Save and Plan Your Renovation
Once you have a render you love, the AI output becomes the starting point for real-world action.
Save the image. Download the full-resolution render. You will use this as a reference throughout your renovation process.
Identify key elements. Look at the render and list the specific changes: wall color, flooring material, furniture style, lighting fixtures, textiles, decor. This becomes your renovation shopping list.
Share with stakeholders. Show the render to your partner, family, roommate, or landlord. AI renders communicate design intent far more effectively than verbal descriptions or Pinterest boards. "I want to do something like this" accompanied by a realistic image of your actual room eliminates miscommunication.
Photo Tips for Best AI Results
| Do | Don't |
|---|---|
| Shoot in natural daylight | Use only artificial light at night |
| Landscape orientation (horizontal) | Portrait orientation (vertical) |
| Stand in a corner for widest angle | Stand in the middle of the room |
| Keep camera level at chest height | Angle up toward ceiling or down at floor |
| Include two walls, floor, and ceiling | Photograph just one wall |
| Upload as-is (clutter is fine) | Spend an hour cleaning first |
| Use the highest resolution available | Crop or compress before uploading |
| Capture the room empty or furnished | Obscure the room with close-up objects |
Best cameras for AI design (ranked): iPhone 15/16 Pro (ultrawide lens), Samsung Galaxy S24 Ultra, Google Pixel 8 Pro, any phone with an ultrawide lens. Standard phone cameras work fine too — ultrawide just captures more room in one shot.
Advanced photo techniques
If you want the absolute best AI results, these additional tips help:
Photograph the same room from 2-3 angles. Running each angle through the AI gives you different perspectives on the same style transformation. You will see how the style looks from the doorway, from the seating area, and from the far corner.
Remove pets and people. While AI handles furniture fine, pets and people in the photo sometimes produce odd artifacts — a cat merged with a chair leg, a person's arm transformed into a shelf bracket. Take photos of the empty room (meaning no living things — furniture and clutter are fine).
Turn off ceiling fans. Ceiling fans in motion appear blurred in photos, and AI interprets the blur unpredictably. Turn fans off and let the blades stop completely before photographing.
Check your camera lens. Phone camera lenses accumulate fingerprints and pocket dust. Wipe the lens with a soft cloth before shooting. A smudged lens produces soft, hazy photos that degrade AI output quality noticeably.
AI for Different Rooms
Different rooms produce different quality results from AI tools. Here is what to expect:
Living Room
Living rooms are the sweet spot for AI design tools. They are typically the largest room, with the most furniture variety, and the most style options. AI handles living rooms extremely well because the training data is heavily weighted toward living room photography.
Best styles to try: Scandinavian, Modern, Japandi, Bohemian, Mid-Century Modern. Common issue: Very large open-plan living rooms sometimes lose coherence at the far end of the room. If your living room is part of an open plan, photograph just the living area rather than the entire open space.

Bedroom
Bedrooms produce consistently good results. The AI handles bed placement, nightstands, lighting, and textiles well. Bedrooms with visible closets or odd alcoves can sometimes produce awkward results — try photographing from an angle that minimizes these features.
Best styles to try: Japandi, Scandinavian, Minimalist, Bohemian, Coastal. Common issue: Very small bedrooms with the bed taking up 80%+ of the visible floor area. The AI has less room to work with, but the style transformation (bedding, wall color, lighting) still works well.

Kitchen
Kitchens are where AI design tools deliver some of the most dramatic transformations. A dated 1990s kitchen with oak cabinets and laminate counters can look genuinely stunning in Modern or Scandinavian style. The AI handles cabinets, countertops, backsplash, appliances, and lighting fixtures.
Best styles to try: Modern, Scandinavian, Farmhouse, Industrial, Transitional. Common issue: Galley kitchens (narrow, one-wall) sometimes produce less impressive results because there is less visual variety for the AI to work with. L-shaped and U-shaped kitchens photograph best.

Bathroom
Bathrooms work well for style visualization, particularly for tile, vanity, and fixture selection. The AI can show you what a complete bathroom renovation would look like — new tile, new vanity, new fixtures, new lighting.
Best styles to try: Modern, Spa/Zen, Scandinavian, Industrial, Mediterranean. Common issue: Very small bathrooms (half baths) can produce results where the AI adds elements that would not physically fit. Use the output as style direction rather than a literal plan.
AI for Exteriors and Yards
Most people think of AI design tools as interior-only, but the technology works just as well — sometimes better — for exterior and landscape visualization.
Exterior/Facade Design
Upload a photo of the front of your house, and AI tools can show you:
- New siding or cladding materials (from vinyl to stone, brick to stucco)
- Different paint color schemes
- New windows and doors
- Roof style changes
- Porch or entryway additions
- Architectural style transformations (ranch to modern, colonial to farmhouse)
This is particularly valuable because exterior renovations are expensive and irreversible. Seeing your house in a new style before committing to $30,000+ in siding and trim work is enormously valuable.
Photo tip for exteriors: Photograph from across the street or from the end of your driveway. You want the full front facade visible with some surrounding context (yard, driveway, sky). Avoid photographing at midday when the sun creates harsh shadows on one side of the house.
GenRoom's facade design feature handles dozens of exterior styles. You can also try room makeover for a quick exterior transformation.
Yard and Landscape Design
Upload a photo of your yard — front or back — and AI can show you:
- New landscaping (plants, trees, flower beds)
- Hardscaping (patios, walkways, retaining walls)
- Outdoor living spaces (decks, pergolas, fire pits)
- Lighting design
- Pool and water feature visualization
Photo tip for yards: Shoot from the house looking outward, or from the property edge looking back toward the house. Morning or late afternoon light produces the most natural-looking renders.
Why exterior and yard matter. Most AI design guides focus exclusively on interiors, but exterior visualization is arguably more valuable for one simple reason: exterior renovations are more expensive, more visible, and harder to reverse. A wrong paint color on your living room wall costs $200 and an afternoon to fix. A wrong siding choice on your exterior costs $15,000 and months to replace. AI visualization eliminates that risk for both interior and exterior projects.
Create interior design with AI
Upload a photo of your room and get a professional design in 30 seconds. First generation is free.
From AI Render to Real Renovation
An AI render is a powerful starting point, but it is just that — a starting point. Here is how to bridge the gap between a beautiful AI image and a completed renovation.
Use the render as a visual brief
The most effective use of an AI render is as a communication tool. Show it to:
- Contractors. "I want my kitchen to look like this." A render eliminates the ambiguity of verbal descriptions. The contractor can see the cabinet style, countertop material, backsplash pattern, and lighting design you want.
- Designers. If you hire a professional designer for execution, the AI render gives them a clear starting point. They can refine the concept, source specific products, and create a realistic budget.
- Partners and family. Making design decisions together is hard when each person has a different mental image. An AI render gets everyone looking at the same thing.
Identify specific products
Look at your AI render and identify the specific elements you want to replicate:
- Wall color. Match the render to paint swatches. Most hardware stores can color-match from a photo.
- Flooring. Identify the material (hardwood, tile, concrete) and general tone (light oak, dark walnut, gray stone).
- Furniture. Note the style, scale, and material of key pieces. Use these as search parameters on furniture websites.
- Lighting. Note fixture styles (pendant, recessed, sconce) and color temperature (warm, neutral, cool).
- Textiles. Curtain style, rug pattern, throw pillow colors.
Get professional estimates
Take your render and product list to 2-3 contractors for estimates. Having a clear visual reference dramatically improves the accuracy of contractor quotes — they can see exactly what you want instead of guessing.
Budget reality check
AI renders do not come with price tags. The Modern kitchen the AI generated might cost $15,000 or $50,000 depending on material quality and your local labor market. Get real quotes before committing emotionally to a specific render.
Create a renovation timeline
Once you have contractor estimates and know your budget, plan the renovation in phases if needed:
Phase 1: Highest impact, lowest cost. Paint, lighting, textiles (curtains, rugs, throw pillows). These changes are inexpensive, reversible, and can dramatically shift the feel of a room. Compare your AI render to what you can achieve with just these changes — you might be surprised how close you can get.
Phase 2: Furniture. Key pieces that define the style — sofa, dining table, bed frame, accent chairs. If budget is tight, replace the single largest piece first (usually the sofa) and let the rest follow over time.
Phase 3: Permanent changes. Flooring, cabinets, countertops, tile work. These are the expensive, permanent changes that require contractors. Save these for when you are certain about the direction — which is exactly what AI visualization helps you confirm before spending.
Phase 4: Structural. Wall removal, room additions, window changes. The most expensive and disruptive. Only pursue after phases 1-3 have confirmed that the style direction is right for your home and lifestyle.
AI tools are most valuable in the planning phase before any money is spent. Use them to confirm your direction, align stakeholders, and communicate clearly with contractors. The $0-10 you spend on AI visualization can save thousands in renovation mistakes.
Limitations: What AI Cannot Do
Being honest about limitations helps you use AI tools more effectively.
Building codes and permits. AI has no knowledge of your local building codes, zoning laws, or permit requirements. Any structural change (moving walls, adding windows, extending the footprint) needs professional verification before execution.
Exact dimensions. AI works from 2D photos and does not produce dimensionally accurate output. Furniture in the render is approximately the right scale, but you cannot order a sofa based on the pixel dimensions in an AI image.
Structural assessment. AI cannot tell you whether a wall is load-bearing, whether your floor can support heavy stone tile, or whether your roof structure can handle solar panels. These questions require an in-person professional assessment.
Plumbing and electrical. Moving a sink, adding an outlet, or relocating a light fixture requires knowledge of your home's infrastructure that AI simply does not have.
Material-specific accuracy. AI can show you that marble countertops would look beautiful in your kitchen. It cannot tell you which specific marble (Calacatta vs. Carrara vs. Statuario), at what thickness, with which edge profile, from which supplier, at what cost.
Cost estimation. An AI render shows you what a renovation would look like, not what it would cost. Costs vary enormously by location, material grade, and contractor pricing.
Existing fixture integration. If you want to keep your existing hardwood floors but change everything else, AI tools typically cannot accommodate that request. Most tools transform the entire room (in GenRoom you can select just an area with the brush and describe the change). Some advanced tools (like Spacely AI) offer element-level control, but the results are less reliable than full-room transforms.
Multi-room coordination. AI tools process one room at a time. They do not ensure that your living room, kitchen, and bedroom designs are stylistically coherent as a set. You need to manage cross-room consistency yourself — try the same style across all rooms and compare the results as a collection.
Understanding these limitations does not diminish the value of AI design tools. It helps you use them for what they excel at (fast, cheap, realistic style exploration) and know when to bring in professionals (execution, engineering, product specification).
AI vs Professional Designer: When to Use Each
| Scenario | Best Choice | Why |
|---|---|---|
| Exploring style options early on | AI tool | Try 10 styles in 10 minutes at near-zero cost |
| Visualizing a single room change | AI tool | Instant result, no appointment needed |
| Full home renovation planning | Designer + AI | AI for initial direction, designer for execution |
| Structural changes (walls, additions) | Designer/architect | AI cannot assess structural feasibility |
| Material and product selection | Designer | Designers have supplier relationships and material expertise |
| Budget planning and management | Designer | AI cannot estimate costs or manage budgets |
| Quick check: "Would this style work?" | AI tool | 30-second answer vs. waiting for a consultation |
| Real estate staging | AI tool | Faster and 90% cheaper than physical staging |
| Commercial space design | Designer | Complex requirements beyond AI capabilities |
| Color palette exploration | AI tool | See colors on your actual walls instantly |
The smartest approach: Use AI tools for the exploration and direction-setting phase ($0-10). Once you know what you want, bring a professional designer in for the execution phase. You will save the designer time (and therefore money) by arriving with a clear visual direction instead of vague ideas.
Real numbers make this concrete. A typical interior designer charges $150-300/hour. If you arrive at a consultation saying "I want something modern but warm," the designer spends 3-5 hours developing concepts and mood boards before you see anything — that is $450-1,500 before a single design decision is made. If you arrive with three AI renders saying "I love this direction — can you refine it and help me execute?", you skip the exploration phase entirely. The designer can immediately focus on material selection, product sourcing, and project management. You save hours of billable time and get to the actionable phase faster.
Frequently Asked Questions
How much does AI home design cost?
Most AI design tools offer free tiers. GenRoom provides 6 free credits (about 3 designs). Paid options range from a $9.99 one-time credit pack (GenRoom, no subscription) to $29/month (Interior AI, HomeDesigns.ai). For occasional use, the free tier is often sufficient. For a renovation project involving multiple rooms and many style iterations, a one-time $9.99–$19.99 GenRoom pack is vastly cheaper than any alternative.
Do I need design experience to use AI tools?
No. The entire point of AI design tools is that they require zero design knowledge. You upload a photo, pick a style from a visual menu, and the AI handles everything. The output is a finished, styled room — not a wireframe or mood board that requires interpretation.
Can AI design tools work with furnished rooms?
Yes. AI tools are designed to work with rooms in their current state — furnished, cluttered, messy. The AI removes or replaces existing furniture and decor with the new style. You do not need to empty the room first.
How accurate are the AI results compared to real life?
Modern AI design tools produce highly photorealistic output. The style, colors, materials, and furniture are accurately represented. Room geometry (ceiling height, window positions, wall angles) is preserved. The main accuracy gap is dimensional: furniture sizes are approximate, not exact. Use AI output for style direction, not furniture ordering.
Can I use AI to design my exterior?
Yes. GenRoom supports exterior facade design and yard/landscape design in addition to interiors. Upload a photo of the front of your house and see it in dozens of exterior styles. This is particularly valuable for exterior renovations where mistakes are expensive and permanent.
How long does an AI room redesign take?
With GenRoom, about 30 seconds from upload to finished render. Slower tools take 60-90 seconds. Either way, you can visualize a room in multiple styles within 5-10 minutes — compared to days or weeks for traditional design visualization methods.
Can landlords or renters use AI design tools?
Absolutely. AI design is useful for renters in two ways: (1) exploring non-permanent changes like furniture, rugs, curtains, and decor that transform a space without modifying the structure, and (2) having a productive conversation with a landlord about permitted modifications by showing them exactly what you have in mind.
What rooms work best with AI design tools?
Living rooms and kitchens produce the most dramatic and reliable results. Bedrooms and bathrooms also work well. Very small rooms (closets, small half-baths) can produce less reliable results because the AI has limited spatial context to work with.
Can I use AI renders for insurance or appraisal purposes?
No. AI renders show potential design changes, not actual conditions. They should not be used for insurance claims, property appraisals, or legal documentation. These contexts require actual photographs of real conditions.
How do I share AI renders with others?
Most AI design tools let you download renders as standard image files (JPG or PNG). You can share these via email, text message, social media, or any image-sharing method. Some tools also generate shareable links. GenRoom renders download at full resolution; free-tier results carry a watermark, which any paid pack removes.
Start Designing
The best way to understand what AI home design can do for your space is to try it. Upload a photo of any room — the one you are sitting in right now works perfectly — and see it transformed.
Try GenRoom free — 6 credits, no credit card →
You might be surprised by what you find. Many of our users discover that the style they were certain about is not actually their favorite once they see it on their real room — and that a style they would never have considered becomes the clear winner. That is the value of AI design: risk-free exploration of possibilities that used to require real money and real commitment to discover.
A year ago, visualizing your home in a new style required professional help or pure imagination. Today, it takes 30 seconds and costs nothing. The technology will only get better from here — but the tools available right now are already good enough to make meaningful renovation decisions with confidence. The sooner you try it, the sooner you move from wondering what your home could look like to knowing.
