Room Divider Ideas: How to Zone a Studio or One Room With AI
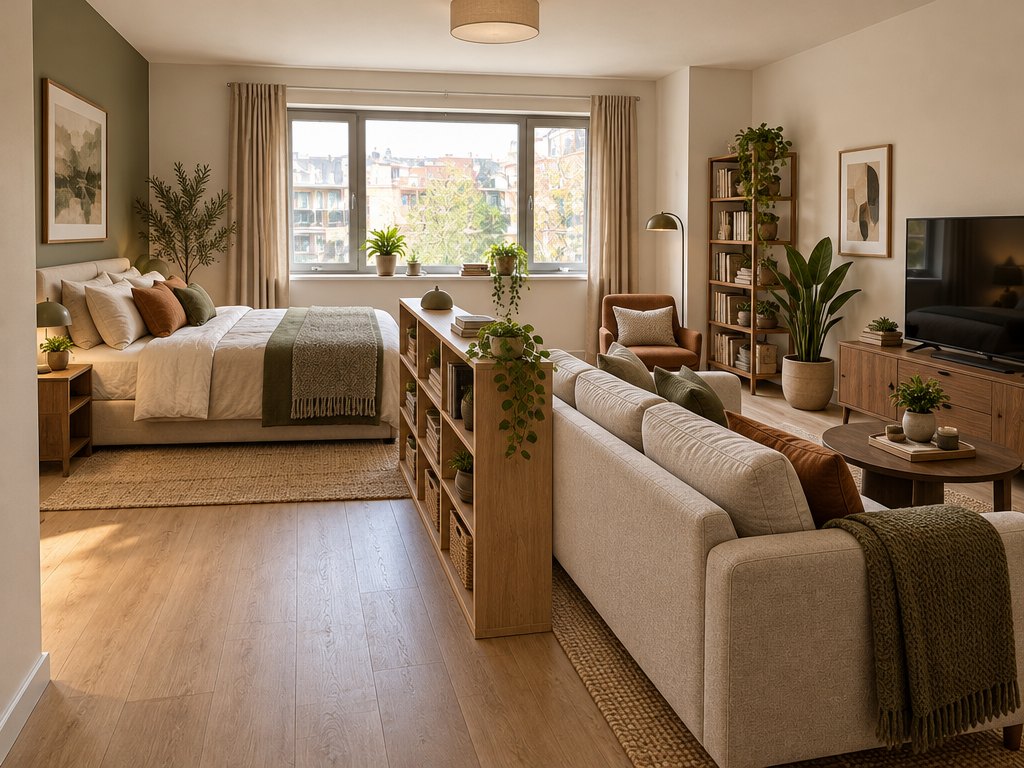
One studio, two zones: a low open shelf now separates the bed from the sofa. This is an unedited result from the GenRoom Studio.
The best room divider is the one that solves your actual problem: privacy for the bed, a quiet corner for work, or just a clear line between "living" and "sleeping". Open shelving keeps light and adds storage, a glass partition gives a real wall without losing daylight, a ceiling-track curtain is the cheapest closable option, and a slatted screen hides the bed while staying airy. Rugs, light and a platform zone a room without any divider at all. The fastest way to choose is to see each option in a photo of your own room before you buy anything.
That is exactly what people ask GenRoom for. Between March and mid-October 2026, 721 people described this job to the GenRoom Studio in their own words. One person drew lines on a photo: the striped part should become a separate room closed off with glass or concrete, and the vertical lines marked the entrance to the living room, where a door should go. Others asked to turn one room into "two cozy sitting areas for chilling, with warm lighting", to add "a study space, plants and a relaxation area", or to make a studio with a kitchenette "modern, cozy and functional".
There is no special "zoning" button in the Studio, so we tested what actually works. We took three ordinary rooms (a studio with the bed and sofa in one space, a long living room, and a bedroom with a free corner), ran 19 generations, and kept every result unedited. Below you will find four dividers on the same studio photo, three ways to zone without a divider, the exact Studio steps, and the limits we hit.
This article is only about the dividing line. For the whole studio layout (furniture that earns its footprint, plans by size, renter tricks), see our studio apartment design guide; to plan every room of a flat, start from AI apartment design.
Which room divider should you choose?
Choose by the problem, not by the picture. If you need privacy for sleeping, pick something that closes: a curtain, a glass partition with a door, or a dense slatted screen. If you need storage too, pick open shelving. If the room is dark, keep the divider see-through or skip it and zone with rugs and light.
| Divider | Hides the bed | Keeps daylight | Blocks sound | Floor space it takes | Renter-friendly | Best for |
|---|---|---|---|---|---|---|
| Open shelving unit | Partly | Mostly | No | Shelf depth | Yes (freestanding, but anchor it) | Storage plus a visual line |
| Glass partition with steel frames | No (unless frosted) | Yes | Somewhat | Very little | Usually no (fixed to floor and ceiling) | A "real" separate bedroom without losing light |
| Ceiling-track curtain | Yes, when closed | Only when open | No | Almost none | Often (tension rods exist) | Cheapest closable sleeping nook |
| Slatted wood screen | Partly | Mostly | No | Very little | Freestanding versions only | Airy privacy, warm look |
| Platform under the bed | No | Yes | No | Raises a whole zone | Rarely | A clear "bedroom" level in an open room |
| Rugs and separate lighting | No | Yes | No | None | Yes | Zoning when you cannot add anything tall |
| Furniture placement (sofa back, desk) | Partly | Yes | No | Uses what you own | Yes | Free, reversible first step |
Two honest notes before you buy. Only a glass partition with a door gives you some acoustic privacy; the rest of this table blocks views, not sound. If one person works while another sleeps, plan for that. And a tall freestanding shelf in the middle of a room has no wall behind it: the U.S. Consumer Product Safety Commission's Anchor It campaign asks people to secure bookcases and keep heavy items on lower shelves. For a divider shelf that means a low, wide unit, a floor-to-ceiling fixing kit, or heavy things only at the bottom.
What do four different dividers look like in the same studio?
We uploaded one photo of a studio where the bed and the sofa share one open space with nothing between them, and asked for four different dividers. Each one is a single edit from the same original photo: 2 credits and 26 to 49 seconds from click to result.
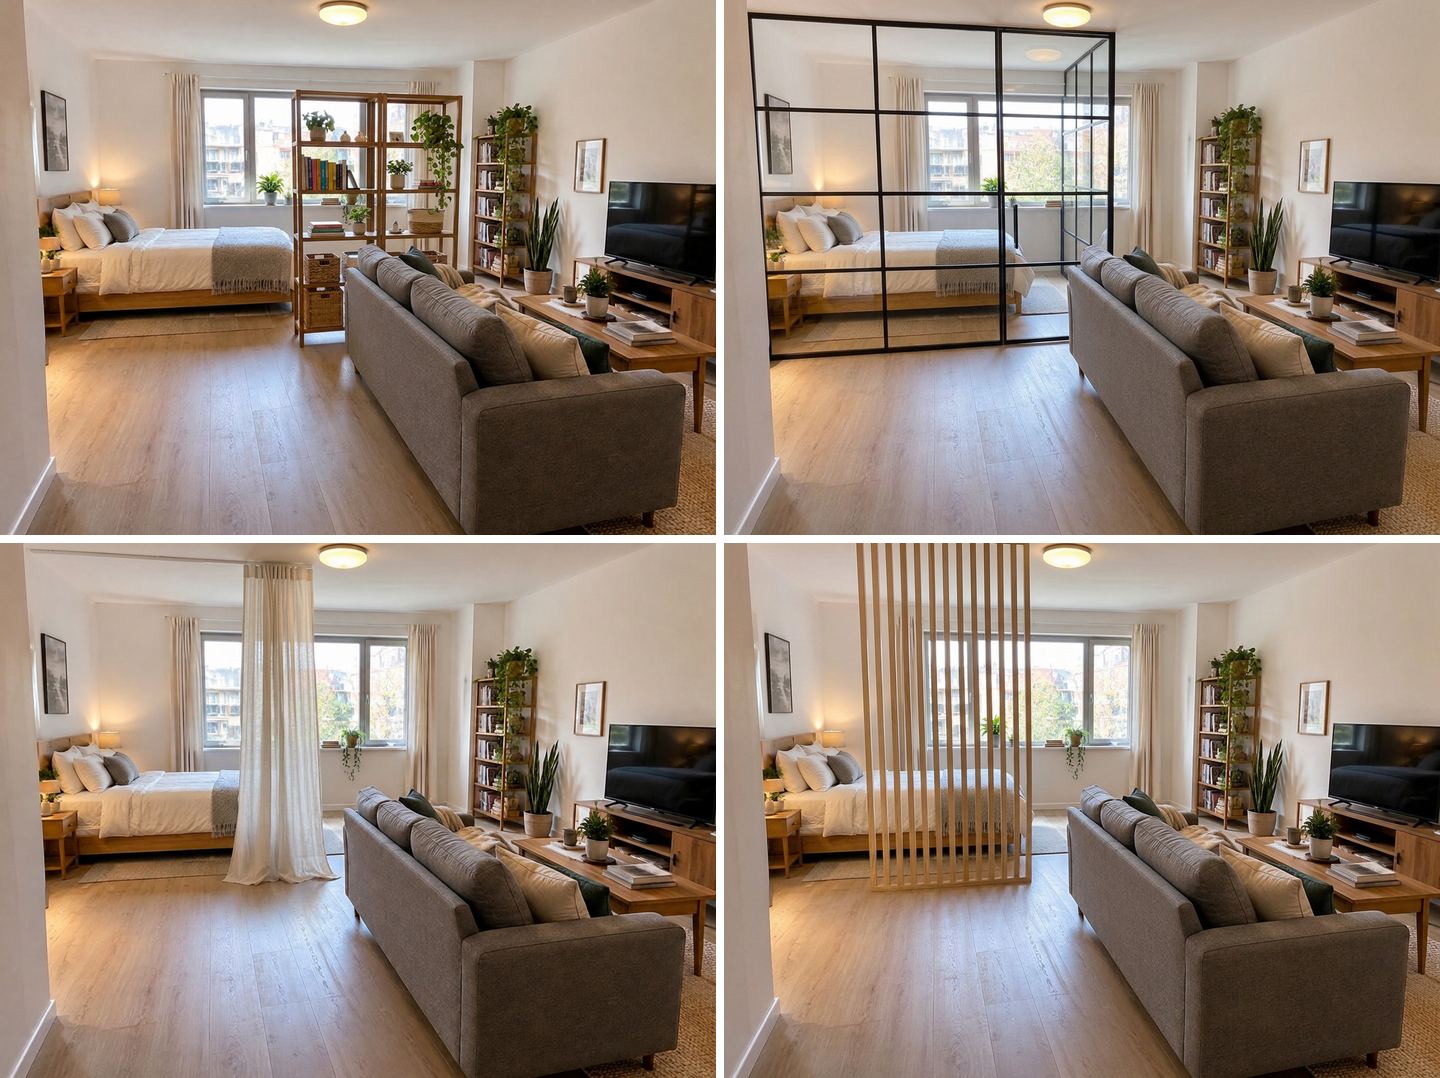 Same photo, four dividers. Top: open shelving, glass partition. Bottom: ceiling-track curtain, slatted screen. The bed, sofa, TV and window stay where they were.
Open shelving: storage and a soft line
For the shelf we used Select area in the editor, painted a band between the bed and the sofa, and typed: "Add a tall open bookshelf room divider here, between the bed and the sofa, with books, baskets and plants on the shelves." The Studio put a two-bay wooden shelf exactly in the painted band and filled it with books, baskets and plants. Everything outside the band stayed the same.
What the picture tells you that a product photo does not: in this room, the shelf stands partly in front of the window. Open shelves let light through, but a solid bookcase in the same spot would darken the bed area. Seeing that in your own photo is the point of testing.
Glass partition: a real wall that keeps the light
This was a text-only edit: "Add a floor-to-ceiling glass partition with thin black steel frames between the bed and the sofa, so the sleeping area becomes a separate glass bedroom. Keep everything else as it is." The result puts the bed behind a framed glass wall that runs to the ceiling, and daylight from the window still reaches the sofa.
It is the closest answer to the person who wanted part of their room "closed with glass or concrete". Glass keeps the view and the light, concrete would not. A built partition is a construction job, though: it is fixed to the floor and ceiling and usually needs the landlord's or building's approval.
Curtain on a ceiling track: the cheapest option that closes
The curtain took two tries, and that is a useful lesson. Our first, text-only prompt produced a curtain bunched in one spot, and the camera angle shifted (see the limits section below). The second time we painted the strip with Select area and wrote: "Hang floor-length light linen curtains here on a ceiling track, half drawn, so they screen the bed from the sofa area." That gave a clean ceiling track and a sheer linen curtain right at the foot of the bed.
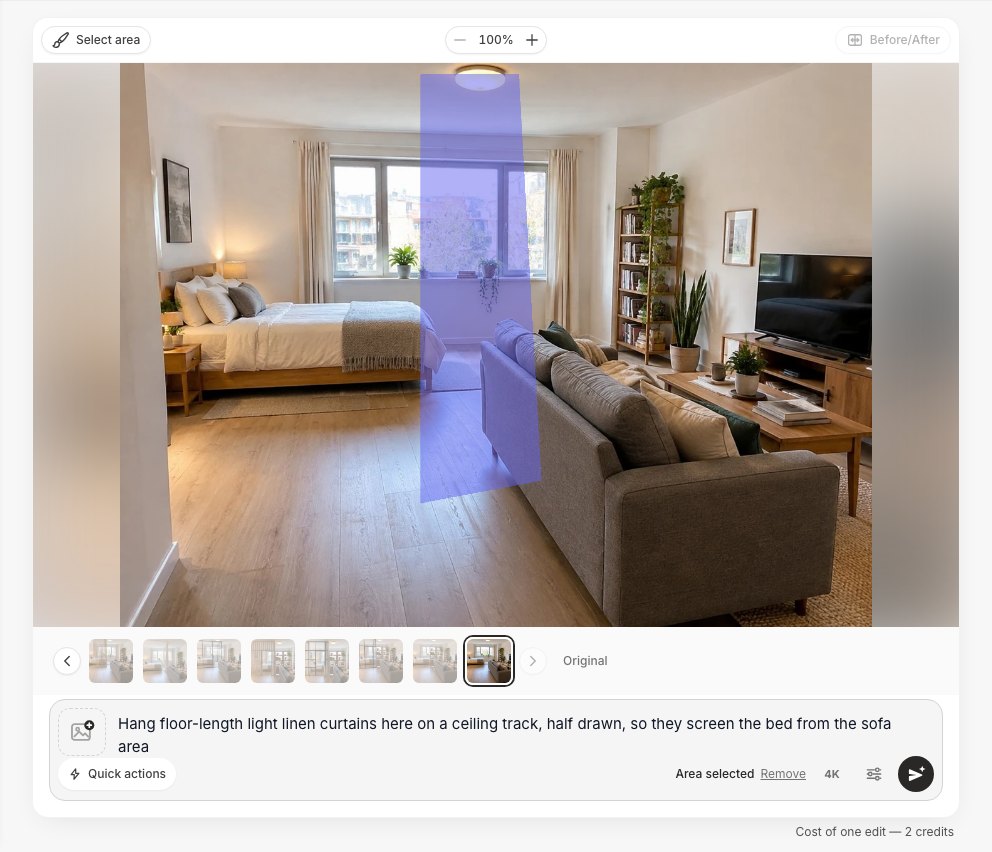 The editor: "Select area" marks where the divider goes, the text says what it is. "Area selected" next to the prompt confirms the selection.
Slatted wood screen: airy privacy
"Add a floor-to-ceiling screen of vertical light wood slats between the bed and the sofa, separating the sleeping area from the living area." The slats hide most of the bed from the sofa while the window stays visible between them. In real life a slat screen is either fixed to the floor and ceiling or bought as a freestanding panel, so check which kind you need before you order.
How can you zone a room without any divider?
Zone with what you already have: a rug under each zone, a separate light source for each zone, and, if you can build, a platform that lifts the sleeping area. None of these block light or views, which is why they work in small, dark rooms.
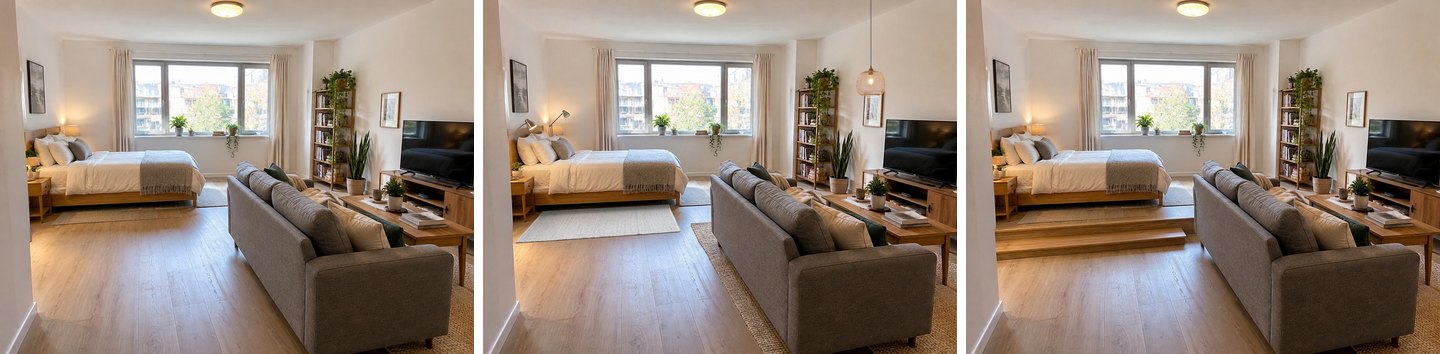 Left: original. Middle: two rugs and separate lighting. Right: the bed raised on a low wooden platform with one step.
Rugs and light. We asked: "Zone the room without any divider: a large rug under the sofa and the coffee table, a separate smaller rug beside the bed, a pendant lamp above the coffee table and a reading lamp by the bed." The result is subtle: a big jute rug now holds the sofa area together, a lighter rug marks the bed side, and reading lamps appeared at the headboard. The pendant landed closer to the TV wall than to the coffee table, so check where a ceiling light would really hang in your room.
Platform. "Put the bed on a low wooden platform about 30 cm high with one step, so the sleeping area is raised above the living area." The bed now stands on a wooden podium with a step. The model does not measure, so treat the height as "low", not as 30 cm. The Studio's own tips say the same: anchor sizes to objects, not to millimeters. If you like it, a platform can also hide drawers; our storage ideas article shows how to test built-ins on a photo.
How do you zone a room in GenRoom, step by step?
Upload a photo, then either pick a mode and describe the zones in your own words, or add a ready task. Refine the result in the editor with text or "Select area".
- Upload a photo of the room at /studio. Shoot from a corner or the doorway so both future zones are in the frame.
- Pick a mode in "Your brief": Full makeover (new furniture, finishes and decor; walls, windows, doors and camera angle stay) or Rearrange furniture (your own pieces, moved for walkways and better use of space).
- Type your wish in "Add your own wishes", for example "a separate sleeping area and living area" or "a work area by the window".
- Check "Ideas for this photo". After analysing the photo, the Studio suggests ideas for that specific room. For our studio it offered Define zones next to Full makeover.
- Or add a ready task: "Ready tasks" → "Furniture & decor" → Home office nook.
- Press "Create design" (2 credits). Our designs took 22 to 37 seconds.
- Refine in the editor: type one change at a time, or use Select area to paint where a divider should stand, then press Apply (2 credits per edit).
The fastest route: Full makeover and "Define zones"
We picked Full makeover, then the "Define zones" idea, and added nothing else. Behind the button is a precise instruction: create a clearer separation between the sleeping and living zones with a low partition or shelving unit.
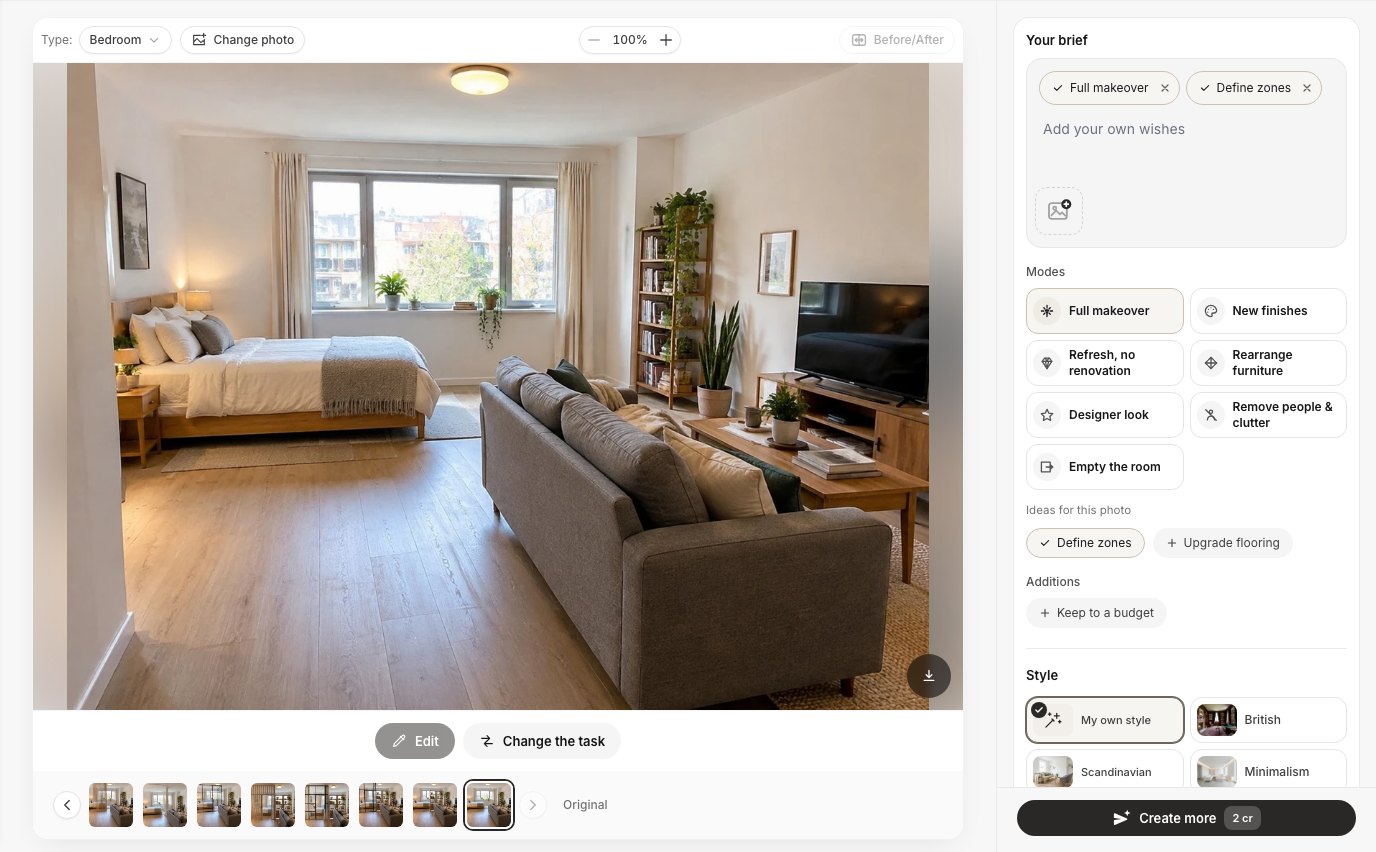 Full makeover plus the "Define zones" idea. Ideas depend on the photo, so you may see different ones.
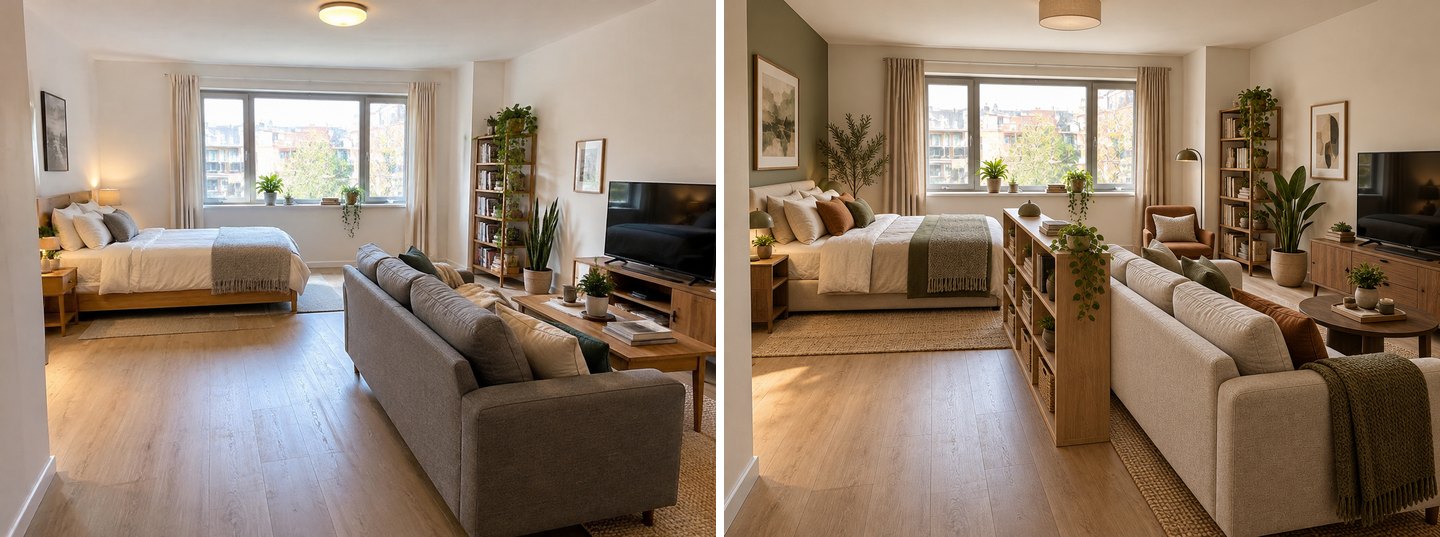 Before and after. The low shelf hides the mattress from the sofa but keeps the window open. The style changed too, because Full makeover redesigns finishes and decor.
Rearrange furniture: zone with the pieces you own
If you do not want to buy anything, use Rearrange furniture and say what the zones are. Our wish: "Separate the sleeping area from the living area. The bed must not be visible from the sofa."
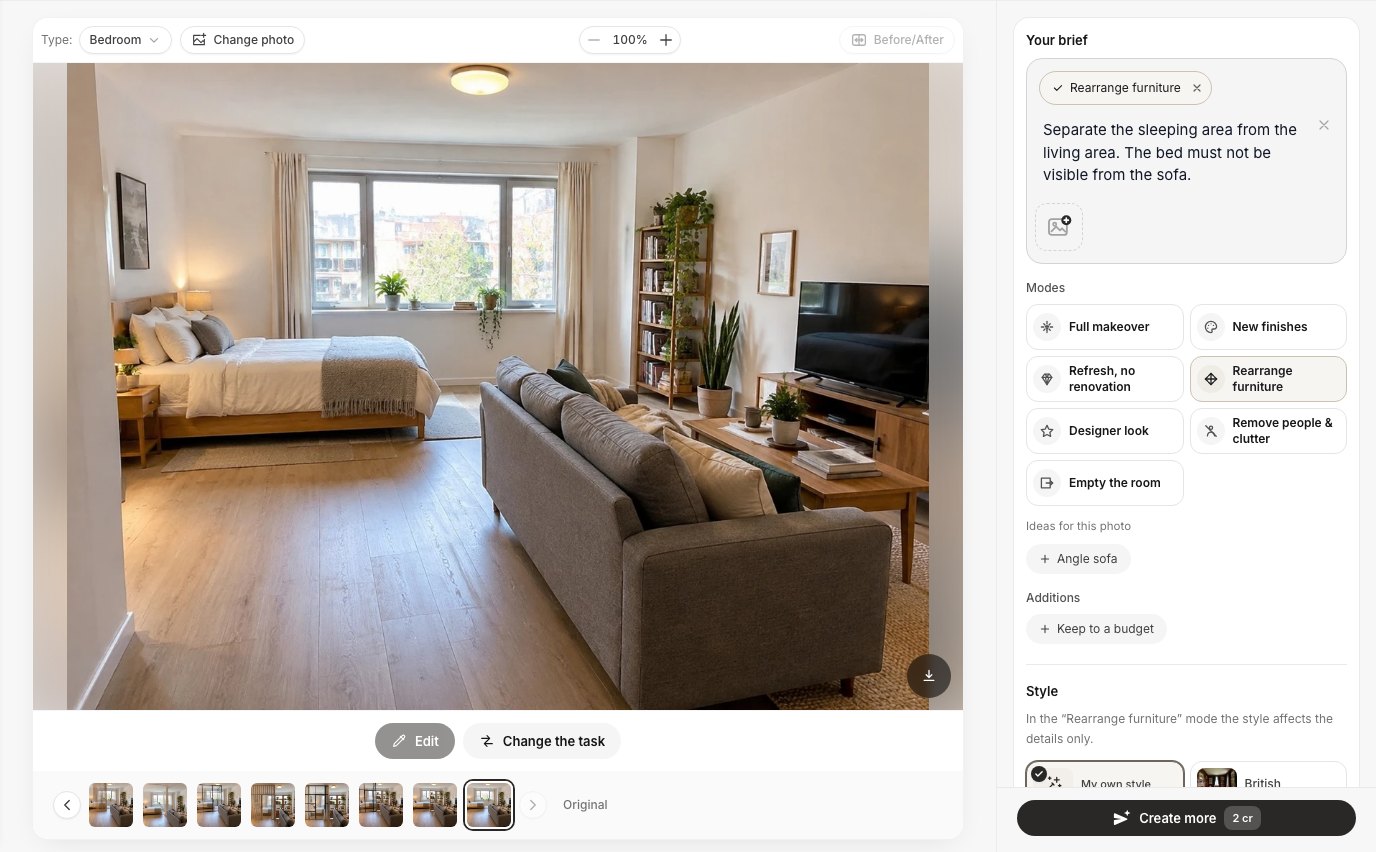 Rearrange furniture with a written wish. For this photo the ideas list also offered "Angle sofa".
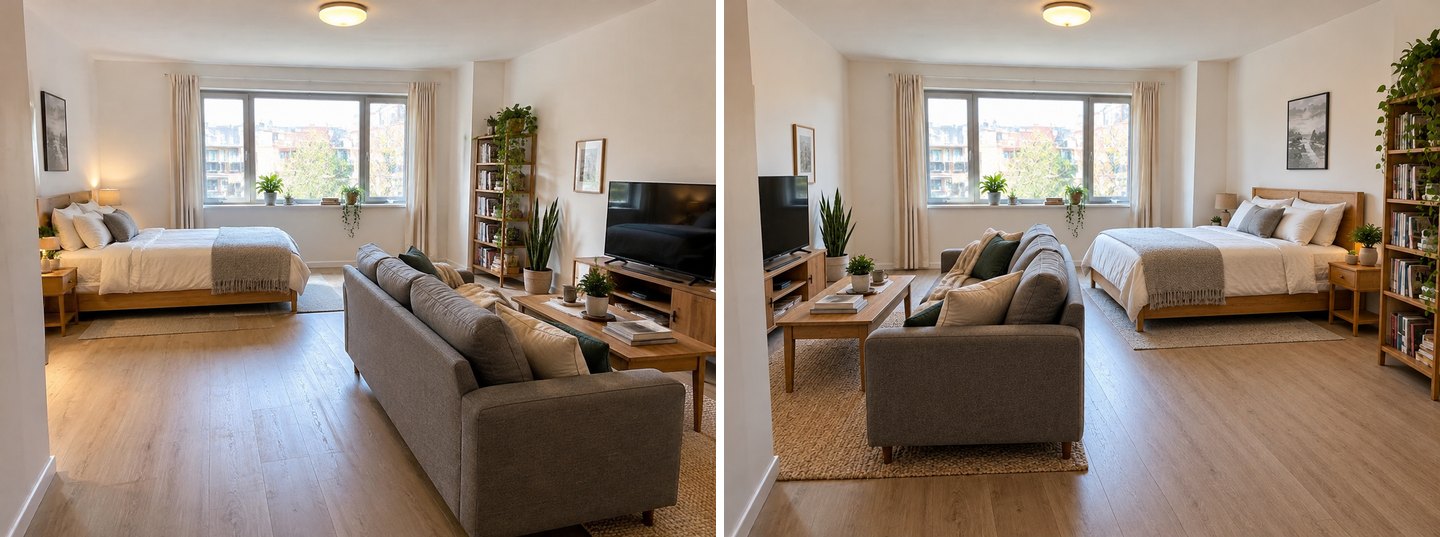 The same furniture, a different plan. The sofa now faces the TV with its back to the bed. The TV moved to another wall, so you would need a socket and an antenna or internet point there.
For more ways to test layouts with your own furniture, see our guide to rearranging furniture with AI.
Full makeover in your own words
Many people simply describe the result they want. We used a wish close to a real request: "This is a studio apartment: modern, cozy and functional, with a separate sleeping area and living area."
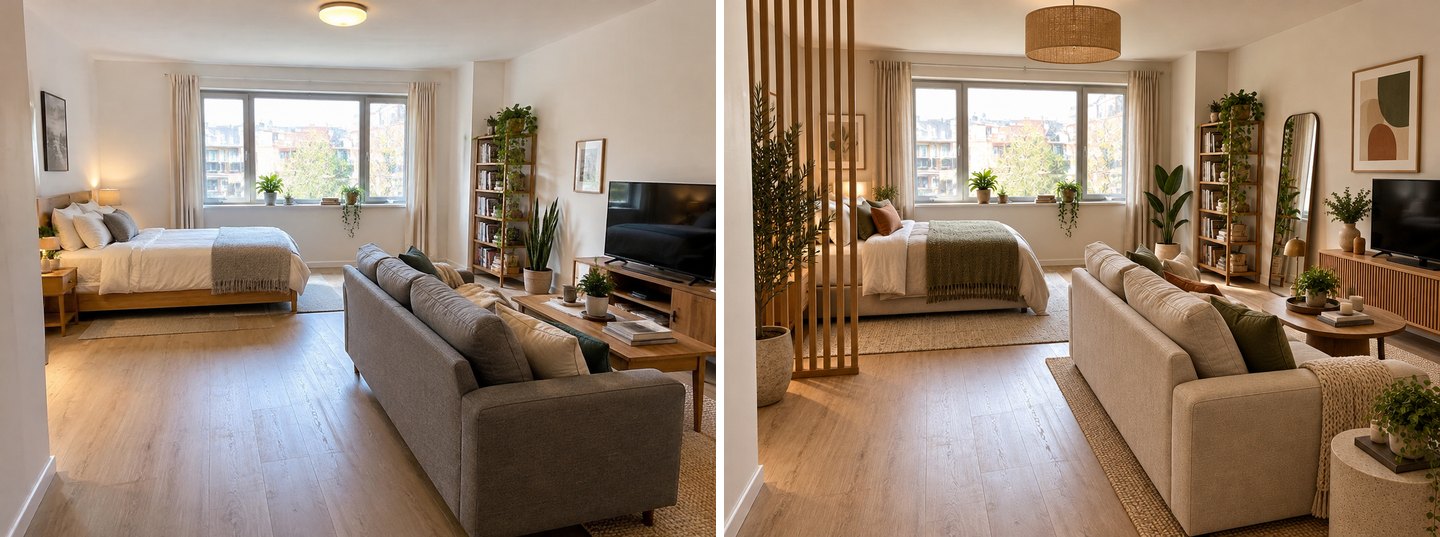 Full makeover with a written wish chose its own divider: a slatted wood screen and a tall plant. The window, walls and camera angle stayed.
How do you split a long living room into living and work areas?
Put the work zone at the end with the window, and let a shelf, a rug or the back of a chair mark the border. We tested a narrow room about twice as long as it is wide, with the sofa at one end and empty floor near the window.
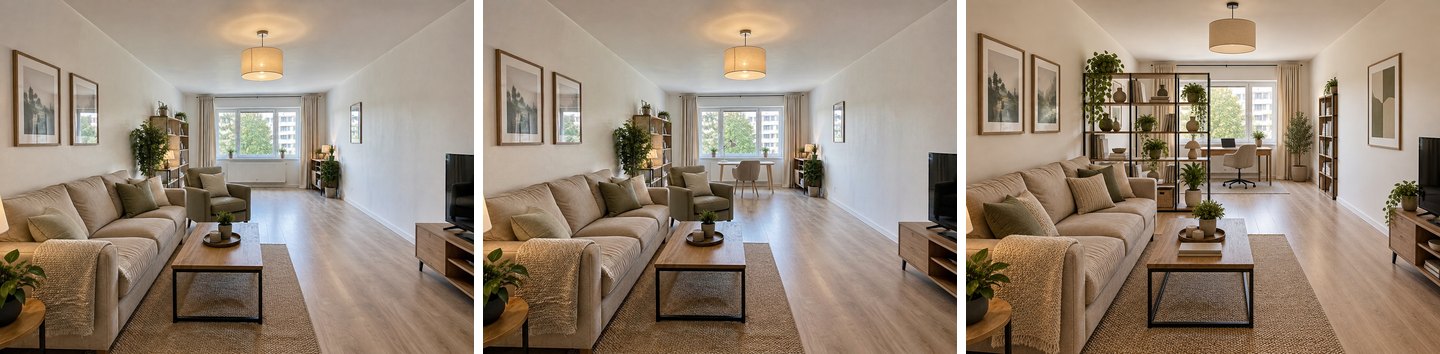 Left: original. Middle: the ready task "Home office nook". Right: Full makeover with the wish to split the room by an open shelving unit.
The ready task Home office nook is a one-click option. Its instruction is to set up a workspace by the window with a desk, a comfortable chair and a desk lamp, and that is what it did. It placed the desk directly in front of the radiator, which is fine in a picture and less fine in winter.
The Full makeover version followed the whole wish: "Split this long room into two zones: a living area with the sofa in the near half and a work area with a desk by the window in the far half, separated by an open shelving unit." It looks like two rooms, but it also changed the art and decor, as Full makeover does.
The "two cozy sitting areas" request needs a different tool. With Rearrange furniture and the wish "Recreate this into two cozy seating areas for chilling, with warm lighting", the Studio moved the armchair to the window end, gave it its own round rug and a lamp, and warmed the light. No new furniture was bought for that second zone.
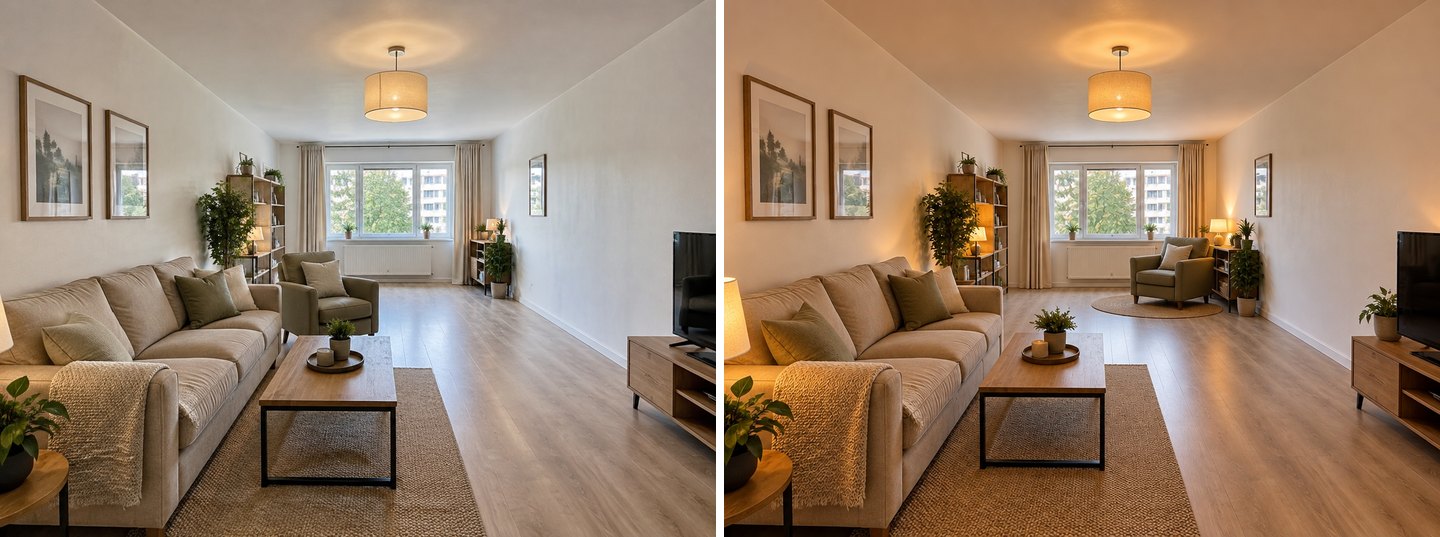 Two seating areas from the furniture already in the room: the sofa group and a reading corner by the window.
If your plan involves removing a wall instead of adding one, our open floor plan visualizer guide covers that case.
Create interior design with AI
Upload a photo of your room and get a professional design in 30 seconds. First generation is free.
How do you add a work zone to a bedroom?
Use the ready task for the default layout, or paint the exact corner with Select area and say what should separate it from the bed. Both kept the bed, the window and the curtains exactly as they were.
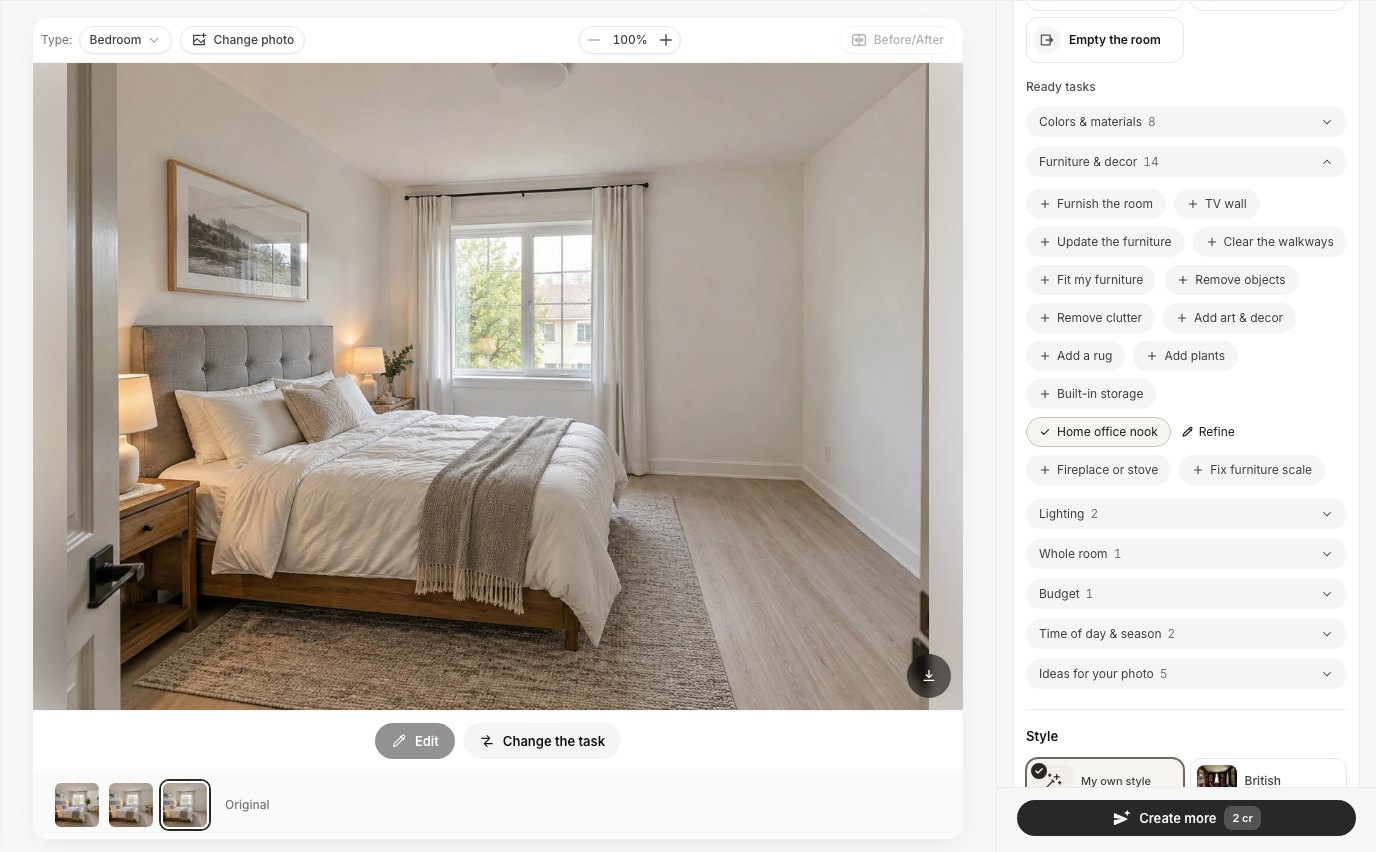 Ready tasks → Furniture & decor → Home office nook.
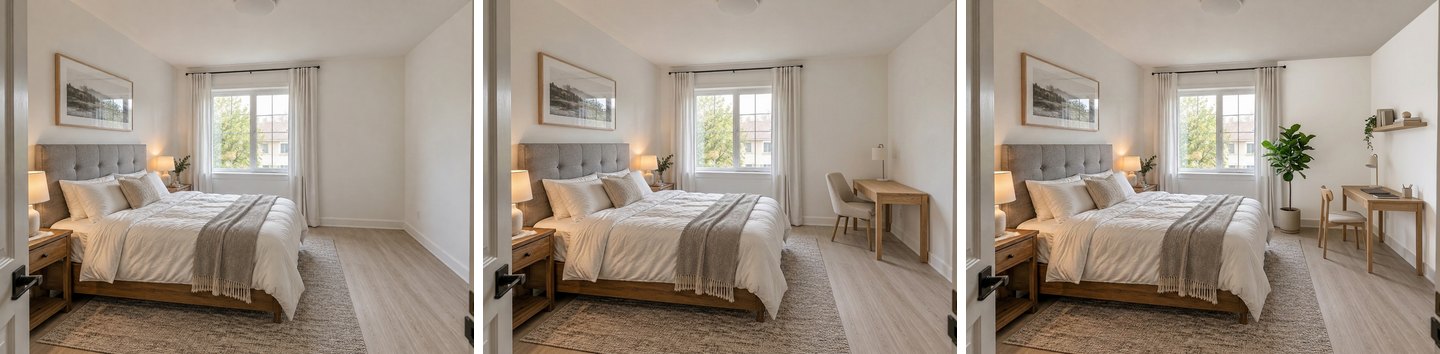 Left: original. Middle: "Home office nook". Right: Select area on the corner plus "a compact desk with a chair, a desk lamp and a wall shelf above it, separated from the bed by a tall plant".
The second version is the better zone: the plant is a soft divider, and the shelf makes the corner read as a workplace rather than a desk pushed against a wall. If the whole room needs a new purpose rather than a corner, see spare room ideas with AI.
What should you check before buying a room divider?
Check four things the picture cannot tell you: height, light, walkways and fixing.
- Ceiling height and fixing. Measure floor to ceiling before ordering a curtain track, a tension pole or a slat kit. Tension systems need a solid ceiling; a suspended ceiling may not hold them.
- Light from the window. In our studio, every divider stood partly in front of the window. Open shelves, glass and slats passed the light; a solid unit would not.
- Walkways. Keep a clear path from the entrance to each zone, and from the bed to the door. If the divider forces you to squeeze past furniture, move it or make it lower.
- Anchoring. Tall shelving in the middle of a room has no wall to lean on. Fix it to the floor and ceiling, or choose a lower, wider unit with heavy items at the bottom.
- Permission. Glass partitions and platforms are building work. Renters should ask before fixing anything to the floor or ceiling.
What does the AI not do well when zoning a room?
It shows ideas, not drawings to build from. These are the limits we ran into on 19 generations.
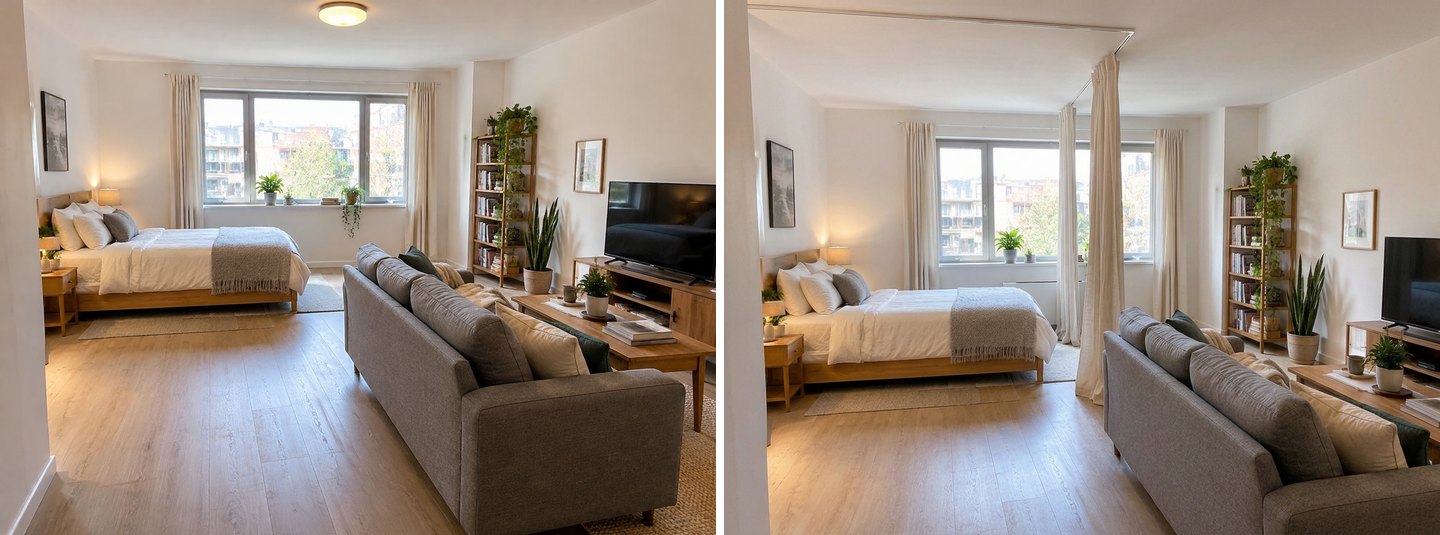 Our first curtain attempt, from text only: the curtain is bunched at one point and the framing moved. With Select area, the second try was clean.
- No zoning mode. You describe the zones yourself, or pick a ready task or a photo idea. "Define zones" appeared for our studio photo; it is not guaranteed for every photo.
- Text-only edits can shift the camera. Our first curtain edit zoomed in and moved the framing. Painting the area with Select area fixed it. The Studio's own tip says the same: for local changes, use the brush.
- No measurements. "30 cm platform" or "1.2 m shelf" will not hold: the model does not count or measure. Describe sizes relative to objects ("a shelf as high as the window sill").
- Vague objects come out vague. In the long room we asked for "a low open shelf behind the armchair" in a text-only edit, and got an empty wood-and-glass frame. Name a concrete thing: "a low two-tier bookshelf with books".
- It does not think about radiators, sockets or permits. The desk went in front of a radiator, and the rearranged TV moved to a wall that may have no socket.
- Full makeover restyles everything. If you only want the divider, use the editor or Rearrange furniture instead.
- Edits stack. Each edit starts from the version selected in the strip under the photo. Pick the original (or a good version) before the next edit, or mistakes pile up.
FAQ
How do I divide a studio apartment without building walls?
Use a freestanding open shelf, a curtain on a ceiling track or tension rod, a slatted screen, or simply turn the sofa so its back faces the bed. Add a rug and a lamp to each zone. In our test, all of these kept the window light; only a curtain hid the bed fully when closed.
What is the cheapest way to divide a room?
Use what you already own: move the sofa, a bookcase or a desk to form the border, and give each zone its own rug and lamp. If you need to close off the bed, a curtain on a ceiling track or tension rod is usually the cheapest option that actually closes.
What can I use instead of a room divider?
Rugs, lighting, a platform, a change of floor or wall colour, and furniture placement. They mark zones without blocking light or adding anything tall, which suits small and dark rooms.
Can AI show a room divider in a photo of my own room?
Yes. Upload the photo to the GenRoom Studio, then use the editor: paint the spot with Select area and describe the divider, or type it as a text edit. Each edit costs 2 credits and took 26 to 49 seconds in our test. A free account comes with 6 credits; free results carry a watermark.
Is there a special zoning mode in GenRoom?
No. Use Full makeover or Rearrange furniture with a written wish, the ready task "Home office nook", or a photo idea such as "Define zones" when the Studio suggests it.
Will the AI keep my furniture and walls?
Editor changes and Rearrange furniture keep your pieces; Full makeover keeps the walls, windows, doors and camera angle but replaces furniture and decor. Always compare with the original using Before/After.
The Bottom Line
Room divider ideas are easy to find and hard to judge, because a shelf that looks airy in a catalogue can block your only window. Test the option on your own photo first: four dividers on our studio cost one edit each, and the comparison made the choice obvious. Start with furniture placement, rugs and light; add a shelf, slats or a curtain if you need more; save glass and platforms for when you are ready to build. When you have a favourite, upload your room to the Studio and try it.