Laundry Room Ideas: Try a Makeover on Your Own Photo With AI
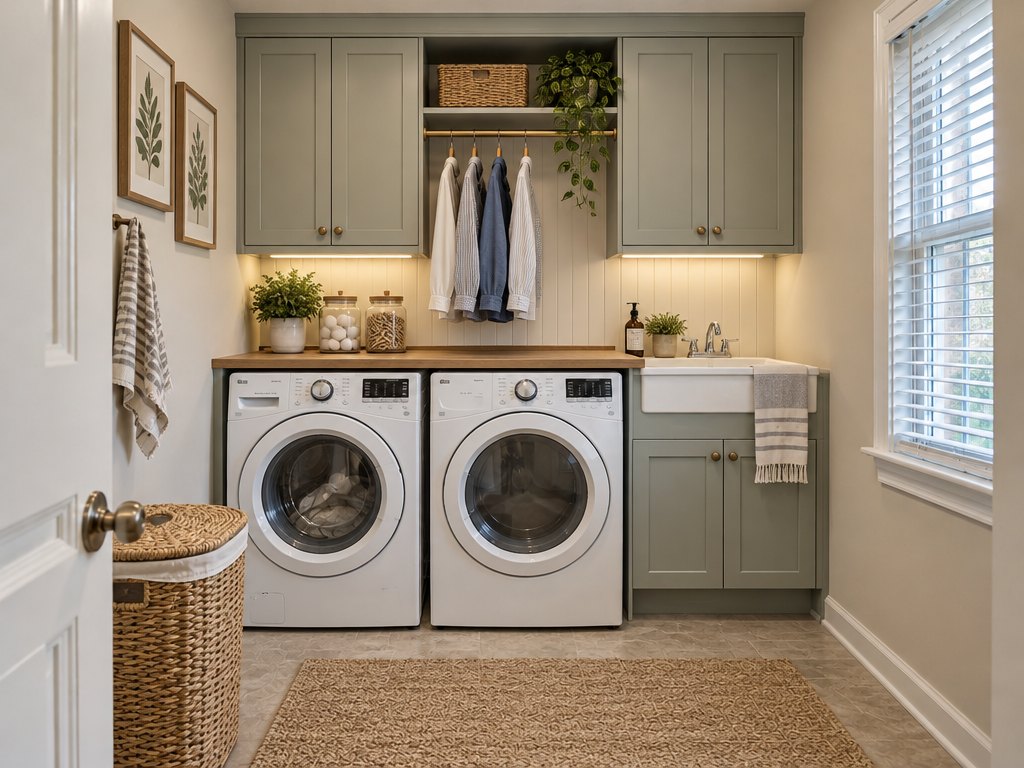
A real result from the GenRoom Studio. The washer, the dryer, the sink position, the window and the door come from the original photo of a cluttered utility room.
The best laundry room ideas for a small space all start with the machines you already have: a worktop over front-loaders becomes a folding counter, closed cabinets above replace the sagging wire shelf, a rod holds shirts straight out of the dryer, and in a closet the washer and dryer can be stacked or hidden behind doors. The hard part is picturing which of these fits your room.
You can test them on a photo of your own space. In the GenRoom Studio you upload one photo, the Studio recognises it as a Laundry Room, you pick a mode or type what you want, and 20–45 seconds later you see the same room with a new layout and finishes. Each result costs 2 credits, and a free account starts with 6.
People bring this problem to GenRoom all the time. Between March and October 2026, 196 people described a laundry room or utility room they wanted to change, in their own words. Below you'll find what they asked for, the exact Studio path for each request, real before-and-after results on three spaces (a cluttered utility room, a laundry closet behind bifold doors and a basement laundry corner), where the AI got it wrong, and the venting and clearance checks to make before anyone builds anything.
What Do People Ask For When They Redesign a Laundry Room?
They rarely ask for "a beautiful laundry room". They ask for a counter, more storage, and a way to keep the machines where the water and the vent already are. Here are typical requests, paraphrased and anonymized:
| What people write | What they actually want | Best Studio tool |
|---|---|---|
| "Stack the machines, add a counter and storage. Dark blue or green walls." | Floor space and a folding surface | Your own words in the brief, or Full makeover + brief |
| "A worktop from one wall to the other with the machines underneath." | One continuous folding counter | Full makeover + brief, or the editor's Select area |
| "The back wall and the window stay, the washer and dryer stay in the room." | New finishes around fixed services | Refresh, no renovation + a "keep" list |
| "Remove the bed and the desk, add cabinets near the washer and dryer and more counter space." | A spare room turned into a laundry | Change the room type to Laundry Room, then Full makeover |
| "1.7 × 1.15 m, top-loading washer on the back wall, a rail above it for hanging clothes, shelves on the right." | A tiny laundry with exact sizes | Brief, then check the sizes with a tape measure |
| "I only want a washer, no dryer, and there are no vents on the right side." | A layout that respects the services | A brief that names every pipe and vent |
| "Make it minimalist and add a dog washing station." | A utility room that does more than laundry | Full makeover + brief |
Two patterns stand out. First, people list what must stay: the sink, the window, the machines, the water connection. Second, a lot of requests mention a service the AI can't see behind the wall: a gas heater, a vent, a drain, the hookup next to the sink. Keep both in mind; they decide whether a result is a usable idea or a pretty picture. If your laundry shares space with a bathroom, our guide to small bathroom layouts with a washing machine covers that case.
Which Laundry Room Ideas Work in a Small Space?
The ideas that work best in a small laundry use the wall above the machines and the space beside them, not the floor in front of them. This table sums up the ones we tested and what to check before you copy them.
| Idea | Best for | What to check first |
|---|---|---|
| One worktop over the washer and dryer | Side-by-side front-loaders | Not over a top-loader: its lid has to open |
| Stack the dryer on the washer | Narrow rooms and closets | A matching pair and the stacking kit the manufacturer lists |
| Closed upper cabinets | Any laundry with a free wall above the machines | Leave the water hookup and the vent reachable |
| Tall cabinet beside the machines | Brooms, the ironing board, the vacuum | Door swing of the room and of the machines |
| Hanging rod or pull-out drying rack | Shirts straight from the dryer, air-dried items | Ceiling height and the walkway in front |
| Sink in a base cabinet | Rooms that already have a utility sink | The drain stays where it is |
| Louvered bifold doors | Laundry closets in a hallway or kitchen | Ventilation openings the dryer manual asks for |
If the laundry also has to hold coats, boots and the dog's lead, the mudroom and laundry combo layout is a better starting point. For built-ins in other rooms, see our AI storage ideas.
How to Try a Laundry Room Makeover on Your Own Photo
It takes about five minutes from photo to first result. Here is the Studio path we used for every image in this article.
- Take the photo. Stand in the doorway at eye level and get the whole wall with the machines, the floor in front and part of the ceiling. Open closet doors fully. Don't tidy up first: the AI handles baskets and bottles, and you want to see your real room.
- Upload it in the Studio. The photo analysis sets the space type. All three of our test photos, including the unfinished basement, were recognised as Laundry Room on their own. If yours shows something else, open Your space above the photo and pick Laundry Room from the list.
- Pick a mode, a ready task or an idea. Modes rebuild the whole room, ready tasks change one thing, and "Ideas for your photo" are suggestions made for your specific photo.
- Write your brief. Say what stays and what to add, in plain words.
- Press "Create design". In our tests a result took 18 to 41 seconds to generate, and 2 credits each time.
- Refine with Edit. For a change in one exact spot, use Select area in the editor and describe what to put there.
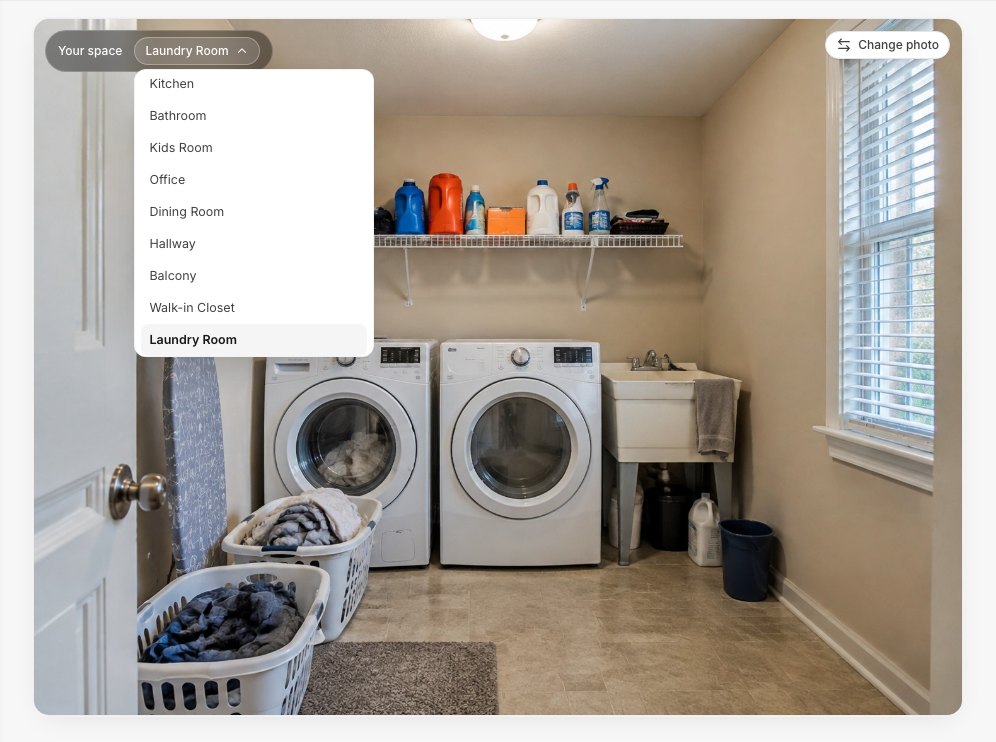 The space type sits above the photo. The analysis picked Laundry Room by itself; the list is there if it guesses wrong.
Which mode to choose for a laundry room
For a laundry room the Studio shows seven everyday modes (seasonal holiday modes come and go). This is how they behaved on our photos:
| Mode | What it changes | Use it when |
|---|---|---|
| Full makeover | Finishes, furniture, lighting and decor | You want a new laundry room and can accept that services may be tidied away |
| New finishes | Walls, floor and ceiling; furniture stays | You only want new paint, tiles or flooring |
| Refresh, no renovation | Paint, textiles, lighting and a smarter layout; floors, ceiling and built-ins stay | Rentals, basements, anything with pipes you can't move |
| Rearrange furniture | The arrangement of what's there | A laundry with freestanding shelves, a cart or a table |
| Designer look | Palette, lighting, textiles, decor | The room works but looks dull |
| Remove people & clutter | Baskets, bottles and scattered items | A clean "before" or a listing photo |
| Empty the room | Furniture, rugs and decor | Starting from scratch |
Kitchen remodel and Bathroom remodel only appear when the space type is Kitchen or Bathroom.
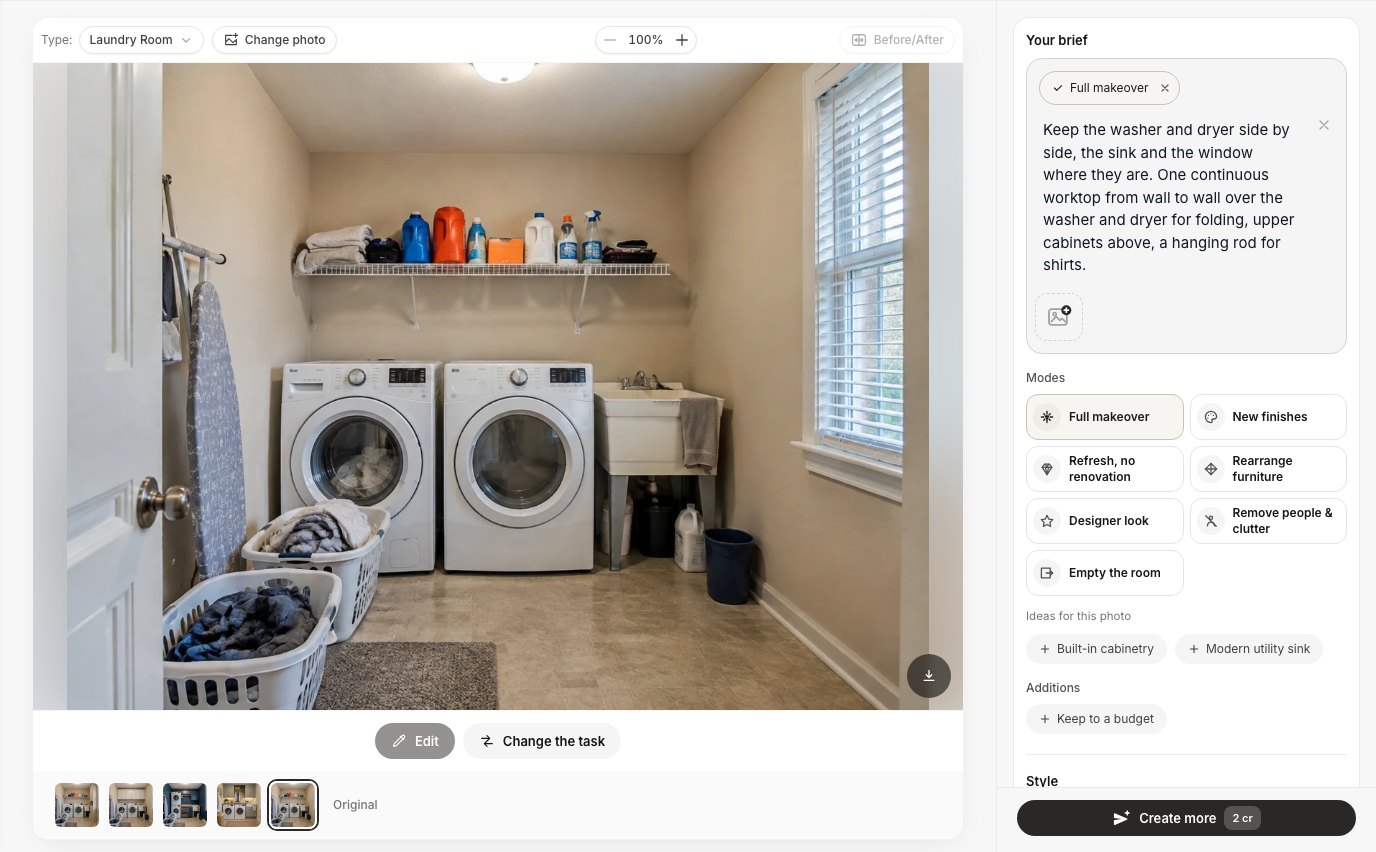 The brief combines a mode chip with your own words. The idea chips under the modes are generated for this photo, so yours will be different.
Case 1: A Cluttered Utility Room
This is the room most people described: side-by-side front-loaders, a single wire shelf crowded with detergent, a plastic utility sink on legs, laundry baskets and an ironing board on the floor. There is no surface to fold on except the dryer.
One worktop, upper cabinets and a rod
We used Full makeover with this brief: "Keep the washer and dryer side by side, the sink and the window where they are. One continuous worktop from wall to wall over the washer and dryer for folding, upper cabinets above, a hanging rod for shirts."
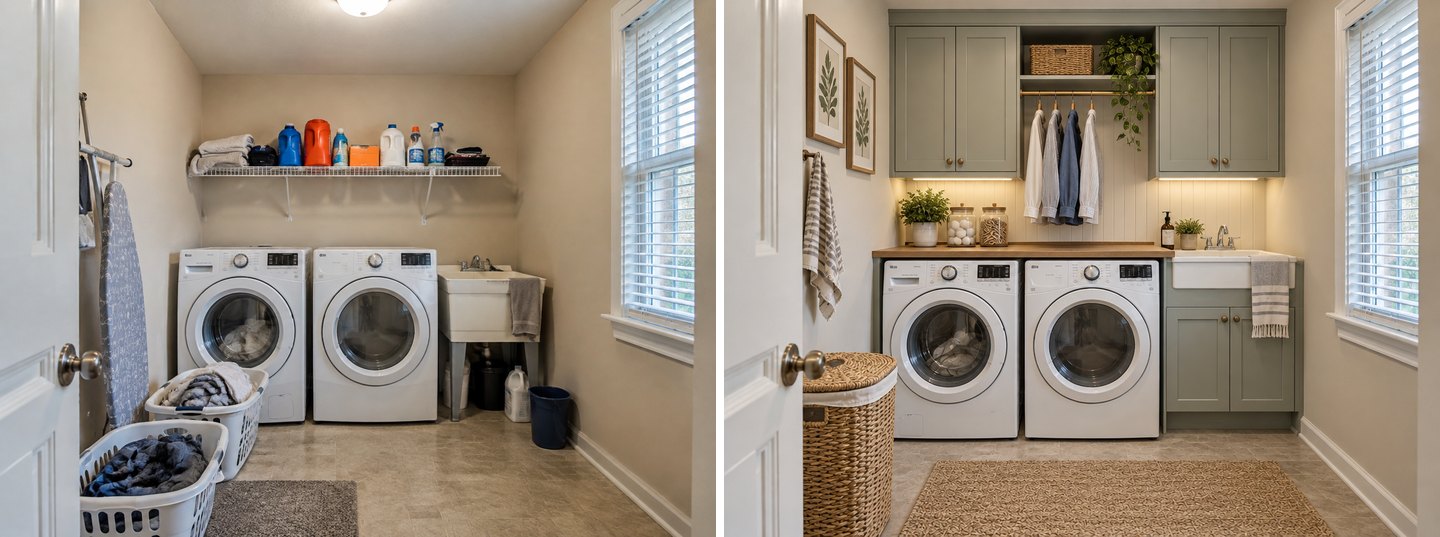 Full makeover with a brief. The machines, the window and the door are the originals; the sink kept its position but got a cabinet.
Almost everything in the brief came through. The washer and dryer stayed side by side, the worktop runs over both and on to the sink, the cabinets have a gap for the hanging rod, and the sink is in the same corner. One thing did not: the worktop stops at the washer instead of reaching the left wall, so there is still an empty gap by the door. For a request this specific, check the ends of every counter in the result.
Stacked machines and dark blue walls
The next request is one we saw almost word for word: stack the machines, add a counter and storage, dark walls. This time we left the mode off and only typed the brief: "Stack the dryer on top of the washer to free up space. Add a folding counter and storage cabinets, a pull-out drying rack and a rod for hanging clothes. Dark blue walls."
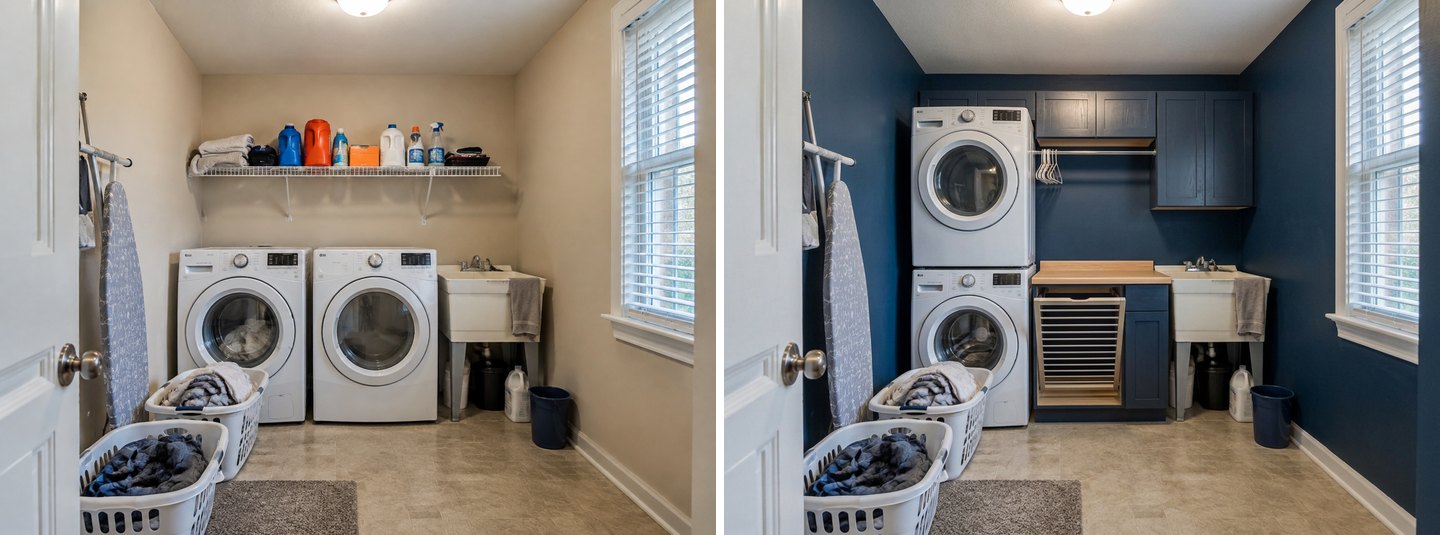 A typed brief only, no mode. The stack frees the wall for a counter, a drying rack and cabinets. The baskets and the ironing board are untouched because the brief didn't mention them.
Stacking freed the wall next to the machines, and the counter, drying rack and rod all appeared. Two honest notes. The "folding counter" came out short, about the width of one cabinet. And the AI simply put one machine on top of the other: in real life you need a pair the manufacturer allows to be stacked and the kit made for it (Whirlpool's stack-kit instructions, for example, limit each kit to front-load models). A brief without a mode also changes less of the room: the baskets, rug and ironing board stayed exactly where they were.
The smallest change: one idea chip
Not everyone wants a renovation. Under Ready tasks → Ideas for your photo, the Studio offered six ideas made for this photo, among them "Add upper cabinets", "Upgrade ceiling light", "Use matching hampers" and "Add sink curtain".
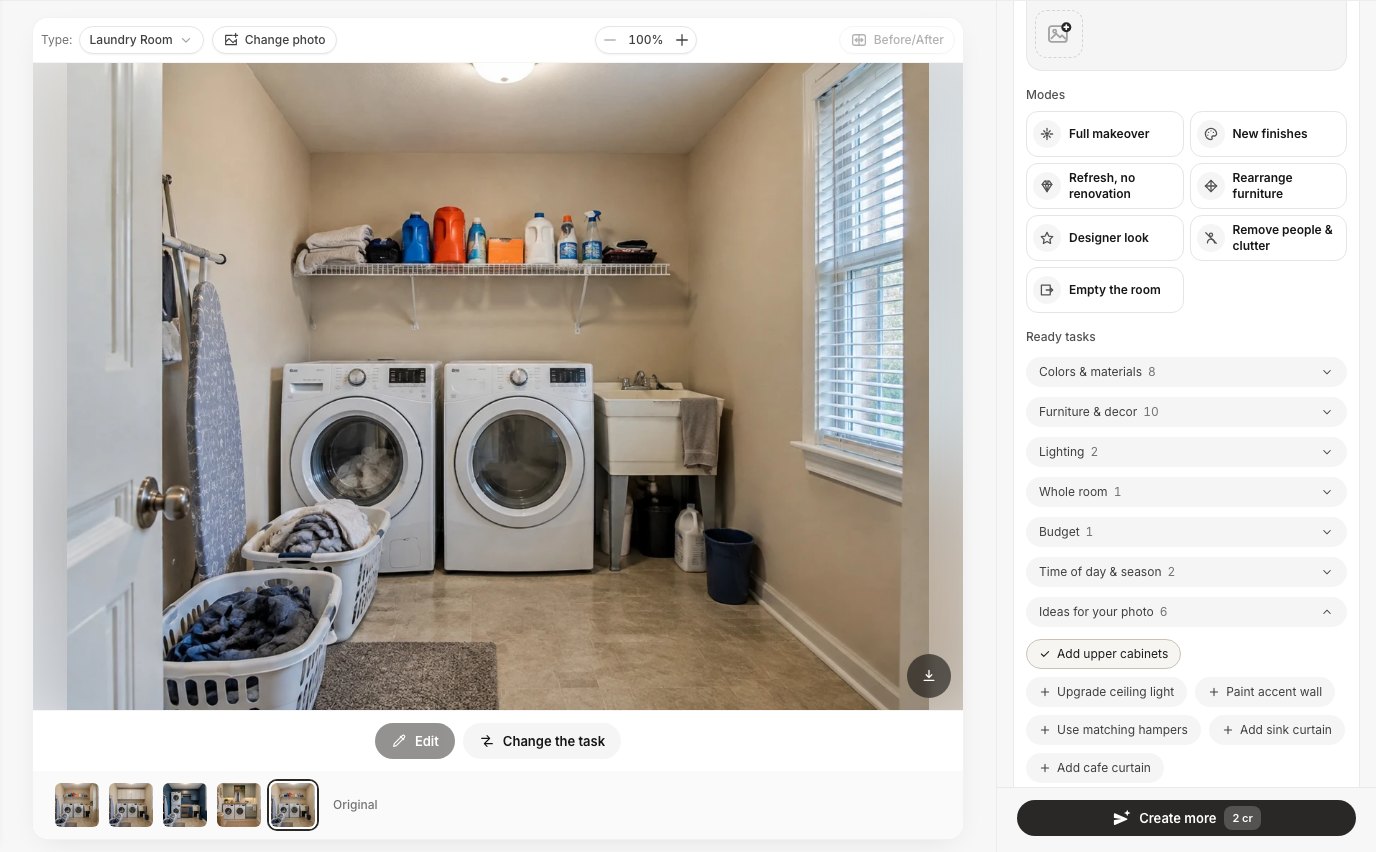 "Ideas for your photo" are suggestions written for the picture you uploaded. One click adds an idea to the brief.
We compared that one chip with the general Furniture & decor → Built-in storage task, which by default puts floor-to-ceiling storage along a free wall.
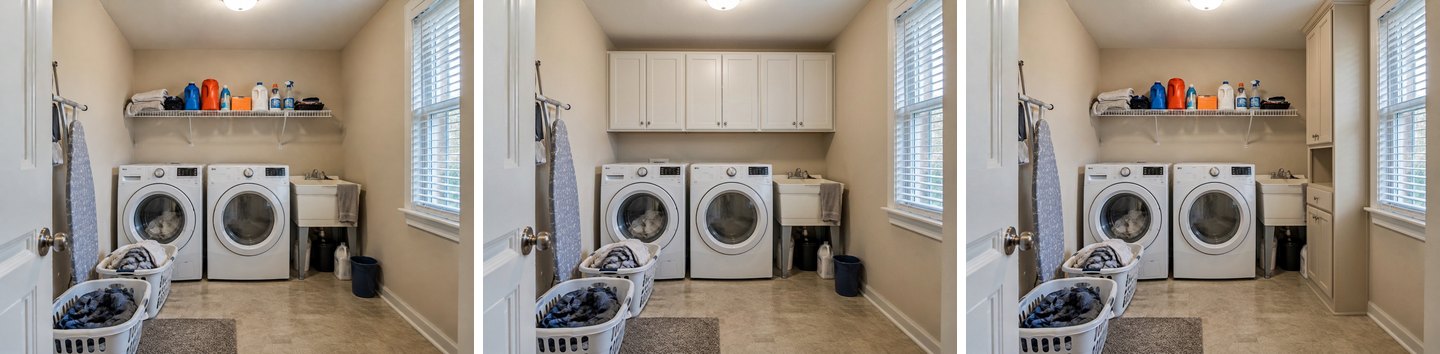 Left: original. Middle: the "Add upper cabinets" idea, which changed only the wall above the machines. Right: the Built-in storage task, which chose a narrow corner instead of the wall above the machines.
The idea chip gave the cleanest before-and-after of the whole test: the wire shelf became a row of closed cabinets and nothing else moved. The Built-in storage task was less useful here. It kept the wire shelf and put one narrow cabinet in the corner by the window. In a laundry room, the free wall is usually above the machines, and a general storage task doesn't know that. Say where you want storage in the brief.
Case 2: A Laundry Closet in a Hallway
The second space is the classic apartment laundry: a washer and dryer side by side in a closet about 1.6 m (5 ft) wide, behind white bifold doors, with one wire shelf, the water hookups on the back wall and a foil vent hose behind the dryer.
Full makeover vs Select area
We tried the same goal twice. First with Full makeover and a brief asking for a wooden worktop over both machines, two open shelves with baskets and doors that close. Then in the editor: we pressed Edit, then Select area, drew a box around the wall above the machines and wrote: "Replace the wire shelf with two solid oak shelves with woven baskets, and add an oak worktop resting just above the washer and dryer. Keep the silver dryer vent hose in place."
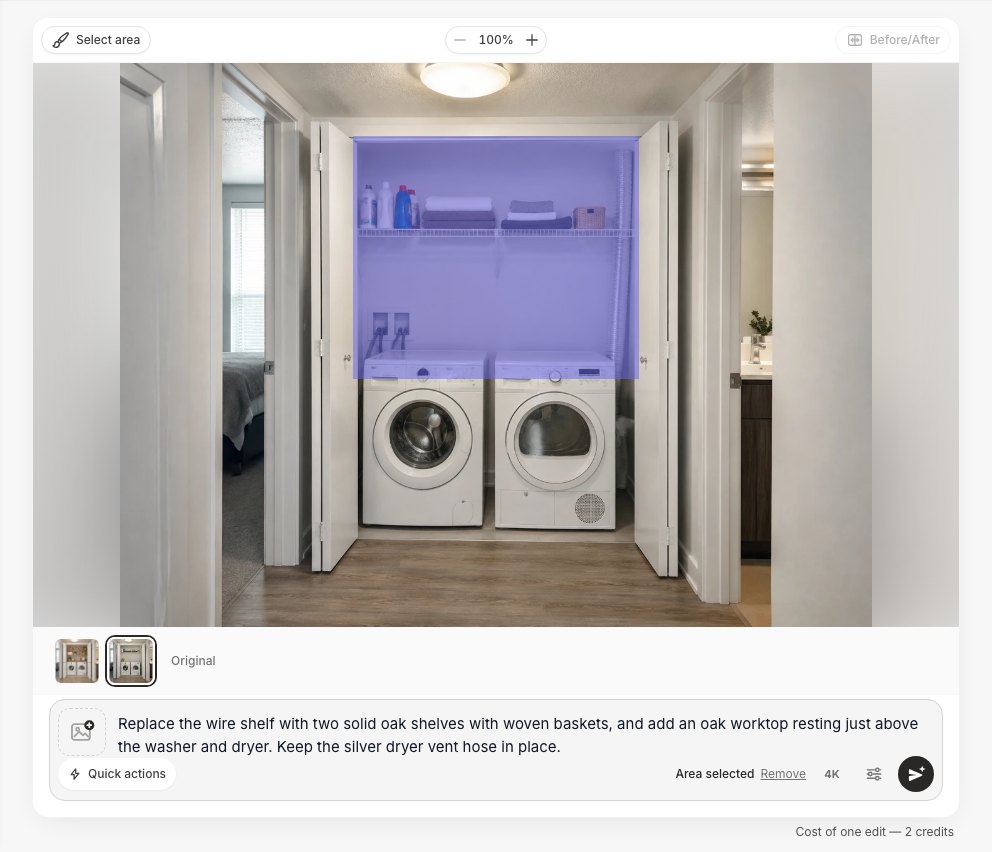 Select area limits the change to the part you paint. Everything outside the selection stays as it was.
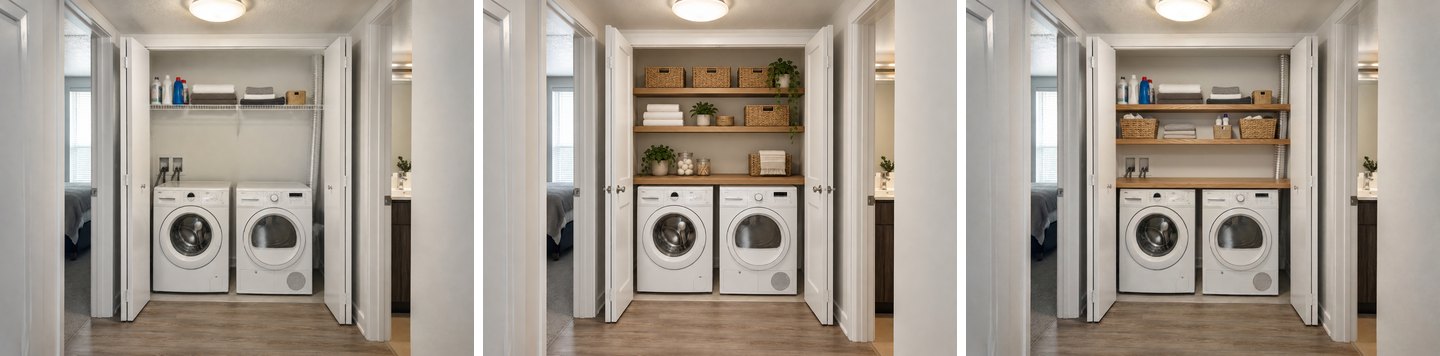 Middle: Full makeover removed the water hookups and the dryer vent hose to make the wall look clean. Right: Select area with "keep the vent hose" kept both.
Both versions look good, but only one is buildable. The Full makeover made the back wall perfectly clean by deleting the water hookups and the vent hose, and it kept the bifold doors folded open even though we asked for doors that close. The Select area edit did exactly what we asked: oak shelves, baskets, a worktop just above the machines, and the vent hose and hookups in their place. The lesson: when a service is in the picture, name it in the brief, or edit only the area around it.
Close it up: louvered bifold doors
Many requests asked for "covered" or "hidden" machines. We selected the whole closet opening and asked to replace the open doors with closed white louvered bifold doors.
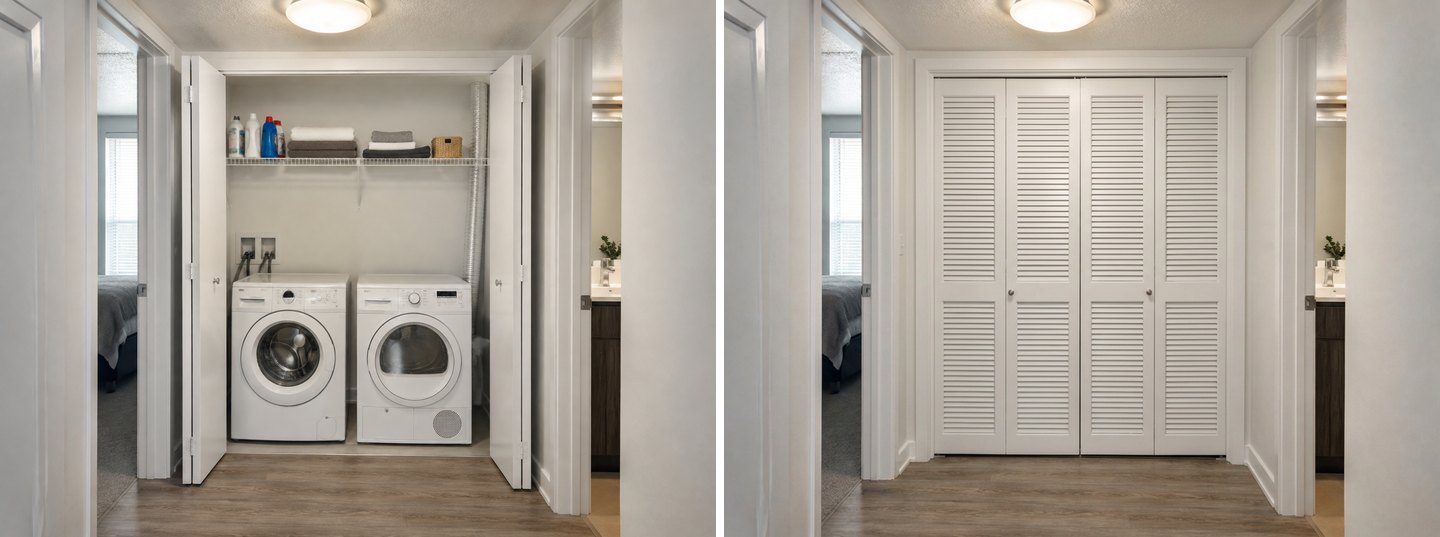 A Select area edit of the closet opening. The hallway, the floor and both side doorways are exactly as in the original.
The result is clean and believable, and louvers are not just a style choice here. Dryer manuals ask for air openings in closet doors. Whirlpool's installation sheet for its NED4600Y series electric dryers says a closet with a door needs ventilation openings at the top and bottom of the door, shown as 48 in² and 24 in² (310 and 155 cm²), and that louvered doors with equivalent openings are acceptable (Whirlpool W10514172A). Check the manual for your own model before you pick solid doors.
Create interior design with AI
Upload a photo of your room and get a professional design in 30 seconds. First generation is free.
Case 3: A Basement Laundry Corner
The third space is an unfinished basement: a top-loading washer and a dryer against a concrete block wall, a plastic utility sink, exposed joists and pipes, a gas water heater on the left, a floor drain, and a foil vent duct running from the dryer to a small window. For more on finishing the rest of the space, see our AI basement finishing ideas.
We ran it twice. Full makeover with a brief asking for cabinets, a worktop, the sink, shelves, a drying rack, bright lighting and a sealed floor. Then Refresh, no renovation with a brief that starts with a keep list: "Keep the water heater, the exposed ceiling, the pipes, the floor drain and the silver dryer vent duct running to the window exactly as they are. Add a worktop, shelves and a wall-mounted drying rack, and brighter lighting."
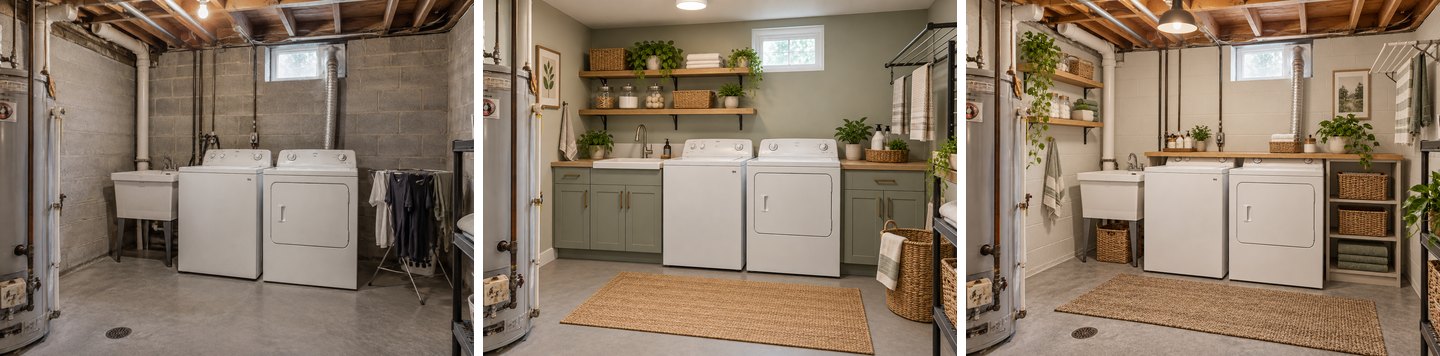 Middle: Full makeover hid the services and enlarged the window. Right: Refresh with a keep list kept every service, but laid the worktop over the top-loader's lid.
The Full makeover is a nice picture of a finished basement laundry, but it is not your basement any more. It closed the ceiling, removed the pipes, the floor drain and the dryer vent duct, and made the window bigger, although the mode's own description says windows stay. A real version would need the vent rerouted through the wall and the ceiling height checked.
The Refresh result is the honest one. The joists, the pipes, the drain, the water heater and the vent duct are all where they were; the blocks got white paint, and the room got shelves, a wall drying rack and a pendant light. It still made one mistake you'd only catch by looking closely: the new wooden worktop runs straight across the top-loading washer, so its lid could never open. A counter over the machines only works with front-loaders.
What Does the AI Get Wrong in a Laundry Room?
It draws what looks tidy, not what is connected. In nine generations on three spaces we saw these problems:
| What went wrong | Where we saw it | How to avoid it |
|---|---|---|
| Removed the dryer vent, water hookups, pipes or floor drain | Full makeover in the closet and the basement | Name every service in a keep list, use Refresh, or edit with Select area |
| Put a worktop over a top-loading washer | Refresh in the basement | Say "front-loaders under the counter" or "keep the washer lid free" |
| Stacked two machines without asking if they can be stacked | The stacked utility room | Check your models and the stacking kit before you plan the stack |
| Changed the window | Full makeover in the basement | Add "keep the window size" to the brief |
| Ignored part of the brief | Closet doors left open; worktop not wall to wall | Re-run with one change at a time, or use Select area |
| Picked an odd spot for storage | Built-in storage task in the utility room | Say "above the washer and dryer" in your own words |
There is also what the AI can't know at all: the size of your machines, the depth of the closet, where the drain runs, and whether the dryer is gas or electric. The Studio works from one photo. It doesn't measure, so a result is a layout idea to check with a tape measure, not a plan with dimensions.
Dryer Venting and Clearances: What to Check Before You Build
A new laundry layout is only as good as the dryer vent behind it. The U.S. Fire Administration estimates 2,900 clothes dryer fires in residential buildings each year, causing about 5 deaths, 100 injuries and $35 million in property loss, and failure to clean (34%) was the leading factor in those fires (USFA, Clothes Dryer Fires in Residential Buildings).
From that USFA report:
- Building codes require dryers to exhaust directly outdoors. Venting into attics, soffits, ridge vents or crawl spaces is prohibited.
- Vent ducts must be metal with a smooth interior, and the total length must not exceed 35 feet, shorter if there are bends.
- The flexible transition duct between the dryer and the wall must be no longer than 8 feet and not hidden inside walls or ceilings.
- USFA recommends replacing coiled-wire foil or plastic venting with rigid, non-ribbed metal duct, and making sure the outdoor vent cover opens when the dryer runs.
From Whirlpool's installation sheet for its NED4600Y series electric dryers (W10514172A):
- A 4-inch (102 mm) vent is required, rigid or flexible metal; plastic or metal foil vent must not be used.
- Most installations need at least 5½ inches (140 mm) behind the dryer for the vent with its elbow.
- An extra 1 inch (25 mm) on all sides is recommended to reduce noise, and the space must let the dryer door open fully.
- A closet with a door needs ventilation openings at the top and bottom of the door; louvered doors with equivalent openings are acceptable.
Notice the silver foil duct in our basement and closet "before" photos: it is exactly the kind of vent the manual and USFA say not to use. These figures are for one dryer series; your manual has the numbers for yours, and local code decides the rest.
How to Write a Laundry Room Brief the AI Follows
A good brief has three parts, in this order: what stays, what to add, and what it should look like.
- Start with the keep list. "Keep the washer and dryer, the sink, the window, the water heater and the dryer vent duct where they are."
- Name the machine type. "Front-loading washer and dryer" or "top-loading washer". It decides whether a counter can go on top.
- Say where each new thing goes. "Upper cabinets above the machines", "a tall cabinet between the dryer and the wall", not just "more storage".
- Add one finish. "Sage green cabinets and a wood worktop" or "dark blue walls". One or two finishes read better than five.
- Fix one thing at a time. If a result is 80% right, open the editor, select the wrong part and describe only that.
The same approach works when you turn another room into a laundry. Pick Laundry Room under Your space, list what to remove and what to add, and compare with the other options in our spare room ideas.
FAQ
How can I design my laundry room with AI for free?
Create a free GenRoom account. It comes with 6 credits, which is three designs or edits at 2 credits each, with a watermark on the Free plan. Upload a photo in the Studio, check that the space type says Laundry Room, choose a mode or type your brief, and press "Create design". Paid packs start at $9.99 for 36 credits, and they are one-time purchases, not a subscription. The same Studio handles every other room too, see AI interior design.
Can you put a countertop over a washer and dryer?
Yes, over front-loading machines. A worktop resting just above a front-loading washer and dryer is one of the most useful laundry room ideas because it turns the machines into a folding counter. It does not work over a top-loading washer, whose lid opens upward. Leave access to the hookups and the dryer vent behind the counter.
Can any washer and dryer be stacked?
No. Stack only a pair that the manufacturer says can be stacked, using the stacking kit listed in the manual. The AI will happily draw any two machines on top of each other, so check your model numbers before you plan a stacked layout around a picture.
Do laundry closet doors need vents?
Dryer manuals often require them. Whirlpool's installation sheet for its NED4600Y series says a closet with a door needs ventilation openings at the top and bottom of the door, and accepts louvered doors with equivalent openings. Look up the installation instructions for your own dryer.
How do I stop a dryer vent from being a fire risk?
Clean the lint filter before and after every load, keep the area behind the dryer free of lint, and check that the duct is not crushed and the outdoor flap opens. USFA found failure to clean was the leading factor in residential dryer fires, and it recommends rigid metal duct instead of foil or plastic.
Can AI turn a spare room or a basement corner into a laundry room?
It can show you how it would look. Change the space type to Laundry Room, describe what to remove and add, and list the water, drain and vent locations you have. Treat the result as a layout idea: the AI does not know where your pipes run or whether a dryer can be vented from that wall.
The Bottom Line
Most laundry room ideas come down to a few moves: a folding counter over front-loaders, closed cabinets above, a rod or a drying rack, stacking in a narrow space, and doors that hide a closet. Seeing them on a photo of your own laundry room shows which one fits before you buy anything.
In our tests the AI was best when it was told what to keep: the Refresh mode with a keep list and the editor's Select area left the vent, the hookups and the pipes in place. It was worst when given a free hand, quietly deleting the dryer vent. Upload your laundry room to the GenRoom Studio, start with one idea, and check the venting and clearances before anything is built.