Home Coffee Bar Ideas: See a Coffee Station on Your Own Photo
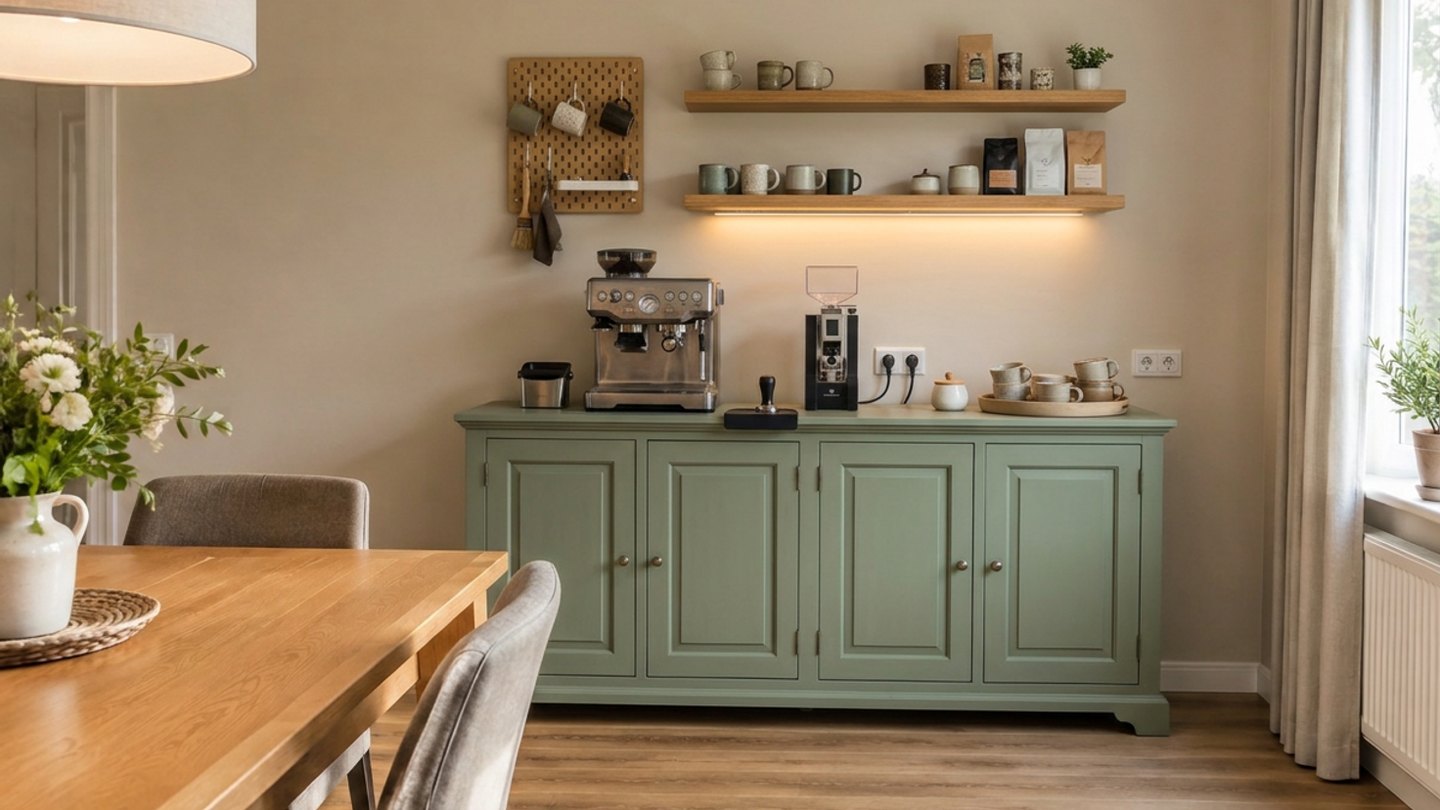
A real result from the GenRoom Studio. The "before" was a plain dining-room wall with a dated brown sideboard. We traced the wall in the editor and described the coffee station in one paragraph.
The best home coffee bar ideas are the ones that fit a spot you already have: a free stretch of kitchen wall, a sideboard in the dining room, or a niche in the hallway. The hard part isn't finding ideas, since there are thousands of coffee-bar photos online. The hard part is knowing how one would look in your corner, next to your fridge, under your socket. You can check that now. Take one photo of the spot, trace it, write what you want, and see it in about 30 seconds.
We tested this in the GenRoom Studio on three typical spots: an empty kitchen wall next to the fridge, a dining-room sideboard and an empty hallway niche. Below are the exact steps, six unedited before/after results, a lighting test, a cheap rolling-cart version, and the places where the AI got it wrong. We also cover the practical checks (outlets, water, walkway width) with sources.
What do people actually ask for when they plan a coffee corner?
Mostly a coffee corner in a specific, awkward spot, with shelves for cups, a cabinet underneath and some warm light. Between March and October 2026, 181 people asked GenRoom in their own words for a coffee bar, coffee station or coffee nook on a photo of their home. Here are some of their requests, paraphrased and anonymised:
- "Put a coffee corner on the empty wall next to the fridge, with glass-front cabinets and LED lights." Glass doors with built-in lighting come up again and again.
- "Instead of the TV unit, a coffee corner as wide as the counter, 240 cm, up to the ceiling." People give exact widths and expect them to be kept.
- "A coffee counter under the window, and hide the boiler inside a cabinet." The coffee bar often has to hide something ugly too.
- "Take out the dining table and make a sideboard with a coffee or drinks area, pictures on the wall and plants." The dining room is the natural second choice when the kitchen is full.
- "Home bar ideas, modern, not bulky, starting from the wall near the plants. I don't want it in the middle of the room."
- "Create a small coffee station in the corner of the kitchen." This is the simplest version, and it's very common.
- "Make it a wine and coffee station without changing the colour or the layout of the cabinets." A good share of people mix coffee and wine.
- "Add a sink for coffee and tea service under the window." Some want water at the station. We tested that, and it's where the AI is least reliable.
Most of these requests were for kitchens, then living rooms; the rest were dining rooms, hallways, home offices and the odd sunroom. About one in five mentions the fridge, and roughly one in seven gives sizes in centimetres or inches. So the real job is not "show me a pretty coffee bar". It's "fit a coffee bar into this exact gap and keep everything else".
Where should a coffee bar go in your home?
Put it where you already pass in the morning, within reach of an outlet, and out of the main cooking path. That usually means one of five spots, and each has its own trade-off.
| Spot | Works best when | Watch out for |
|---|---|---|
| Empty kitchen wall or gap next to the fridge | You have 60–120 cm of free wall and an outlet | Fridge door swing, walkway width |
| End of an existing counter run | You only need a machine, a grinder and a shelf | Losing prep space next to the hob or sink |
| Dining-room sideboard or buffet | The kitchen is small, or you host often | An outlet at sideboard height, carrying water |
| Hallway or living-room niche | There's a recess you don't use | No water nearby; a cabinet sticking out into the corridor |
| Rolling cart | You rent, or aren't ready to build | Small top surface, cords across the wall |
If the coffee bar sits next to a walkway, keep it clear. The NKBA Kitchen Planning Guidelines recommend a walkway of at least 36 in (914 mm). A deep cabinet in a narrow hallway can eat that quickly. Measure the corridor, subtract the cabinet depth, and see what's left.
Which GenRoom tools help you design a coffee bar?
There is no special "coffee bar" button. You describe the station in words, and three tools tell the AI where it goes and how it looks. In our tests, each one did a different job:
| Tool | Where to find it | What it's for |
|---|---|---|
| Select area + text | Editor → Select area (Selection, Brush or Lasso) | Build the coffee bar on one wall or corner and leave the rest of the room alone |
| Built-in storage task, "In the niche" | Design → Ready tasks → Furniture & decor | A built-in cabinet in a niche or along a free wall, plus your own description |
| Lighting quick action | Editor → Quick actions → Light & season | Under-shelf LEDs, warm light, an evening view of the finished station |
| Add quick action | Editor → Quick actions → Objects | Add one piece: a cart, a shelf, a pegboard, a small sink |
All of these are in every plan, including Free. A design or an edit costs 2 credits, and in our tests each result took about 20–40 seconds.
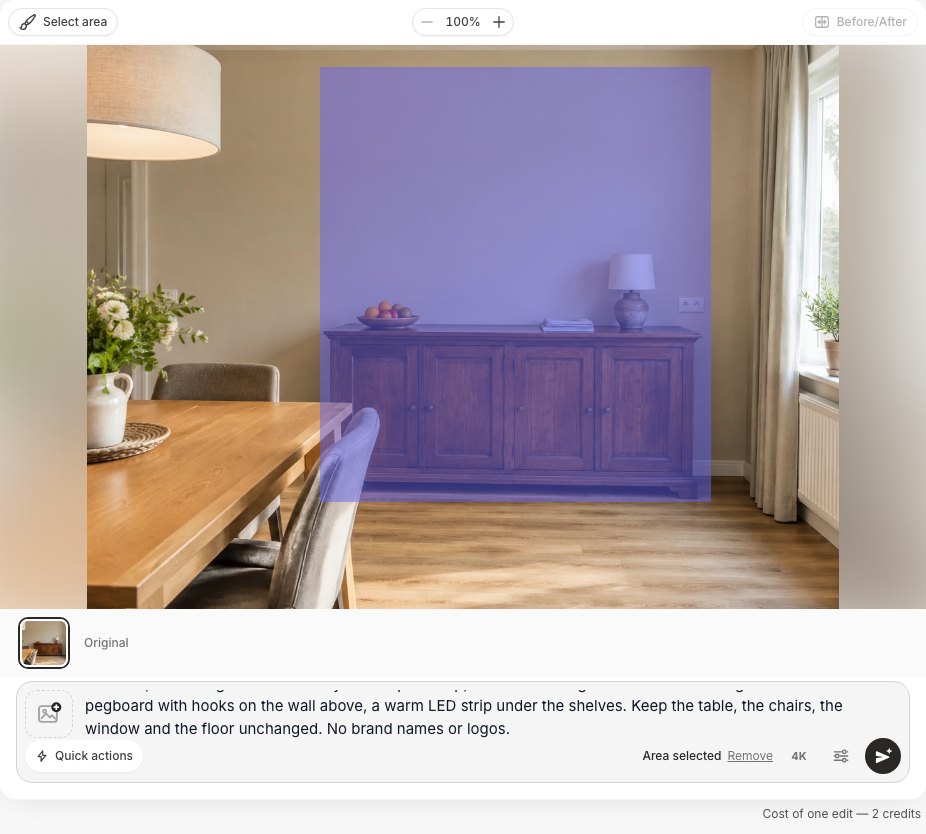 The editor with Select area. The purple shape is the part of the photo the AI may change. The table, chairs and window are outside it, and the prompt says to keep them.
How to design a home coffee bar on your photo, step by step
Photograph the spot, select it, describe the station, and compare. Here is the path that gave us the cleanest results.
1. Take a photo of the spot, not the whole room
Stand back far enough to show the wall or corner and its neighbours: the fridge, the door, the window, the outlet. Shoot at eye level with the lights on and the camera straight. The AI keeps the camera position from your photo, so what's in the frame is what you get.
2. Upload it to the Studio
Open the Studio and upload the photo. It opens in the editor. Your original stays as Version 1, so you can always go back.
3. Select the wall or corner
Click Select area and pick Lasso (or Brush). Then trace the part of the photo where the coffee bar should go: the empty wall from ceiling to floor, or the sideboard plus the wall above it. Confirm the selection. The prompt bar now says "Area selected".
4. Describe the coffee station in one paragraph
Name the pieces, the materials and the light, then what must stay. This is the text we used for the kitchen:
"Turn this empty wall into a coffee corner: a base cabinet with a wooden worktop, an espresso machine and a coffee grinder on it, two open oak shelves with mugs above, a warm LED strip under the shelves. Keep the fridge, the door and the rest of the kitchen unchanged. No brand names or logos."
Add "No brand names or logos" if you plan to share the image. More on why in the limits section.
5. Apply, then compare
Press Apply (2 cr). Use Before/After to compare with the original. If the cabinet is too wide or the shelves too low, say so in a follow-up edit ("make the cabinet narrower, about 80 cm", "move the shelves higher").
6. Finish with light and small changes
Open Quick actions → Lighting to test under-shelf LEDs or an evening view. Use Add for a pegboard, a cart or one more shelf, and Recolor an object for the cabinet colour.
Test 1: an empty kitchen wall next to the fridge
This is the most common request, and it was the cleanest result. The photo shows a small white kitchen. To the right of a freestanding fridge there's about 1.2 m of bare grey wall with one double socket. We traced only that wall and used the paragraph above.
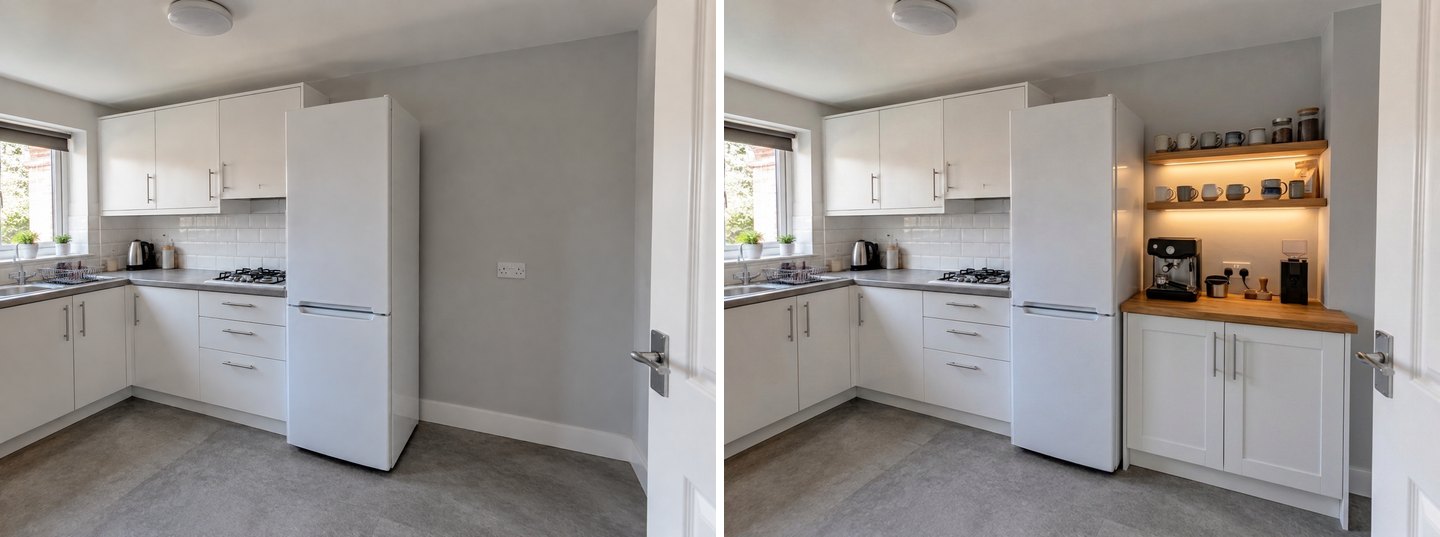 Left: the original photo. Right: Select area on the empty wall plus a one-paragraph description. The fridge, the existing cabinets, the hob, the window and the door are unchanged.
What worked:
- Only the selected wall changed. The fridge, the wall cabinets, the backsplash, the door and the floor stayed exactly where they were.
- The base cabinet matches the kitchen. It came out in white shaker style, close to the existing fronts. It reads as one kitchen, not a piece of furniture standing in front of it.
- The socket stayed where it really is. The machine and the grinder are plugged into the original double socket, which now sits just above the new worktop. That's useful: it shows you whether your real outlet is in a good place.
- The machines carry no logos. We zoomed in on the espresso machine and the grinder and found no brand marks. A coffee bag on the shelf has a plain label with nothing readable on it.
What to check yourself: the cabinet runs to the door frame. In a real kitchen you'd want to check that the door opens fully and the corridor stays wide enough.
A cheaper version: a rolling cart instead of a built-in
If you rent or just want to try the idea, start with a cart. On the same original photo we used Quick actions → Add with "a narrow three-tier rolling metal cart next to the fridge with a drip coffee maker and a kettle on top and mugs on the lower tiers, one small floating wooden shelf above it."
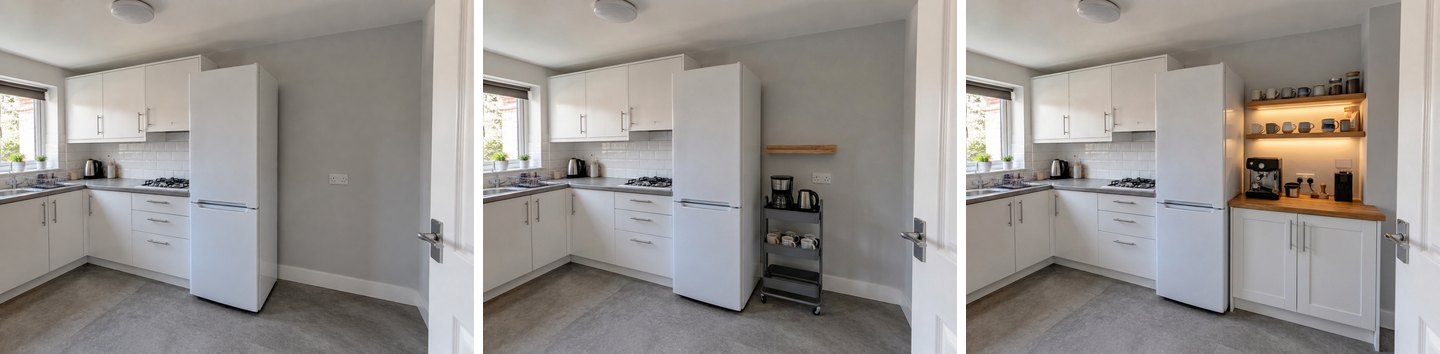 Original, rolling cart (one "Add" edit), built-in coffee corner (Select area). Same photo, same camera.
Side by side, the trade-off is easy to see. The cart is cheap and movable, but it leaves most of the wall empty and gives you a tiny work surface. The built-in uses the whole gap, hides supplies in the cabinet and gives you a real worktop. Seeing both on your own wall is often what settles the decision. The AI placed the shelf a bit high above the cart, so you'd adjust that in real life.
Test 2: a dining-room sideboard turned into a coffee station
A sideboard you already own is the fastest coffee bar. You don't need any construction, just paint, two shelves and an LED strip. Our photo shows a dated dark-brown four-door sideboard against a plain beige wall, with a fruit bowl and a lamp on top. We traced the sideboard and the wall above it and wrote:
"Turn this sideboard into a coffee station: keep the sideboard and paint it matte sage green, put an espresso machine, a coffee grinder and a tray with cups on top, add two floating oak shelves with mugs and a small pegboard with hooks on the wall above, a warm LED strip under the shelves. Keep the table, the chairs, the window and the floor unchanged. No brand names or logos."
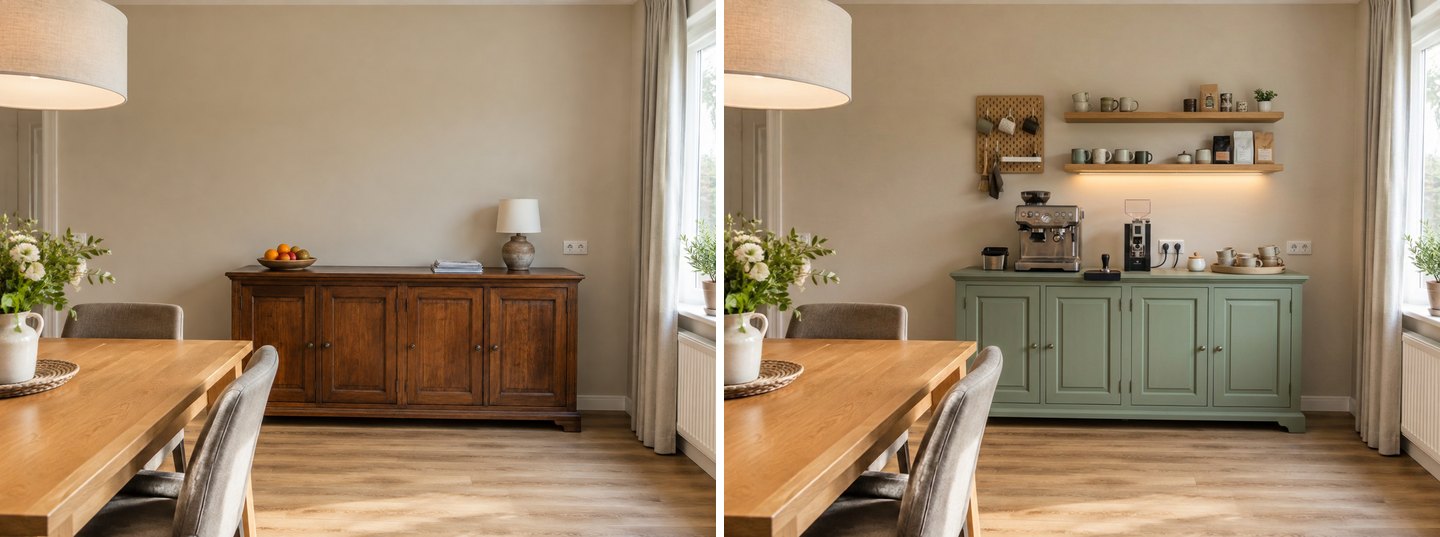 Left: the original. Right: one Select area edit. The sideboard keeps its shape, size, panels and feet; only the colour and what's on and above it changed.
This is the kind of result that answers a real question: "Will my old sideboard work, or do I need new furniture?" The AI kept the sideboard's shape, door panels and feet and only repainted it. So what you see is a weekend project, not a showroom piece. The table, chairs, curtain and radiator are untouched. The lamp and the fruit bowl are gone because we asked for the top to become a coffee surface.
Look closely at the outlets, though. There's a second socket behind the machines that wasn't on the original wall. We show it close up in the limits section below.
If you want to try other colours for the sideboard, use Recolor an object, or follow our guide to new cabinet fronts and colours. The same approach works for a buffet or a dresser.
Create interior design with AI
Upload a photo of your room and get a professional design in 30 seconds. First generation is free.
Test 3: an empty hallway niche turned into a coffee nook
For a niche, the Built-in storage task does the framing for you. Our photo is a narrow apartment hallway with an empty white recess about 1 m wide, with one socket on its back wall. This time we used the design screen instead of the editor:
- Open Design, check that Your space says Hallway.
- Under Ready tasks, open Furniture & decor and pick Built-in storage.
- Under Where, choose In the niche (the other options are "Along a free wall" and "Around the TV").
- In Your brief, describe the coffee nook: "Make the niche a coffee nook: a built-in cabinet at counter height with a wooden worktop, an espresso machine on it, open shelves above for mugs and coffee jars, warm LED strip lighting under the shelves. No brand names or logos."
- Press Create design (2 cr). We didn't pick a mode, so only the task and the brief applied.
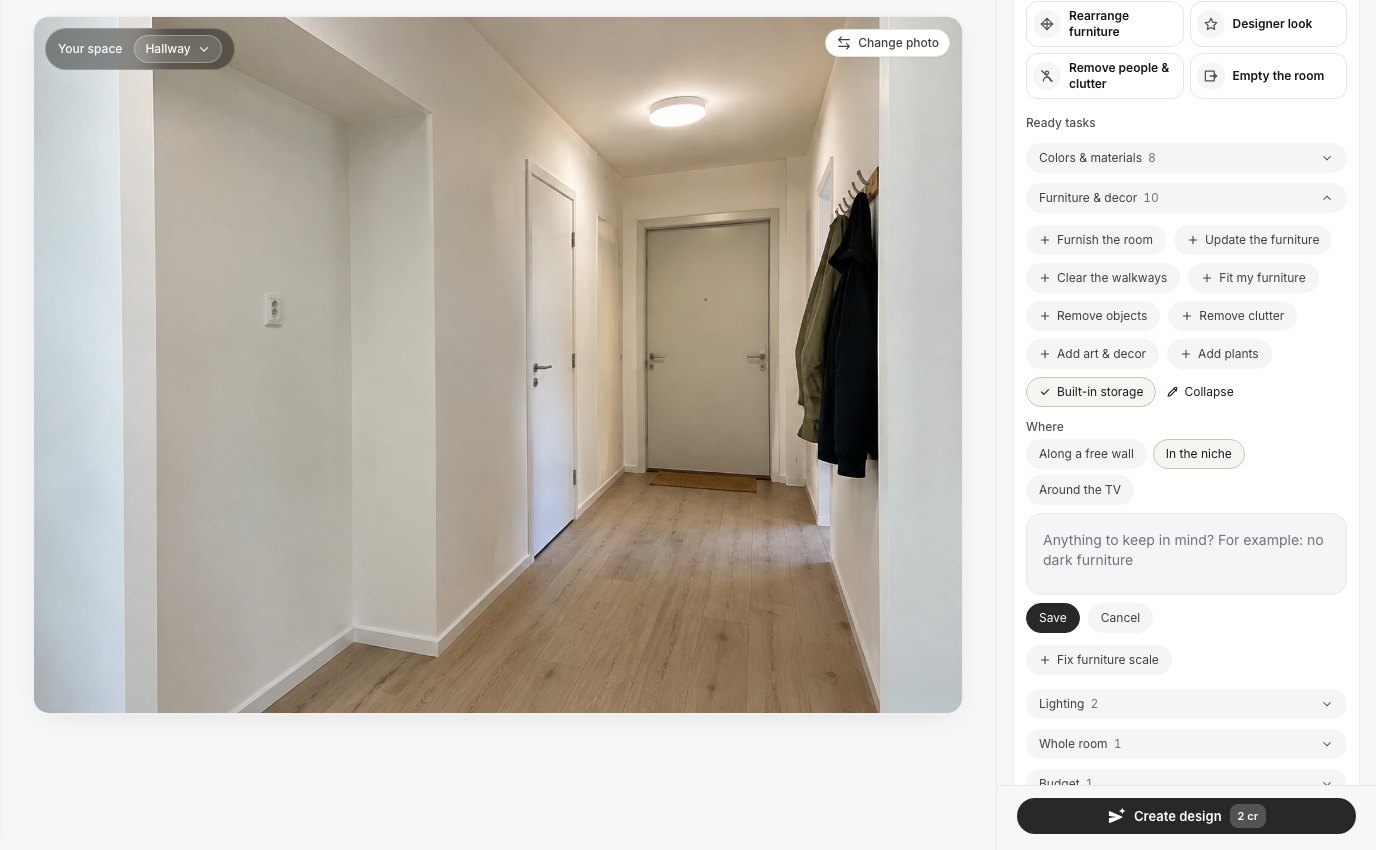 Built-in storage with "In the niche". The task's own text and your brief are combined into one request, so you can pick the ready option and still describe the coffee details in your own words.
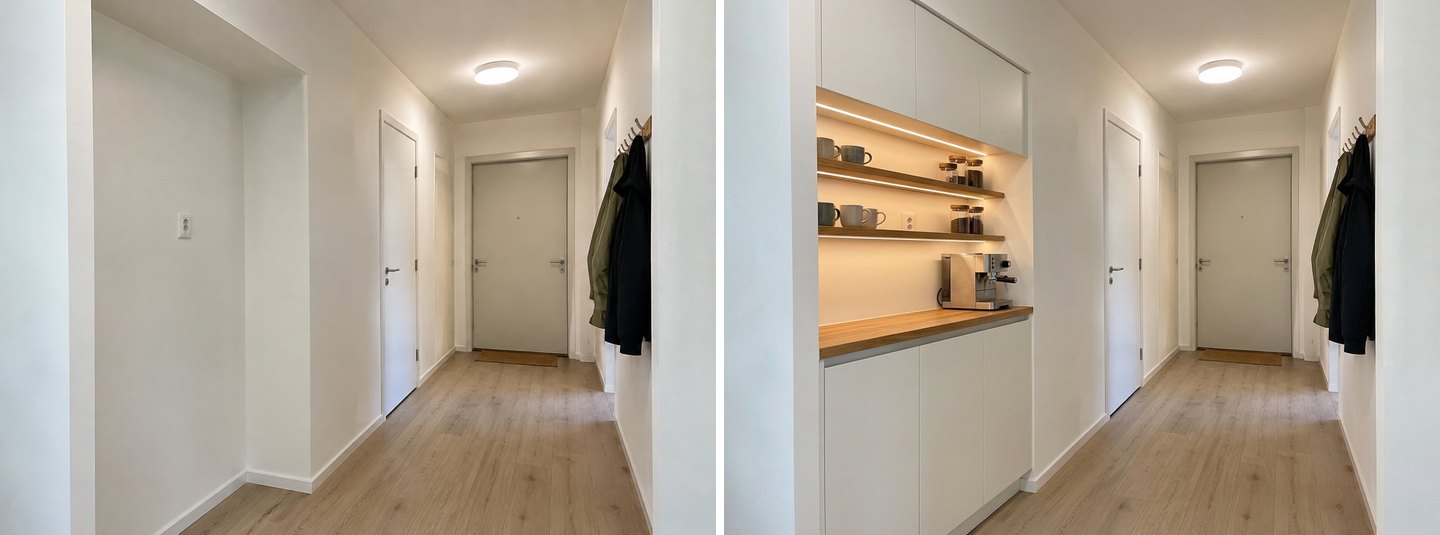 Left: the original hallway. Right: Built-in storage, "In the niche", plus the brief. The doors, the coat rail, the floor and the ceiling light are unchanged.
The Built-in storage task is floor-to-ceiling by design, so the AI added tall cabinets above the coffee shelves, all the way up. In a hallway that's handy, because it gives you closed storage for beans, filters and spare cups. If you want an open niche, say "no upper cabinets" in the brief. The socket again stayed in its real place, between the shelves above the worktop. That's a fair preview of where your cable will run.
For more built-in ideas beyond coffee, see our guide to built-ins and shelves on your own photo.
How to light a coffee bar (and test it first)
Light the work surface, not just the room: an LED strip under the lowest shelf does most of the work. The NKBA guidelines recommend that every work surface be "well illuminated by appropriate task lighting". A coffee counter is a work surface, and a ceiling light behind you casts your shadow straight onto it.
We took the finished kitchen coffee corner and opened Quick actions → Lighting. The field there is "What to do with the light", with ready chips such as Warm light, Spotlights instead of chandelier, Backlight behind the TV and Table lamps. We typed: "evening light: warm LED strip under the shelves switched on, ceiling light off, dusk outside the window."
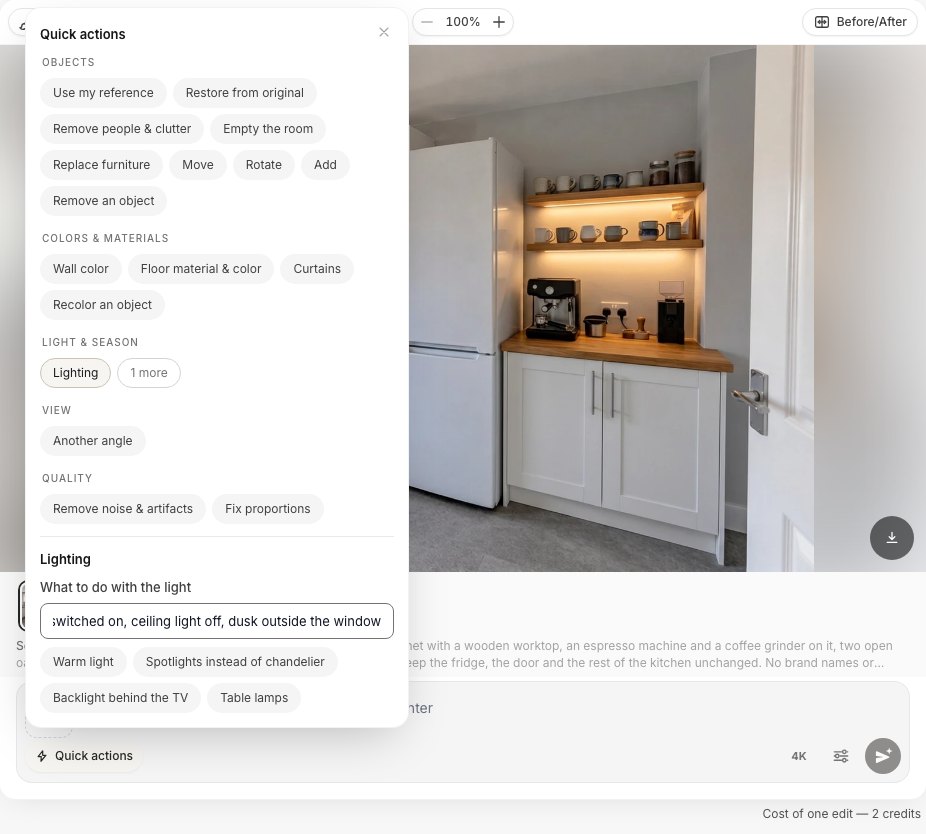 Quick actions → Lighting. You can pick a chip or type your own instruction.
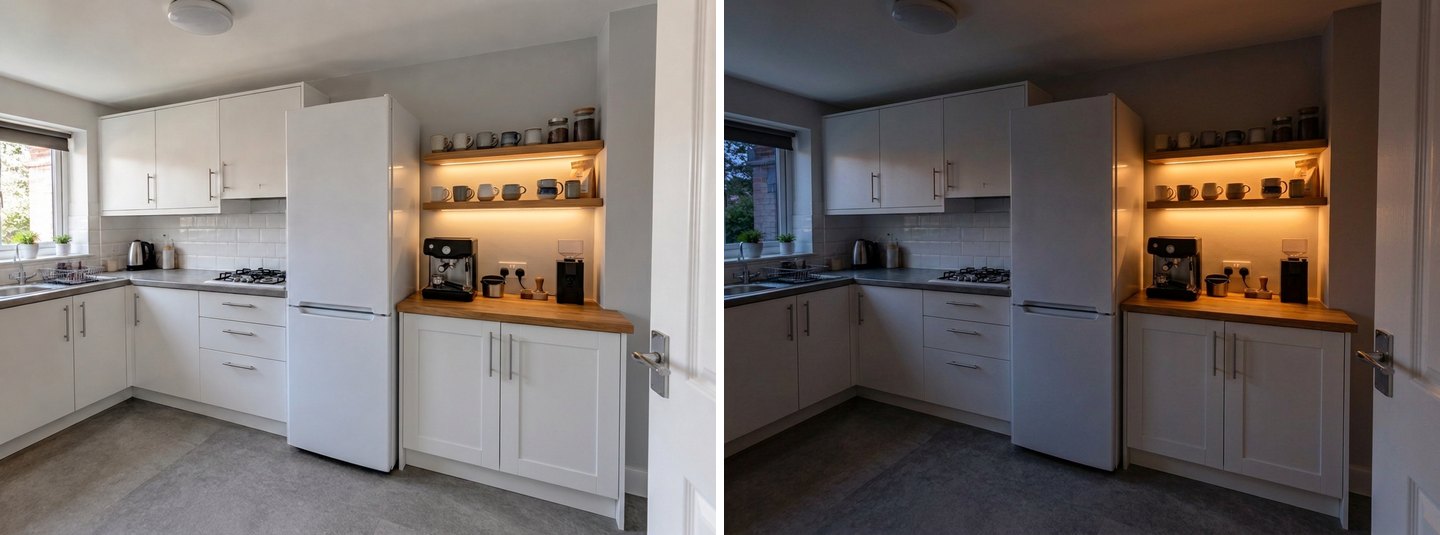 Left: the coffee corner from Test 1. Right: the Lighting quick action. Everything stays in place; only the light changes.
The evening version is the honest test of a lighting plan. In daylight any coffee bar looks fine. At 7 a.m. in winter you'll see whether the strip lights the worktop or only the mugs. Here the light lands on the worktop and the machine, which is what you want. The view outside the window turned only slightly darker, not full dusk, so don't rely on the window for mood. For more lighting ideas on a photo, see AI lighting design for your room.
Coffee bar ideas by budget
Start with what you have; build only when you know you'll use it. These are the setups we tested, from cheapest to most involved.
| Setup | What changes | Tested here |
|---|---|---|
| Tray or cart | Nothing fixed; a cart, one shelf | Rolling cart next to the fridge |
| Existing sideboard | Paint, two floating shelves, a pegboard, an LED strip | Dining-room sideboard |
| New base cabinet + shelves | One cabinet, a worktop, open shelves, under-shelf light | Kitchen wall next to the fridge |
| Built-in niche | Joinery to size, worktop, shelves, upper cabinets | Hallway niche |
| Station with water | All of the above plus a supply line and a drain | Hallway niche + bar sink (see limits) |
We don't quote prices because they vary too much by country and by maker. The order of cost, though, is clear from the table. Water is the step that changes the budget most, because it adds a plumber.
If the coffee bar is part of a bigger kitchen refresh, our kitchen update without remodelling guide covers fronts, worktops and backsplashes on the same photo.
What to check before you build it: outlets, water, space
A render won't tell you whether your outlet, pipes and walkway can take the station. These checks will.
- Outlets. The US Fire Administration's electrical fire safety tips say to "always plug small appliances directly into a wall outlet", not to overload wall outlets, and to use extension cords only temporarily. An espresso machine, a grinder and a kettle on one station is a lot for a single outlet and a power strip. If the outlet isn't where your station will be, that's a job for a qualified electrician, which the same leaflet also insists on.
- GFCI near water. In US kitchens, the NKBA guidelines (citing the International Residential Code) note that receptacles serving countertops need GFCI protection, as do receptacles within 6 ft of the outside edge of a sink. Rules differ by country, so ask a local electrician.
- Water. A plumbed-in machine or a small bar sink needs a supply line and a drain. A sink also needs a route for the waste pipe, which is the hard part on an outside wall or in a hallway. Without a plumber's check, plan for a machine with a water tank.
- Space. Keep at least a 36 in (914 mm) walkway in front of the station (NKBA). Measure your tallest machine with its lid open, then set the shelf above it with room to spare.
- Heat and steam. Don't put a kettle or a steam wand directly under a closed wall cabinet or a shelf of books. Open shelves with a bit of clearance age better.
Where does AI coffee bar design fall short?
It shows a believable look, not a working plan, and it can invent things that aren't in your room. Here are the problems we hit in six runs.
It invents outlets and labels
In the sideboard test, a new double socket appeared on the wall behind the machines, next to the real one. The AI "solved" the power problem for you, but your wall still has only one outlet. The coffee bags on the shelf also got label-like patches with squiggles that look like text but aren't. We asked for no brands, and there were none, but the AI still dresses packaging to look real.
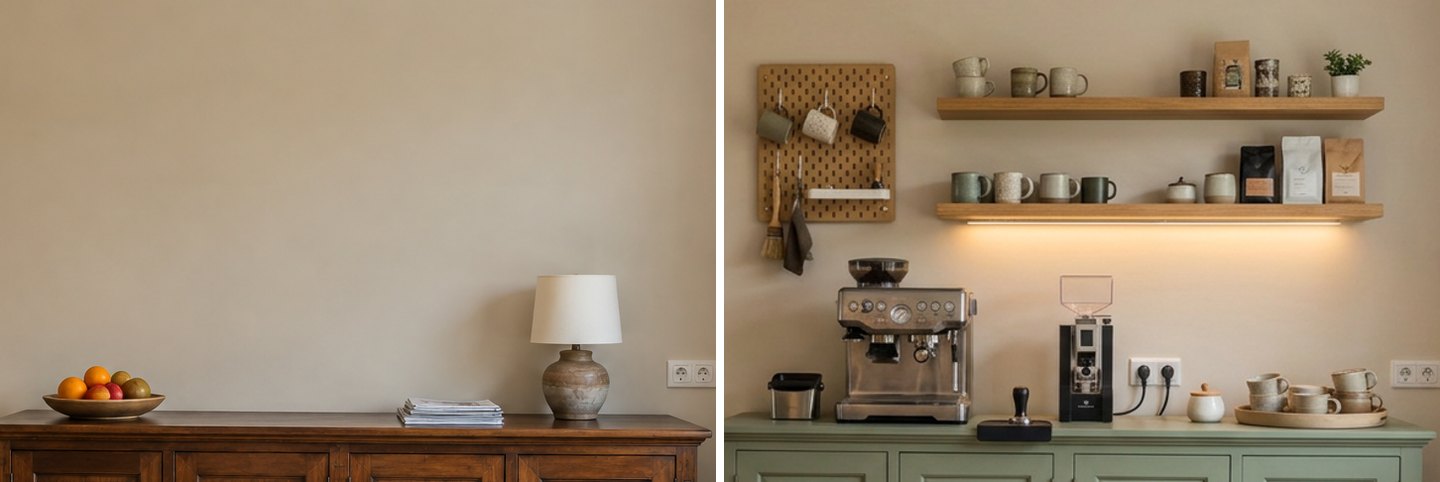 Left: the original wall, one socket on the right. Right: the edit added a second socket in the middle that isn't really there, plus made-up labels on the coffee bags.
Write "keep the existing sockets, do not add new ones" in your text if you want an honest preview of the wiring. Treat every label in the image as decoration.
It adds a sink anywhere, with no pipes
We asked for "a small round bar sink with a tall tap set into the worktop" in the hallway niche. The AI fitted it neatly in about 20 seconds, in a corridor with no water line in sight. The image looks plausible. The plumbing behind it doesn't exist.
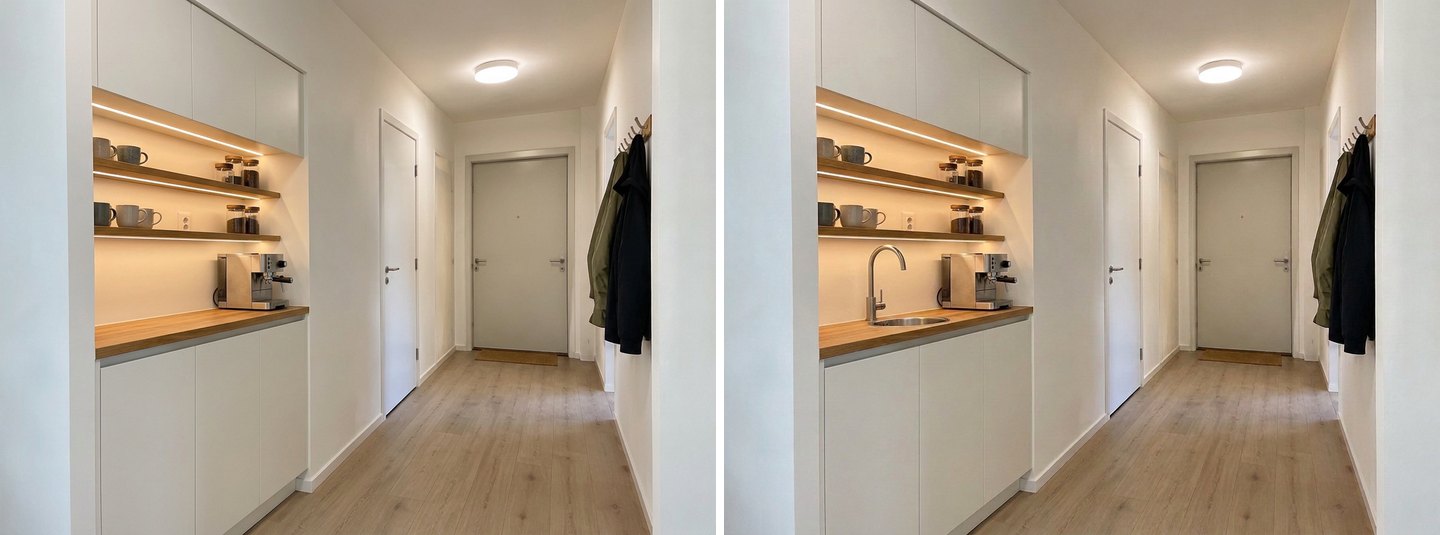 The "Add" quick action put a bar sink into the hallway niche. It looks right, but the AI doesn't know where your pipes and drain are.
This is the most important limit for a coffee bar. The AI doesn't know where your water supply, drain or wiring run, and it won't warn you. Use the image to decide whether you want a sink. Then ask a plumber whether you can have one there.
Other things to expect
- No scale. Ask for "80 cm wide" and you'll get something close, not exact. Check sizes with a tape measure, not the image.
- The AI tidies up. Things you didn't mention may disappear from the selected area. The lamp and fruit bowl on our sideboard did, because the top became a coffee surface.
- Built-in storage goes floor to ceiling. Say "no upper cabinets" if you want an open niche.
- It is not a cabinet drawing. You won't get dimensions or a cut list. Hand the image to a carpenter or a kitchen fitter as a reference.
FAQ
How do I visualize a coffee bar in my own kitchen?
Take one photo of the spot, upload it to the GenRoom Studio, and use Select area to trace the wall or corner. Then describe the coffee bar in a paragraph: cabinet, worktop, shelves, light, and what must stay. You get the same kitchen with the coffee bar in about 20–40 seconds, and you can refine it with more edits.
What do I need for a home coffee bar?
A flat surface at working height, an outlet within reach, your machine and grinder, a place for cups (open shelves, hooks or a pegboard), closed storage for beans and filters, and task lighting over the surface. A water tank machine means you don't need plumbing. A sink or a plumbed-in machine means a plumber.
Can I put a coffee bar in the dining room or a hallway?
Yes. A sideboard in the dining room is the easiest option, since it needs only paint, shelves and an outlet. A hallway niche works well as a built-in. Check the walkway width (NKBA recommends at least 36 in / 914 mm) and remember that water is usually far away there.
How do I hide a coffee bar when I'm not using it?
Use closed cabinets with doors, a niche with upper cabinets, or a sideboard that keeps the machine behind doors. You can test a closed version on your photo the same way: describe cabinet doors that hide the machine, and compare it with the open-shelf version.
Is it free to try?
A free account (no card) gives 6 credits. That's 3 designs or edits at 2 credits each, and Free results carry a watermark. Paid packs are one-time purchases, not a subscription. Start is $9.99 for 36 credits, roughly 18 designs and edits. Details are on the pricing page.
Can I use the images when I talk to a carpenter or a kitchen company?
Yes. Images you create in GenRoom belong to you on every plan, including Free, so you can send them to a fitter or post them. Just remember the image shows a look, not measurements: give the fitter your real dimensions and outlet positions.
The Bottom Line
The fastest way to choose between home coffee bar ideas is to see them on the spot you actually have. In our tests, three paths covered almost every request. Select area plus one paragraph turned an empty kitchen wall or an old sideboard into a coffee station, without touching the rest of the room. Built-in storage with "In the niche" handled a hallway recess, and the Lighting quick action showed how the station looks on a winter morning.
Use the image to choose the look and the spot. Then check the outlet, the water and the walkway in real life, because the AI will happily add sockets and sinks your walls don't have. Start with one photo of your corner in the GenRoom Studio, or explore more kitchen design ideas.