Small Bathroom Layout Ideas: Try Them on Your Own Photo With AI
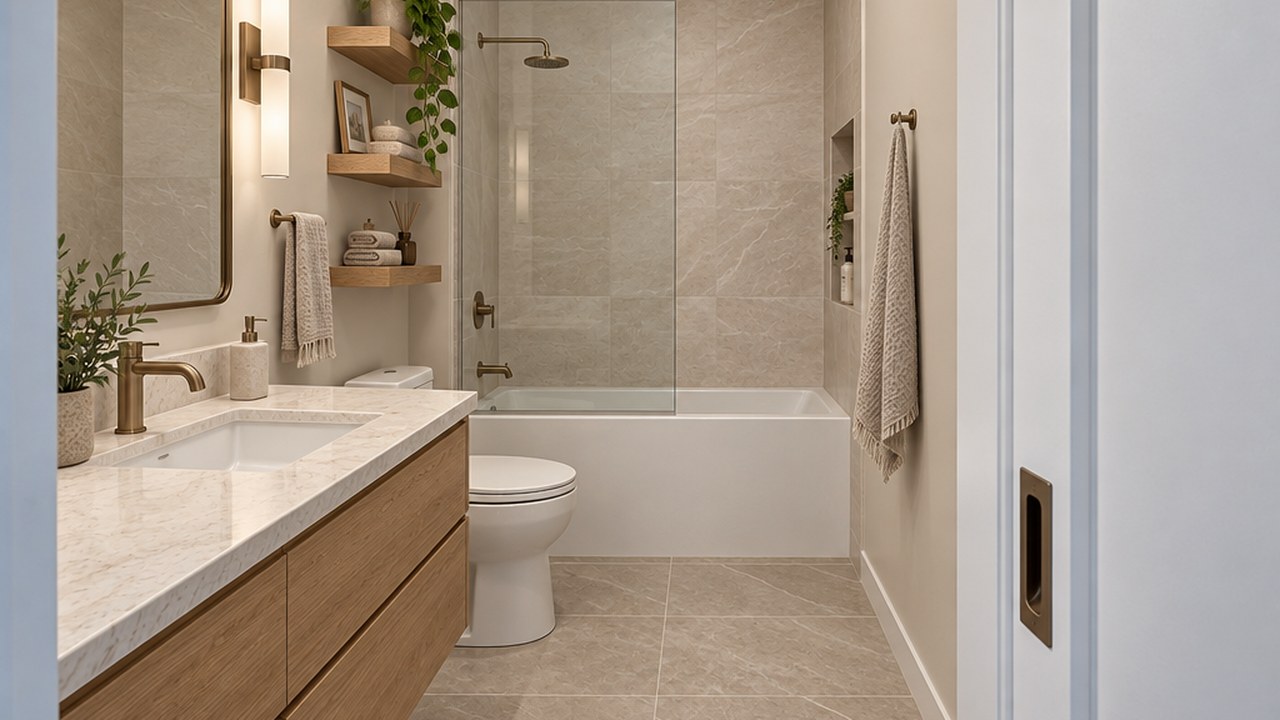
A real GenRoom Studio result for a 5 × 8 ft hall bathroom: floating vanity, open shelves above the toilet, a glass panel instead of the curtain and a pocket door instead of the swinging one. The before photo is further down.
The best small bathroom layout ideas all do the same thing: they free floor space. Wall-hung fixtures show more floor, a shower takes less room than a tub, a pocket door stops swinging into the room, and the wall above the toilet becomes storage. A washing machine fits best under a continuous countertop next to the sink, not standing on its own.
You can test these moves on a photo of your own bathroom before you call a plumber. In the GenRoom Studio you upload one photo, describe the layout you want, and get a picture of the same room rearranged in 20–60 seconds. We tried it on three small bathrooms, one of them with a washing machine, and show every result below: what worked, and where the AI made the room bigger than it really is.
What you'll find here:
- what 1,176 people asked for when they planned a small bathroom in GenRoom;
- the clearances to check first (code minimums and NKBA recommendations);
- three real before/after cases: a bathroom with a washer, a narrow 5 × 8 ft bath and a tiny shower room;
- where to put a washing machine, and the electrical rules that apply;
- what the AI gets wrong, and how to write a request it follows.
What Do People Ask For When They Plan a Small Bathroom?
From March to mid-October 2026, 1,176 GenRoom users described a small bathroom layout in their own words. They wrote in many languages, but the requests sound alike. Here are a few, paraphrased and anonymised:
- "The bathroom is 150 × 230 cm with a pipe riser in the corner. Box in the riser, move the toilet left, put the washing machine under the sink."
- "We have a 115 × 335 cm bathroom and can't fit a washer and a dryer. Can a renovation fix that?"
- "Keep the water connections: bathtub in the recess, sink next to it, washing machine on the same wall, toilet opposite."
- "5 by 8 feet. I need a shower, a vanity and a toilet, and a sliding door so there's room to move."
- "Make the sink unit narrower so the shower can be longer."
- "Here's the empty space. Give me ideas how to use it."
Two patterns stand out. About one request in seven mentions a washing machine or a dryer: in many countries the bathroom is the only place the washer can go. And almost a third of the requests include measurements: room size, door width, the width of the shower tray. People want a layout that fits their real centimetres.
That second wish is where an AI image tool has to be honest. A photo-based generator shows you what a layout looks like in your room. It does not draw it to scale. We show exactly what happens when you type dimensions further down, in the section on what the AI gets wrong.
Which Small Bathroom Layouts Work Best?
The most efficient small bathroom layout puts the toilet, the sink and the shower along one or two walls and keeps a clear strip of floor in front of them. Which version fits depends on the shape of the room and on where the drain and the soil stack are.
| Layout | Best for | The key move |
|---|---|---|
| One wall (all fixtures in a row) | Narrow rooms, budget remodels | Shared plumbing wall; shower or tub across the far end |
| Two walls (galley) | Wider rectangles | Vanity and washer on one side, toilet and shower opposite, walkway between |
| Corner shower | Square rooms | A square or quadrant shower in the corner frees a full wall |
| Shower instead of tub | Rooms where the tub eats the floor | A walk-in shower with one glass panel in place of the tub |
| Wet room | The tightest rooms | No tray, no cabin: the whole floor is waterproofed and slopes to a drain |
| Washer under a countertop | Bathrooms that double as laundry | One continuous top over the washer and the sink, storage above |
Five moves help in almost every small bathroom:
- Wall-hung fixtures. A wall-hung toilet and a floating vanity show the floor underneath, which makes the room read larger and is easier to clean.
- Shower instead of tub. If nobody uses the bath, a walk-in shower is often the single biggest gain. We cover it in detail in tub to shower conversion on your photo.
- Storage above the toilet. The wall over the cistern is usually empty. A shallow cabinet or open shelves add storage without using floor.
- A pocket or sliding door. A swinging door needs a clear arc inside the room. A pocket door needs none.
- A corner sink, or a narrower vanity. In very tight rooms, a small corner basin or a shallow vanity gives back the space in front of the toilet.
What Clearances Does a Small Bathroom Need?
Before you fall in love with any picture, check that the fixtures fit with the clearances below. These are US figures: the building code minimum from the International Residential Code (IRC) and the more comfortable recommendation from the National Kitchen & Bath Association (NKBA). Other countries have their own rules, so treat the table as a sanity check and confirm locally.
| What | Code minimum (IRC) | NKBA recommendation |
|---|---|---|
| Toilet or sink centerline to a side wall or fixture | 15″ (381 mm) | 18″ (457 mm) for a toilet, 20″ (508 mm) for a sink |
| Free space in front of a toilet, sink or tub | 21″ (533 mm) | 30″ (762 mm) to the opposite fixture or wall |
| Free space in front of a shower entry | 24″ (610 mm) | — |
| Shower interior | 30″ × 30″ (762 mm), 900 sq in | 36″ × 36″ (914 mm) |
| Shower opening | 22″ (559 mm) clear | — |
| Entry door clear opening | Local codes | 32″ (813 mm); 24″ (610 mm) if the structure can't change |
| Separate toilet compartment | 30″ × 60″ (762 × 1524 mm) | 36″ × 66″ (914 × 1676 mm), with a swing-out or pocket door |
Sources: IRC 2021, section P2705.1 and P2708 and the NKBA Bathroom Planning Guidelines with Access Standards.
The code, quoted in the NKBA guidelines, also says that entry and fixture doors must not interfere with one another. In a small bathroom that rule alone often decides between a swinging door and a pocket door.
How to Try a New Bathroom Layout on Your Own Photo
You need one photo and a short description. Here is the path we used for every result in this article.
- Take the photo from the doorway, at eye level, with as much floor and as many fixtures in frame as you can. The AI can only rearrange what it can see.
- Upload it to the Studio and keep the room type "Bathroom".
- Pick the "Bathroom remodel" mode and type your layout in the brief: what goes where, and what must stay (a boiler, a window, the door).
- Click Create design. A mode result took 19–21 seconds to generate in our tests.
- Fix one spot at a time in the editor: press Select area, draw around the place you want to change, describe the change and send it.
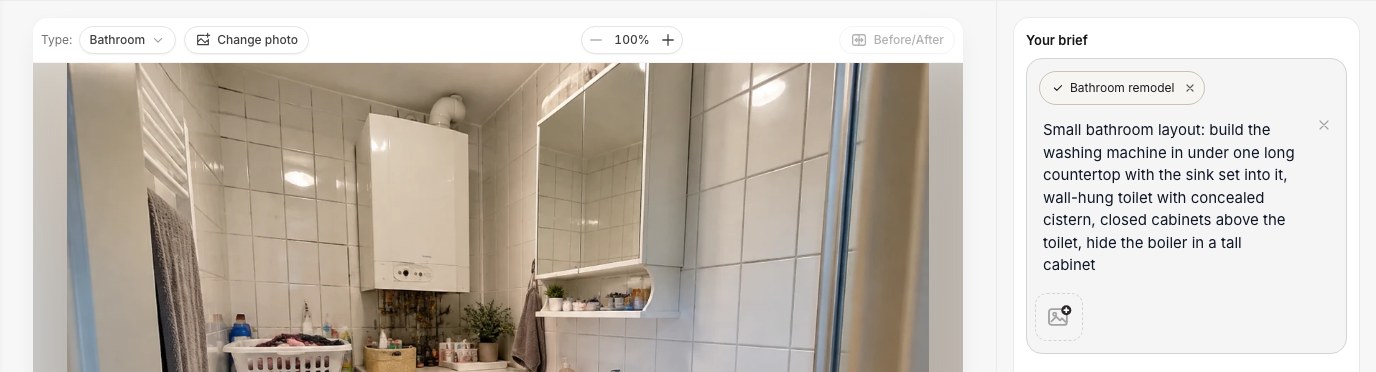 The brief in the Studio: the "Bathroom remodel" mode plus a typed layout request. The mode's own description promises new tiles, vanity, shower or tub, fixtures, mirror and lighting.
Two things to know before you start. The "Bathroom remodel" mode changes finishes too: new tiles, new vanity, new lights. If you want to keep your tiles and change only the layout, edit the photo spot by spot instead (Case 1 shows both). And each design or edit costs 2 credits; a free account comes with 6 credits, enough for three tries (free results carry a watermark).
Case 1: A Small Bathroom With a Washing Machine
This is the bathroom most of our users described: a European apartment bathroom with a front-loading washer standing on its own, a small base cabinet, a pedestal sink, a floor-standing toilet and a boiler on the wall. Everything is there, but nothing lines up, and there is no surface to put anything on except the washer itself.
The layout request
We used the "Bathroom remodel" mode with this brief: "Small bathroom layout: build the washing machine in under one long countertop with the sink set into it, wall-hung toilet with concealed cistern, closed cabinets above the toilet, hide the boiler in a tall cabinet."
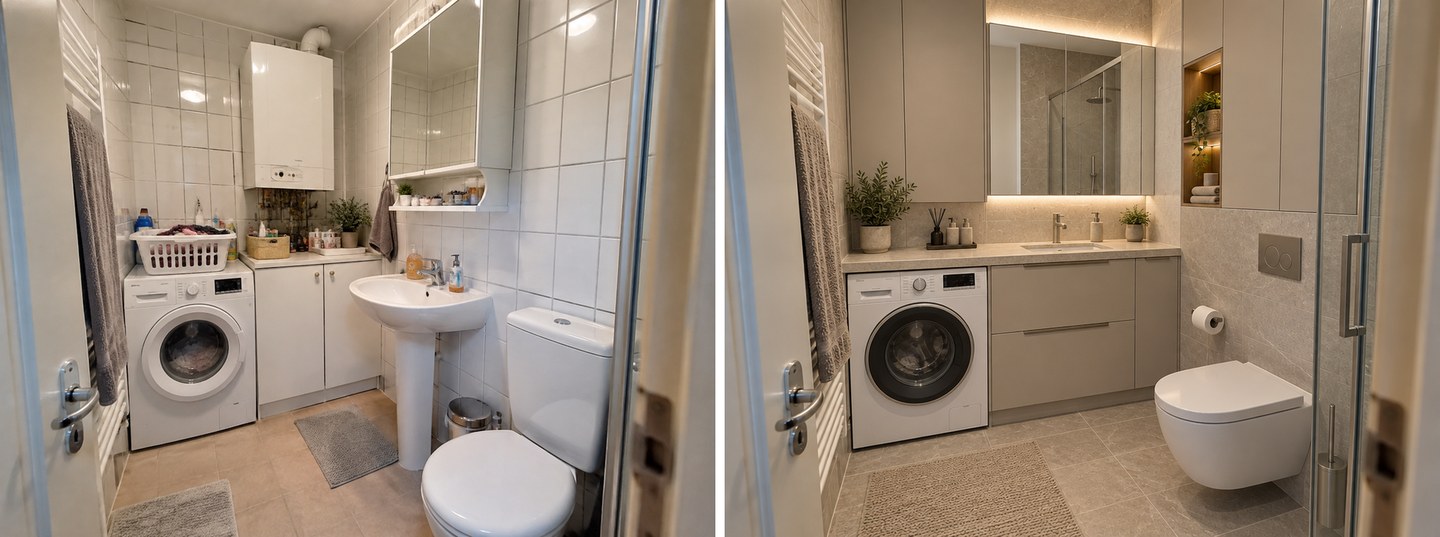 Bathroom remodel mode with the layout brief. The washer sits under a continuous countertop, the toilet is wall-hung, and the boiler wall became tall cabinets. Note that the room also looks wider than in the original.
The layout ideas came through: the washer is built in under one long top with the sink set into it, the toilet is wall-hung with a flush plate, and the boiler is hidden behind tall doors. As a mood picture of "where could this go", it's useful.
Look at the proportions, though. The back wall is noticeably wider than in the photo, and the floor in front of the vanity has grown. That is the price of a full remodel: the AI redraws the room and quietly gives itself more space. Keep that in mind before you measure anything off this picture.
Keep the tiles, change only the furniture
If you like your tiles, try the "Rearrange furniture" mode with the same brief. It is meant to keep the pieces and finishes and move things around.
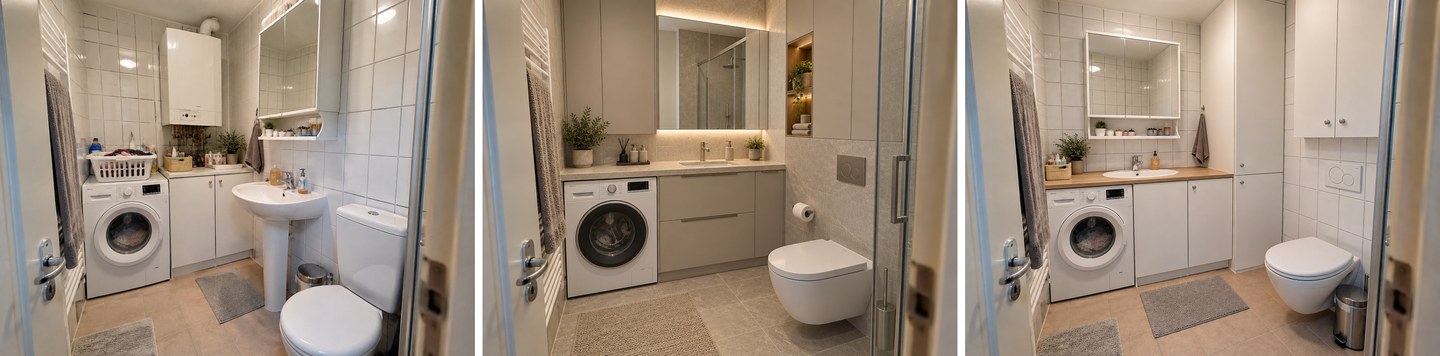 Same brief, two modes. Middle: "Bathroom remodel" (new tiles and lighting). Right: "Rearrange furniture" (white tiles kept, new countertop and cabinets). Both stretched the room.
The white tiles stayed, and the new arrangement is close to what our users ask for: a wood top over the washer, the sink set into it, a wall-hung toilet and a tall cabinet. The room is again wider than the original.
Without a brief, "Rearrange furniture" did very little here: it only pulled the base cabinet away from the washer and widened the wall to make a gap. In a bathroom most pieces are plumbing, so the mode needs you to say what to move.
The most faithful option: Select area
The edit that changed the least was a local one. In the editor we pressed Select area, drew around the washer, the cabinet and the pedestal sink, and wrote: "Replace the washing machine, the white cabinet and the pedestal sink with one continuous countertop: the same washing machine built in under the left end, a sink set into the countertop on the right, drawers under the sink."
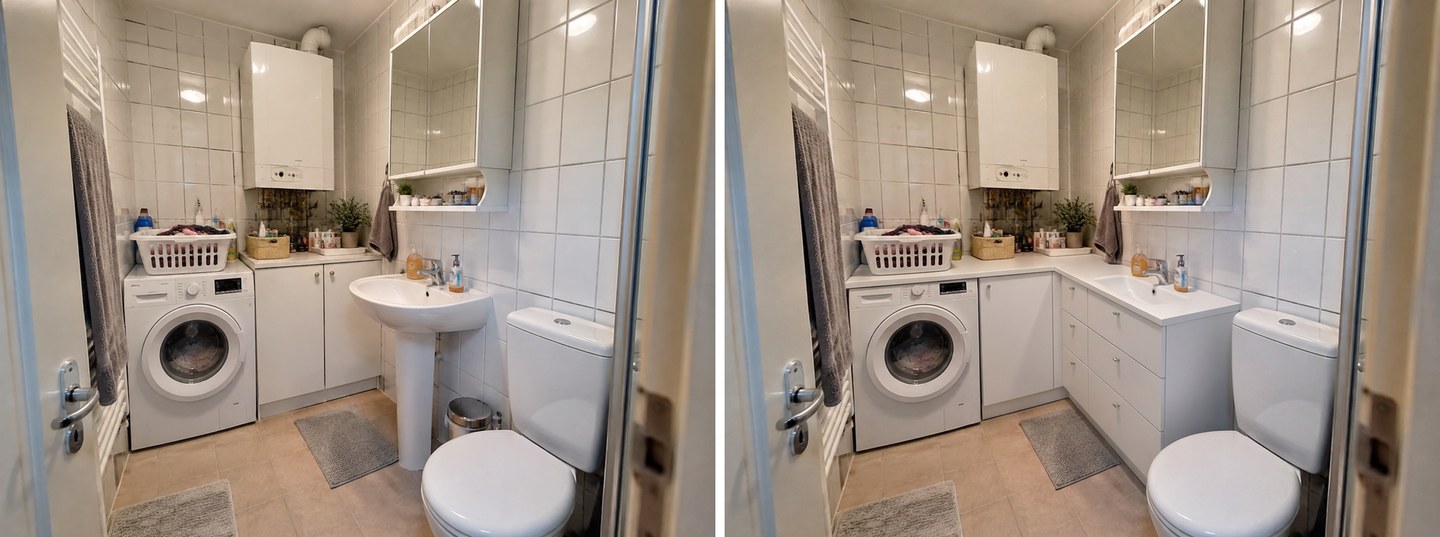 A Select area edit: one continuous top over the washer, a vanity with drawers instead of the pedestal sink. The tiles, the boiler, the mirror cabinet and the toilet are untouched.
This is the result to show a fitter. The room is the same size, and only the selected area changed. It also shows a real planning problem: the new vanity runs right up to the toilet, so the lower drawers would hit the toilet bowl. On paper, check the 15″ (381 mm) from the toilet's centerline to the side of the vanity before you order a unit that wide.
Case 2: A Narrow 5 × 8 ft Bathroom
The second room is a typical American hall bathroom: a bulky oak vanity along one wall, a toilet next to it, a tub with a shower curtain at the far end, and a six-panel door swinging into the room. The door alone blocks a third of the view, and of the floor.
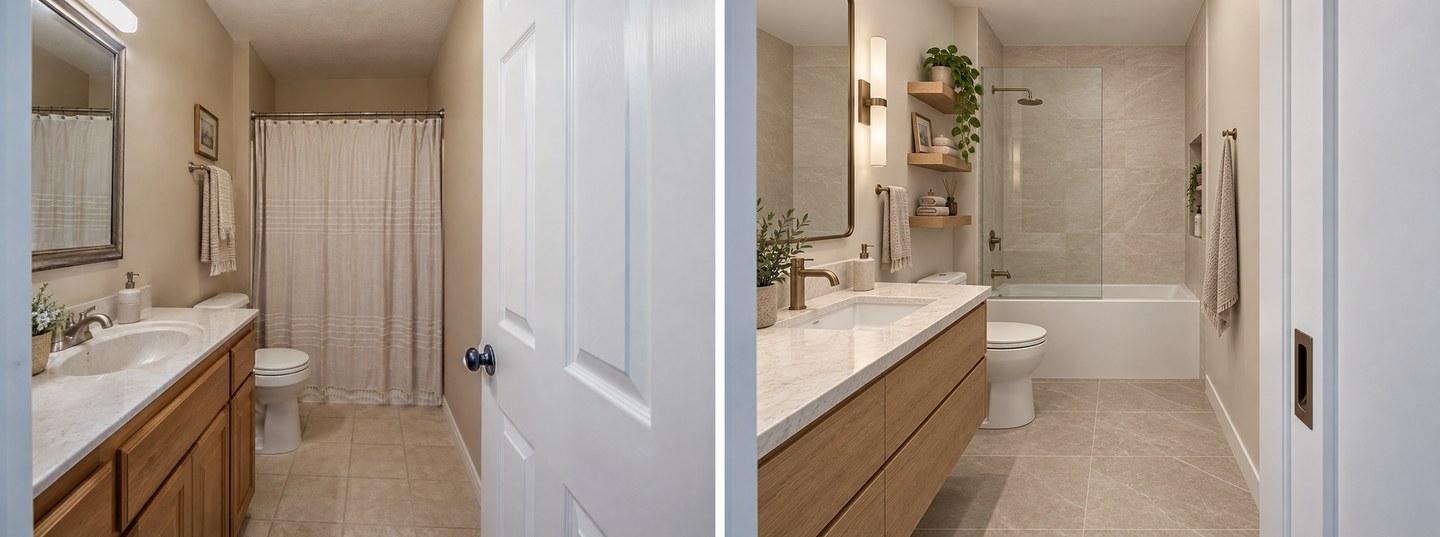 Bathroom remodel mode with the brief: floating vanity, open shelves above the toilet, a glass panel instead of the curtain, a pocket door instead of the swinging one. All four requests were followed.
The brief asked for four changes, and all four appear: a floating vanity, open shelves above the toilet, a fixed glass panel over the tub and a pocket door. The mode also changed the tiles, the mirror and the lighting, as it promises. The tub stayed a tub, because we didn't ask otherwise. If you want a walk-in shower here, see the tub to shower guide.
Just the pocket door
Sometimes the door is the whole problem. We asked the editor for one change only: "Replace the swinging door in the foreground with a pocket sliding door that slides into the wall; keep everything else the same."
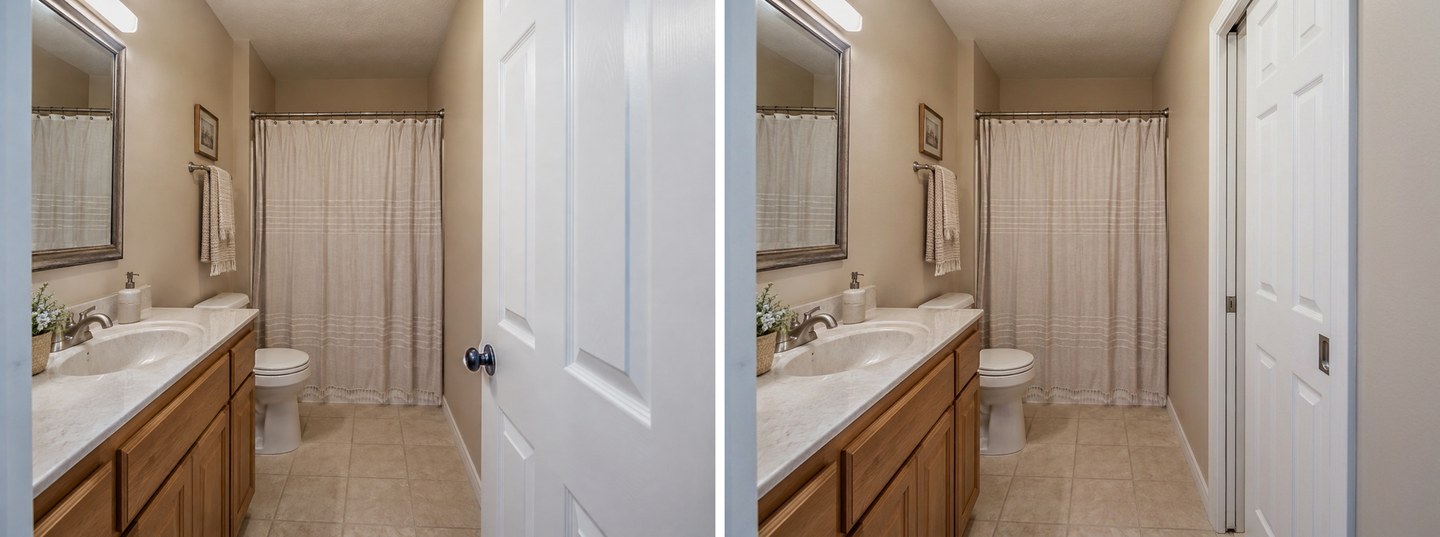 One typed edit: the swinging door becomes a pocket door. The vanity, the toilet, the curtain and the floor are unchanged.
It's a clean, believable edit, and it shows how much room a door swing takes. In reality a pocket door needs an empty wall cavity next to the opening, with no pipes or wiring in it. The picture can't tell you whether your wall has one.
Storage above the toilet
For storage we first tried the Built-in storage ready task (in Ready tasks → Furniture & decor), with a note in Refine: "Closed cabinet on the wall above the toilet." The task added a tall cabinet, but on the free wall behind the door, not above the toilet. Its default instruction is "along a free wall", and that won.
The fix was again Select area: we drew a rectangle on the wall above the cistern and wrote "A closed white wall cabinet with two doors above the toilet, mounted on this wall."
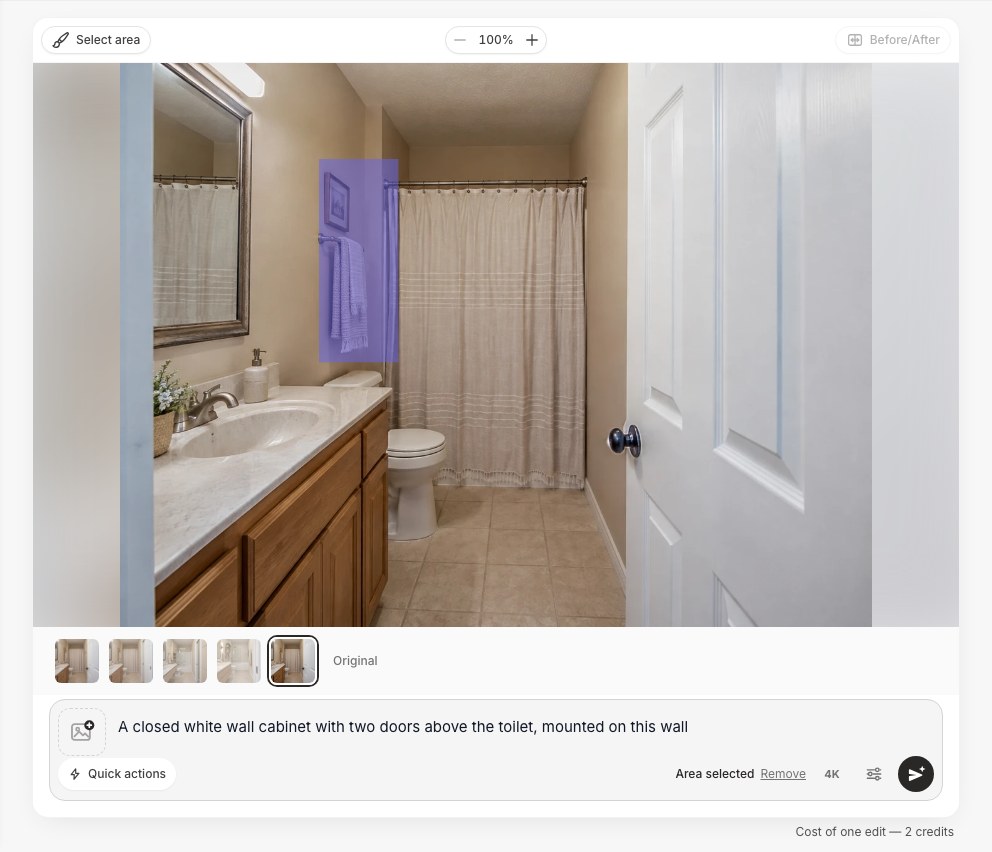 Select area in the editor: the highlighted rectangle tells the AI exactly where the cabinet goes.
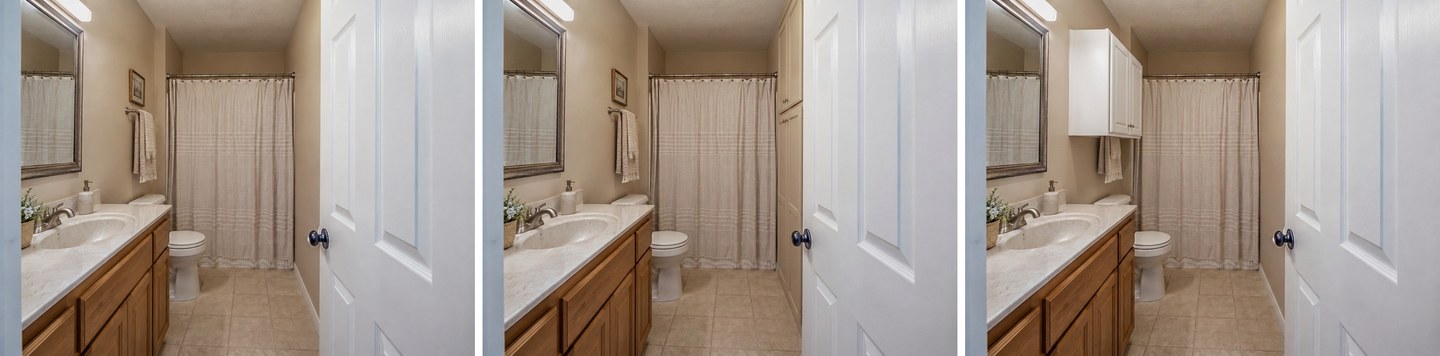 Left to right: original, Built-in storage task (cabinet on the wrong wall), Select area edit (cabinet above the toilet). When the place matters, select it.
For more storage ideas on a photo, from niches to recessed shelves, see storage and built-ins on your photo.
Create interior design with AI
Upload a photo of your room and get a professional design in 30 seconds. First generation is free.
Case 3: A Tiny Shower Room
The third room is the smallest: a windowless shower room with a dated curved corner cabin with frosted doors, a tiny corner basin and a floor-standing toilet. The brief asked for a square walk-in shower with one clear glass panel, a wall-hung toilet, a small wall-hung vanity with drawers and a mirror cabinet.
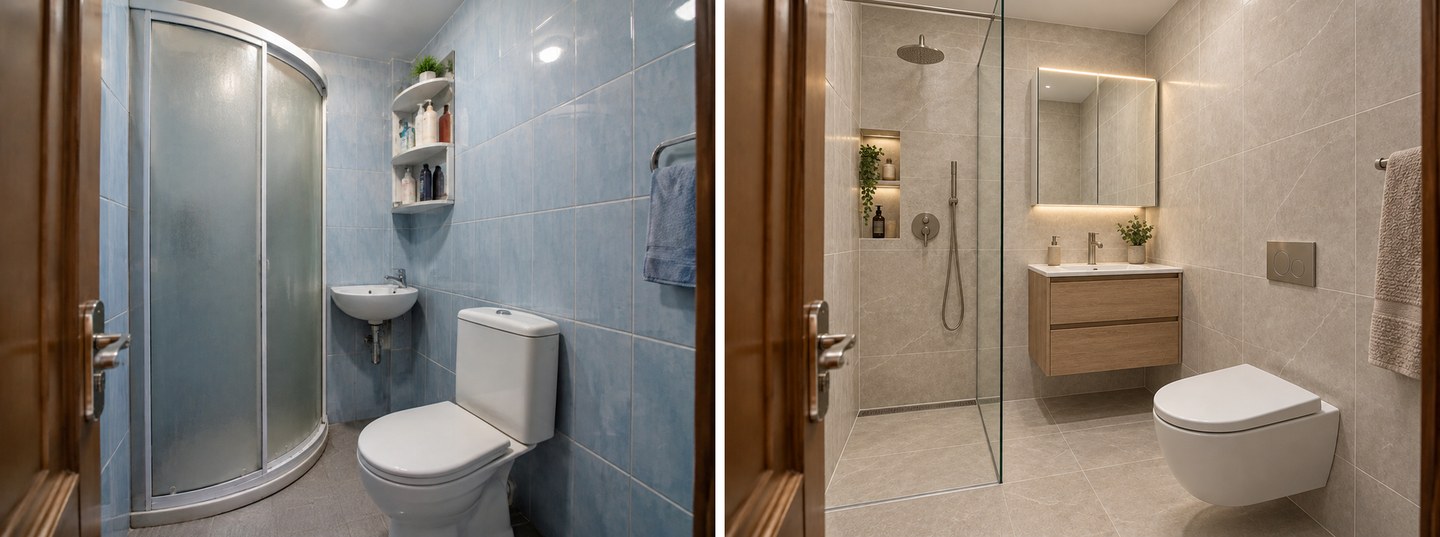 Bathroom remodel mode: the curved cabin became a walk-in shower with one glass panel, the corner basin became a small floating vanity, and the toilet is wall-hung. The back wall is wider than in the photo.
Visually this is the strongest change of the three. Clear glass instead of a frosted cabin and one large tile instead of small blue ones make the room feel twice as big. Part of that, however, is not design: the AI widened the back wall so that a vanity fits next to the shower. In the real room the basin sits in the corner because there is no straight wall to spare. A wide picture is not a wider room.
Where Can a Washing Machine Go in a Small Bathroom?
The best place for a washing machine in a small bathroom is under a countertop that continues over the sink area, as close as possible to the existing drain and water supply. That gives you a surface on top, hides the hoses and makes the washer look like part of the furniture. Other options:
- Under the sink. Some basins are made to sit on top of a washer. It works, but the sink ends up higher than usual and the plumbing is tight.
- In a recess or behind a door. An alcove next to the shower or the tub can take a washer, or a washer with a dryer stacked on top, behind cabinet doors.
- Over the toilet: no. The wall above the toilet is good for shelves, not for appliances.
- Next to the shower: check the electrical rules first.
The electrical rules
This is where a washing machine in a bathroom becomes a safety question, and it differs by country:
- UK: the IET explains that washing machines and tumble dryers may be installed in a bathroom if they are supplied from a switched fused outlet outside the zones, protected by a 30 mA RCD, and permitted by the manufacturer. Ordinary 13 A sockets are only allowed 3 m horizontally from the boundary of zone 1 (IET, Section 701 of BS 7671).
- US: under the IRC, all bathroom receptacles must be GFCI-protected, and no receptacle may sit within or directly over a tub or shower stall (summarised in the NKBA guidelines linked above).
Moisture matters too. The IRC asks for a window of at least 3 sq ft with half of it opening, or an exhaust fan of at least 50 cfm vented outside. A washer and drying laundry add humidity to a room that is already wet.
What happened when we asked the AI to add a washer
We gave the tiny shower room from Case 3 one more request: "Add a front-loading washing machine to this bathroom." There is no free wall in that room.
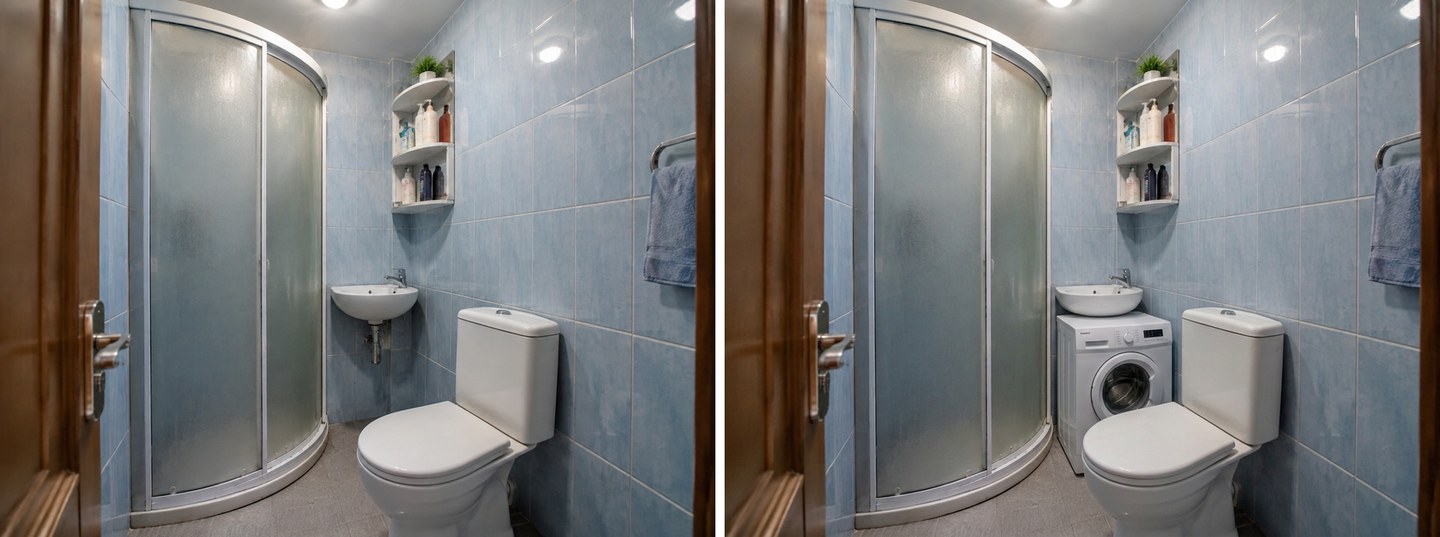 The AI always finds a place. Here the washer is squeezed between the shower cabin and the toilet, and the cabin moved to make the gap. Its door could not open past the toilet bowl.
The AI did what it was asked, and the picture looks plausible at a glance. But the cabin was nudged aside to create a gap that does not exist, and the washer door faces the toilet. This is the most important thing to understand about image AI: it never says "it doesn't fit". You have to check that yourself with a tape measure.
What Does the AI Get Wrong in a Small Bathroom?
GenRoom shows layouts as pictures of your room, not as drawings to scale. Here is everything that went wrong in our 12 generations, so you know what to watch for.
| What we saw | Where | What to do |
|---|---|---|
| Typed dimensions are not respected | Case 1, test below | Treat sizes as wishes; check them on a floor plan |
| The room gets wider or deeper | All three remodels | Use Select area when proportions matter |
| An object disappears without being asked | The boiler vanished in the dimensions test | Name what must stay: "keep the boiler" |
| A washer is squeezed into a gap that isn't there | Case 3 | Measure the real gap first |
| A new vanity runs into the toilet | Case 1, Select area | Check 15″ (381 mm) from toilet centerline to the vanity |
| The storage task chose its own wall | Case 2 | Select the exact spot |
| "Rearrange furniture" without a brief barely moves anything | Case 1 | Always say what goes where |
What happens when you type exact dimensions?
We gave the Case 1 bathroom a brief full of numbers: "Bathroom is 165 × 210 cm. Keep the 60 cm washing machine on the left wall, then an 80 cm vanity, then a 40 cm wall-hung toilet in the right corner; 70 cm of free floor in front of everything."
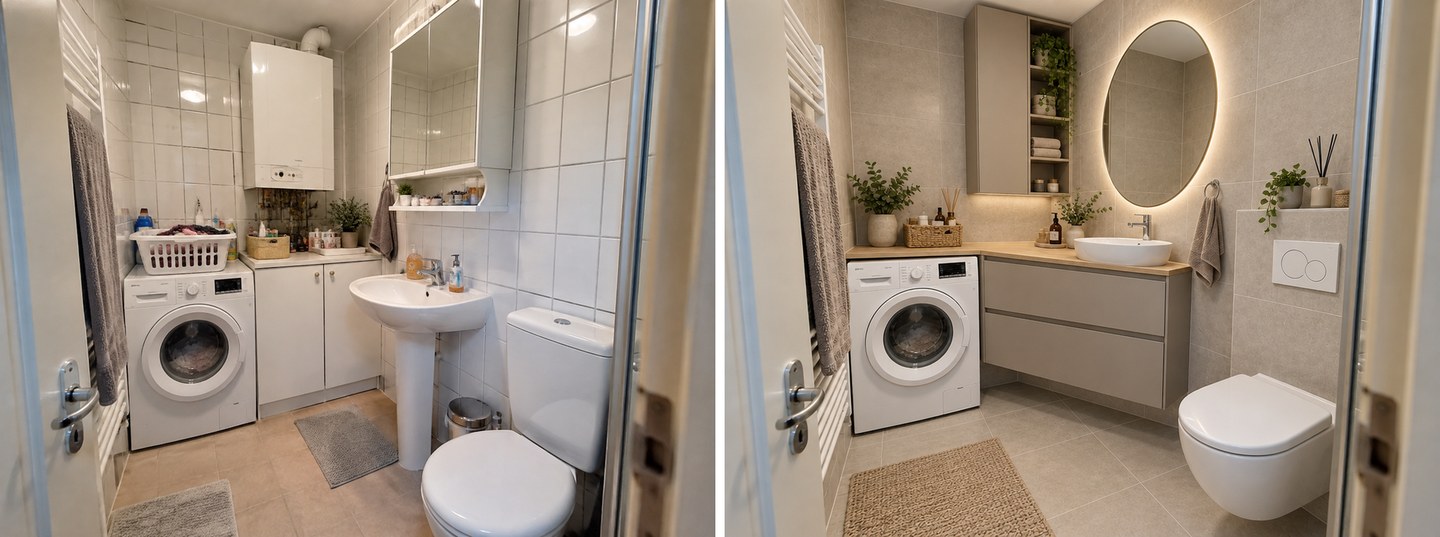 A brief with exact centimetres. The order of the pieces is right, but the floor is far larger than in the photo, the vanity is L-shaped rather than 80 cm, and the wall boiler is simply gone.
The order is right: washer on the left, vanity, toilet in the right corner. Nothing else follows the numbers. The vanity wraps the corner, the floor in front of it has grown, and the wall boiler disappeared, which no real renovation can do. The AI reads "165 × 210 cm" as a mood, not as a constraint.
If you need a layout that fits your exact measurements, plan it on a floor plan first: in GenRoom you can upload a plan (even a hand-drawn sketch) and get a top view and each room furnished, but that is also not a CAD tool where you draw walls to scale. Use a tape measure, the clearance table above and, for the final plan, a fitter or a designer. Use the photo AI to decide what you want the room to look like.
How to Write a Small Bathroom Layout Request the AI Follows
After 12 generations, these rules made the difference:
- Say what goes where, in order. "Washer on the left wall, then the vanity, then the toilet in the corner" works better than "fit everything in".
- Name what must stay. The boiler, the window, the door, the soil stack. Anything you don't mention may change.
- One request per edit when the place matters. Select the area, describe one change, send it. Then the next one.
- Use the mode for ideas, Select area for decisions. "Bathroom remodel" is great for seeing a new style and arrangement at once; local edits keep your room's real size.
- Write in plain words, not sizes. "A narrow vanity" and "a small square shower" are understood. "A 47 cm vanity" is not measured.
- Compare with the original. Use Before/After and look at the walls, not just the furniture: if the back wall got wider, the layout won't fit as drawn.
If the whole bathroom is up for change, see how the same Studio handles new tiles on your photo and a new vanity and fixtures. For a broader overview of planners and generators, see our test of the best AI bathroom design tools, and the AI bathroom design page.
FAQ
What's the best layout for a small bathroom?
For most small rooms it's a one-wall or two-wall layout with a shower instead of a tub, wall-hung fixtures and a clear strip of floor in front of them. Keep the toilet and the sink on the existing plumbing wall to save cost, and leave at least the code minimum of 21″ (533 mm) in front of each fixture, ideally 30″ (762 mm) as NKBA recommends.
Is it legal to put a washing machine in the bathroom?
In many countries, yes, with conditions. In the UK, the IET says washing machines and tumble dryers may be installed in a bathroom if they are supplied from a switched fused outlet outside the zones, protected by a 30 mA RCD and allowed by the manufacturer. In the US, bathroom receptacles must be GFCI-protected. Check local rules and use a qualified electrician.
Where should the washing machine go in a small bathroom?
Under a continuous countertop next to the sink, as close as possible to the existing drain and water supply. That gives you a work surface, hides the hoses and keeps the washer away from the shower. In a very small room, a recess with doors or a stacked washer and dryer can work.
Can AI design a bathroom layout with exact dimensions?
Not from a photo. In our tests GenRoom followed the order of the pieces but not the centimetres: the room grew, the vanity changed shape and a boiler disappeared. Use the AI to see how a layout looks, then confirm the sizes on a plan with a tape measure or a professional.
How do you organize an extremely small bathroom?
Use the walls, not the floor: a cabinet or shelves above the toilet, a mirror cabinet over the sink, a recessed niche in the shower and hooks on the back of the door. A pocket door or a wall-hung vanity frees floor space; a corner basin helps in the tightest rooms.
Is there a free AI bathroom planner?
GenRoom gives a free account 6 credits with no card. A design or an edit costs 2 credits, so you can try three layouts on your own photo (free results have a watermark). Paid packs start at $9.99 for 36 credits, one-time, with no subscription.
The Bottom Line
Small bathroom layout ideas are easier to judge on your own room than on someone else's. In the GenRoom Studio, the "Bathroom remodel" mode with a clear brief turned all three of our small bathrooms into convincing new layouts: a washer under a countertop, wall-hung fixtures, storage over the toilet, a pocket door, a walk-in shower. Select area kept the real proportions best.
What the AI won't do is tell you that something doesn't fit. It widened rooms, ignored typed centimetres and squeezed a washer into a gap that isn't there. So use it to choose the look, then check every clearance with a tape measure before anyone picks up a drill. Upload your bathroom photo to the Studio and try your layout.