Bathroom Vanity Visualizer: Swap Vanity and Fixtures on a Photo
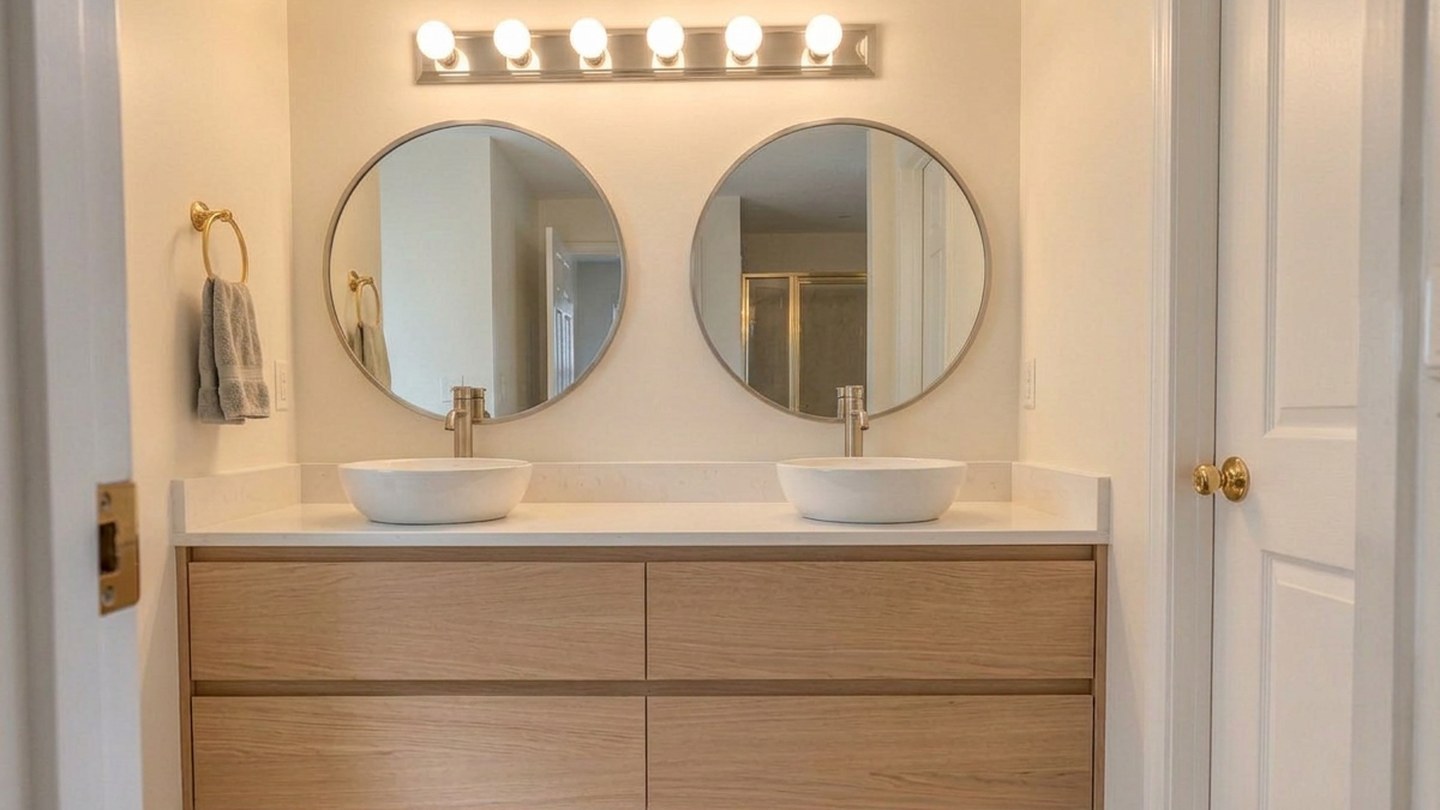
A real result from the GenRoom Studio: the old oak vanity became a floating double vanity, then the mirror and the light bar were swapped. The walls, the floor tiles, the door and the camera angle are from the original photo.
A bathroom vanity visualizer shows a new vanity, sink, faucet, mirror or fixture finish on a photo of your own bathroom, while the tiles, walls and floor stay as they are. You upload one photo, pick a ready task or describe the change, and the AI swaps only the pieces you named: brass taps for brushed nickel, a pedestal sink for a cabinet, a single vanity for a floating double one.
That is what the GenRoom Studio does. For bathrooms it has two ready tasks for this job, New fixtures (with four metal finishes) and Double vanity, and an AI editor where Replace furniture, Recolor an object, Select area and Use my reference handle the rest: a new mirror, one finish on every metal piece, a cabinet that must stay inside a marked area, or the vanity from a product photo. Each design or edit costs 2 credits, and in our tests a result took about 20–30 seconds.
This guide starts from real requests. Between March and October 2026, 809 GenRoom users asked for this in their own words: not "redesign my bathroom", but "keep my bathroom, change the vanity" or "make every fixture brushed nickel". Below are those requests, the exact Studio path for each, real results from two bathrooms we shot for this article, the measurements worth checking before you buy, and the things the AI still gets wrong.
What Do People Want to Change Around the Vanity?
Most people want one zone changed and everything else left alone: the sink area, the metal finish or the mirror. These are typical requests from our data, anonymized and paraphrased:
| What people write (paraphrased) | What they really want | Best Studio tool |
|---|---|---|
| "Change all fixture colors to brushed nickel" | One finish on every metal piece | AI editor, a request that names every piece |
| "Replace with chrome fixtures" / "make everything black" | A finish swap, shapes kept | Recolor an object, or the editor with a list |
| "Make the mirror brushed nickel instead of black" | One object, one finish | Recolor an object |
| "Two vessel sinks instead of one integrated basin" | A double vanity | Double vanity + wishes |
| "Redesign only the sink area, a sink from wall to wall" | A new vanity, rest kept | Double vanity, or Replace furniture |
| "A cabinet below the basin in the marked area, not beyond it" | A vanity with a hard boundary | Select area (lasso) + text |
| "The vanity top to match the floor, a closed cabinet instead of open" | A different cabinet and top | Replace furniture |
| "This exact vanity from the store, in my bathroom" | A specific product | Use my reference + a product photo |
The pattern is the same as with bathroom tiles: the job is "try one thing", and the worry is that the AI will redo the whole room. Picking the right tool matters more than the wording.
Which GenRoom Tool Works as a Bathroom Vanity Visualizer?
Use the New fixtures task to replace the faucet and sanitary ware in one finish, the Double vanity task to turn one vanity into two basins, and the AI editor for everything precise: Recolor an object for a finish swap that keeps shapes, Replace furniture for a new mirror or cabinet, Select area to fence the change in, and Use my reference for a product you photographed.
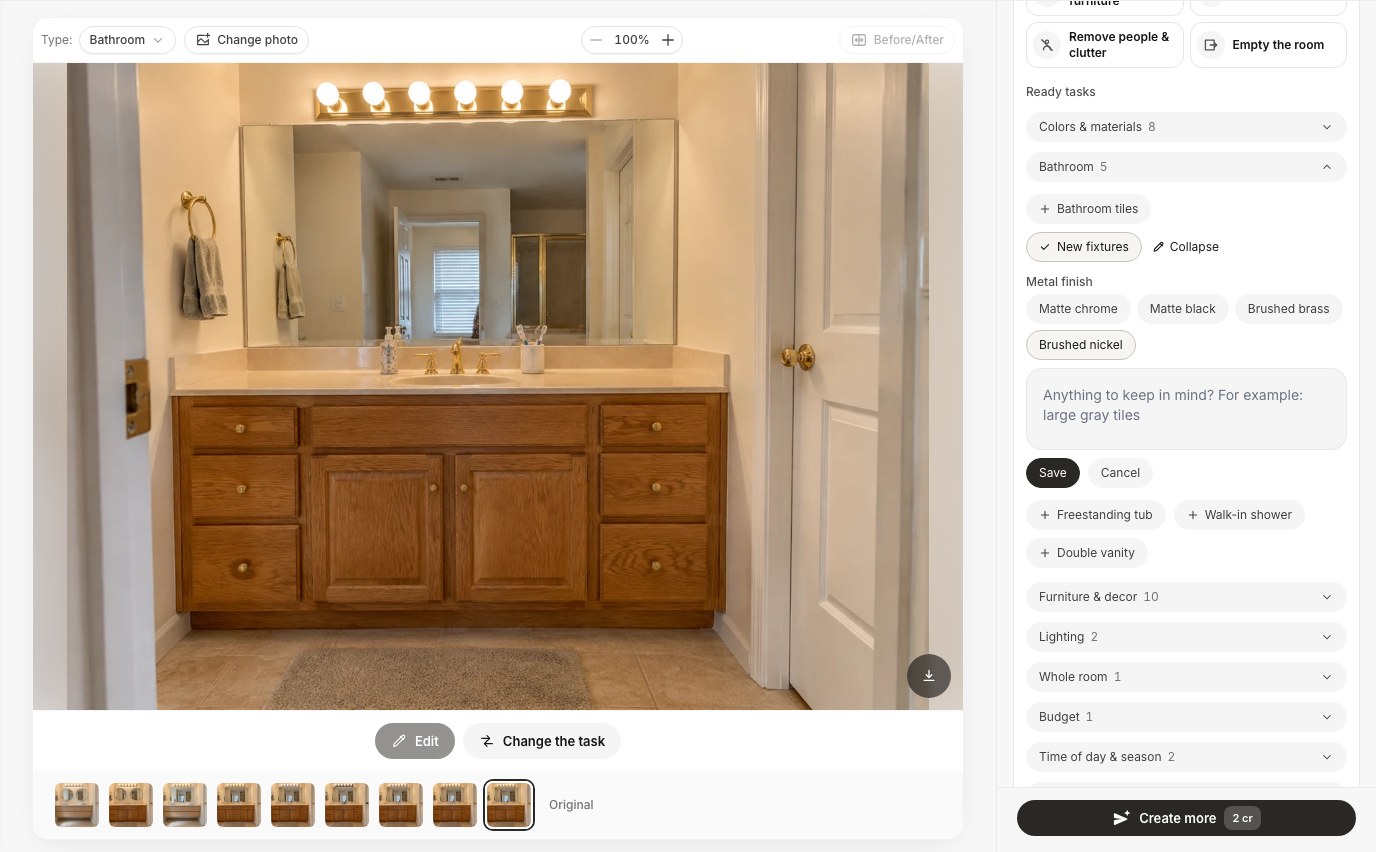 Ready tasks → Bathroom → New fixtures → Refine. Pick Matte chrome, Matte black, Brushed brass or Brushed nickel, then Create design. Double vanity sits in the same list.
| Tool | Where | What it changes | Use it for |
|---|---|---|---|
| New fixtures (ready task) | Design screen → Ready tasks → Bathroom | Faucets and sanitary ware, in one of four finishes | A quick "new fixtures" preview |
| Double vanity (ready task) | Design screen → Ready tasks → Bathroom | The vanity becomes a double vanity with two basins and a wide mirror | Two sinks on a long wall |
| Recolor an object | AI editor → Quick actions | The color or finish of the objects you name | Chrome to nickel to black, shapes kept |
| Replace furniture | AI editor → Quick actions | The object you name, replaced with the one you describe | A new mirror, a closed cabinet, a different top |
| Select area (brush or lasso) | AI editor, top left | Only the area you outline | A vanity that must not grow past a line |
| Use my reference | AI editor → Quick actions | What you describe, taken from your photo | A vanity or faucet from a store or catalog |
| Bathroom remodel (mode) | Design screen → Modes | Tiles, vanity, shower or tub, fixtures, mirror and lighting | A whole new bathroom, not a vanity swap |
The last row is there as a contrast. We show what it does to a small bathroom further down; for a full remodel see our AI bathroom design guide and the AI bathroom remodel page.
Case 1: Brass to Chrome, Brushed Nickel and Matte Black
Our first bathroom is a late-1990s room: a 5-foot honey-oak vanity with raised-panel doors, a cultured-marble top with one oval sink, polished brass taps, a frameless mirror glued to the wall, a brass Hollywood light bar, brass towel rings and a brass door knob. The owner likes the cabinet for now and wants to see the metal in another finish first.
Step 1: Take a usable photo
Shoot straight at the vanity wall from the doorway, at eye level, with the lights on. Get the whole vanity, the mirror and the light fixture in the frame, and leave the counter mostly clear. Anything the AI cannot see, it has to invent.
Step 2: Try the New fixtures task
In the Studio, upload the photo with Design from a photo; it was recognized as a bathroom automatically. Open Ready tasks → Bathroom → New fixtures → Refine, choose Brushed nickel and click Create design.
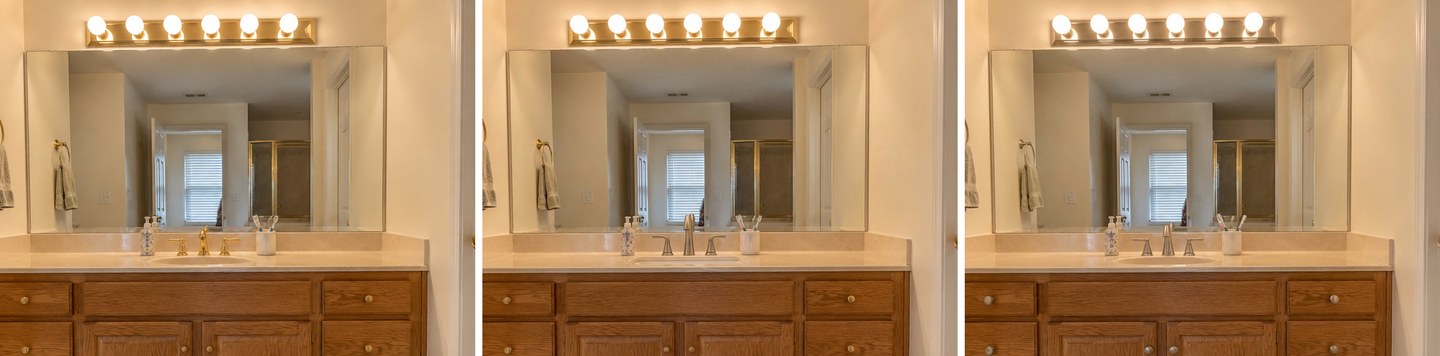 Left: the original. Middle: New fixtures → Brushed nickel changed the faucet only. Right: an editor request that named every metal piece changed them all.
The task did exactly what its name says: it replaced the faucet and handles with brushed nickel ones. The brass light bar, the towel rings, the cabinet knobs and the door knob stayed brass. If you want one finish across the room, the task is the wrong tool; you need a request that names every piece.
Step 3: One finish on every metal piece
Open the photo in the AI editor (the pencil icon in the left bar, or Edit under a result) and write one request that lists every metal object. Ours was:
Change every metal finish to brushed nickel: the faucet and its handles, the light bar above the mirror, both towel rings, the cabinet knobs and the door knob. Keep their shapes and everything else exactly as it is.
The editor asks whether to edit the whole photo or a selected area; for a finish swap across the room, choose Edit the whole photo. We ran the same request three times from the original photo, changing only the finish: polished chrome, brushed nickel and matte black.
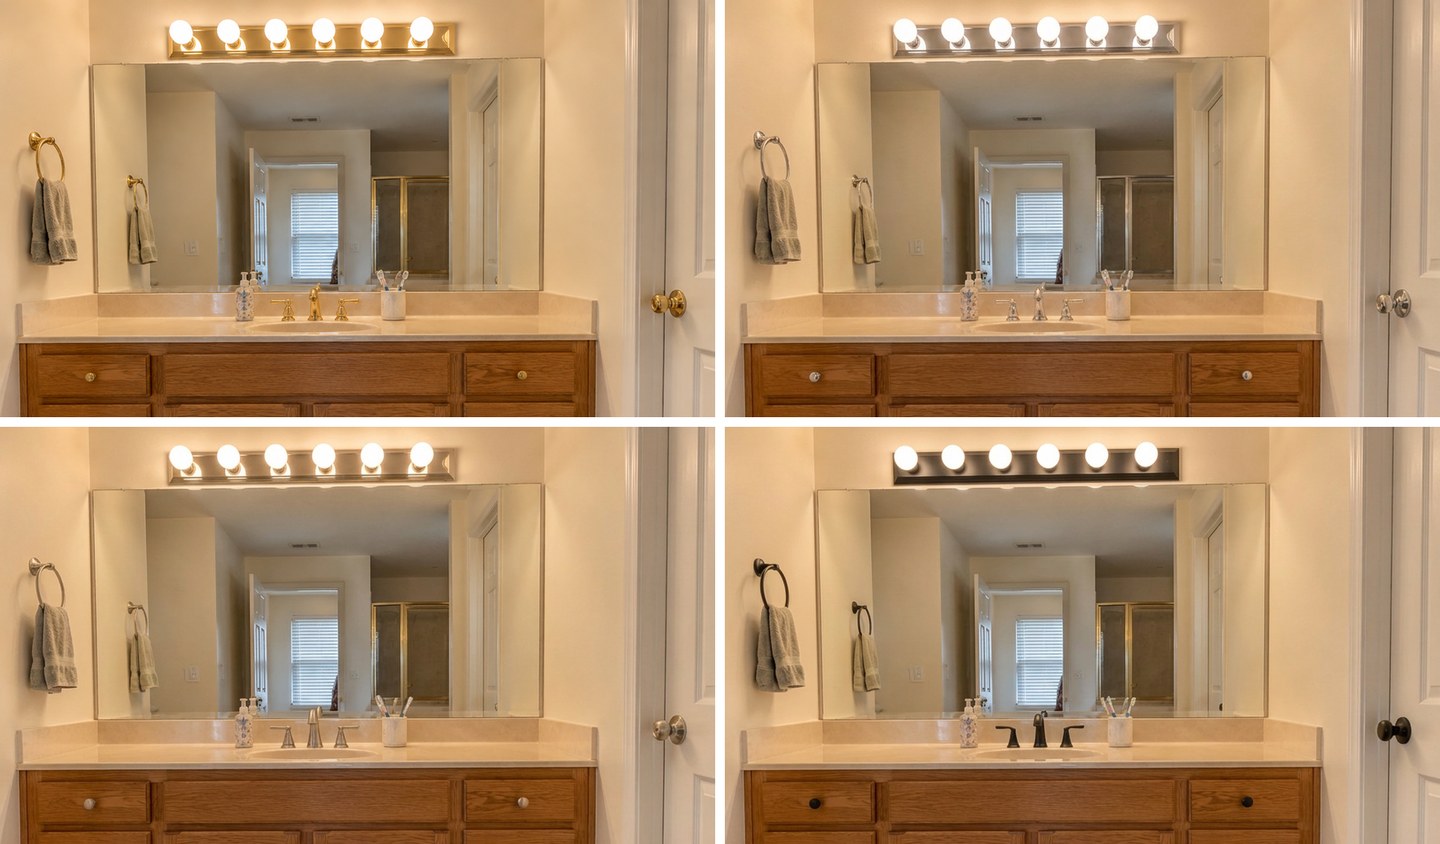 Top: the original brass and polished chrome. Bottom: brushed nickel and matte black. Same photo, same request, only the finish word changed.
This is the most useful comparison for a finish decision. Chrome reads cool and bright, brushed nickel softer and slightly warmer, and matte black turns the knobs and the light bar into graphic accents against the honey oak. Seeing all four next to the same cabinet answers the real question ("does black work with my oak?") faster than any showroom. Notice how close chrome and brushed nickel look at this distance; the difference is more about sheen and fingerprints than color.
Step 4: Change the mirror
"Make the mirror brushed nickel instead of black" was one of the most common mirror requests. Here we went further with Quick actions → Replace furniture and typed: "the large frameless mirror with two round mirrors with thin brushed nickel frames, one above each end of the vanity; keep the light bar".
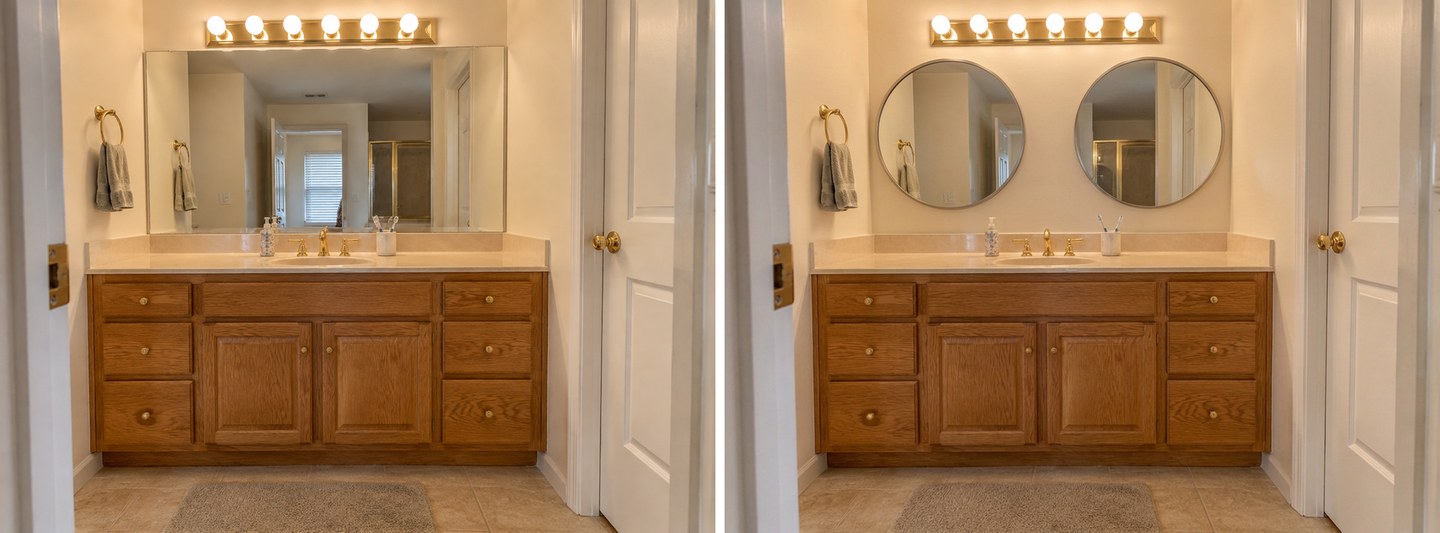 Replace furniture: two round mirrors in place of the glued-on one. Everything else, including the brass taps, is the original.
The swap is clean, and it shows a design problem immediately: two mirrors over a vanity with one sink in the middle look off-center, and nickel frames next to brass taps look accidental. That is exactly the kind of mismatch you want to catch on a screen rather than on the wall. The fix is the next case: two mirrors belong over two sinks.
Case 2: From a Single Vanity to a Floating Double Vanity
"Two vessel sinks instead of one integrated basin" and "a sink spanning the whole wall" are requests for a double vanity. The same 5-foot wall is a realistic test.
The Double vanity task on its own
Ready tasks → Bathroom → Double vanity has no options: its instruction is to replace the vanity with a double vanity with two basins and a wide mirror, if the wall is long enough.
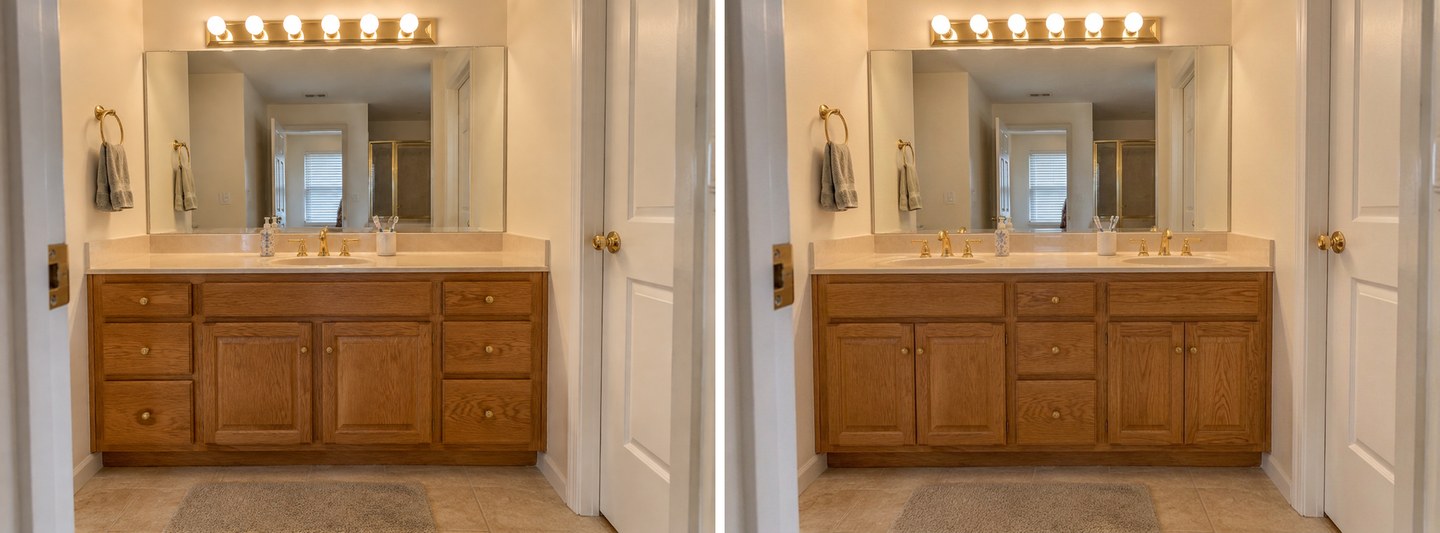 Double vanity with no wishes: two sinks, two brass faucets, and the same honey-oak raised-panel style as before.
Without wishes, the AI stayed close to the original: same oak, same raised panels, same brass, now with two basins. That is useful if you only want to check whether two sinks fit visually; it is not a new look.
Double vanity plus your wishes
Add what you want in Add your own wishes under the brief. We kept the task and wrote: "A floating double vanity in light white oak with flat slab drawers, a white quartz top and two white vessel sinks, brushed nickel faucets; open floor below the vanity."
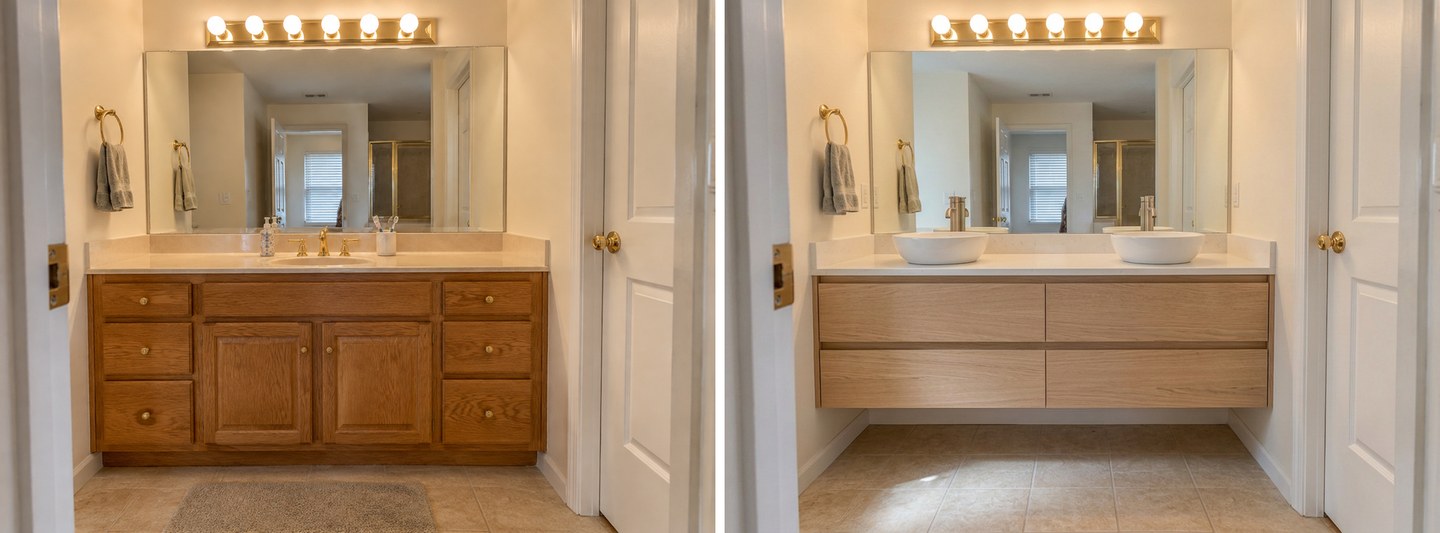 Double vanity + wishes: a floating cabinet, two vessel sinks, open floor below. The wall, the floor tiles, the door and the light are the originals.
This is the result people were asking for. The floating cabinet makes the room look larger because you see floor under it, and the two vessel sinks sit at the ends of the counter with room between them. The AI also continued the floor tile under the new vanity. In a real bathroom that floor may not exist: an old cabinet often sits on a bare subfloor or a patch of older tile, so check before you choose a floating vanity.
Finish the look: mirrors and light in one finish
From that result we used Replace furniture again: "the large frameless mirror with two round mirrors with thin brushed nickel frames, each one centered above one of the two sinks; and the brass light bar with a brushed nickel one".
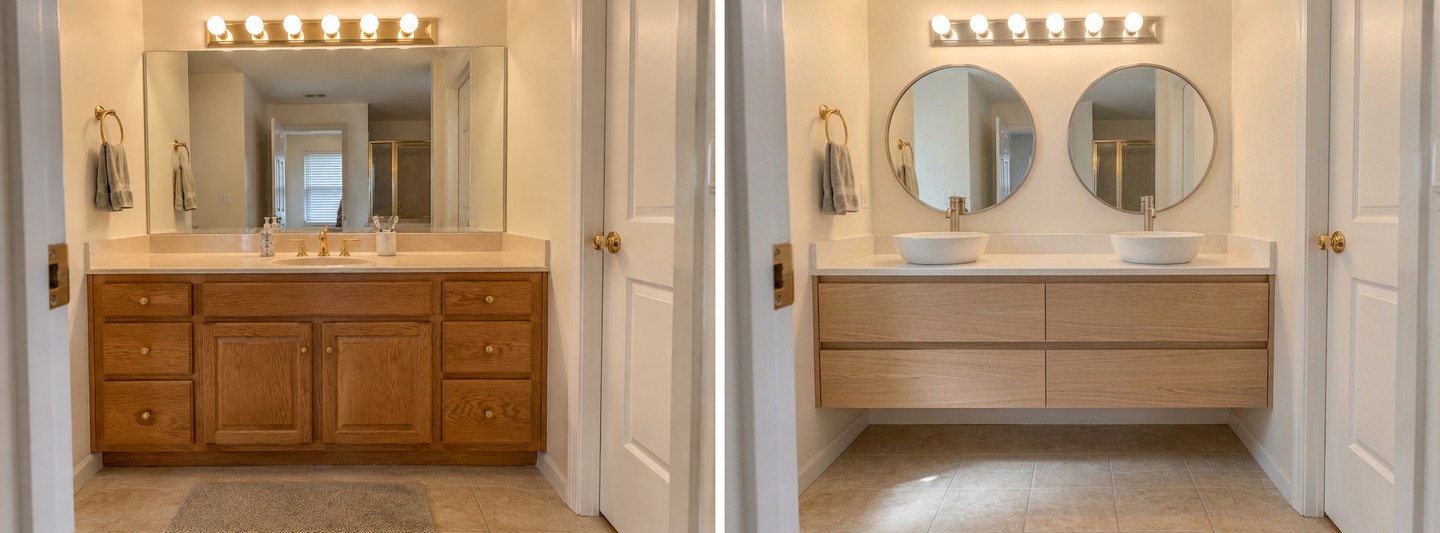 Two edits from the original: Double vanity with wishes, then Replace furniture for the mirrors and the light. Look at the towel ring and the door knob: still brass.
The mirrors are now centered over the sinks, and the light bar and faucets match. But the towel ring and the door knob are still brass, because we did not name them. The AI changes what you list and leaves the rest, which is what you want, until it leaves a finish you forgot. One more edit ("the towel ring and the door knob to brushed nickel") would fix it; in a real renovation, that is two more items for the shopping list.
Case 3: A Small Bathroom With a Pedestal Sink
The second bathroom is small: a white pedestal sink with a chrome faucet, a chrome medicine-cabinet mirror, a chrome sconce, white subway tile wainscot, a toilet right next to the sink and a black-and-white hex floor. The questions here are storage and finish.
Chrome to matte black with Recolor an object
In the AI editor, open Quick actions → Recolor an object and fill in "What, and to which color". We wrote: "the faucet, the mirror frame, the wall sconce, the towel ring and the toilet flush lever to matte black".
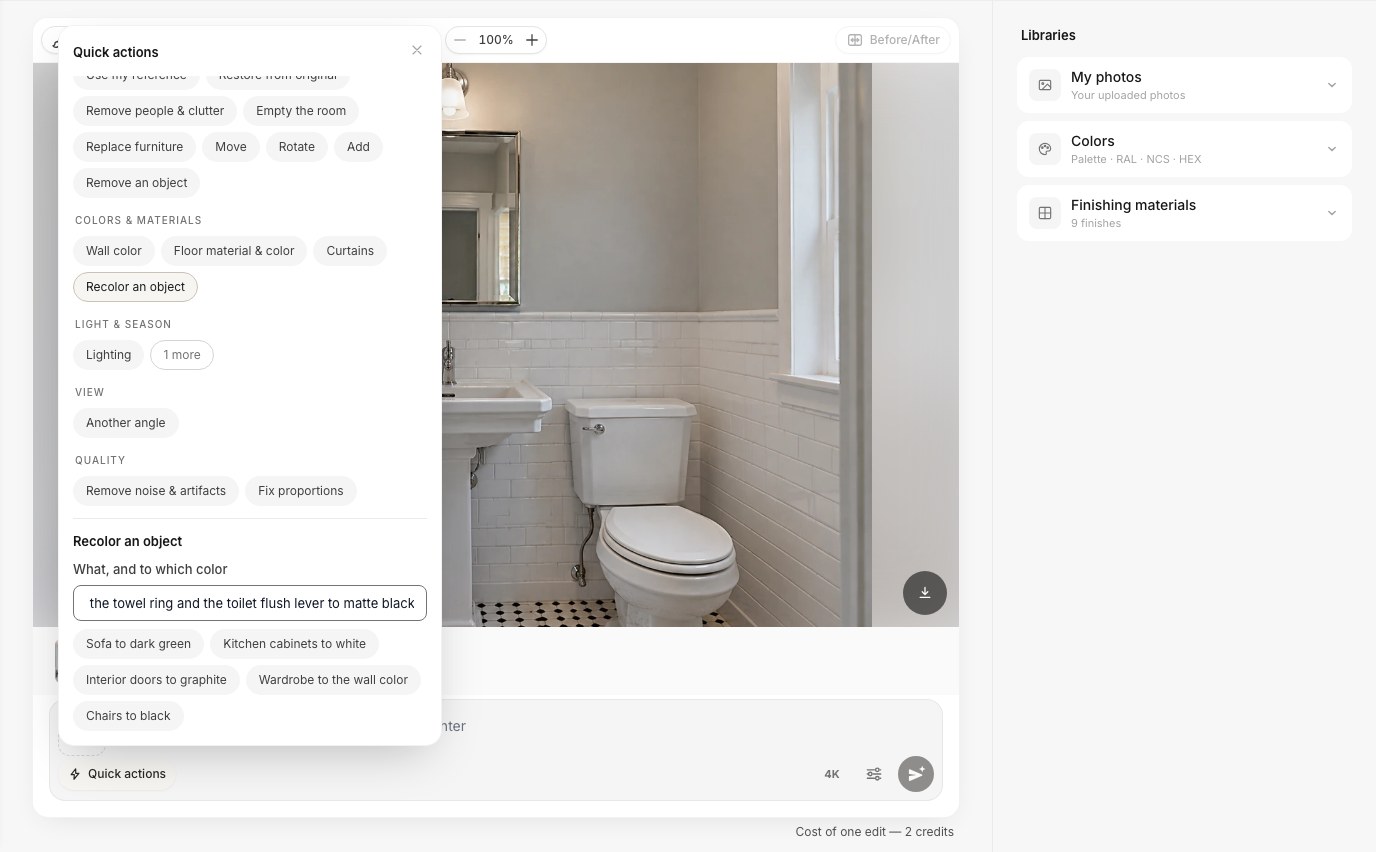 Quick actions → Recolor an object. Name every object and the finish in one line; the ready chips are only examples.
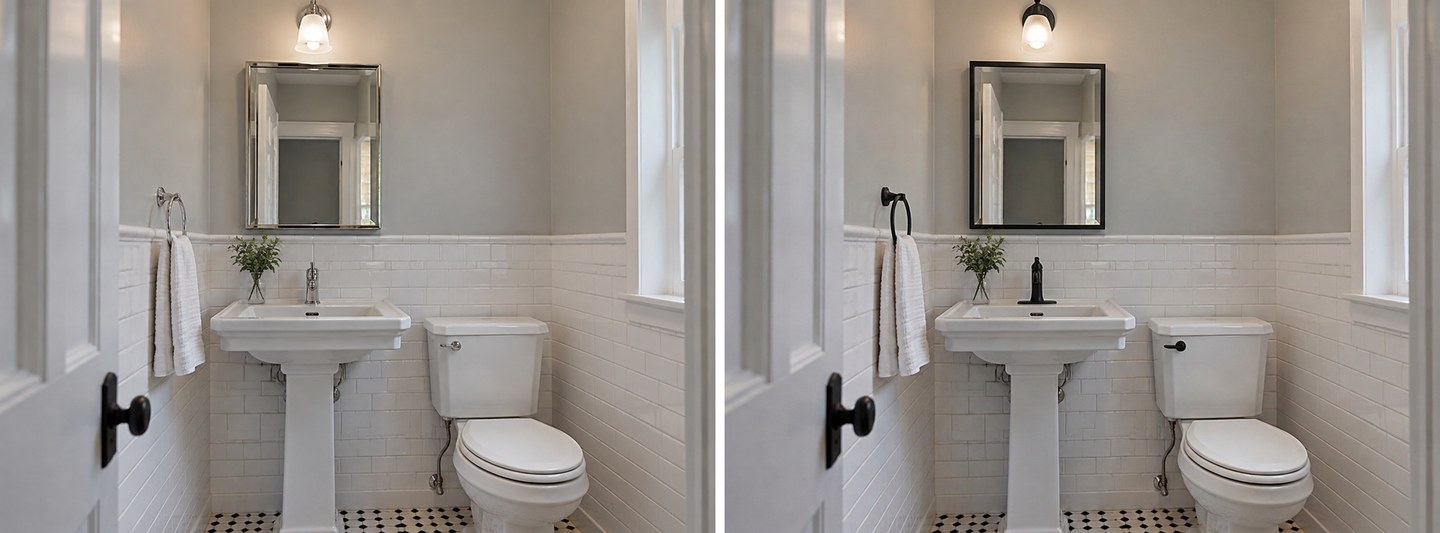 Recolor an object: five metal pieces to matte black. The sink, the toilet, the tiles and the floor are untouched.
All five pieces turned black and nothing else moved. Against white subway tile and a black-and-white floor, matte black reads as a deliberate choice, which is why it is popular in small white bathrooms. One detail: the faucet came back as a slightly different model, with a deck plate and a curved spout. A recolor can still redraw an object, so check the shape you would actually buy.
What New fixtures does in a small bathroom
For comparison, we ran New fixtures → Brushed nickel on the same photo.
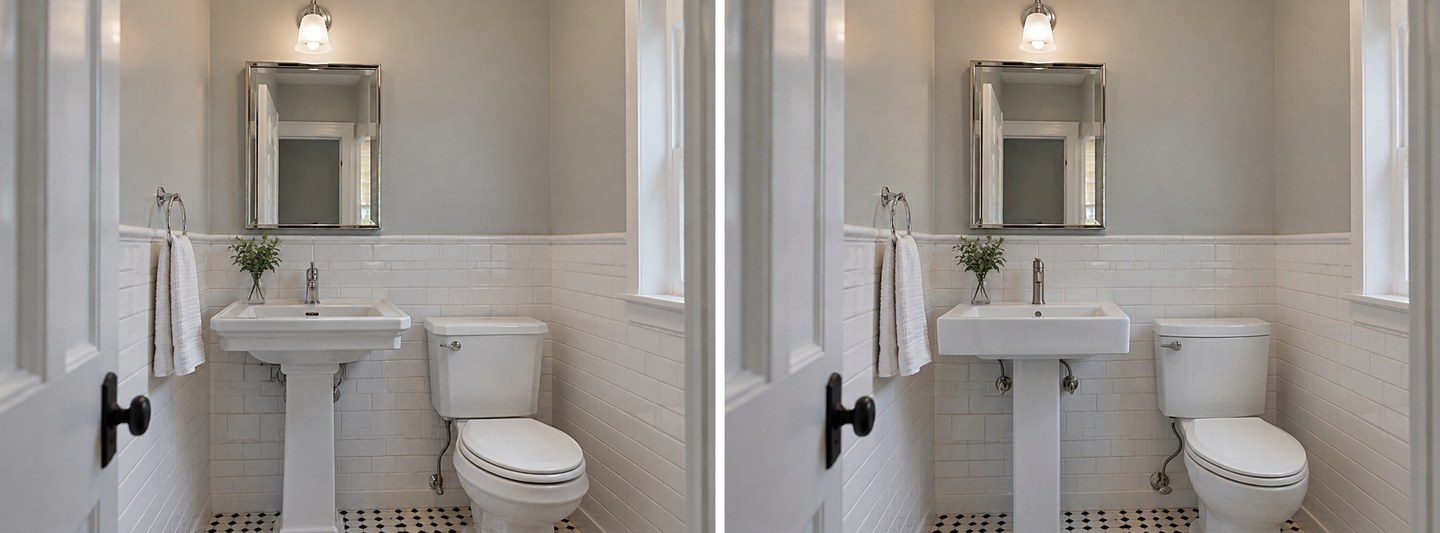 New fixtures → Brushed nickel: a brushed nickel faucet, but also a new, squarer pedestal sink and a new toilet. The mirror, the sconce and the towel ring stayed chrome.
Here the task replaced the "sanitary ware" literally: the classic pedestal sink and the toilet became more modern models. That is useful if you are replacing them anyway, and surprising if you only wanted a new faucet. Rule of thumb: New fixtures for "new fixtures", Recolor an object for "same fixtures, new finish".
A cabinet under the basin, inside a marked area
"Design a cabinet below the basin in the marked area, it must not exceed it" is a real request, and the reason is practical: the toilet is right there. In the AI editor, click Select area, choose Lasso, outline the space under and around the sink, and click Done — keep the selection.
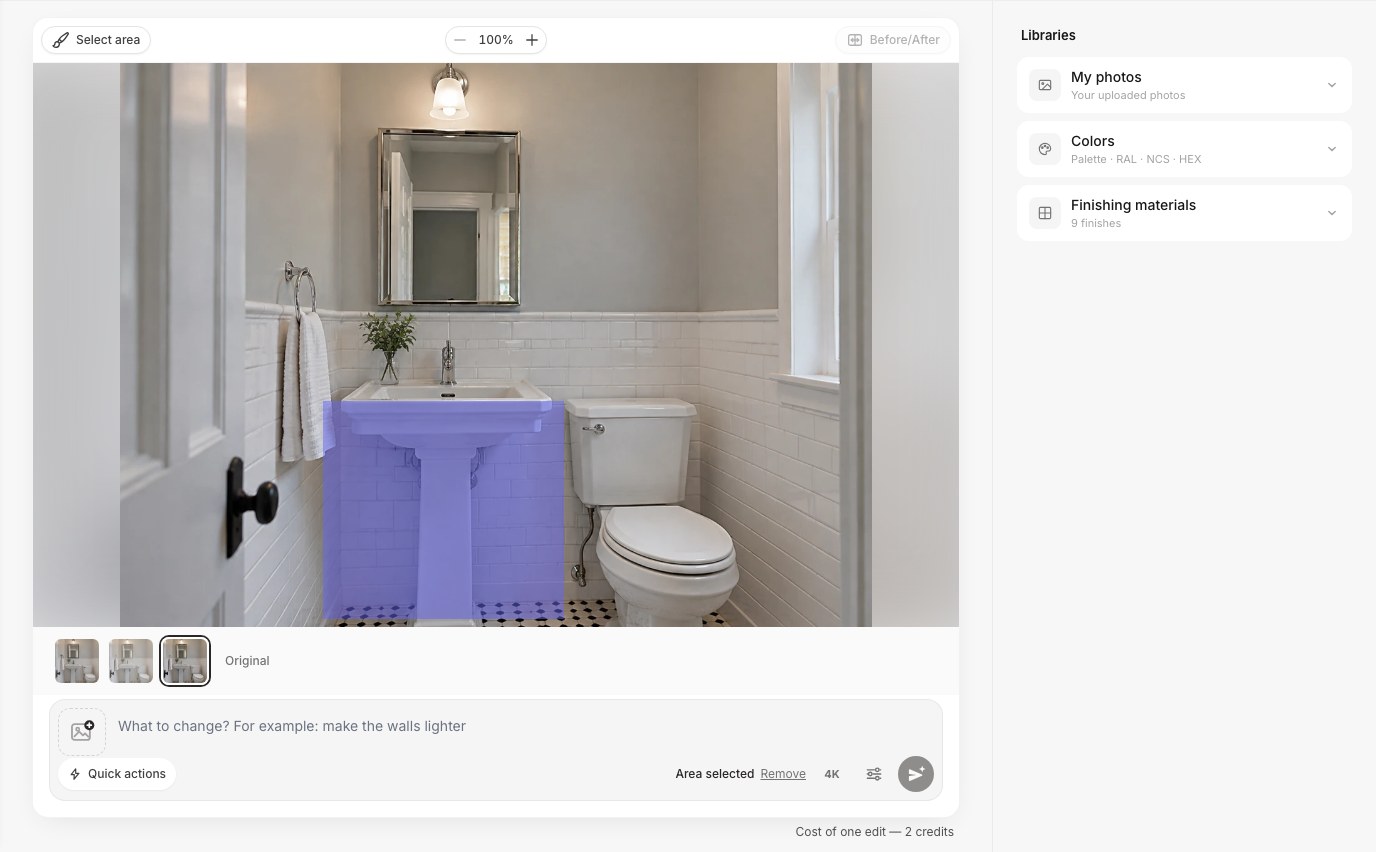 Select area → Lasso around the sink zone. "Area selected" in the composer means the edit stays inside the outline.
We wrote: "Replace the pedestal sink with a closed vanity cabinet with a basin on top, only inside the marked area — it must not go beyond it. White shaker doors, brushed nickel knobs, the same chrome faucet."
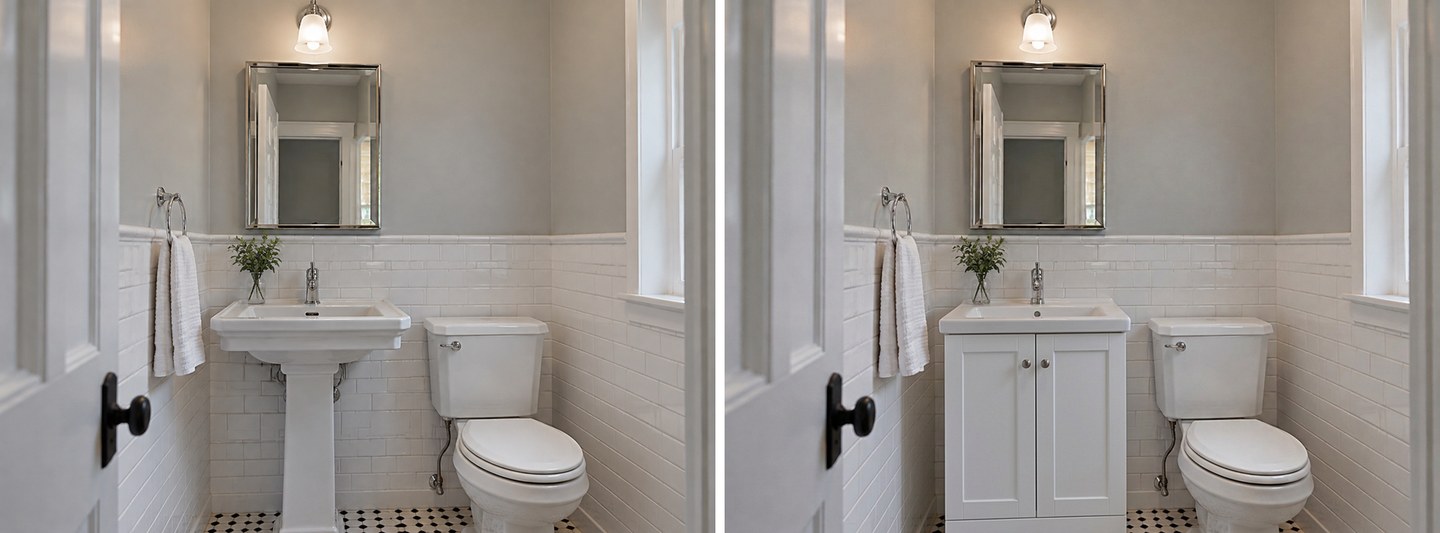 Lasso + text: a closed shaker vanity in the marked area only. It stops before the toilet, and the faucet, mirror and tiles are the originals.
The cabinet filled the area and did not cross into the toilet's space. This is the most reliable way to keep a vanity from "growing" in a preview: the AI has no tape measure, but it does respect a drawn boundary. Draw the outline as wide as the cabinet you can actually fit, not wider.
The exact vanity from a product photo
Many people already have a vanity in mind. We took a catalog-style photo of a 36-inch floating walnut vanity with a white vessel sink and a matte black faucet. In the AI editor, add it with the photo button in the composer (it becomes "photo 2"), then open Quick actions → Use my reference and say what to take and where:
the floating walnut vanity with the white vessel sink and the black faucet from photo 2, in place of the pedestal sink; keep the mirror, the toilet, the tiles and everything else as it is
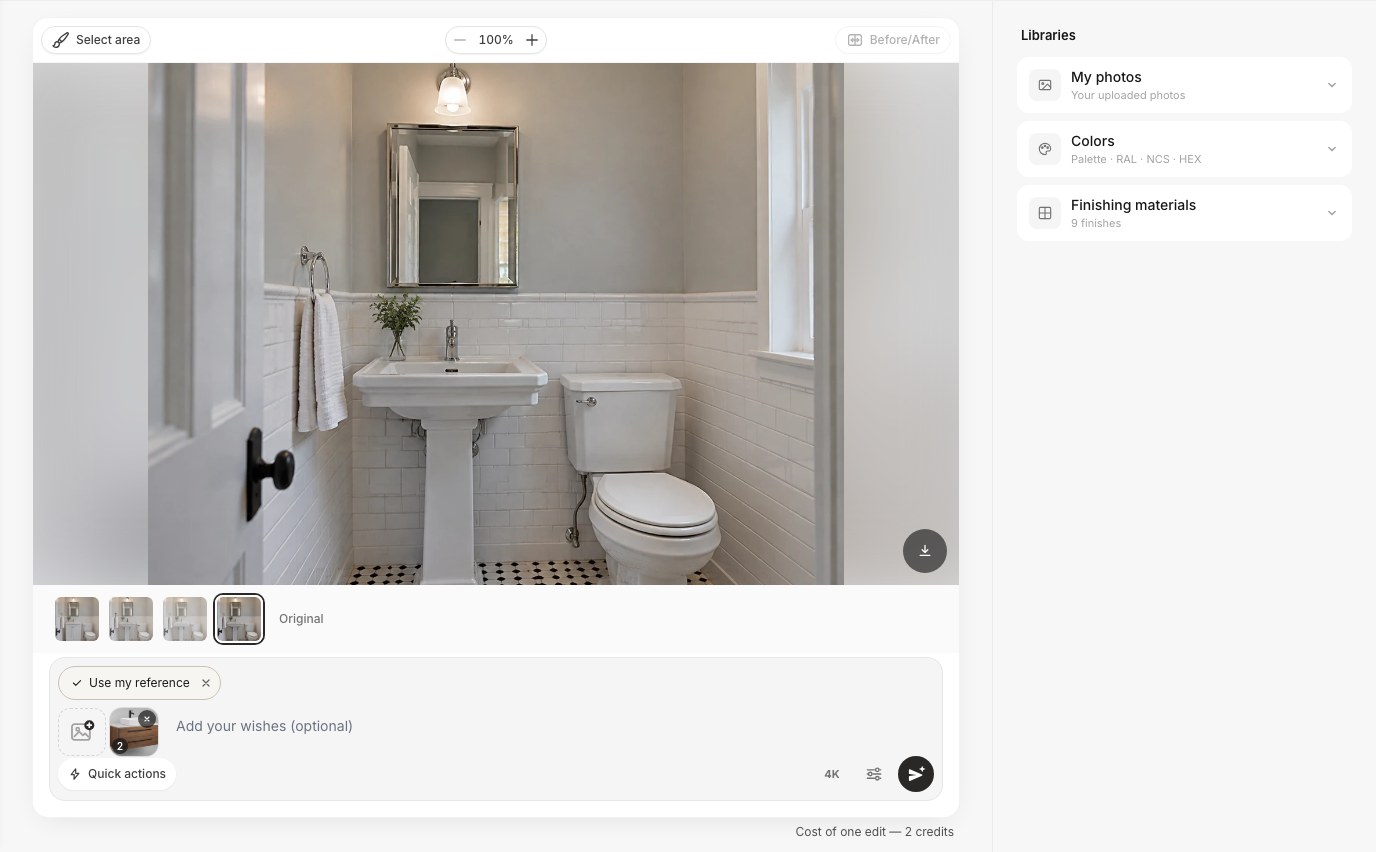 Use my reference: the product photo appears as a numbered thumbnail in the composer.
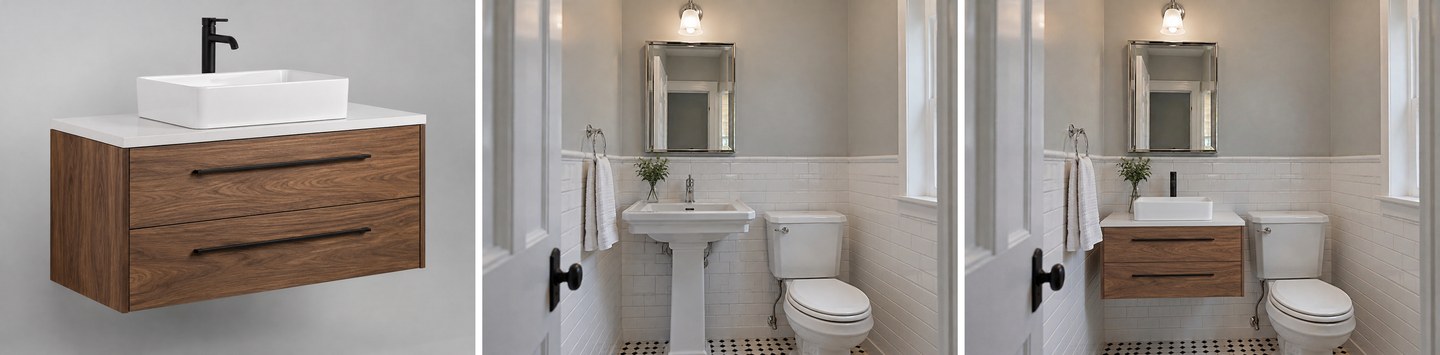 Left: the product photo. Middle: the original. Right: the result. Wood grain, drawer layout, black bar pulls, the vessel sink and the faucet all match the product.
The match is close: the walnut grain, the two drawers with long black pulls, the rectangular vessel sink and the black faucet all came through. Two honest notes. First, the vanity sits almost against the toilet tank. A 36-inch product may simply not fit there, and the AI does not check that; it scales the product to look right in the photo. Second, the walnut and black next to the chrome mirror and sconce mix finishes, which may or may not be what you want. If you like the result, Recolor the mirror and sconce in the next edit. For more on placing a specific product from a photo, see our guide to visualizing furniture in your room.
Why not just use Bathroom remodel?
Because it changes everything. Same photo, the Bathroom remodel mode with no wishes:
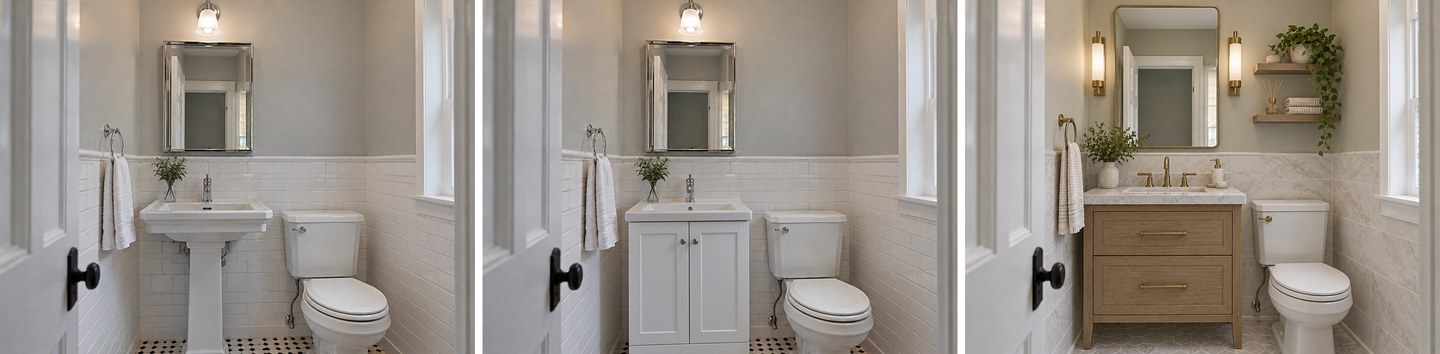 Left: the original. Middle: a vanity-only edit. Right: Bathroom remodel, which also replaced the tiles, the floor, the mirror, the lighting and added shelves.
The remodel looks good, but it answers a different question. If your tiles and floor are staying, a vanity-only edit is the honest preview. If you also want to see your style options for a full refresh, the style pages are a good start: mid-century modern, art deco and wabi-sabi bathrooms, each with its own vanity ideas.
Create interior design with AI
Upload a photo of your room and get a professional design in 30 seconds. First generation is free.
Vanity Measurements to Check Before You Buy
A preview shows how a vanity looks; it does not measure. These are the numbers to check against the real room.
1. Height. Bob Vila calls a 36-inch vanity height standard and notes that the National Kitchen & Bath Association (NKBA) allows a range of 32 to 43 inches (Bob Vila, bathroom design basics). Older vanities, like the one in our first bathroom, are often lower. A vessel sink sits on top of the counter and raises the rim, so check the counter height with the bowl you plan to use.
2. Sink spacing on a double vanity. According to the same source, the sinks in a double vanity should be 30 to 36 inches apart, center to center. The NKBA recommends 20 inches from the center of a sink to a side wall, while code allows a minimum of 15 inches. With the code minimums, 15 + 30 + 15 inches adds up to a 60-inch vanity, the tightest double layout; that is why two people at a 5-foot double vanity stand close.
3. Clearance in front. Bob Vila cites the NKBA recommendation of 30 inches of clear space in front of a vanity or toilet, with a building-code minimum of 21 inches. A deeper vanity steals that space in a small bathroom.
4. Plumbing positions. Swapping a vanity on the same drain and supply lines is the cheap case. Two sinks where there was one, or a floating vanity where the drain came up through the floor, means moving plumbing. HomeAdvisor puts new plumbing lines for a vanity at $400 to $2,000 (HomeAdvisor, bathroom vanity installation). The AI happily puts a second sink anywhere; it does not know where your pipes are.
5. One finish family, from one supplier. "Brushed nickel" from two brands can differ in tone and sheen. If you want everything to match, buy the faucet, drain and accessories from one collection, and check towel bars, light fixtures and door hardware: they are often from different makers.
What Does the AI Get Wrong?
The AI is good at style, finish and placement. It is weak at the things a plumber and a cabinet maker care about. Across 13 results we saw:
- No real sizes. A 36-inch product was fitted into a space that looks narrower, right against the toilet tank. Put the width in your request and check it with a tape measure.
- It changes only what you name. Our finished double vanity kept a brass towel ring and a brass door knob, because we did not list them. Name every metal piece in one request.
- Tasks do more or less than you expect. New fixtures changed only the faucet in one bathroom, and the sink and toilet as well in the other.
- A recolor can redraw the object. The matte black faucet came back as a different model.
- Mirrors lag behind. In one result the mirror still reflected a brass towel ring after the real one had turned nickel.
- Floors appear where they might not exist. Under a new floating vanity, the AI continues the tile. In reality you may find a gap or a subfloor.
- Plumbing is invisible. No drain or supply lines are shown for a vessel sink or a second basin, and nothing checks whether they are possible.
- Resolution is preview size. Our 1472 × 1104 photos came back at 1200 × 896 from most tasks and edits (the lasso edit kept the full size), and at 1024 × 768 from the Bathroom remodel mode. Use 4K if you need a larger file.
None of this ruined a result, but all of it is a reason to finish with a plan on paper and, ideally, a quote.
What Does a Vanity Preview Cost Compared With the Real Thing?
In GenRoom a design or an edit costs 2 credits. A free account gets 6 credits (no card), enough for three previews; Free results carry a watermark. Paid packs are one-time, with no subscription: Start $9.99 for 36 credits (about 18 previews), Basic $19.99 for 100 credits, Pro $39.99 for 300 credits. Purchased credits are valid for 180 days, and a failed generation returns its credits. Details are on the pricing page.
The real work, according to HomeAdvisor (updated June 2026):
| Job | Typical cost |
|---|---|
| Bathroom vanity installation | $300–$2,200, most spend about $1,500 |
| Premade vanity alone | $100–$2,600 |
| 4-foot double vanity with countertop | $550–$1,900 |
| 5-foot double vanity with countertop | $600–$2,200 |
| New plumbing lines for a vanity | $400–$2,000, average $1,000 |
Our whole test for this article was 13 designs and edits, 26 credits. If you are deciding between a $600 vanity on existing plumbing and a double vanity that needs a plumber, a few previews are a cheap way to decide whether the second sink is worth it.
How to Write a Vanity or Fixture Request the AI Follows
The best requests in our data named four things: what to change, what it becomes, the finish, and what must stay. A template:
Replace [object] with [new object: size, material, color], [finish] hardware. Keep [everything that stays].
Requests that worked in our tests:
- "Change every metal finish to brushed nickel: the faucet and its handles, the light bar above the mirror, both towel rings, the cabinet knobs and the door knob. Keep their shapes." (editor, whole photo)
- "The faucet, the mirror frame, the wall sconce, the towel ring and the toilet flush lever to matte black." (Recolor an object)
- "Replace the pedestal sink with a closed vanity cabinet with a basin on top, only inside the marked area." (Select area + text)
- "A floating double vanity in light white oak, two white vessel sinks, brushed nickel faucets." (Double vanity + wishes)
Three habits help. List every metal piece when you change a finish. Change one thing per edit, so you can see what each change does. And start a new idea from the original photo; chains of edits drift. The Before/After button in the editor compares each result with the original. If you want to repaint the existing vanity instead of replacing it, our cabinet color visualizer guide covers that.
FAQ
Is there a free bathroom vanity visualizer?
Yes. A free GenRoom account gives 6 credits without a card, which is three previews (each design or edit is 2 credits). Free results carry a watermark. Vanity brands and retailers also offer free visualizers for their own catalogs; GenRoom works with any vanity you describe or photograph.
Can I see a new vanity in my bathroom from a photo?
Yes. Upload the photo to the Studio. For two sinks, use Ready tasks → Bathroom → Double vanity and add wishes. For a different single vanity, open the AI editor and use Replace furniture, or Use my reference with a product photo. To keep the vanity inside a fixed space, outline it first with Select area.
How do I change only the faucet and fixture finish, not the fixtures?
Use Quick actions → Recolor an object in the AI editor and list every piece: faucet, handles, light fixture, towel rings, knobs, mirror frame. The New fixtures task is for new fixtures; in our tests it also replaced the sink and toilet in one bathroom.
Can I try chrome, brushed nickel and matte black side by side?
Yes. Run the same request from the original photo once per finish and compare the results in the editor. Changing only the finish word gives a fair comparison, as in our brass, chrome, brushed nickel and matte black grid above.
Does the AI get the vanity size right?
No. It draws what looks right in the photo; it does not measure. Write the width in your request, outline the space with Select area, and check the real width, the 30–36 inches between sink centers on a double vanity, and the clearance in front before you buy.
Do brushed nickel and chrome go together?
They can, because both are cool silver tones, but they rarely look intentional next to each other on the same wall: one is matte, the other mirror-bright. If you mix finishes, mix on purpose (for example nickel fixtures and black hardware) and repeat each finish more than once. A preview is the cheapest way to see whether your mix works.
The Bottom Line
A bathroom vanity visualizer is most useful when it changes only the vanity zone. In the GenRoom Studio that means New fixtures for new fixtures, Recolor an object for a finish swap, Double vanity (with wishes) for two sinks, Replace furniture for a mirror or cabinet, Select area to keep a vanity inside its space, and Use my reference for a product you already found. In our two bathrooms, the four-finish grid and the lasso-limited cabinet were the most decisive previews. Use them to choose the look, then check height, sink spacing, clearance and plumbing on paper. Upload your bathroom to the Studio and try the vanity before you buy it.