How to Visualize Furniture in Your Room with AI Before Buying
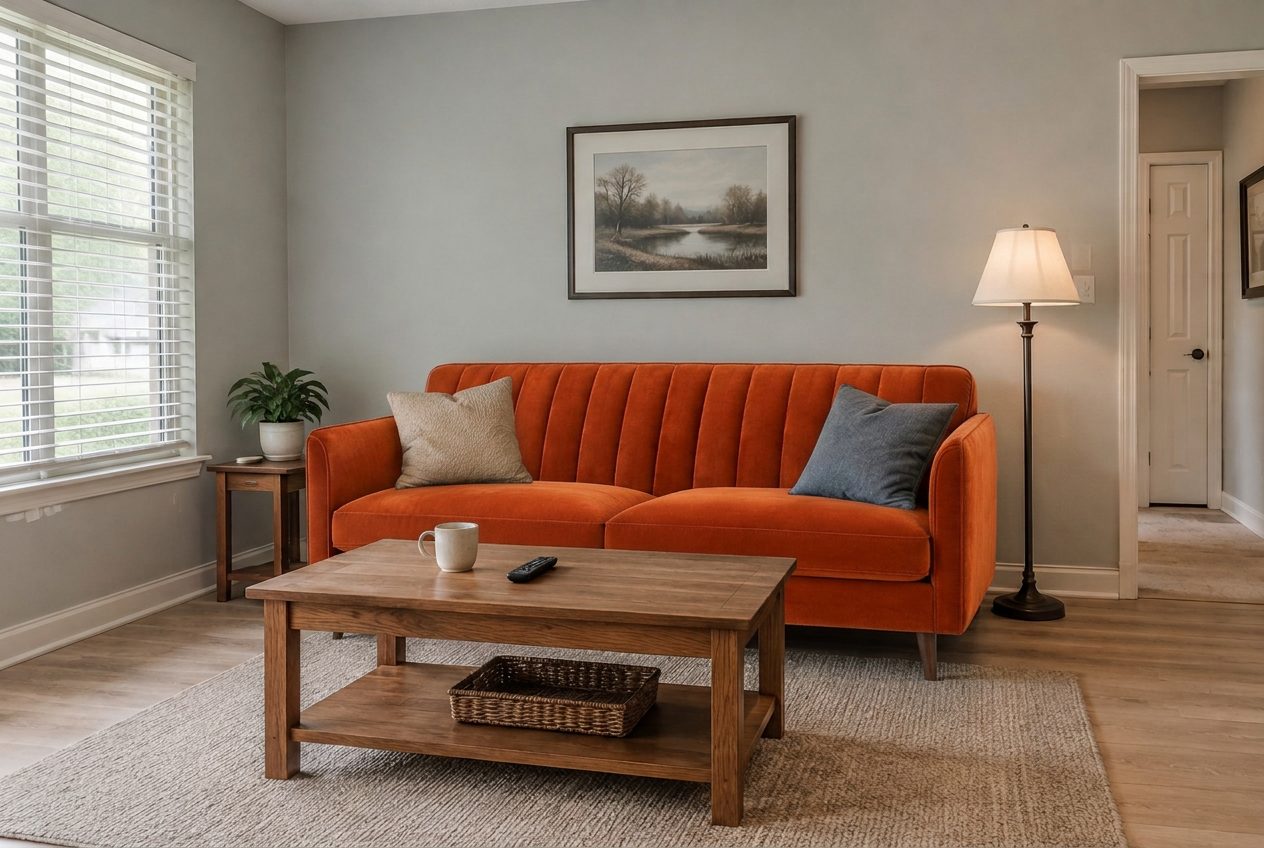
The sofa came from a product photo; the room, the coffee table, the lamp and the pillows are the ones from the original photo.
To visualize furniture in your room with AI, take one photo of the room, upload it to an AI photo editor, and either describe the new piece ("replace the brown sofa with a light grey linen three-seater") or attach a product photo of the exact item and ask the AI to put it in place of the old one. The edit keeps your walls, floor, windows and everything else, so you see the new sofa, table or armchair in your real light and your real colors. What AI does not do is measure: treat the picture as a test of style and color, and check the size with a tape measure.
This guide shows the whole process on real rooms, with unedited results from the GenRoom Studio. It covers three ways to do it: describe the piece in words, use a store photo as a reference, or place the product on the photo yourself and set its size and angle by hand. Then it covers the part most guides skip: what goes wrong with scale, and how to fix it.
In this guide:
- What people actually ask for when they try furniture in their room
- AR apps vs room planners vs AI photo editing
- Swap a piece by describing it
- Put a specific product from a store photo into your room
- Replace one piece only, with the lasso or the brush
- Place the product yourself and set its size
- Scale and proportions: the honest limits
- Costs, photo tips and FAQ
What do people actually ask for when they try new furniture in their room?
Most people don't want a whole new interior: they want to swap one piece and keep everything else. Since March 2026, more than a thousand GenRoom users have described exactly this job in their own words. The requests are strikingly specific, and they show what a furniture preview has to handle.
Here are typical ones, paraphrased:
- "Replace the sofa with the one in my reference photo."
- "Swap the dining table for the one in the reference, and make the back wall white."
- "The sofa should be one solid cream color and a little narrower."
- "Make it a standard 93-inch sofa without the chaise, and keep everything else the same."
- "Add a small dressing table with a long mirror. It has to fit the space."
- "Swap the two chairs for a desk."
- "The chest of drawers should be white and the same height as the bed."
Three patterns stand out. People often have a specific product in mind, usually a photo from a store website. They care that nothing else changes. And they ask about size: "narrower", "93 inches", "the same height as the bed", "it has to fit". The first two are what current AI does well. The third is where you need to be careful, and the last third of this guide is about it.
Which method should you use: AR app, room planner or AI photo editing?
Use AR when exact size is the question, a room planner when the layout is the question, and AI photo editing when the question is "how will this look in my room". The three tools answer different questions, and many people end up using two of them.
| Method | How it works | Best for | Weak spot |
|---|---|---|---|
| AR "view in your room" (retailer apps) | Your phone camera places a 3D model of the product in the live room | True-to-scale size checks of products in that store's catalog | Only items that have a 3D model; looks like a 3D model, not a photo |
| 2D/3D room planner | You draw the room to scale and drag furniture in | Layout, walkways, what physically fits | Takes time to draw; renders don't look like your actual room |
| AI photo editing (e.g. GenRoom) | You edit a photo of your room with words, a reference photo or an inserted product picture | Style, color, material and "does it suit the room" with your real light and finishes | Does not measure: sizes are approximate |
AI photo editing has one big practical advantage: it works with any product, from any store, as long as you have a photo of it. You don't need the retailer to offer an AR model, and you don't need to rebuild your room in a planner. That's why it fits the "I found this sofa online, will it work here?" moment so well.
How do you swap a sofa in your photo by describing the new one?
Upload a photo of the room to the editor, open Quick actions, pick "Replace furniture", type what to replace and with what, and press Apply. The result appears in under a minute, and the edit costs 2 credits.
Step by step in the GenRoom Studio:
- Open Editor in the Studio and press Choose a file (JPG, PNG, WEBP or HEIC, up to 50 MB). The photo opens on the canvas as the "Original" version.
- Press Quick actions under the photo. In the "Objects" group, choose Replace furniture.
- In the field "What to replace, and with what", describe the swap. Ready answers are offered too, such as "Sofa with a beige corner sofa", "Table with a round one" or "Bed with an upholstered one".
- Press Enter. The action appears as a chip above the text field; you can add wishes in the field if you like.
- Press Apply. Each edit becomes a new version in the strip under the photo, and Before/After compares it with the original.
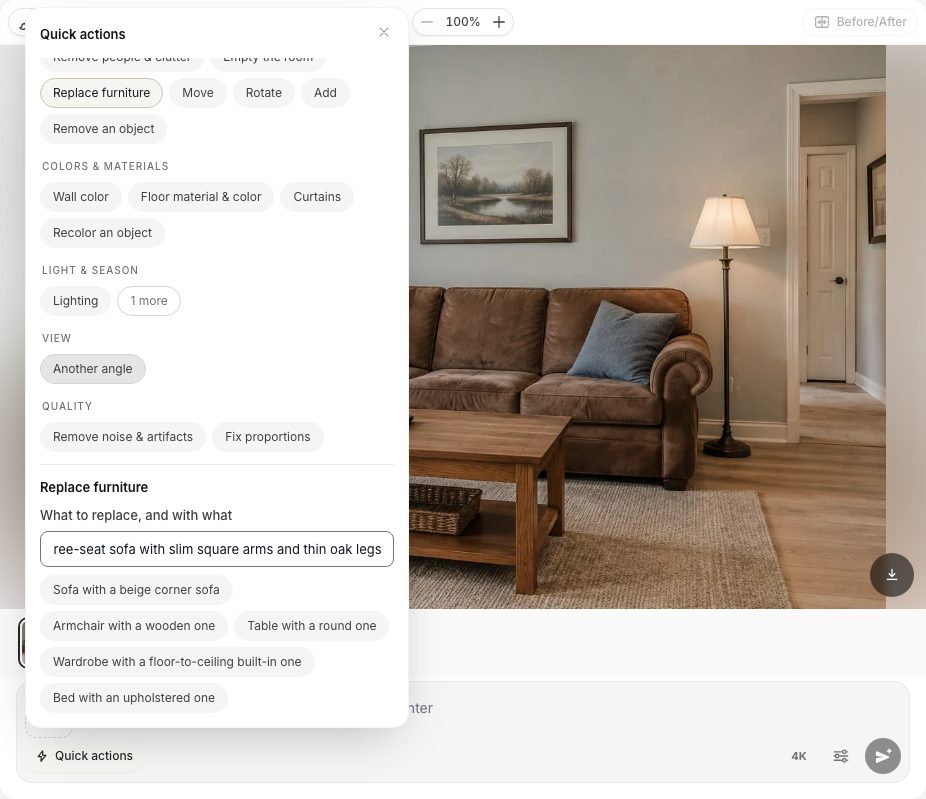 Quick actions in the editor. "Replace furniture" asks one question: what to replace, and with what.
We tested it on an ordinary living room with a tired brown microfiber sofa. The instruction was: "the brown sofa with a light grey linen three-seat sofa with slim square arms and thin oak legs". The edit took 37 seconds from pressing Apply.
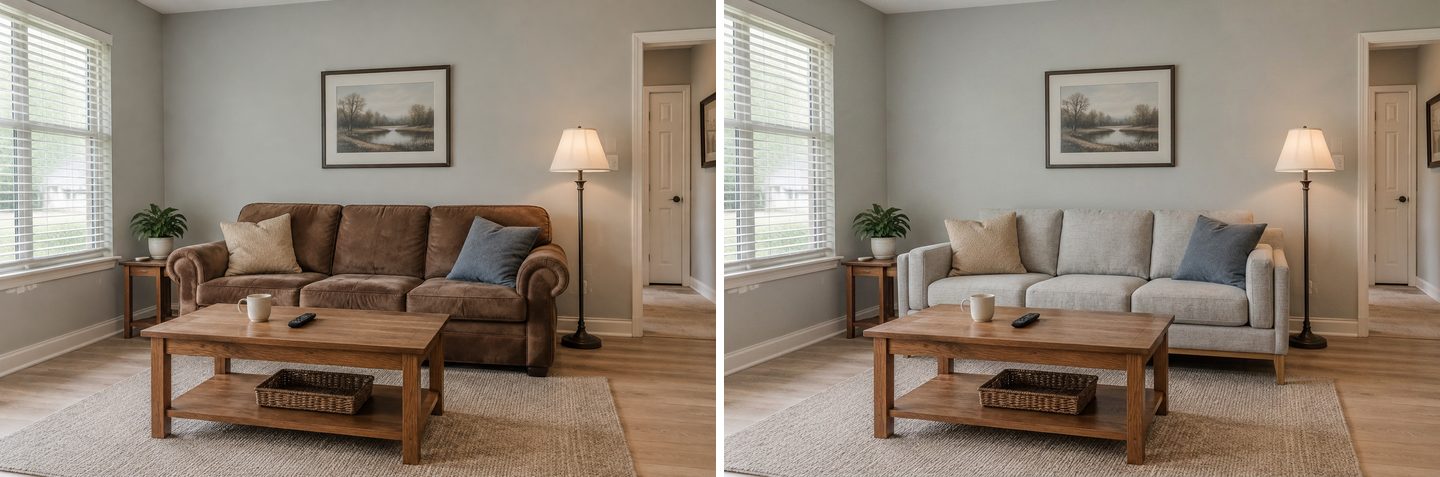 Before (left) and after (right). Unedited Studio result.
Look at what stayed: the coffee table, the mug and the remote, the basket, the rug, the floor lamp, the framed print, even the two throw pillows, now sitting on the new sofa. That's the point of the "Replace furniture" action: the request it sends asks the model to keep the position of everything else unchanged.
One thing to notice: the new sofa is a little wider than the old one and now reaches the lamp. We'll come back to that in the section on scale.
Tips for the description:
- Name the old piece the way it looks in the photo ("the brown sofa", "the dark pine table"), so the AI knows exactly which object to replace.
- Describe the new one by shape, material and color: "three-seat", "slim square arms", "boucle", "walnut tapered legs", "rust velvet".
- One piece per edit. Instructions in the Studio say it plainly: given a list of five changes, the model will do two or three and lose the rest.
For more on writing edit instructions, see our guide to editing AI room designs with text prompts.
How do you put a specific sofa from a store photo into your room?
Attach the product photo as a reference, then use the "Use my reference" quick action and say what to take and where: "the sofa from photo 2, in place of the brown sofa". The AI copies the product's shape, material, pattern and color into your room.
This is the most common version of the job: you've already found the sofa, and you want to see that exact one at home.
- In the editor, press the Add a photo button on the left of the text field and choose Add as a reference. Pick the product photo.
- The reference appears next to the field with a number. Your room photo is photo 1, so the first reference is photo 2.
- Open Quick actions and choose Use my reference. In "What to take and where", type something like "the sofa from photo 2, in place of the brown sofa".
- Press Apply.
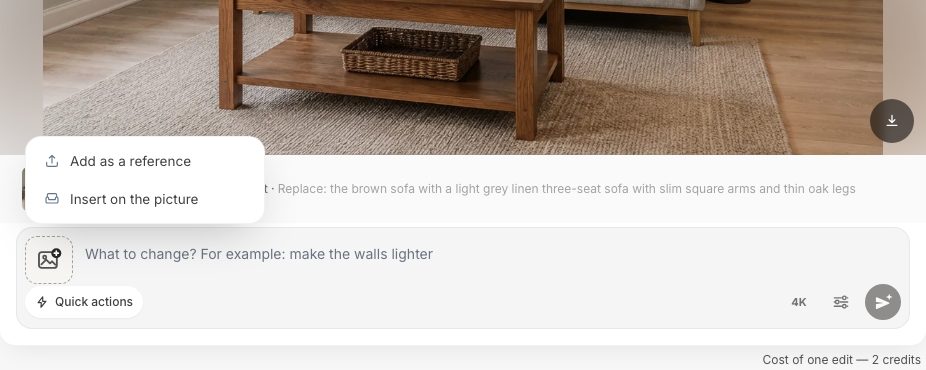 Two ways to use a product photo: as a reference for the AI, or inserted on the picture as an object you position yourself.
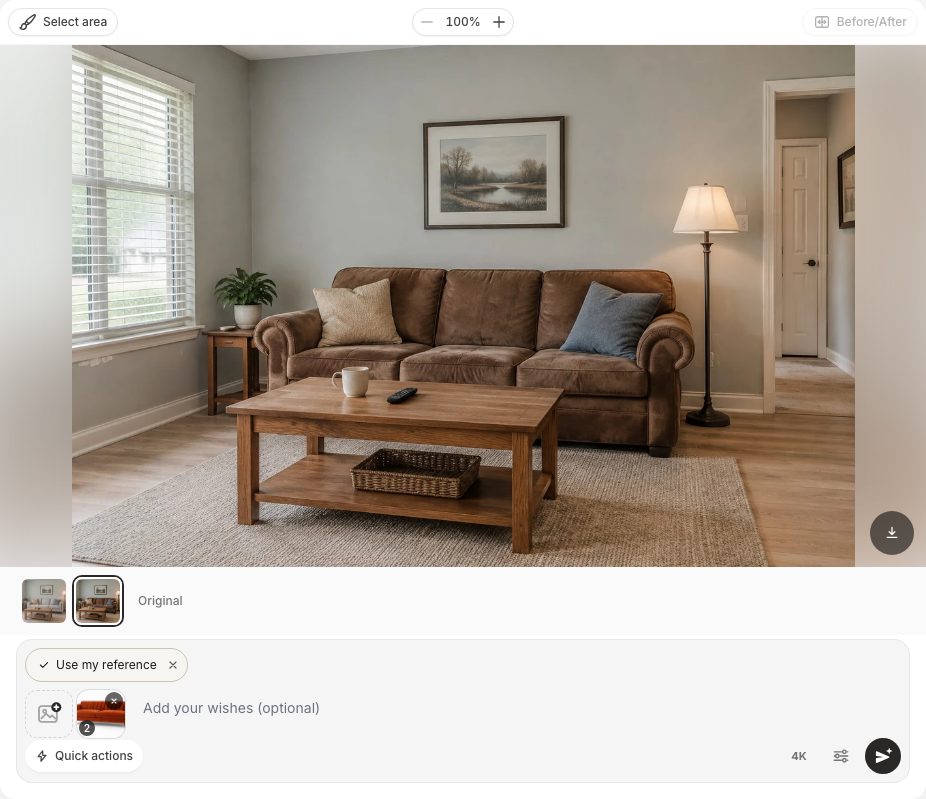 The reference is attached as photo 2; the "Use my reference" action tells the AI what to take from it.
For the test we used a plain catalog-style photo of a mid-century sofa: rust velvet, a channel-tufted back, tapered walnut legs, on a white background. Here is the same living room before and after.
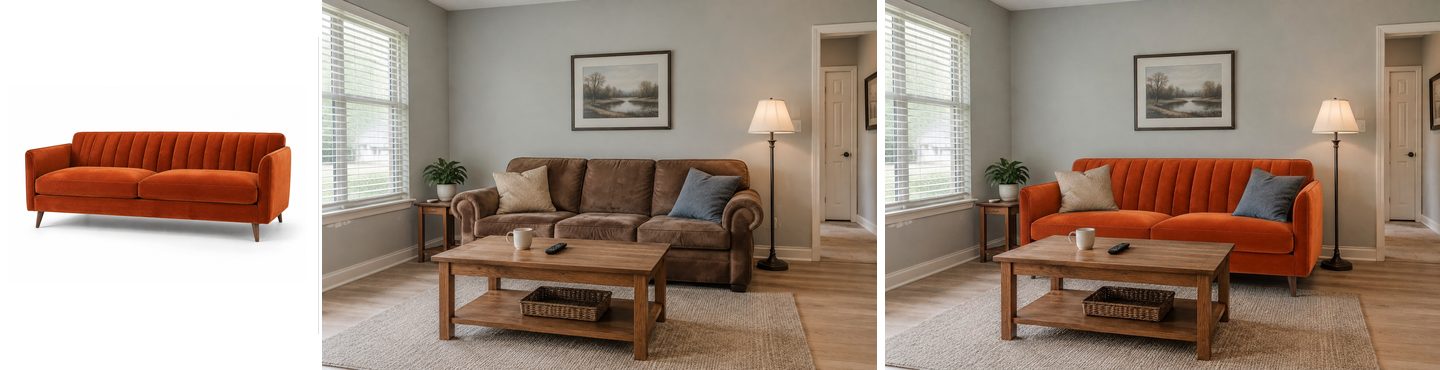 Reference product photo (left), the room before (middle), and the result (right). Unedited.
The tufted back, the slim track arms, the tapered legs and the velvet color all carried over. The room didn't change: same print, same lamp, same coffee table. The edit took 37 seconds.
What makes a good reference photo:
- One product, plain background. A store "white background" shot works best. A lifestyle photo with three sofas and a dog makes the AI guess which object you mean.
- A similar angle to your room photo. A three-quarter view is the safest choice.
- Say what to take. "The sofa from photo 2" is better than "use the reference". If the AI ever returns your reference photo instead of editing, the Studio refunds the credits and suggests exactly this: name what to take from it.
How many references can you use? One reference per edit on every plan, including Free. Up to five references are part of the Pro plan, which helps when you want to try a sofa and a rug together, or show the sofa from two angles.
How do you replace only one piece and leave the rest exactly as it is?
Press "Select area", trace the old piece with the lasso (or paint over it with the brush), then describe the change. Only the selected area is edited; the rest of the photo stays exactly as it is.
This matters most in busy rooms, where the AI might otherwise "improve" things you didn't ask about. The Studio even nudges you: if you type an edit that sounds like a change to one place, it asks "Change only this place?" and offers Select area or Edit the whole photo. You weren't charged for that question, and your text stays in the field.
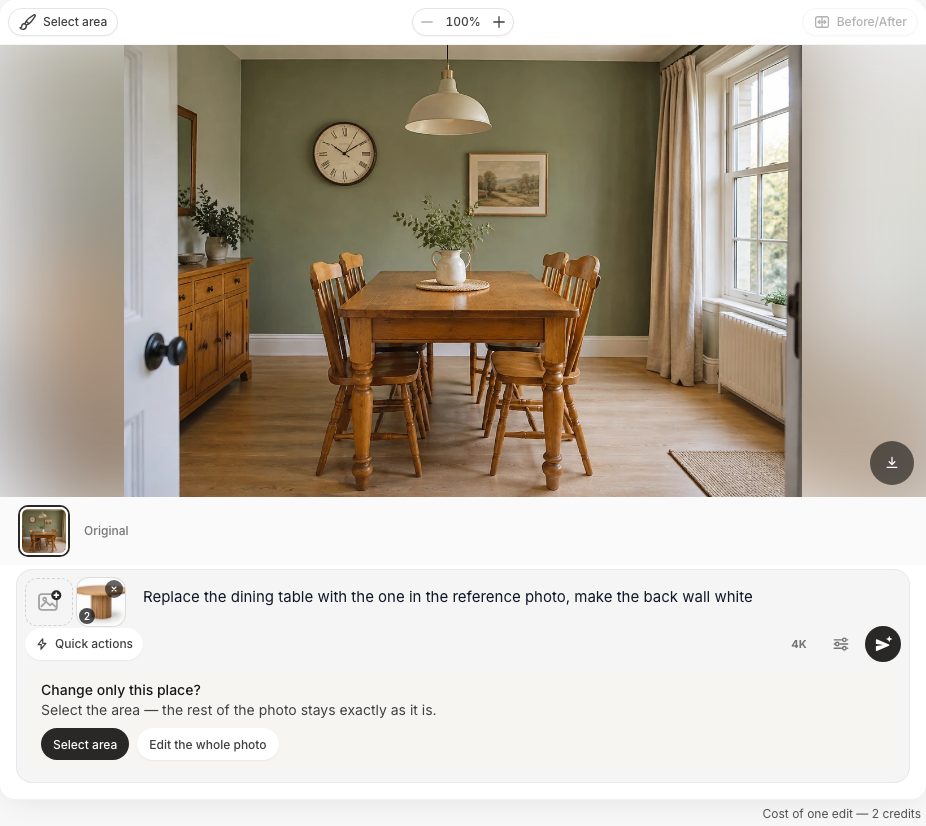 The Studio suggests selecting an area when the edit concerns one place.
We took a real request almost word for word: "Replace the dining table with the one in the reference, make the back wall white". The dining room had a dated orange pine table and four spindle-back chairs. The reference was a catalog photo of a round light-oak table on a fluted pedestal.
- Add the table photo with Add a photo and Add as a reference.
- Press Select area. The toolbar has Brush and Lasso; trace around the table and press the check mark to keep the selection.
- Type "Replace the dining table with the one in the reference photo" and press Apply.
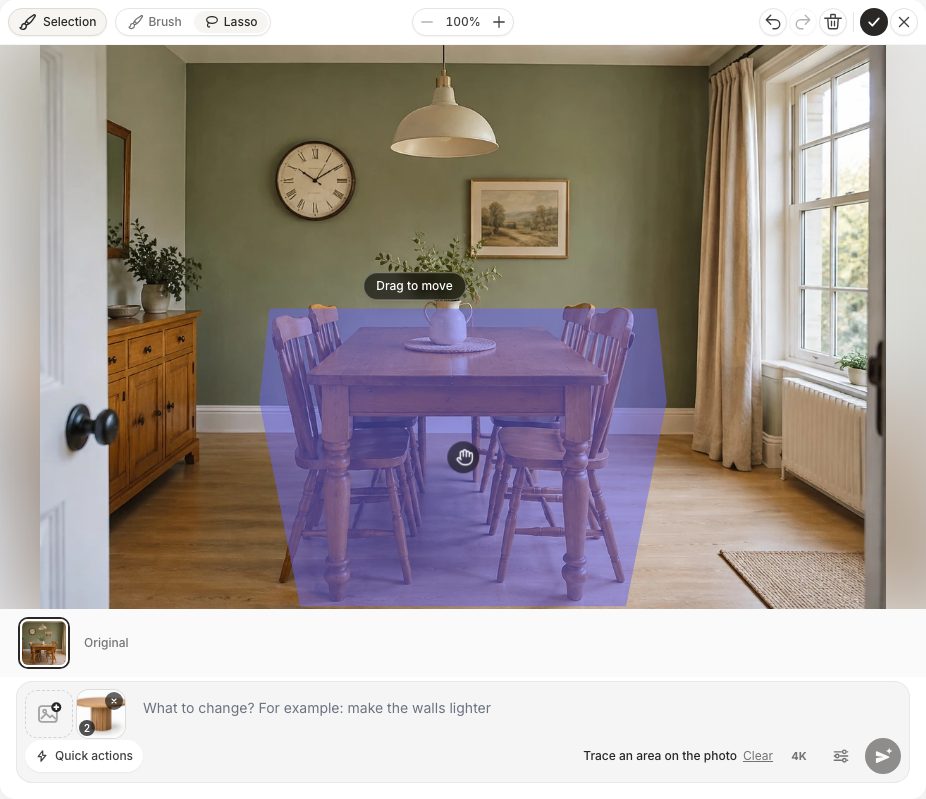 Lasso selection around the table. The selected area is highlighted; you can drag it to adjust.
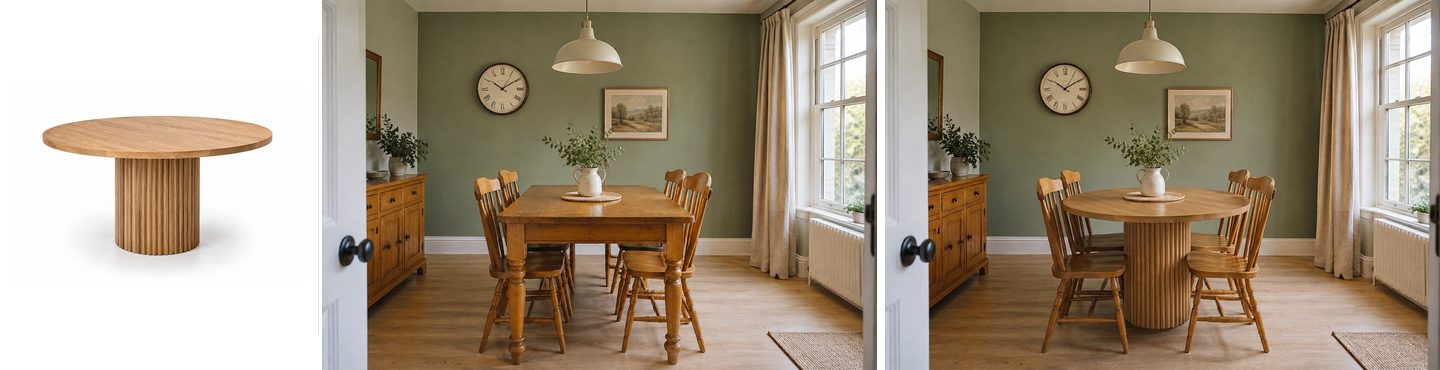 Reference (left), before (middle), after (right).
The round table with its fluted base arrived, and the same chairs were arranged around it. Outside the selection, nothing moved: the sideboard, the clock, the curtains, the radiator and the rug by the window are identical.
Then the second half of the request, as a separate edit: Quick actions, Wall color, "white".
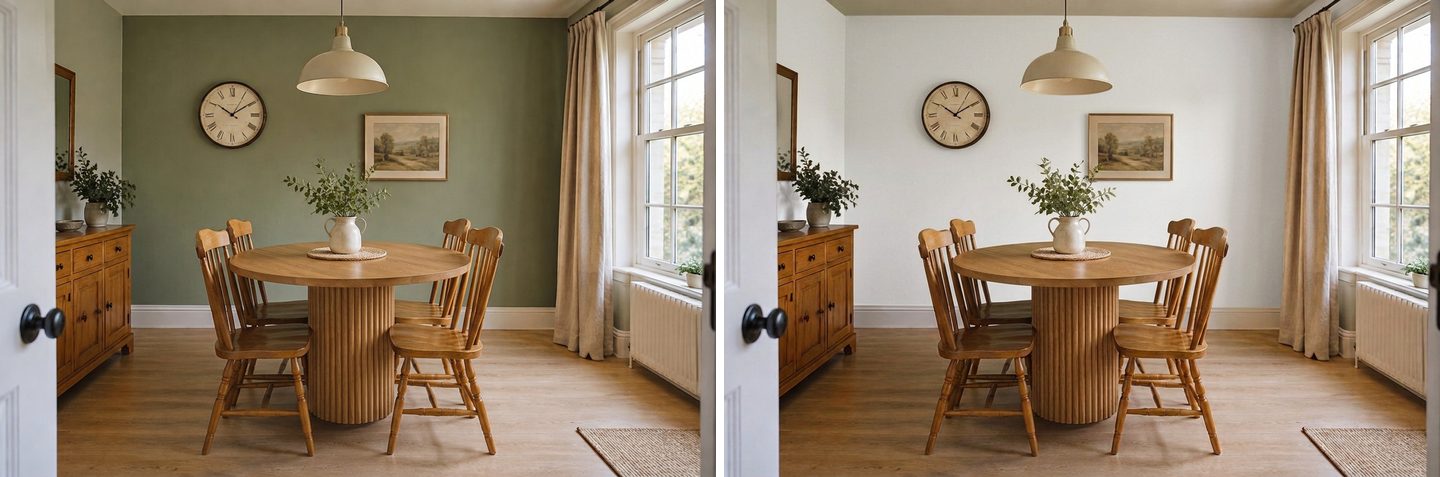 Second edit: the back wall from sage green to white. The new table stayed as it was.
Splitting the job in two is the reliable way to do it. Every edit starts from the selected version, so you build the room step by step and can always step back to an earlier version in the strip. For dining room styles to try with your new table, see our AI dining room design ideas.
Can you place the product yourself and control its size?
Yes: choose "Insert on the picture" instead of "Add as a reference". The product lands on your photo with its background removed, and you move, resize and turn it by hand before the AI blends it into the room.
This is the closest thing to a collage, and it's the best answer to "the AI made it too big". You decide where the piece stands and how large it is; the AI's job is to fit it in with matching light, shadows and perspective.
- Press Add a photo and choose Insert on the picture, then pick the product photo.
- Wait a few seconds while the Studio is "Removing the background…". The cut-out product appears in the middle of the photo, selected.
- Drag it into place. Use the corner handles or the keyboard: arrows move it, + and − change the size, [ and ] turn it. Shift makes the step larger.
- Optionally, describe how to fit it in, e.g. "stand it on the floor by the right end of the coffee table".
- Press Apply.
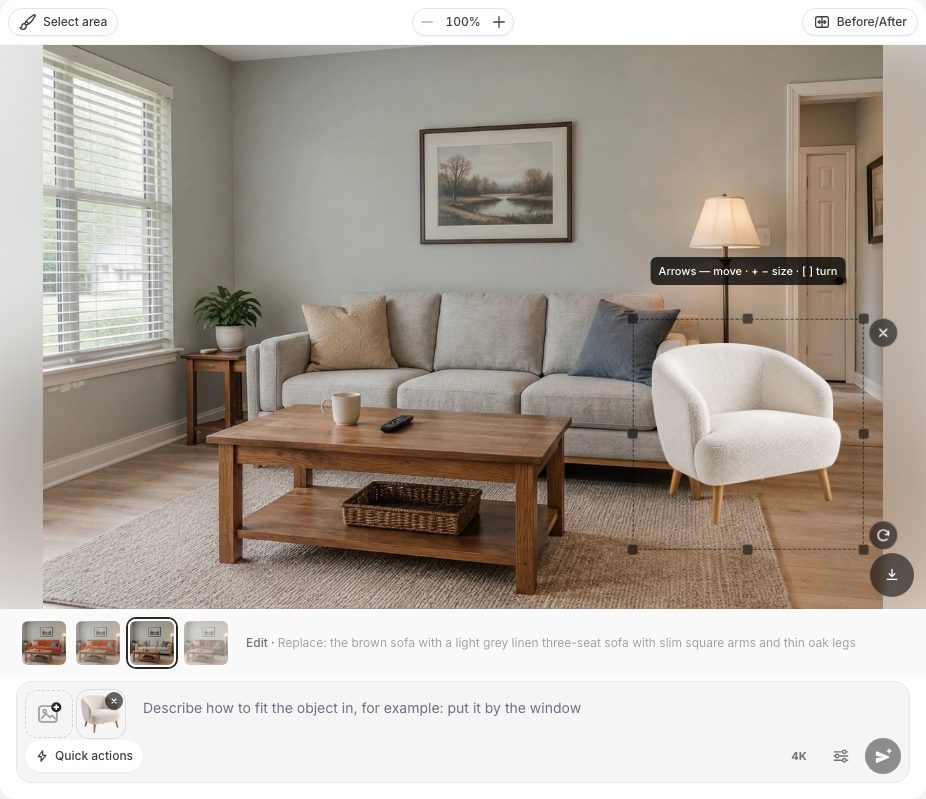 The armchair after "Insert on the picture": background removed, handles for size and turning.
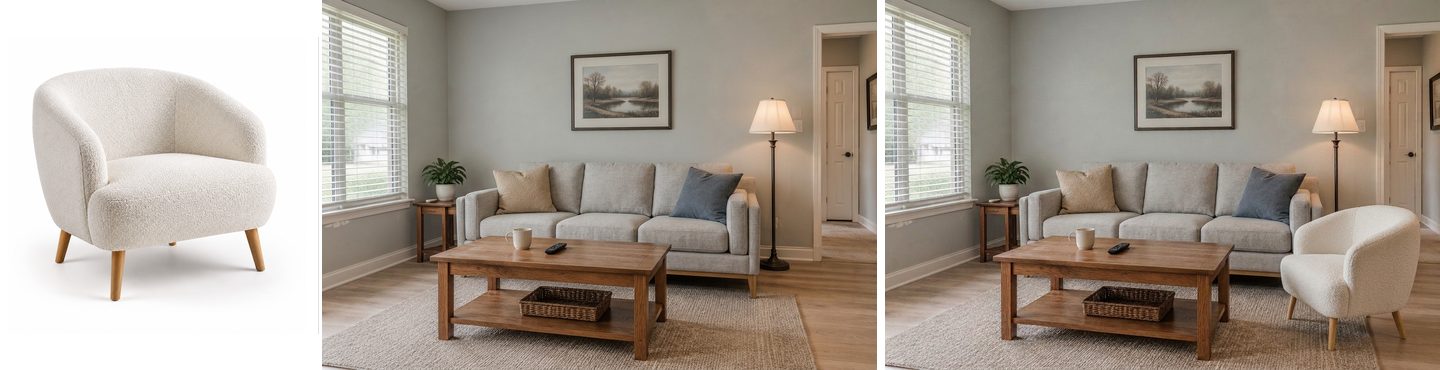 Product photo (left), room before (middle), result (right). The armchair keeps the size we set by hand.
The result kept the size and position we chose, added a floor shadow, and matched the daylight in the room. You can place up to five objects on one photo, which is handy for testing a chair together with a side table and a lamp.
If the background removal fails on a busy product photo, the Studio tells you it inserted the object with its background, and offers "Remove the background again". A plain-background product shot avoids this.
Create interior design with AI
Upload a photo of your room and get a professional design in 30 seconds. First generation is free.
Will a new piece fit into an empty spot?
AI can add a piece to an empty spot and size it to the gap, but treat "it fits" as a visual check, not a measurement. Use the Add quick action and describe both the piece and the place.
A bedroom request we see often: "add a small dressing table with a long mirror, it has to fit the space". We tried it on a bedroom with an empty stretch of wall between the bed and the window: "a small white dressing table with a stool and a tall narrow standing mirror on the empty wall between the bed and the window, sized to fit that gap".
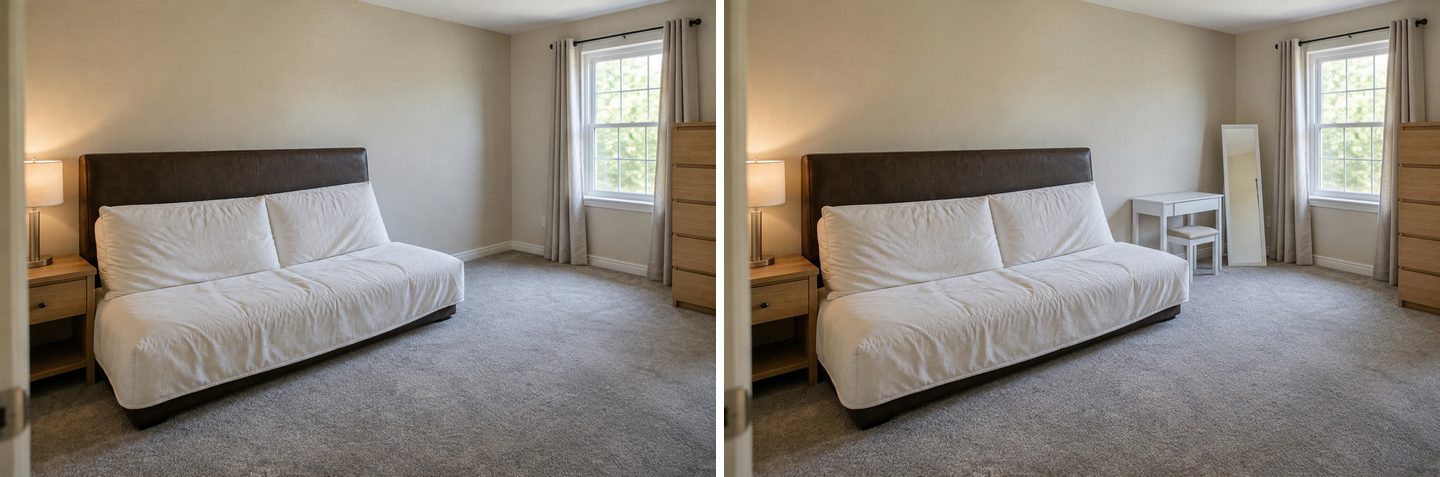 The Add action placed the dressing table, stool and mirror in the gap; the bed, nightstand and chest of drawers stayed as they were.
The AI picked a compact table that visually fits the wall, and kept the bed, the nightstand, the curtains and the chest of drawers. Whether a real 100 cm table fits there is a question for your tape measure, which brings us to the honest part.
Is the AI result true to scale? What goes wrong and how to fix it
No: AI photo editing doesn't measure anything, so sizes in the result are approximate. It is very good at style, color and material, and decent at "about the right size", but it can't promise that a 93-inch sofa looks 93 inches in your photo. The Studio's own instructions say it directly: the model does not count or measure, and the result is a visual concept, not a working drawing.
Here is a real failure from our test. The rust sofa from the store photo came out slightly too long and touched the floor lamp. We selected the sofa with the lasso and asked: "Make the selected orange sofa about 15% less wide, so there is a clear gap between its right arm and the floor lamp."
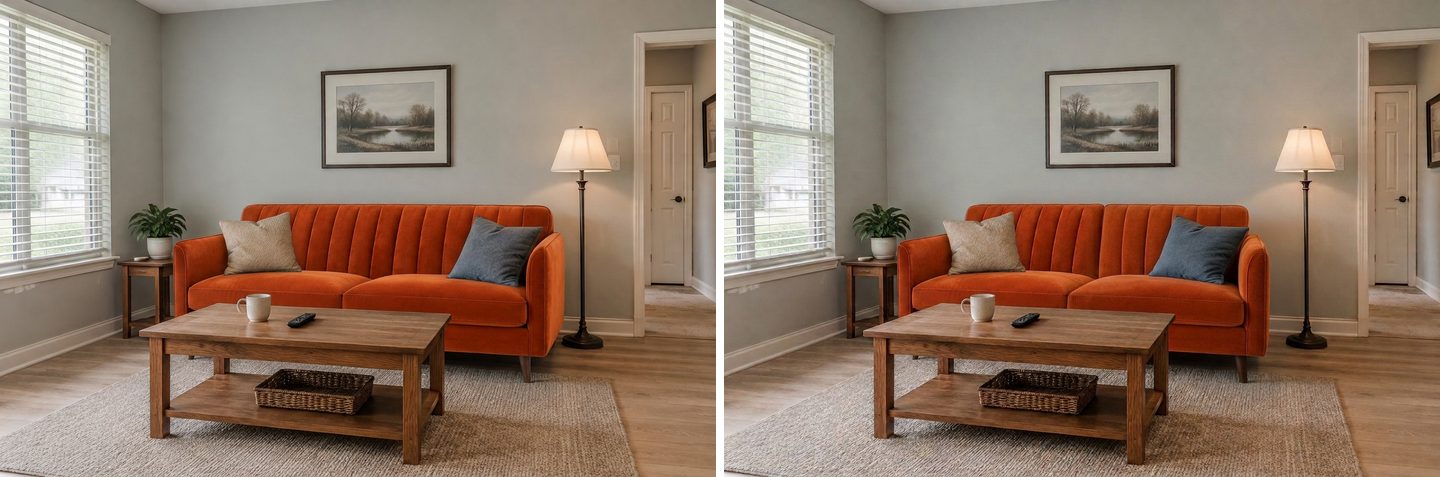 Limitation: the "15% narrower" request barely changed the width, and the channel-tufted back turned into two cushions. Percentages and inches don't hold.
The sofa got only marginally shorter, still touches the lamp, and its tufted back was redrawn as two cushions. Numbers like "15%" or "93 inches" are exactly the kind of instruction the model doesn't follow reliably.
What works instead:
- Set the size yourself with "Insert on the picture". When size matters, place the product as an object and scale it by hand against something you know: the sofa next to it, a door (usually about 80 cm or 32 inches wide), a radiator, a window. The AI keeps the size you set.
- Anchor to objects, not numbers. "As long as the window is wide", "the same height as the bed", "ending before the floor lamp" work better than centimeters.
- Use "Fix proportions" for oversized pieces. It's a quick action in the Quality group that asks the model to make furniture sizes realistic, with no oversized pieces.
- Go back instead of piling up fixes. Every edit starts from the previous picture, so mistakes accumulate. If a version went wrong, pick an earlier version in the strip and edit from there.
- Use "Restore from original" if something else changed. Name it ("the windows", "the floor lamp") and the Studio brings it back from the original photo.
- Check the real numbers on paper. Measure the wall and the product before you order. Classic living room guidelines from designer Emily Henderson: 16 to 18 inches (40–45 cm) between the sofa and the coffee table, a coffee table at least half the length of the sofa, and 30 to 36 inches (75–90 cm) of walkway between large pieces.
A practical split that works: AI for "does this sofa suit my room", tape measure (or a retailer's AR view) for "does it fit through the door and along the wall".
How do you take a photo that gives the best result?
Shoot the room in daylight, from eye level, with the whole piece you want to replace in the frame and some floor around it. The AI can only keep what it can see.
| Do | Why |
|---|---|
| Shoot from the opposite side of the room at eye level | The AI keeps your camera angle; a natural angle gives a natural result |
| Keep the whole old piece in the frame, with floor around it | The new piece needs room; cropped legs or arms make the AI guess |
| Use daylight, lamps off | The edit keeps the time of day and the light of your photo |
| Remove clutter from the piece (blankets, bags) | Or use "Remove people & clutter" first |
| Use a plain product photo as the reference | One object on white = fewer guesses about what to copy |
| One change per edit | Lists of changes get partly lost |
If you'd rather start from an empty room, the Empty the room quick action clears the furniture first; see our guide to AI furniture removal. And if you want to redesign the whole room rather than one piece, the Studio's design modes and 60+ styles are on our living room design page.
How much does it cost to visualize furniture with GenRoom?
Each edit costs 2 credits, and a free account comes with 6 credits, enough for three edits, with no card required. Free results carry a watermark.
| Pack | Price | Credits | About how many edits |
|---|---|---|---|
| Free | $0 | 6 | 3 (watermarked) |
| Start | $9.99 | 36 | 18 |
| Basic | $19.99 | 100 | 50 |
| Pro | $39.99 | 300 | 150, plus up to 5 reference photos per edit and private designs |
These are one-time credit packs, not a subscription; purchased credits are valid for 180 days. If an edit fails, the credits return automatically. Editing with words, with the brush or lasso, with one reference photo, and inserting objects on the picture work on every plan, including Free. See pricing for details.
FAQ
Is there an app to visualize furniture in my room?
Yes, there are three kinds. Retailer AR apps place 3D models of their own products into your camera view at true scale. Room planners let you draw the room and drag in furniture. AI photo editors such as the GenRoom Studio edit a photo of your actual room, with any product you have a picture of. GenRoom runs in the browser on desktop and mobile, so there's nothing to install.
How can I see what a piece of furniture will look like in my room?
Take a photo of the room, upload it to an AI editor, and either describe the piece or attach a product photo as a reference. For the exact item, use "Add as a reference" plus "Use my reference" ("the sofa from photo 2, in place of the brown sofa"). To control the position and size yourself, use "Insert on the picture".
Can AI add furniture to a photo of my room?
Yes. Use the "Add" quick action and describe the piece and the place ("a floor lamp to the right of the armchair"), or insert a product photo directly on the picture. The rest of the photo is kept.
Can I use a photo from a furniture store website?
Yes. A plain "white background" product shot works best, ideally from a three-quarter angle similar to your room photo. One reference per edit is available on every plan; up to five are part of the Pro plan.
Will the new sofa be the right size?
Approximately, not exactly. AI photo editing doesn't measure, so instructions like "93 inches" or "15% narrower" are not reliable. Set the size yourself with "Insert on the picture", compare it to things you know (a door, a window), and confirm with a tape measure before ordering.
What is the 2/3 rule for sofas?
It's a common rule of thumb for proportions: the coffee table should be about two-thirds the length of the sofa. Some designers allow at least half. Keep 16 to 18 inches between the sofa and the coffee table, and 30 to 36 inches of walkway between large pieces.
Can I take a picture of my living room and redesign it for free?
Yes. A free GenRoom account (no card) includes 6 credits: three edits or three designs. Results on the free plan carry a watermark. For a full makeover instead of one piece, see AI living room makeover ideas.
The Bottom Line
You can visualize furniture in your room with AI in about a minute per try: one photo of the room, one product photo or one sentence, and a version you can compare with the original. In our tests, AI handled style, color and material very well, kept the rest of the room untouched, and placed a store-photo sofa, table and armchair convincingly. What it doesn't do is measure. Let AI answer "does it look right here?", and let your tape measure answer "does it fit?". Then order with confidence.