How to Edit AI Room Designs with Text Prompts (AI Editor)
How to Edit AI-Generated Room Designs with Text Prompts (AI Editor Guide)
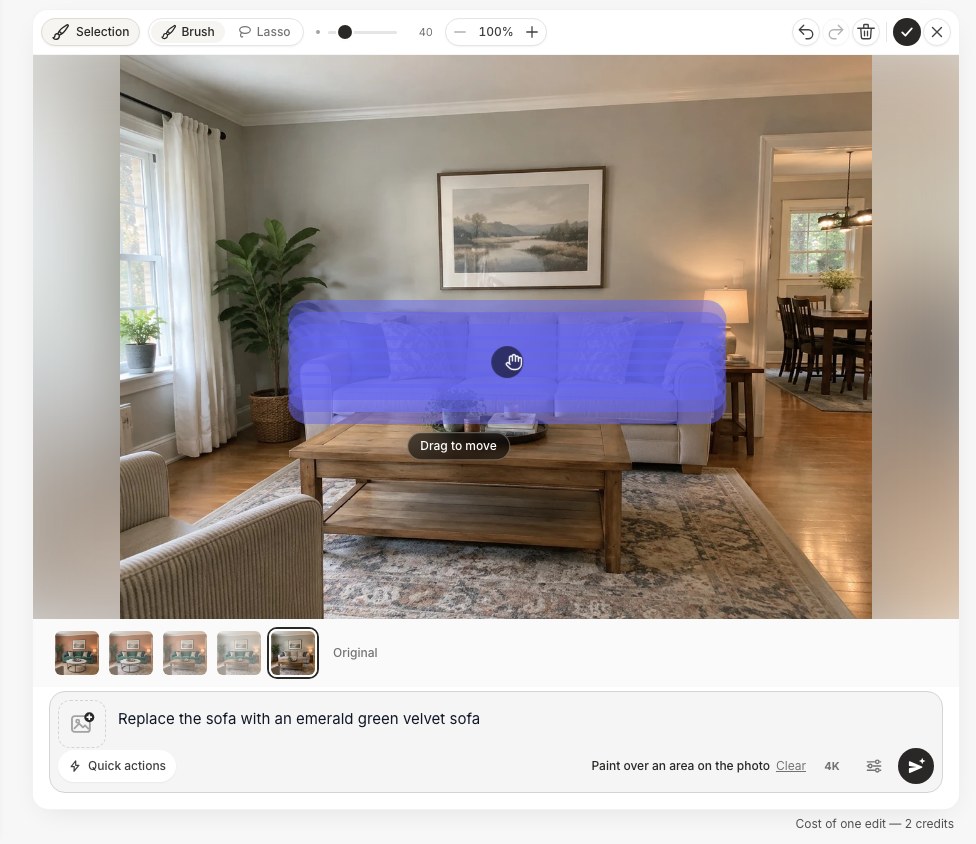
To edit an AI-generated room design with text prompts, open the result in an AI editor, type a plain-English instruction describing one change — for example, "make the sofa green" or "add a floor lamp in the left corner" — and let the AI regenerate only that element while keeping the rest of the room intact. You repeat this a few times, one change per prompt, until the design matches what you had in mind.
That last part is where most people go wrong. The first image an AI produces is almost never the final one — it's a starting point. The real skill is refinement: nudging a good render toward a great one without starting over. This guide covers exactly how text-prompt editing works, gives you 18 copy-and-paste prompts that produce reliable results, walks through a complete edit-by-edit workflow, and lists the common mistakes that leave people frustrated. Tools like GenRoom include a built-in AI Editor for precisely this, so we'll use it as a concrete reference throughout.
What does it mean to edit an AI room design with text?
Editing an AI room design with text means changing specific parts of an already-generated image by describing the change in words, instead of re-rolling a whole new design. You keep the layout, the camera angle, and the parts you like — and swap only what you name.
This is different from the initial generation. When you first upload a room photo and pick a style, the AI reinterprets the entire space at once. A text edit is surgical: "replace the coffee table with a round marble one" tells the model to change one object and leave everything else alone. It's the difference between repainting a house and touching up a single wall.
Under the hood, the editor combines your existing render with your instruction and regenerates a new version that honors both. Because you're guiding it in natural language, there are no layers and no design software to learn — you type what you want (or brush over the area) and look at what comes back.
Why refinement matters more than the first render
A single generation is a lottery. You might love the style but hate the rug, or the layout is perfect but the walls are the wrong color. Without editing, your only option is to generate again and hope the next random result fixes the rug without ruining everything else you liked. Text editing removes the gamble: you lock in the good parts and fix the rest one instruction at a time. This iterative loop — generate, evaluate, adjust, repeat — is the same iterative design process professional designers use, just far faster.
How the AI Editor works in GenRoom
GenRoom's AI Editor lets you change any generated design with plain-text instructions — or by brushing over an area and describing the change — and it's available in every plan, including Free. The workflow moves from a first rough generation to a polished final image in a handful of prompts.
Here's the end-to-end process:
- Generate a base design. Upload a photo of your room, facade, or yard, pick a mode or a style, click "Create design," and let GenRoom produce the first render in about 30 seconds. You can start free — the plan includes 6 credits with no credit card.
- Choose the render worth refining. Pick the result that has the best bones: right layout, right mood, right camera angle. Don't obsess over details yet — you'll fix those next.
- Open it in the AI Editor. Instead of downloading, send the render into the editor where you can type instructions or brush over the exact area you want to change.
- Make one change per prompt. Type a single, specific instruction — "change the wall color to warm terracotta" — and generate. Review the result.
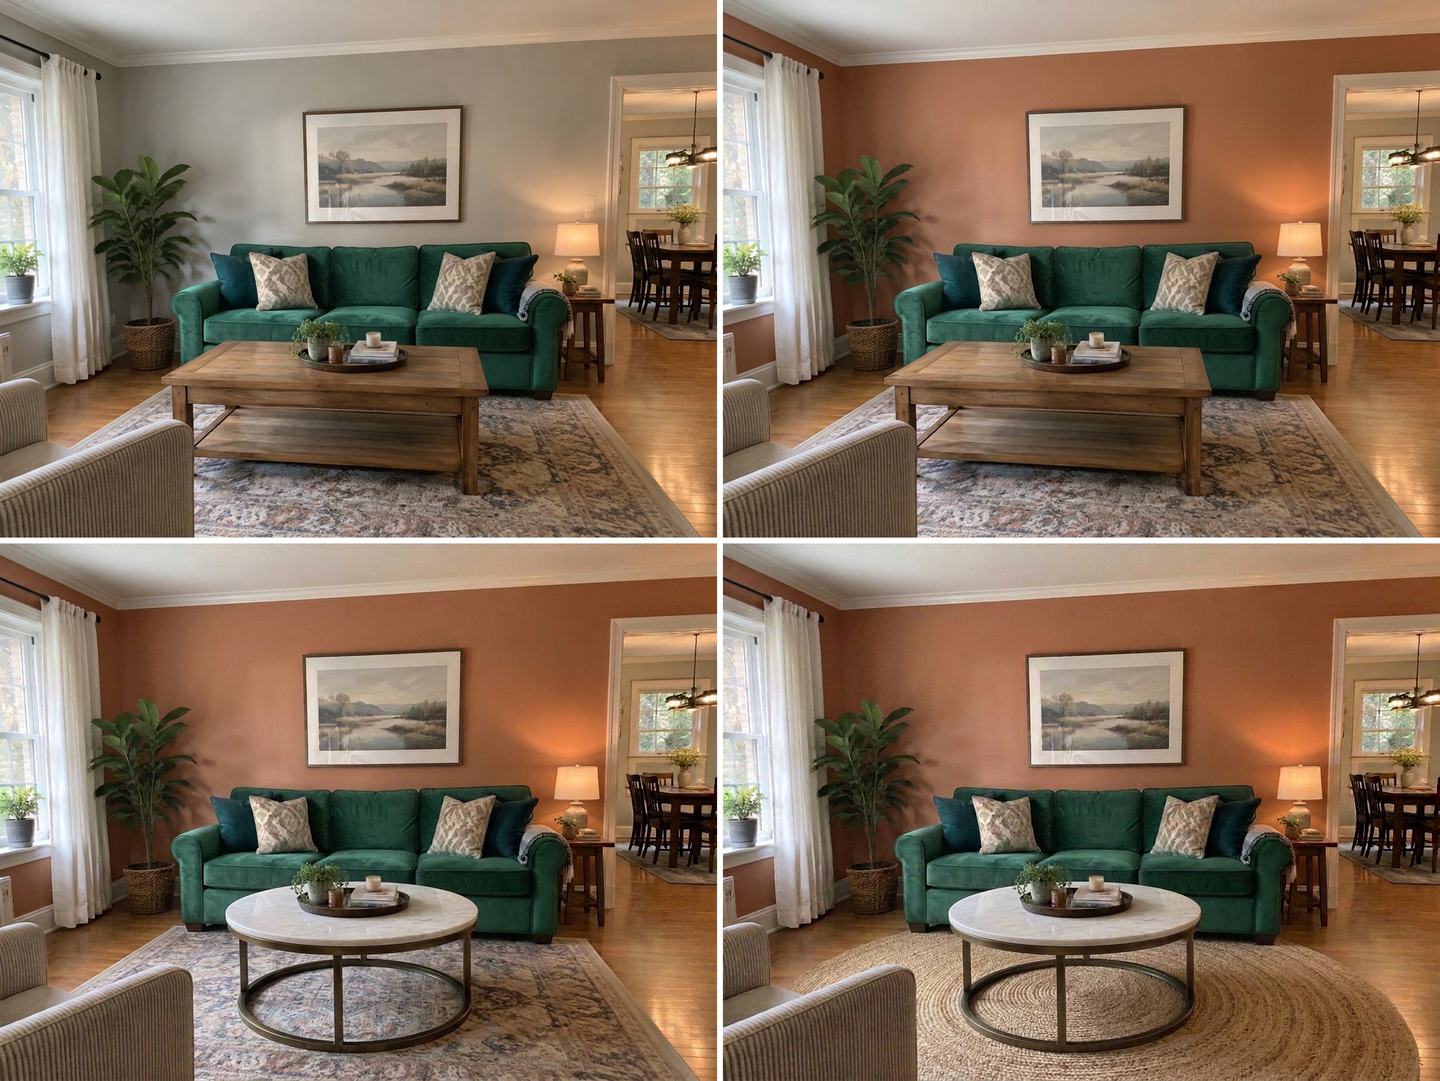
- Stack your edits. Keep the version you like and add the next instruction on top of it. Each edit builds on the last, so the design converges toward your vision.
- Export the final image. When it looks right, download it in full resolution (4K is included on Basic and Pro; Free and Start get one free 4K).
The key mental shift: treat the editor like a conversation, not a form. You're giving one clear instruction at a time and reacting to what you see.
Quotable takeaway: The best AI room edits come from many small, specific prompts — not one long, overloaded description. Change one thing, look, then change the next.
18 text prompts that actually work
Below are prompts grouped by what they change. They're written to be specific about what and where, which is what makes AI edits land accurately. Copy them, then swap in your own colors, materials, and positions.
Furniture and layout
- "Replace the sofa with a low-profile beige linen sectional."
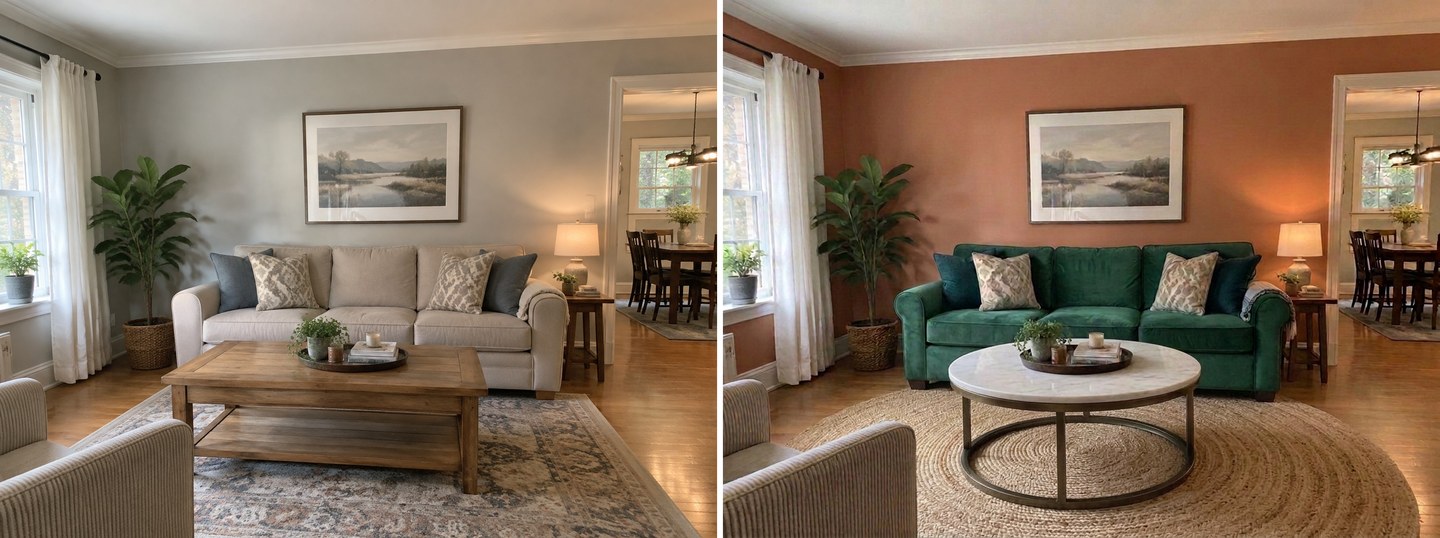
- "Swap the coffee table for a round travertine table."
- "Turn the armchair on the right into a mid-century tan leather chair."
- "Add a slim bookshelf against the empty left wall."
- "Remove the ottoman and add a woven jute rug in its place."
Naming the position ("on the right," "against the left wall") helps the AI target the correct object when the room has several similar pieces.
Color and materials
- "Change the sofa color to deep emerald green."
- "Repaint the walls a warm terracotta."
- "Change the flooring to wide-plank light oak."
- "Make the kitchen cabinets matte navy blue with brass handles."
- "Swap the marble backsplash for white subway tile."
Color and material swaps are where text editing shines — you can test five paint colors in the time it takes to open a single paint can.
Lighting and mood
- "Add a tall arc floor lamp in the left corner casting warm light."
- "Change the lighting to soft, warm evening ambiance."
- "Add recessed ceiling spotlights for brighter, even lighting."
- "Replace the pendant light above the table with a sleek black pendant."
Lighting prompts change the entire feeling of a room. "Warm evening ambiance" versus "bright natural daylight" can make the same layout feel cozy or crisp.
Decor and finishing touches
- "Add a large fiddle-leaf fig plant next to the window."
- "Hang a single large abstract artwork above the sofa."
- "Add sheer white curtains to the windows."
Cleaning up and removing
- "Remove the clutter from the coffee table and keep the surface clean."
Removal prompts are underrated. If a render is 90% right but has an odd extra chair or a busy shelf, one "remove the..." instruction often finishes the job.
| Prompt type | What it changes | Example |
|---|---|---|
| Furniture swap | One piece of furniture | "Replace the sofa with a gray sectional" |
| Color change | Walls, upholstery, cabinets | "Repaint the walls sage green" |
| Material swap | Flooring, countertops, tile | "Change flooring to herringbone oak" |
| Lighting | Fixtures and overall mood | "Add warm evening lighting" |
| Decor | Plants, art, textiles | "Add a large plant by the window" |
| Removal | Take an element out | "Remove the rug" |
A real refinement workflow, step by step
The fastest way to a great result is a short chain of focused edits. Here's a realistic example of turning a decent first render into a finished living-room design.
Start: You generate a Scandinavian living room. The layout and light are great, but the sofa is a bland gray, the room feels a little empty, and the evening mood you wanted isn't there.
- Edit 1 — the hero piece. "Change the sofa color to deep emerald green." Now the room has a focal point. Everything else stays put.
- Edit 2 — fill the gap. "Add a slim bookshelf against the empty left wall." The bare wall now feels intentional.
- Edit 3 — the mood. "Change the lighting to soft, warm evening ambiance." The space goes from showroom to livable.
- Edit 4 — a finishing touch. "Add a tall arc floor lamp in the left corner casting warm light." This anchors the reading nook and reinforces the evening feel.
- Edit 5 — cleanup. "Remove the clutter from the coffee table." Final polish.
Five prompts, roughly five minutes, and you've gone from a generic render to a specific, personal design — without touching a single slider or layer.
The same approach works for kitchens (change cabinet color, swap the backsplash, update the countertop), bedrooms (change the headboard, adjust bedding, soften the light), and even facades and yards. The pattern never changes: one clear instruction, review, repeat.
Create interior design with AI
Upload a photo of your room and get a professional design in 30 seconds. First generation is free.
Common mistakes when editing AI room designs
Most disappointing edits come from a handful of avoidable errors. Here's what trips people up and how to fix it.
Cramming too many changes into one prompt
The mistake: "Make the sofa green, change the floor to oak, add two plants, repaint the walls, and add warm lighting."
Why it fails: The AI has to juggle five competing instructions at once and usually does several of them poorly. You also can't tell which part of the prompt caused a bad result.
The fix: One change per prompt. It feels slower but it's actually faster, because you're not re-rolling a five-part instruction hoping all five land together.
Being vague about what and where
The mistake: "Make it look nicer" or "change the chair."
Why it fails: "Nicer" isn't a direction, and if there are two chairs, the AI guesses which one. Vague prompts produce vague, random changes.
The fix: Name the object, the change, and the position. "Turn the armchair on the right into a tan leather chair" leaves no room for guessing.
Starting over instead of editing
The mistake: Generating a fresh design from scratch every time something is slightly off.
Why it fails: You throw away the good parts and gamble on a whole new random result, which usually introduces new problems.
The fix: Keep the render that's closest and edit it. Refinement beats re-rolling almost every time.
Editing a weak base render
The mistake: Trying to fix a render where the layout or camera angle is fundamentally wrong.
Why it fails: Text edits change elements, not the underlying composition. If the bones are bad, no amount of editing saves it.
The fix: Generate a few base options first and only edit the one with the best structure.
Expecting a construction-ready blueprint
The mistake: Treating the output as exact measurements or a buildable plan.
Why it fails: AI visualization shows you look and feel, not precise dimensions. It's a design preview, not an architectural drawing.
The fix: Use it to decide on styles, colors, and combinations — then take those decisions to a contractor or designer for execution.
Tips to get noticeably better edits
- Describe materials, not just colors. "Matte navy cabinets with brass handles" beats "blue cabinets." Texture and finish give the AI more to work with.
- Reference position clearly. "In the left corner," "above the sofa," "against the far wall" — spatial cues dramatically improve accuracy. For pinpoint changes, brush over the spot instead.
- Change one variable to compare. Testing paint colors? Keep the exact same prompt and swap only the color word so you're comparing apples to apples.
- Keep the versions you like. Save promising intermediate results so you can branch — sometimes edit 3 was better than edit 4.
- Match your prompt to the room's reality. Asking for a sprawling sectional in a tiny room fights the space. Realistic requests produce realistic results.
- Escalate quality at the end. Do your experimenting at standard resolution, then download the winner in 4K once you're happy with the design.
For a broader walkthrough of getting your first render right before you start editing, see our guides on redesigning a room with AI and designing a room from a photo. If you're still choosing a tool, our comparison of AI interior design generators breaks down which ones actually include text-based editing.
Frequently asked questions
Can you edit an AI-generated interior design after it's created?
Yes. With an AI editor like GenRoom's, you type plain-text instructions — "change the wall color," "add a floor lamp," "swap the sofa" — and the AI regenerates only that element while keeping the rest of the design. You don't need to start over, and when words aren't precise enough, you can brush over the exact area and describe the change.
What's the best way to phrase an editing prompt?
Name three things: the object, the change, and the position. For example, "turn the armchair on the right into a gray velvet chair." Keep each prompt to a single change — stacking many edits into one instruction usually produces worse results than making them one at a time.
Do I need design skills to use text-prompt editing?
No. Text editing is designed for people with no design background. If you can describe a change in a sentence — "make the walls warmer" or "add plants near the window" — you can use it. The tool handles the rendering.
Is the AI Editor free?
Yes. GenRoom gives you 6 free credits with a free account and no credit card, and the AI Editor — edits with words and with a brush — is included in every plan, including Free. Each edit costs 2 credits, the same as a design. You can see current plans on the pricing page.
How many edits does it usually take to get a good result?
Most finished designs take between three and six focused edits — one change per prompt. Simple color or lighting tweaks can be done in one or two, while a full room makeover with new furniture, materials, and mood might take five or six.
Can I use text editing for exteriors and yards too?
Yes. The same workflow applies to facades, front yards, and patios: change the siding color, add landscaping, swap the front door, or adjust the lighting — one instruction at a time. GenRoom covers interiors, exteriors, and outdoor spaces in one tool.
The bottom line
Text-prompt editing turns AI room design from a one-shot gamble into a controllable, iterative process. Instead of accepting whatever the first render gives you, you keep the parts you love and refine the rest one clear instruction at a time — "make the sofa green," "add a floor lamp," "warm up the lighting" — until the space matches what's in your head. Stick to one change per prompt, be specific about what and where, and edit a strong base render rather than starting over.
Ready to try it on your own room? Upload a photo and start designing with GenRoom — the first few generations are free, and the AI Editor is waiting when you're ready to refine.