AI Storage Ideas: Add Built-Ins and Shelves to Your Room Photo
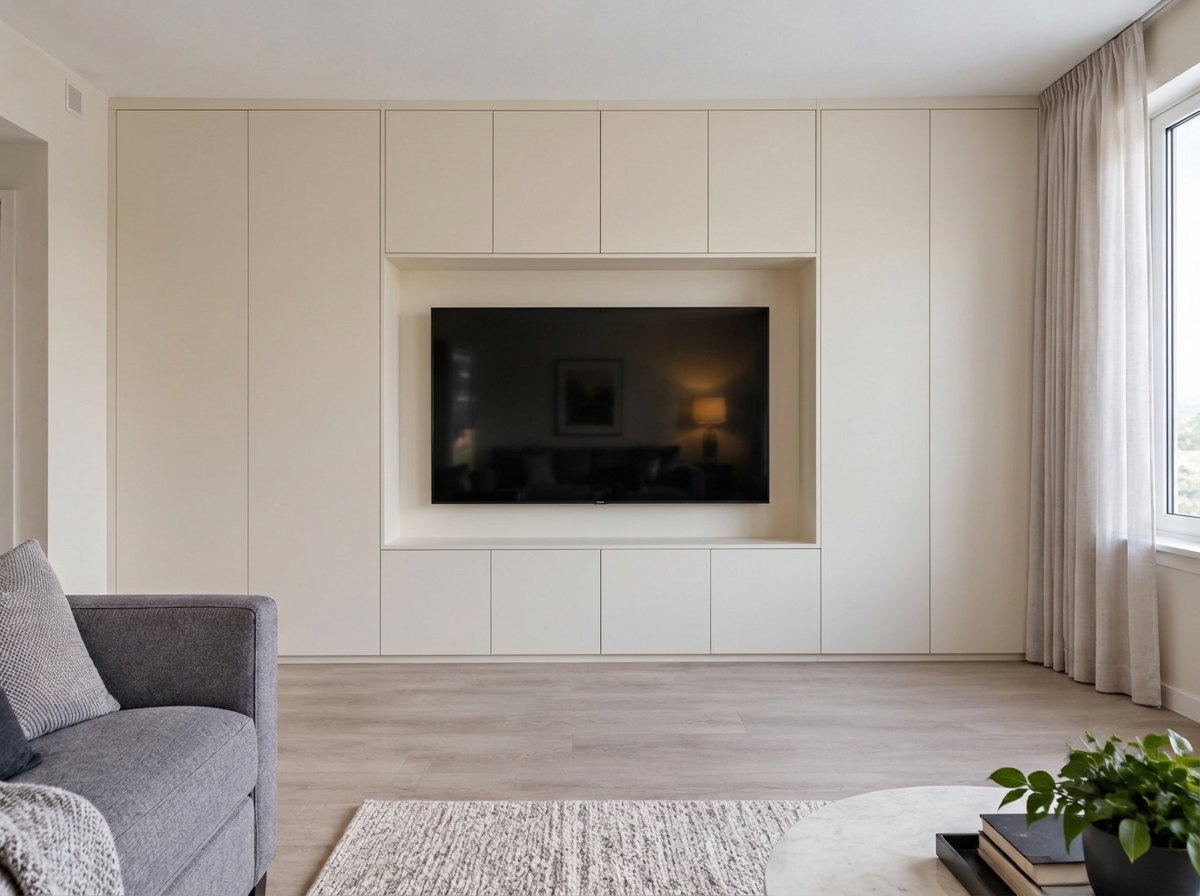
A real result from the GenRoom Studio: one ready task, "Built-in storage → Around the TV". The sofa, rug, floor, window and curtains come from the original photo.
AI storage ideas are most useful when they appear in your own room, on your own walls. In the GenRoom Studio you upload a photo, open Furniture & decor → Built-in storage, choose where it goes (along a free wall, in a niche or around the TV), and about half a minute later you see floor-to-ceiling cupboards in the same room, with the same camera angle. For a single shelf or cabinet in an exact spot, you paint that spot with the brush and type what to add. Each result costs 2 credits, and a free account starts with 6.
People ask for this constantly. Between March and October 2026, 1,625 people described a storage problem to GenRoom in their own words. Most of them did not want a new room. They wanted more storage in the room they already have. Below you'll find the Studio path for each kind of request, real before-and-after results on four test rooms (a small bedroom, a living-room TV wall, a hallway and a pantry), the places where the AI got it wrong, and the measurements to check before anyone builds anything.
What Do People Mean by "I Need More Storage"?
They usually mean one wall, one corner or one cupboard, not a full makeover. Here are typical requests, paraphrased and anonymized:
| What people write | What they actually want | Best Studio tool |
|---|---|---|
| "The room is 10×10, we can't move the bed or the big wardrobe. Suggest more storage." | Extra storage around fixed furniture | Your own words in the brief, or Built-in storage → Along a free wall |
| "Make the two cabinets reach the ceiling, and add a chair to the desk" | Taller versions of what's already there | AI editor: brush the cabinets, Quick actions → Replace furniture |
| "White fitted L-shaped wardrobes with gold accents" | A specific look for fitted wardrobes | AI editor + a reference photo |
| "A place to hang shirts that won't collect dust" | Closed hanging space | Built-in storage, plus "closed doors" in your wishes |
| "This is a pantry: food, cleaning products, vacuum, brooms. Organize it." | Shelving and a home for tall tools | Built-in storage → In the niche, plus a list of what must fit |
| "Style the shelves with the items I attached, add wooden storage boxes" | Shelves that look lived-in | AI editor: brush the shelves, Add, with a reference |
| "Change the recessed shelving to look like the reference" | A new design for an existing niche | Brush the niche + a reference photo |
Search behaves the same way. People type things like "ai cupboard design free", "ai kitchen organizer" or "ai room organizer", and the pages that rank are either general AI room generators or listicles of storage products. Neither shows the idea on your wall. If you are planning a whole dressing room rather than more storage in an existing room, our guide to walk-in closet and wardrobe layouts covers that, with dimensions for each layout.
Which Studio Tool Should You Use?
There are three ways to add storage to a photo, and they differ in how much the AI decides for you.
| Tool | Where it is | What it does | Use it when |
|---|---|---|---|
| Built-in storage (ready task) | Design from a photo → Furniture & decor | Adds floor-to-ceiling built-in storage in the color of the walls: along a free wall, in a niche or around the TV | You want to see a whole storage wall |
| Your own words | The wishes box in the same panel | Follows your brief, e.g. "keep the bed and the wardrobe" | You have constraints the ready task doesn't know about |
| Brush + Add / Replace | AI editor → Select area → Quick actions | Adds or swaps one thing in the spot you painted | One shelf, one cabinet, one wardrobe |
| Reference photo | AI editor → the photo button next to the text box | Copies the look of a system you found | You already know what you want it to look like |
The ready task is the fastest way to see whether a storage wall works at all. The brush is the way to keep everything else untouched. A reference photo is the way to stop the AI from inventing a style.
How to Add Built-In Storage From a Photo, Step by Step
The whole process takes a few minutes. Generation itself took between 22 and 62 seconds per result in our tests.
Step 1: Photograph the wall you want to use
Stand in the doorway or a corner and keep the camera at eye level. Make sure the photo shows the floor along the wall, the ceiling line, and any door, window or radiator next to it. The AI can only respect what it can see. If the door that swings toward that wall is outside the frame, nothing stops the AI from putting a cupboard in its path.
Step 2: Upload it with "Design from a photo"
Open the Studio, choose Design from a photo and upload the picture. The Studio detects the room type (you can change it under "Your space") and shows the modes, ready tasks and styles on the right.
Step 3: Open Furniture & decor and pick Built-in storage
Under Ready tasks, open Furniture & decor and click Built-in storage. Then choose Where:
- Along a free wall: the task tells the AI not to block windows and doors.
- In the niche: for an alcove, a recess or a small closet.
- Around the TV: cabinets that frame the TV wall.
The box under the options takes your own notes, for example "no dark furniture" or "closed doors only".
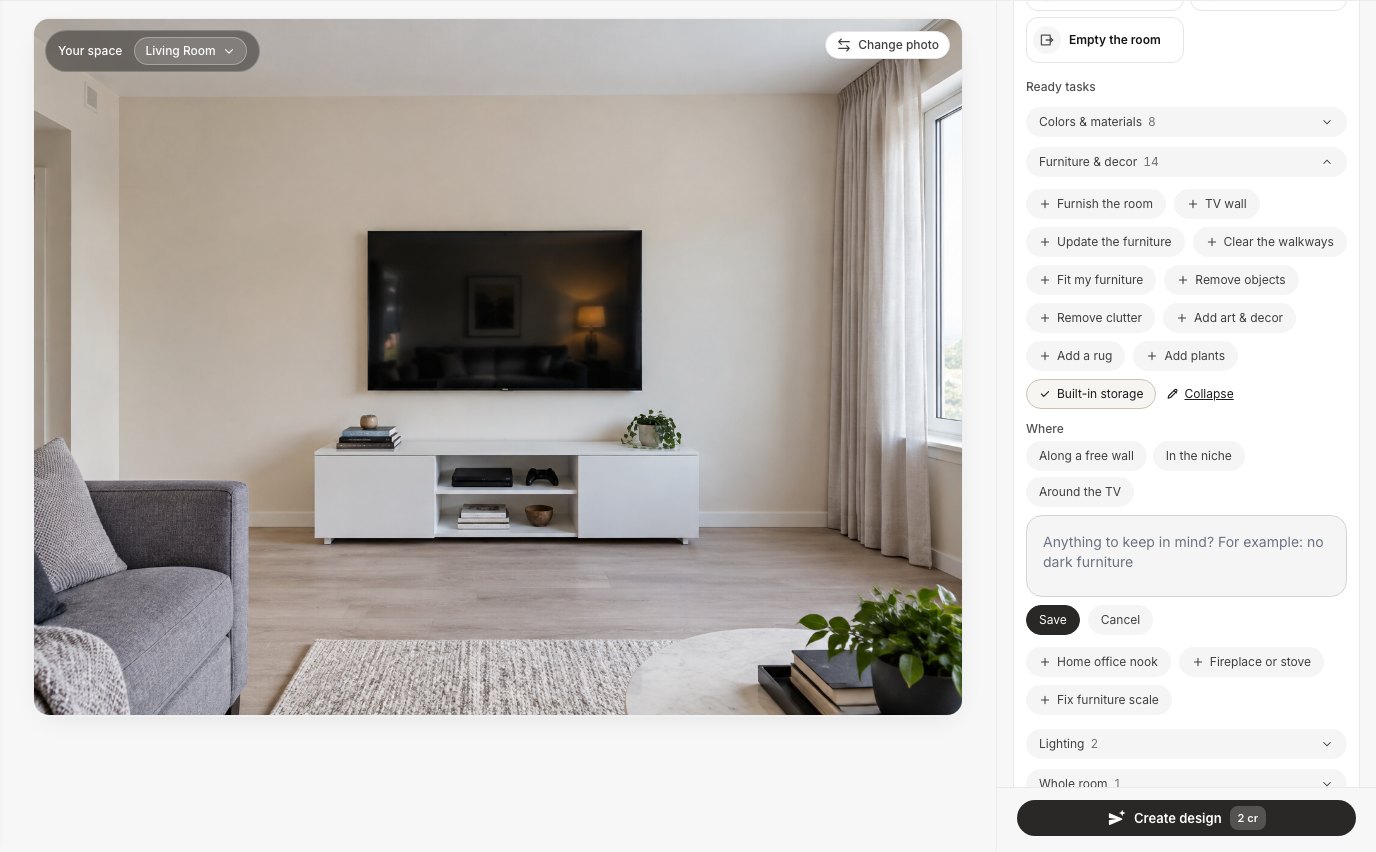 Built-in storage sits in Furniture & decor. The "Where" options decide which wall the cabinets go on.
Step 4: Create the design and compare
Click Create design. You get the same room with the cupboards added, and you can flip between the before and the after. If the idea works, keep going in the AI editor. If it doesn't, try another "Where" option. Each attempt is a new version, and the original photo stays untouched.
Example 1: A TV Wall That Becomes a Storage Wall
The living-room photo had a wall-mounted TV, a low white media unit and a lot of empty wall on both sides. We ran Built-in storage twice: once with Around the TV, once with Along a free wall.
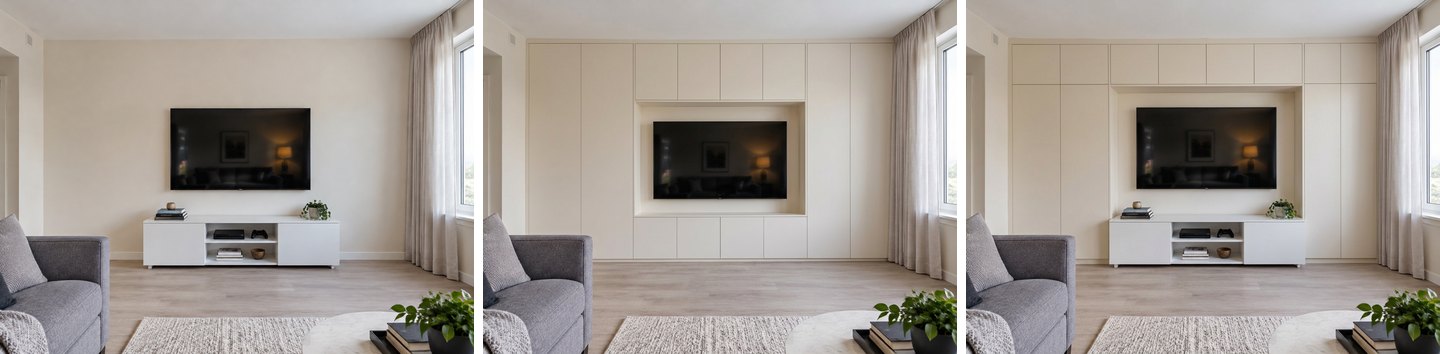 Left: the original. Middle: Around the TV. Right: Along a free wall. The window and curtains stayed clear in both.
Both results kept the sofa, the rug, the floor and the window. Around the TV replaced the low unit with cabinets and set the TV into a recessed niche. Along a free wall kept the original media unit and built tall cupboards and a top row around it. The second is the version you could build in two stages: tall units now, and the bridge over the TV later.
Notice what the AI chose by itself: the cabinets are in the color of the wall, with flat handleless doors. That is what the ready task asks for, because a storage wall in the wall color reads as part of the room rather than as extra furniture. If you want wood or a contrast color, say so in the notes box.
Example 2: A Small Bedroom Where Nothing Can Move
This is the request we see most often: a small bedroom, a bed that has to stay where it is, one freestanding wardrobe, and not enough room for clothes. We typed the request almost word for word into the wishes box: "The room is small. We can't move the bed or the big wardrobe. Suggest more storage."
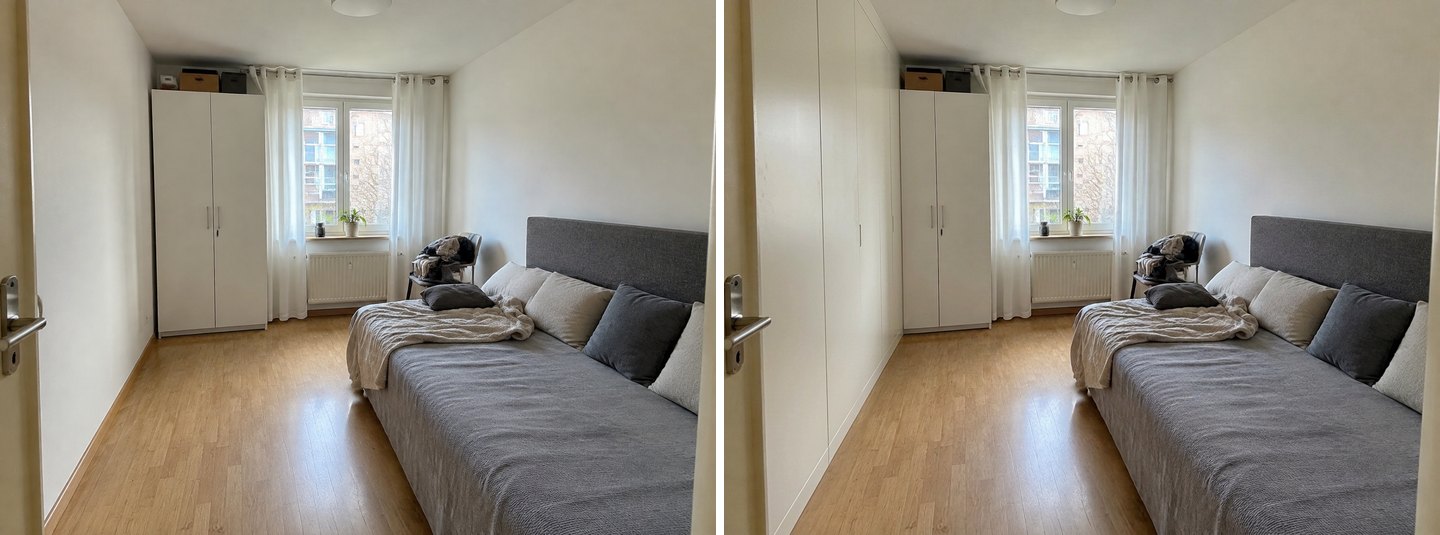 The bed and the original wardrobe stayed. The new cupboards went on the only free wall, and the door and the window stayed clear.
The AI did what a designer would suggest first: it used the long blank wall behind the door for a row of tall built-in wardrobes and left the bed, the old wardrobe, the radiator and the window as they were. The ready task gave a very similar answer, with one difference: it also took the handles off the old wardrobe so that it matched the new row. Your own words are the safer choice when something must stay exactly as it is.
Before you get excited about this result, read the section on depth below. The picture does not tell you whether the wall is long enough for a wardrobe and still lets the door open.
How to Change One Cupboard or Add One Shelf With the Brush
When the request is about one specific object, such as "make this cabinet reach the ceiling" or "add shelves here", use the AI editor rather than a ready task.
- Open the photo in the AI editor and click Select area.
- Paint over the object or the empty spot. The brush tells the AI where the change is allowed.
- Open Quick actions and pick Replace furniture (to swap what is there) or Add (to put something new on an empty wall).
- Type what you want, for example "a built-in floor-to-ceiling wardrobe with flat white doors", and press Apply.
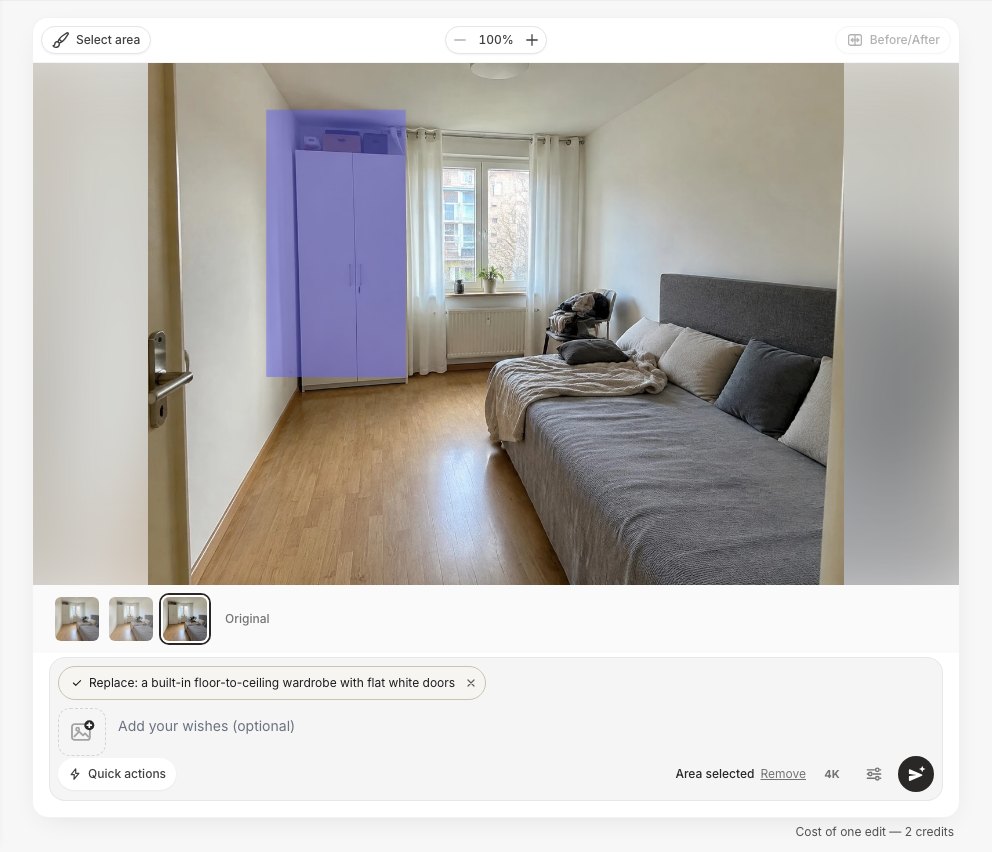 Paint the wardrobe and the empty space above it, then use Replace furniture. "Area selected" under the text box confirms the brush is active.
We painted the old wardrobe together with the gap above it, where boxes were stacked.
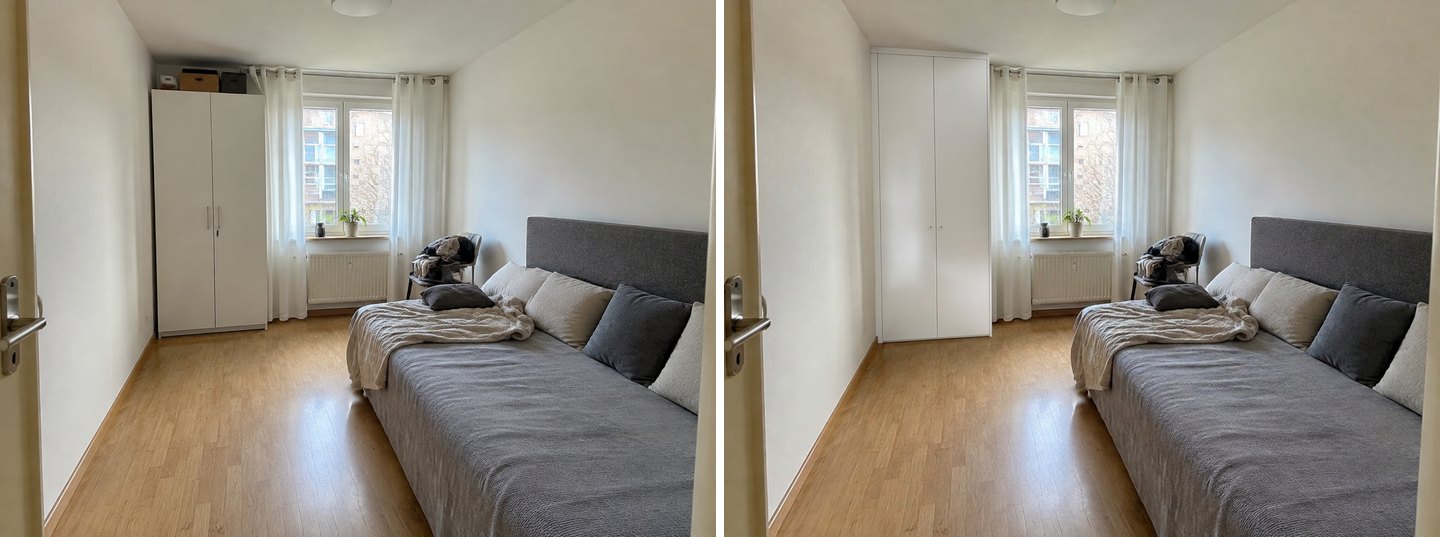 Same width, now up to the ceiling. The boxes on top are gone because that space became cupboard.
The wardrobe kept its width and its place and grew to the ceiling. Nothing else in the room changed. That is the answer to "make the cabinets reach the ceiling": a top box on an existing wardrobe usually adds more usable space than a new piece of furniture, and it costs far less.
For shelves, we painted a rectangle to the left of the TV and used Add with "three floating oak shelves with a few books".
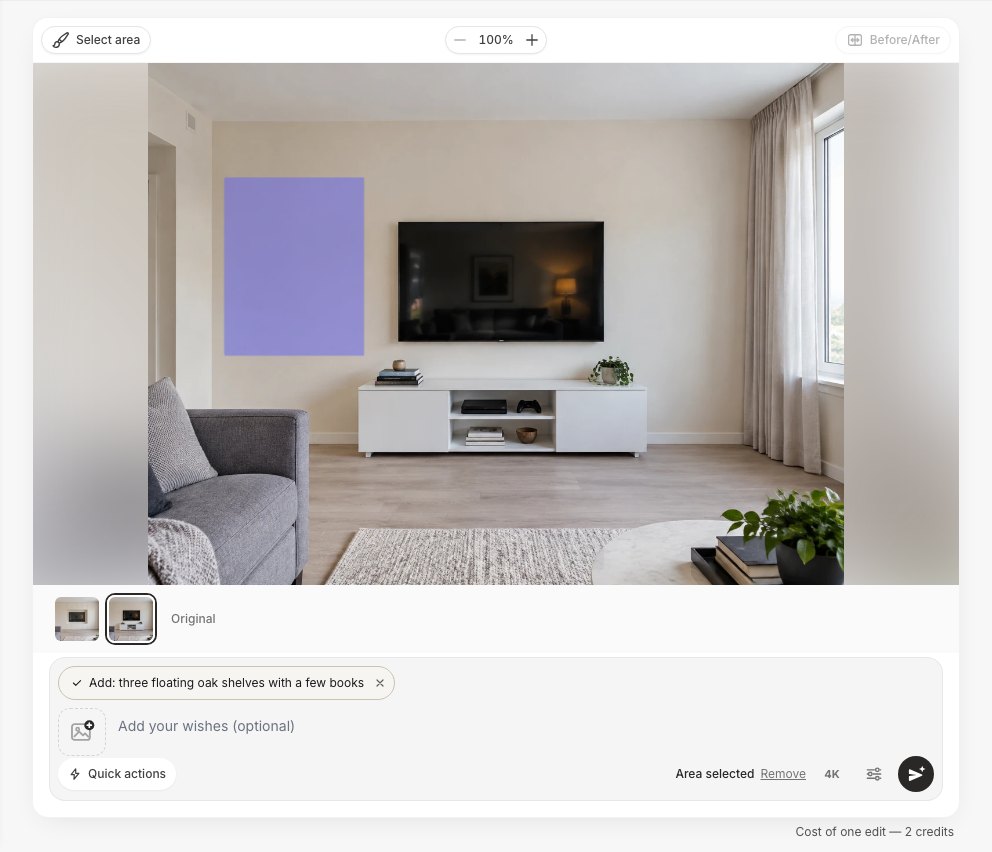 The brush marks the spot. Quick actions → Add turns your words into a chip.
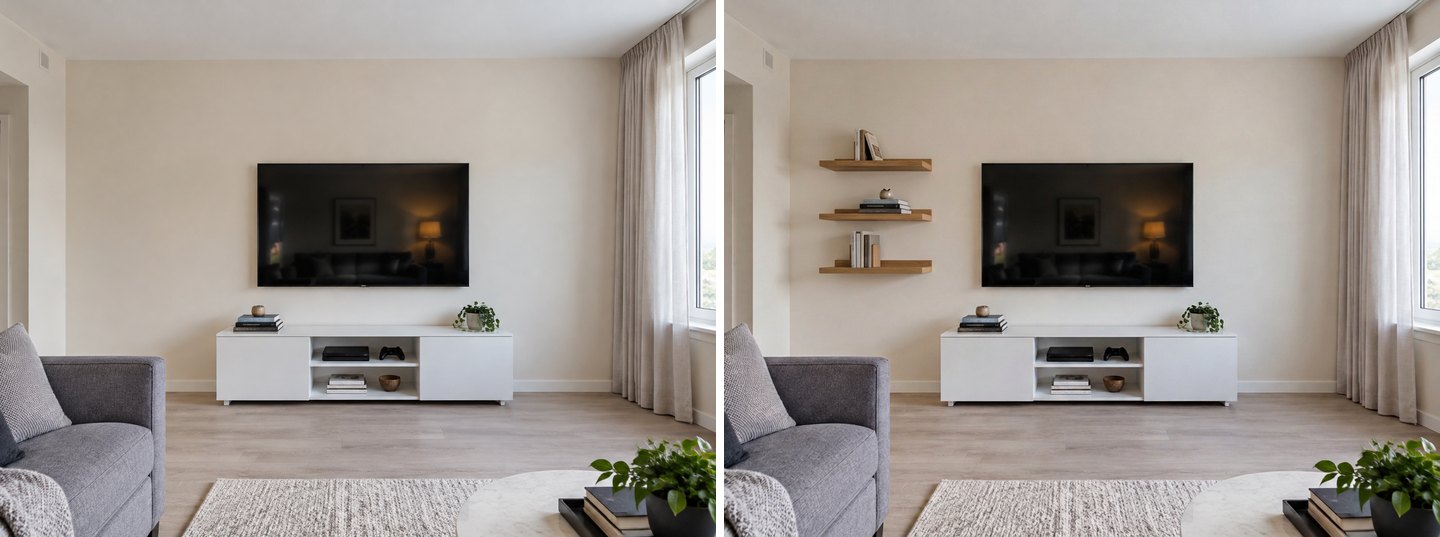 Exactly three shelves, exactly where the brush was. Everything outside the painted area stayed the same.
If you are not sure what to ask for, open Ideas for your photo in the same panel. The Studio suggests ideas for the specific photo; for this TV wall, one of them was "Add floating shelves".
How to Use a Reference Photo for a Specific Wardrobe or Shelving System
If you have already found the system you want (fluted doors, a particular shelving rail, brass handles), show it to the AI instead of describing it. In the AI editor, click the photo button next to the text box and choose Add as a reference. Paint the wall where it should go and write a short instruction.
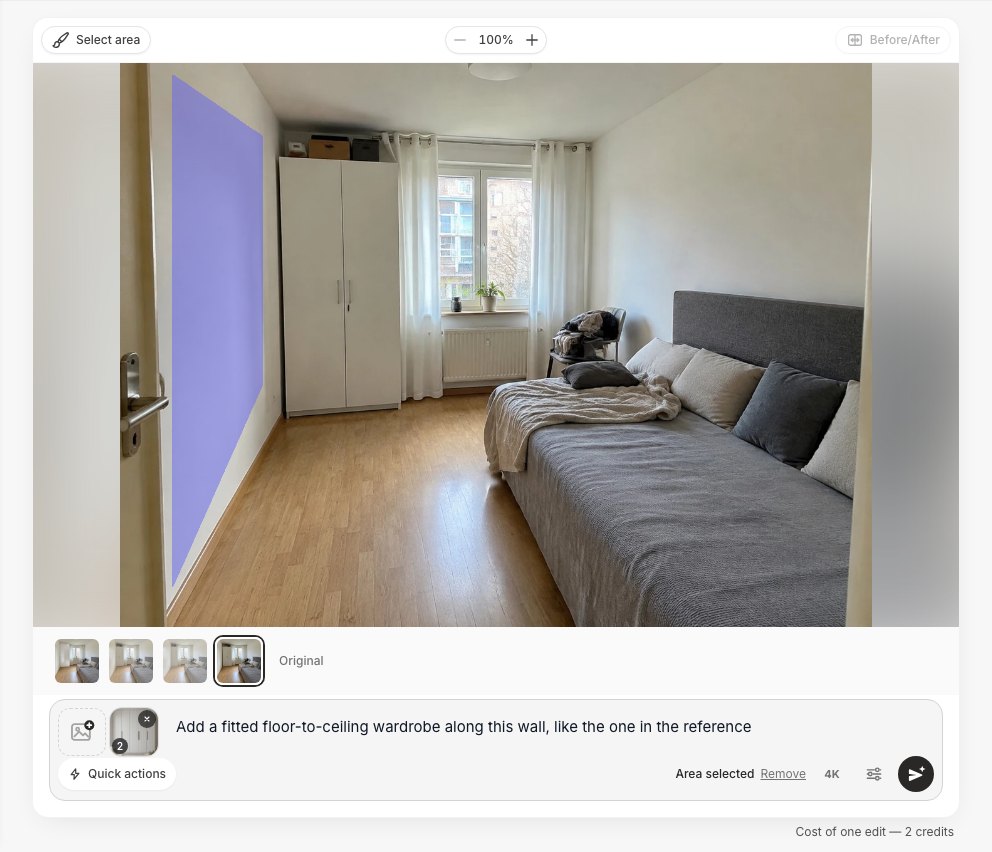 The reference sits next to the text box. The brush limits the change to one wall.
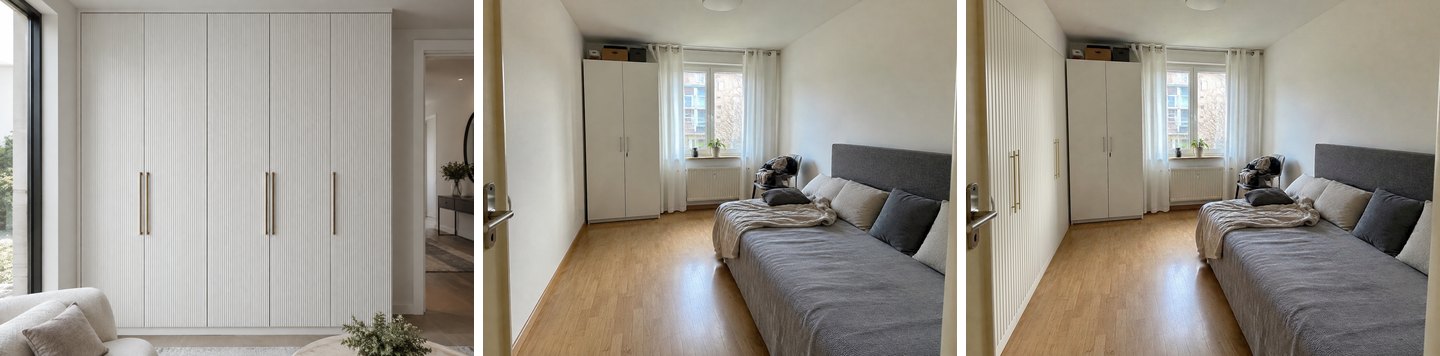 Left: the reference. Middle: the original. Right: the result. The fluting and the long brass handles carried over.
The vertical fluting, the white color and the long brass bar handles carried over from the reference, and the old wardrobe, the bed and the window stayed as they were. This also works for the "white fitted wardrobes with gold accents" kind of request: one good reference photo replaces a paragraph of description. Every plan can attach one reference photo to an edit; the Pro plan allows up to five.
Create interior design with AI
Upload a photo of your room and get a professional design in 30 seconds. First generation is free.
Example 3: A Pantry That Holds the Vacuum Too
Small pantries and utility closets fail for one reason: the shelf is too high for the heavy things and there's no home for the long things. The test photo had one sagging wire shelf, a floor full of bottles and bags, and a vacuum, a broom and a mop leaning against the wall. We used Built-in storage → In the niche and pasted the real request into the wishes: "This is a pantry: food, cleaning products, a vacuum cleaner, brooms and a mop. Organize it."
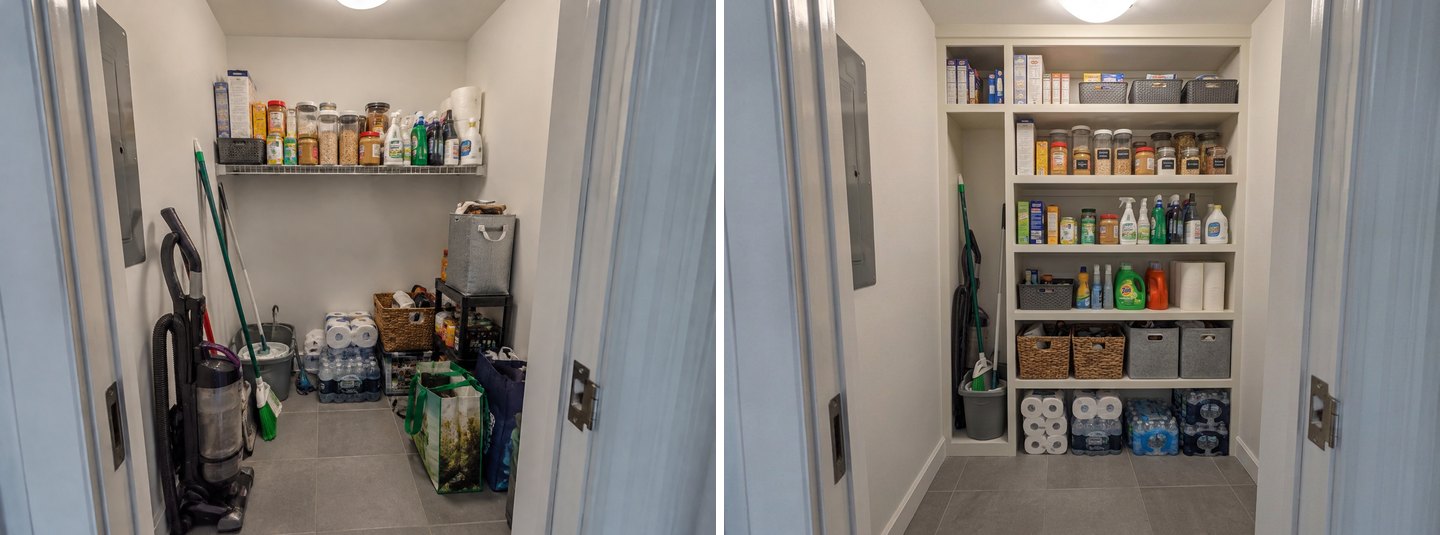 Full-height shelving on the back wall, baskets for the loose items, and a gap at the side for the broom and mop.
The result put shelving from floor to ceiling on the back wall, moved the paper towels and water to the bottom, the jars to eye level, and the spare stock up high, and grouped loose items in baskets. It also left a tall gap at the side for the broom and mop. That gap is the part people usually forget, so list your tall tools in the wishes. The electrical panel on the left wall stayed uncovered, which you would also want in real life.
For the decluttering part on its own (bags and bottles gone, nothing new added), see our guide to removing clutter from a room photo.
Where the AI Gets Storage Wrong
Storage is a harder job for an image model than paint or decor, because cupboards take up real space. We found three problems in our tests. Expect them, and check every result for them.
It can ignore depth
In the hallway, Built-in storage → Along a free wall put a full row of wardrobes on the long wall, hid the coats and shoes, and left the front door and the side doorway clear. It looks great. But the cupboard fronts sit almost exactly where the bare wall used to be. The hallway is just as wide in the "after" as in the "before".
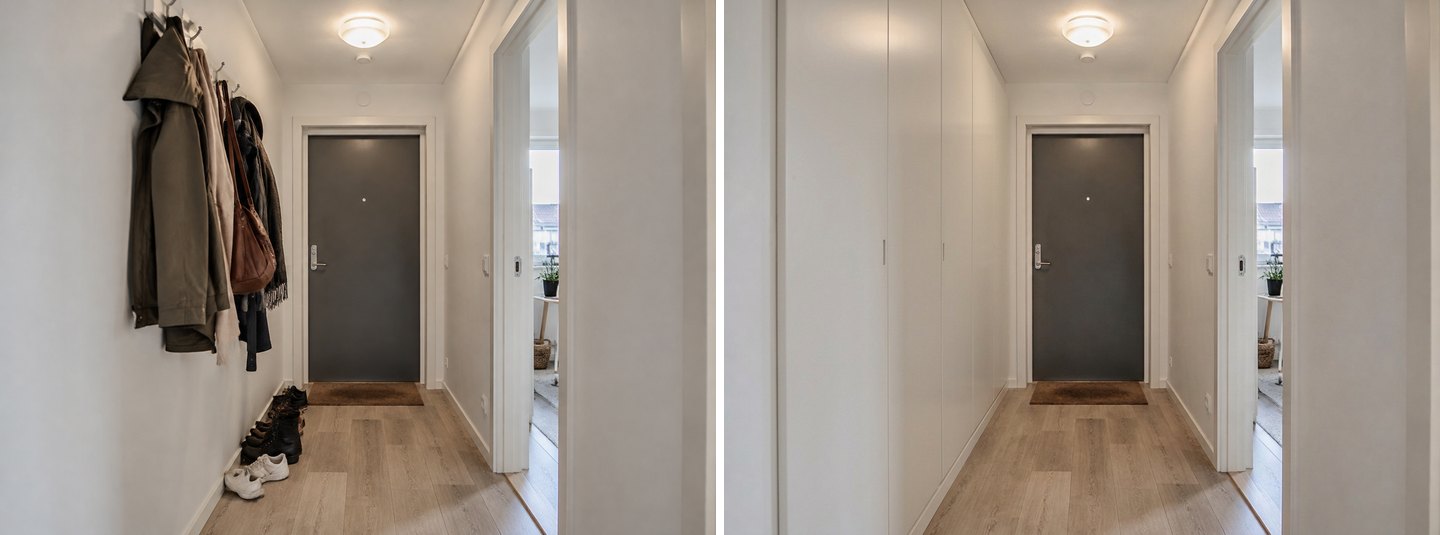 It looks tidy, but the doors sit almost on the old wall line. A real wardrobe would make this corridor much narrower.
In reality, a standard wardrobe frame is about 58 cm (22⅞ in) deep before the doors are added; IKEA's PAX frames come in that depth and in a shallow 35 cm (13¾ in) version. In a narrow corridor, a full-depth wardrobe can eat a third of the width or more. When we repeated the hallway with a more specific brief ("shallow storage only, about 35 cm deep: a shoe cabinet with a bench and closed coat storage on the left wall; keep the front door and the doorway on the right clear"), the result looked like something that could actually be built.
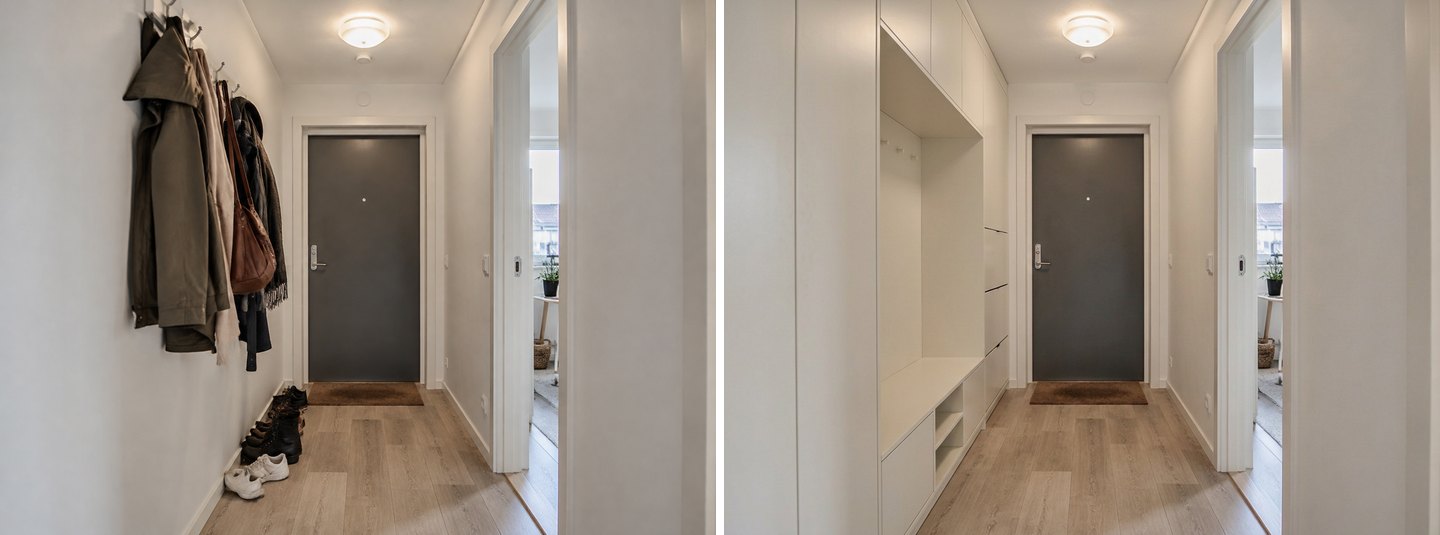 Same hallway, a brief that names the depth and the doors to keep clear. A bench, a coat niche, shoe shelves and shallow cupboards.
The AI still does not measure the result. GenRoom's own instructions say it plainly: the model does not count or measure millimeters, so anchor your request to objects in the room ("from the door casing to the corner") instead. Use the picture to choose the idea, and a tape measure to check it.
It can cover a radiator or crowd a window
On the bedroom window wall, we painted the whole wall and asked for "tall cabinets on both sides and a window seat with drawers under the window". The result looks cozy: two tall cabinets and a seat with drawers. But the seat now sits where the radiator was, with a grille in the front, and one curtain disappeared to make room for a cabinet.
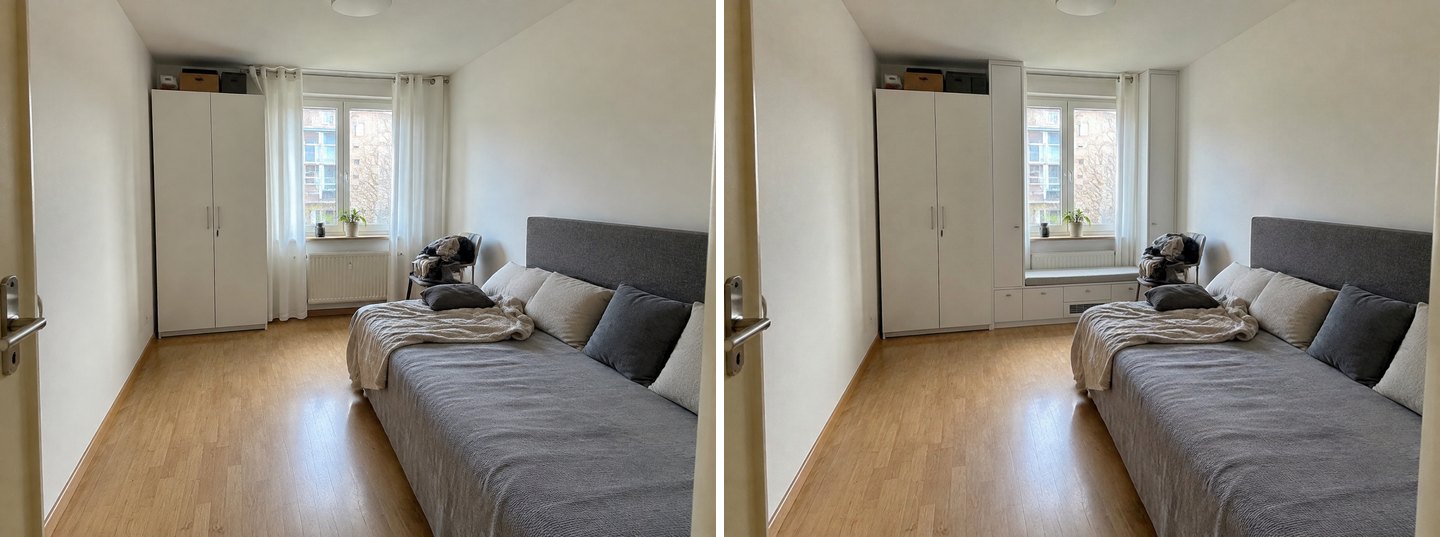 A window seat on top of the radiator. It photographs well, but it is a question for a heating installer before it is a carpentry job.
Built-in seats over radiators do exist, but boxing in a radiator changes how it heats the room, so treat a result like this as a question for your heating installer, not a plan. The ready task's "Along a free wall" option asks the AI not to block windows and doors; when you write your own instructions, add that yourself.
It does not know which way your door swings
In the reference-photo example above, the new wardrobe runs right up to the bedroom door. In the photo, the door is open toward that wall. A real 58 cm deep wardrobe in that spot could stop the door from opening fully. The AI sees a wall, not a door swing. Check the arc of every door and every cupboard door before you commit.
Measurements to Check Before You Build
Use the AI result to pick an idea. Then check it against these numbers in the real room.
| What to check | Rule of thumb | Source |
|---|---|---|
| Full-depth wardrobe | About 58 cm (22⅞ in) deep frame, plus the doors | IKEA PAX |
| Shallow wardrobe or hall cupboard | About 35 cm (13¾ in) deep | IKEA PAX |
| Space between book shelves | 8–12 in (20–30 cm); about 15 in (38 cm) for oversize books | Hunker |
| Hallway width left after storage | The US residential code (IRC R311.6) requires at least 3 ft (914 mm); check your local rules | UpCodes, R311.6 |
| Tall cupboards and bookcases | Anchor them to the wall; keep heavy items on low shelves | U.S. CPSC, Anchor It! |
Three more checks don't need a source, just a tape measure:
- Door swing. Measure from the hinge side of each door to where the cupboard would start. The door has to open fully.
- Sockets, switches and radiators. Mark them on the wall before you plan. The AI may cover them in the picture.
- The width of the run. Cupboard doors come in fixed widths. If your wall is 10 cm short of a full door, you'll need a filler panel, not a narrower picture.
Tips for Better AI Storage Results
These made the biggest difference in our tests:
- Say what must stay. "We can't move the bed or the wardrobe" got a cleaner result than the ready task alone.
- Name the depth when space is tight. "Shallow, about 35 cm deep" changed the hallway result from wishful to plausible.
- List what has to fit. A vacuum, a broom and a mop got their own tall gap in the pantry because we named them.
- Say closed or open. "A place to hang shirts that won't collect dust" means closed doors. Write that.
- Use the brush for one object. Replace furniture and Add only change the area you painted.
- Use a reference for a style. One photo of the doors you like beats a paragraph about them.
- Try another "Where" option before giving up. The same wall gave two quite different TV-wall ideas.
If the room itself needs a different layout before storage makes sense, start with rearranging the furniture, and see our small room design ideas for tricks that make a compact room feel bigger. For bedroom-specific ideas, the AI bedroom design page has more examples.
How Much Does It Cost?
Each design or edit costs 2 credits. A free account gets 6 credits without a card, enough for three results (with a watermark). Paid packs are one-time purchases with no subscription: Start is $9.99 for 36 credits (about 18 designs and edits), Basic is $19.99 for 100 credits, and Pro is $39.99 for 300 credits, with up to five reference photos per design. If a generation fails, the credits come back automatically. Everything in this article, including the 11 results we generated, cost 22 credits.
FAQ
Can AI design storage for my room from a photo?
Yes. Upload the photo in the GenRoom Studio, open Furniture & decor → Built-in storage and choose where it goes: along a free wall, in a niche or around the TV. You get the same room with floor-to-ceiling cupboards added, usually in under a minute. For one shelf or cabinet, use the brush in the AI editor.
How do I get AI to organize my room?
Describe the problem, not just the style. Write what must stay ("we can't move the bed"), what has to fit ("a vacuum, brooms, cleaning products") and whether you want closed doors or open shelves. To clear the mess without adding furniture, use Remove clutter instead.
Can I keep my furniture and only add storage?
Yes. Write that in the wishes ("keep the bed and the wardrobe") or use the brush, which limits the change to the area you painted. In our tests, the bed, the sofa, the floor and the windows stayed the same in every result.
Can AI make my existing wardrobe reach the ceiling?
Yes. Paint the wardrobe and the space above it in the AI editor, choose Quick actions → Replace furniture and type "a floor-to-ceiling wardrobe". In our test, the wardrobe kept its width and position and grew to the ceiling.
Does the AI get the dimensions right?
No. It draws a convincing picture but doesn't measure. In our hallway test, the cupboard fronts sat almost on the old wall line, as if they had no depth. Check depth (about 58 cm for a full wardrobe, 35 cm for a shallow one), door swing and the remaining walkway with a tape measure.
Can I copy a storage system from a photo I found online?
Yes. In the AI editor, attach the picture with Add as a reference, paint the wall and write "like the one in the reference". Every plan allows one reference photo per edit; Pro allows up to five.
Is it free?
A free account gets 6 credits with no card, which is three results with a watermark. Paid packs start at $9.99 for 36 credits, with no subscription.
The Bottom Line
AI storage ideas are worth trying because the answer is often a wall you stopped noticing: the blank wall behind the door, the space above a wardrobe, the sides of the TV. In the Studio, Built-in storage shows you a full storage wall in about half a minute, the brush adds or swaps one piece, and a reference photo copies a system you already like. Then check what the picture can't: depth, door swing, radiators and the walkway that's left. Upload a photo of your room and see where the storage could go.