AI Room Cleaner: Remove Clutter, People and Objects From Photos
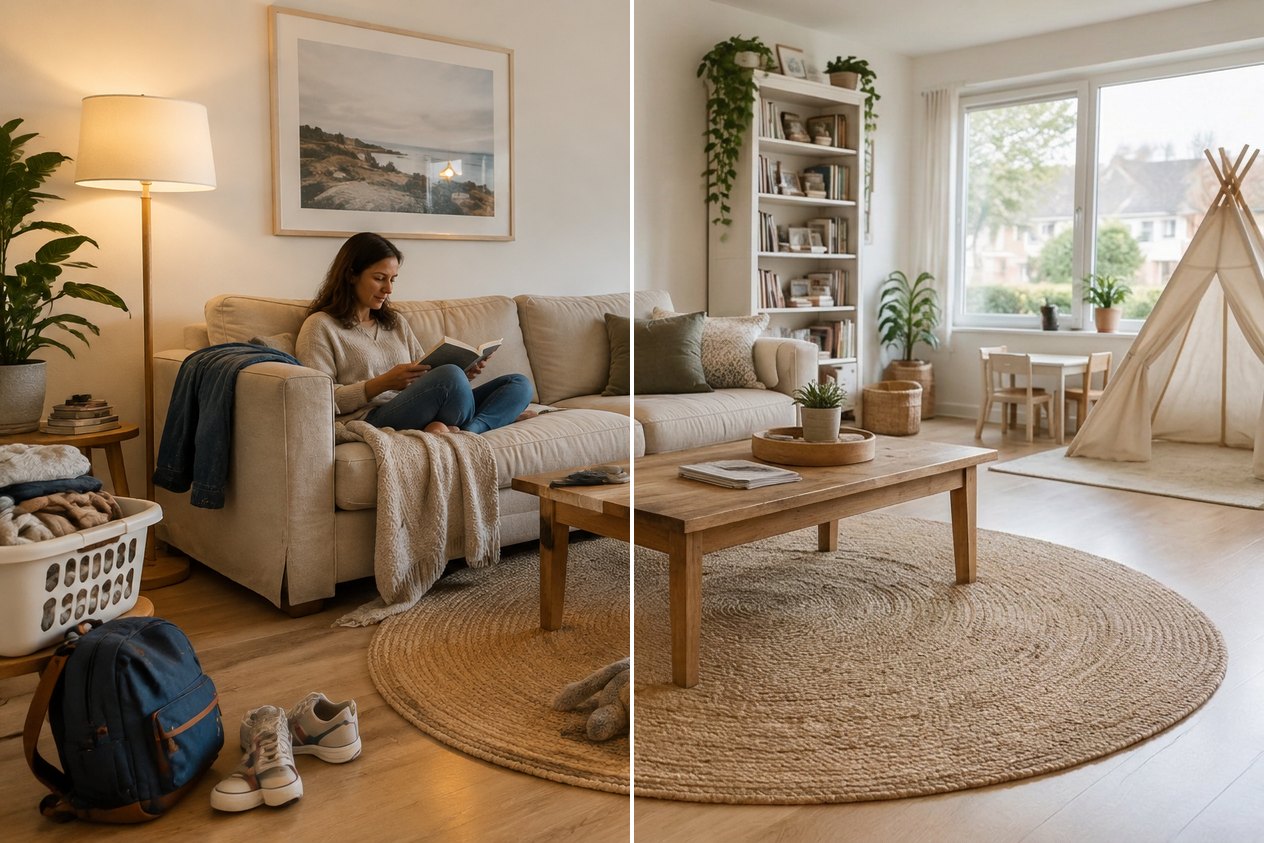
A real result from the GenRoom Studio. Left: the original photo. Right: the same frame after one tap on "Remove people & clutter". The sofa, rug, coffee table and shelves are the originals.
An AI room cleaner removes the things you don't want in a home photo, such as people, pets, toys, laundry, bins or a single object, and fills the gap with the wall, floor or lawn that would be behind it. Everything else stays where it was. In the GenRoom Studio there are three ways to do it. Remove people & clutter is one tap with no selection. Remove an object works with a brush or lasso when only one thing should go. Remove clutter clears countertops and desks. Each run costs 2 credits and took us about 25–35 seconds.
This guide is built on real requests. Between March and October 2026, 1,198 GenRoom users asked, in their own words, to take something out of a photo: a towel, a washing machine, cables, kids' toys, a stranger on the sidewalk. Below are the Studio paths for each kind of request, four scenes we shot for this article (a living room, a bathroom, a kitchen and a house front), and an honest list of what the AI still gets wrong. If you want the opposite job, a completely empty room for staging, see our separate guide to AI furniture removal.
What Do People Actually Ask an AI Room Cleaner to Remove?
Most people don't want a new design. They want their own photo without one or two annoying things. Here are typical requests, paraphrased and anonymized:
| What people write | What it really is | Best GenRoom tool |
|---|---|---|
| "Take out the kids' toys and the wetsuit" | Personal items scattered around | Remove people & clutter |
| "Remove the gentleman" (from a house photo) | A person in the frame | Remove people & clutter |
| "Remove the towel drying above the toilet" | One small object | Remove an object, by name or selection |
| "Remove the washing machine" | One large object in front of a wall | Remove an object + lasso |
| "Leave the photo as it is, just remove the cables and the vents" | Several small fixtures, rest untouched | Remove an object + brush |
| "Remove the lettering on the corner wall" | Something painted on a surface | Remove an object + brush |
| "This desk looks cluttered, make it look tidy" | Small items on surfaces | Remove clutter (ready task) |
| "A well arranged and organised room" | Tidy, possibly with furniture moved | Remove clutter, then Rearrange furniture |
Two things stand out. First, these people say what should stay as often as what should go ("leave the photo as it is"). Second, half of the requests are about a single object, which a one-tap cleaner can't guess. That's why it helps to know which of the three tools to use.
Which Tool to Use: One Tap, a Selection, or a Ready Task
Use one tap when the clutter is "life", and a selection when it is "one thing". GenRoom has several removal tools, and they do different jobs:
| Tool | Where to find it | What it removes | What it keeps |
|---|---|---|---|
| Remove people & clutter | Design modes, and Quick actions in the editor | Rooms: people, pets, toys, clothes, bags, scattered personal items. Facades: people, pets, parked cars, bins, ladders. Yards: people, pets, toys, hoses, tools, bins | Furniture, finishes, lighting, the building, planting |
| Remove an object | Quick actions in the editor | Whatever you name or select with the brush or lasso | Everything outside the selection |
| Remove clutter | Ready tasks → Furniture & decor (rooms) | Dishes, jars, bottles, papers, clothes, boxes and cables on floors, counters, tables and shelves | Furniture, built-in appliances, lights, finishes |
| Remove cars, wires, clutter | Ready tasks (facades) | Parked cars, overhead wires, scaffolding, trash, AC units | The building |
| Restore from original | Quick actions in the editor | Nothing. It brings back a selected area from the original photo | All other edits |
| Empty the room | Design modes and Quick actions | All free-standing furniture, rugs, curtains, decor | Walls, floor, windows, built-ins |
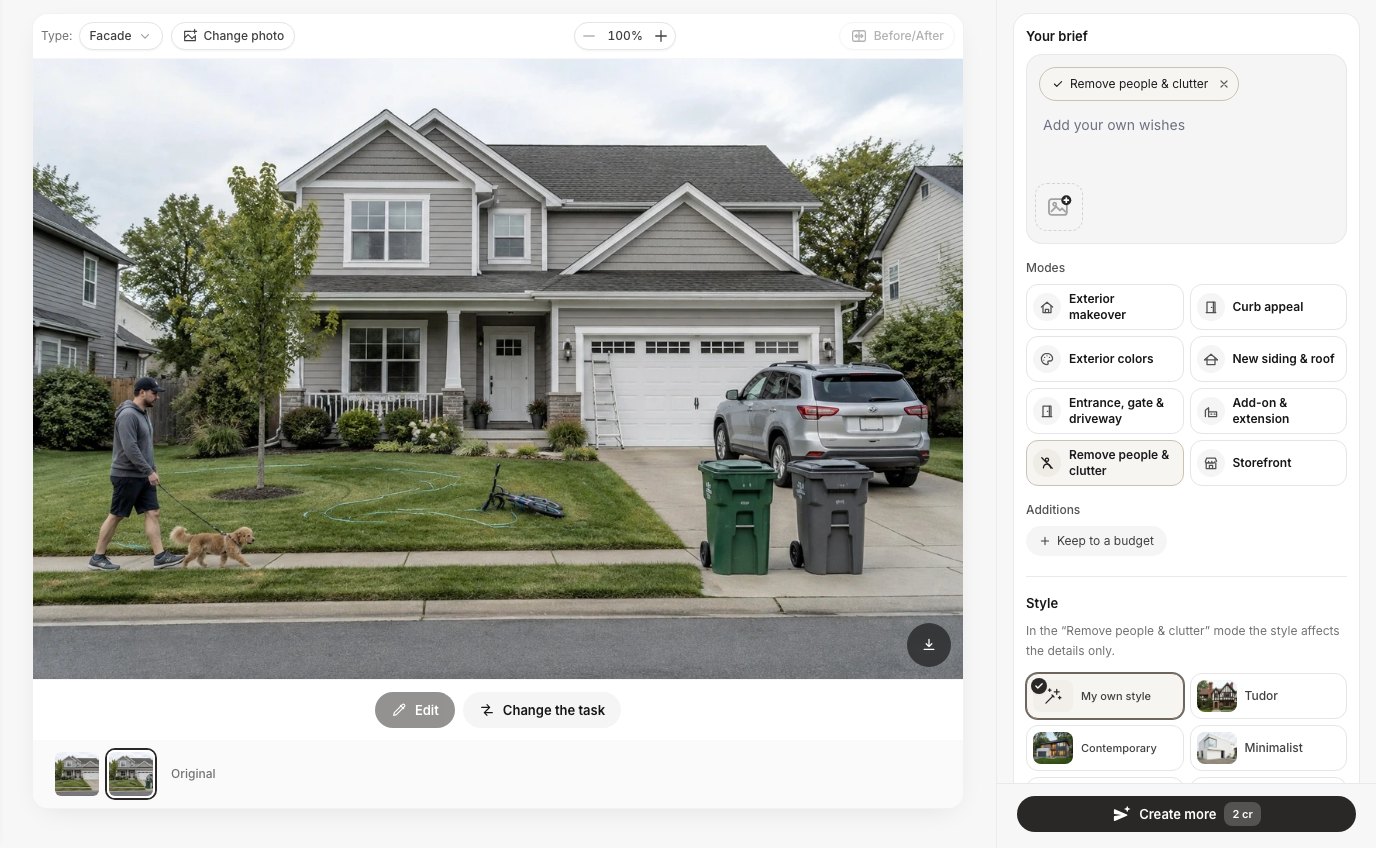 The "Remove people & clutter" mode on a facade photo. The Studio recognised the photo as a facade and offers the exterior version of the mode.
All of these are edits of your photo, not a redesign. Nothing new is supposed to appear, and the camera angle should stay the same. In practice the AI sometimes invents a small filler, and we show where that happened below.
How to Remove People, Pets and Clutter From a Room Photo
Upload the photo, choose "Remove people & clutter", press Create design. You don't select anything and you don't need a prompt. Step by step:
- Take the photo straight and well lit. The AI rebuilds what is hidden from what it can see, so a photo with more visible floor and wall gives it more to work from.
- Open the Studio and upload. The room type is detected automatically; you can change it under "Your space".
- Pick the mode. In the Modes list, tap Remove people & clutter. In this mode the style setting only affects small details, so you can leave it on "My own style".
- Press Create design (2 credits). Our runs finished in 24–37 seconds from the click.
- Check, then keep or fix. Use the Before/After slider. If something you wanted has gone, use Restore from original on that area (see below).
You can also start from the editor: open Quick actions → Remove people & clutter and press Apply. It's the same instruction and the same model, and it works the same way on a phone.
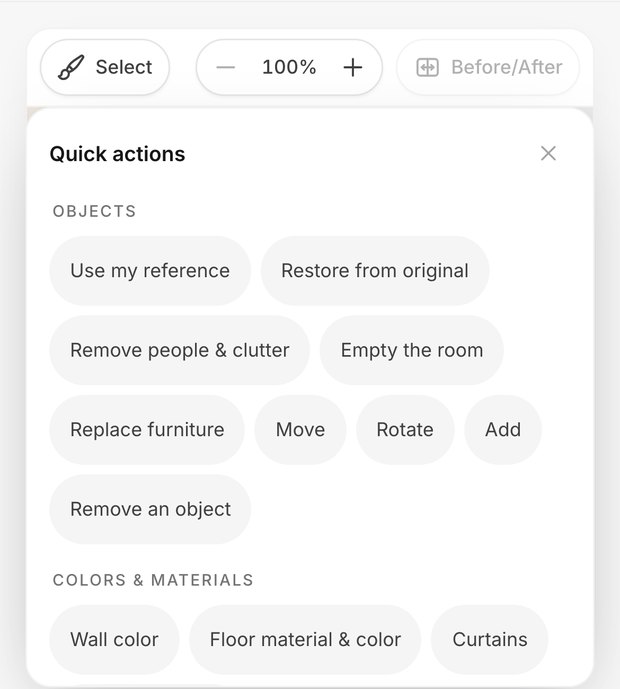 The same Quick actions on a phone. "Select" above the photo turns on the brush and lasso.
Test 1: A lived-in family living room
We used an ordinary family living room: a woman reading on the sofa, a golden retriever on the rug, building blocks and toy cars on the floor, a plush toy, a backpack, sneakers, a laundry basket and a jacket on the armrest.
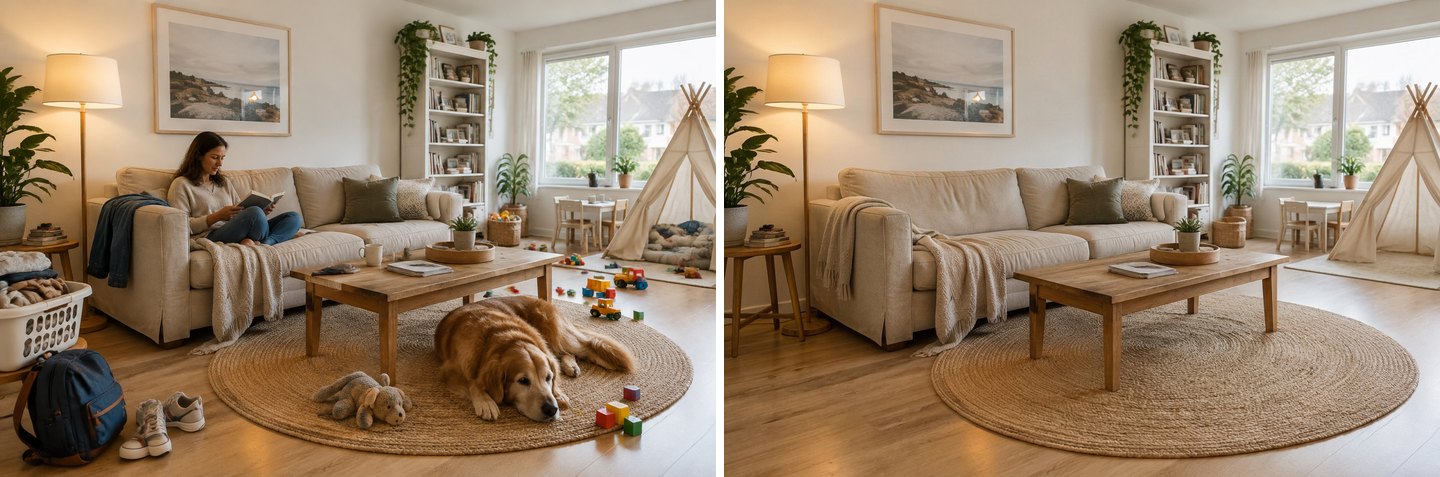 One tap, about 30 seconds. People, the dog, toys, shoes, bag, basket and mugs are gone. The furniture, rug, shelves, plants and the play tent stayed.
What it got right. It removed the woman, the dog, every toy, the backpack, the sneakers, the laundry basket, the jacket and the mugs on the coffee table. The sofa where the woman sat was rebuilt with a matching seat cushion. The jute rug under the dog came back with an even weave, and the side table that was half hidden by the basket now has visible legs. The furniture, the bookcase and the plants are the originals.
What it changed that it shouldn't have. The jacket on the left armrest was swapped for a beige knit throw. That's a small invented filler, not just a removal. The whole picture also came back slightly brighter and warmer, and the framing moved by a few pixels. The kids' play tent stayed because it is furniture-sized, but the toys inside it were removed. All of this is fine for a tidy social or listing photo, but you should know it happens.
Keep one thing: bring the dog back
Sometimes "remove everything" is too much. A pet-friendly rental listing or a family photo might want the dog, just not the mess. That's what Restore from original is for: select an area, choose the action, and that part of the original photo comes back while the other edits stay.
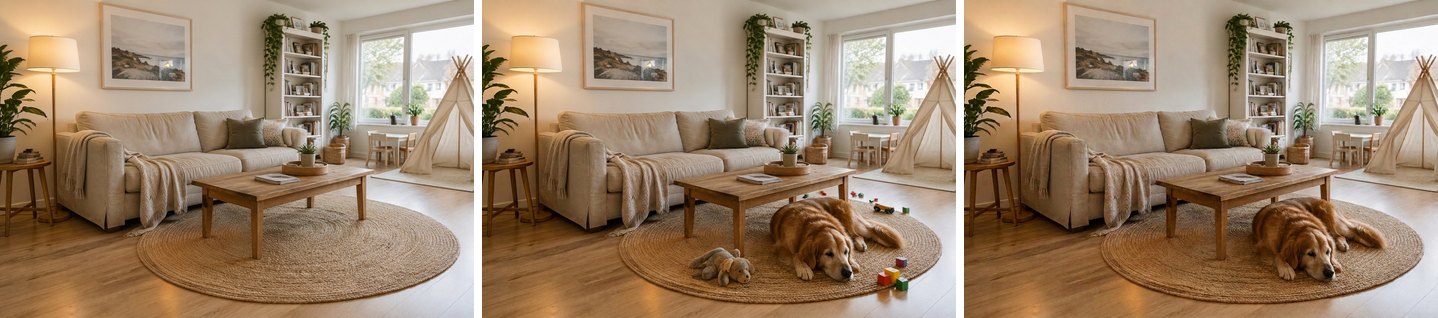 Left: after "Remove people & clutter". Middle: "Restore from original" on the dog also brought back the toys next to it. Right: "Remove an object" with "the plush toy, the toy blocks and the toy cars" cleared them again.
Honest result: the restore brought the dog back exactly as it was, but also the plush toy and the blocks lying next to it, partly outside our selection. One more 2-credit edit ("Remove an object", typed as "the plush toy, the toy blocks and the toy cars on the rug and the floor") removed them and kept the dog. The restore itself was the slowest edit in our tests, at just under a minute. Lesson: select tightly around the thing you want back, and expect to need one follow-up edit.
How to Remove One Object With the Brush or Lasso
For a single object, select it and use "Remove an object". It's the most reliable way to take out one thing without touching the rest, because the model only works inside your selection. In the editor:
- Press Select area above the photo and choose Brush (paint over the object) or Lasso (draw around it).
- Press the check mark to keep the selection.
- Open Quick actions → Remove an object. With a selection you don't need to type anything; the instruction becomes "remove the object in the selected area and fill the freed space in the same style".
- Press Apply (2 credits).
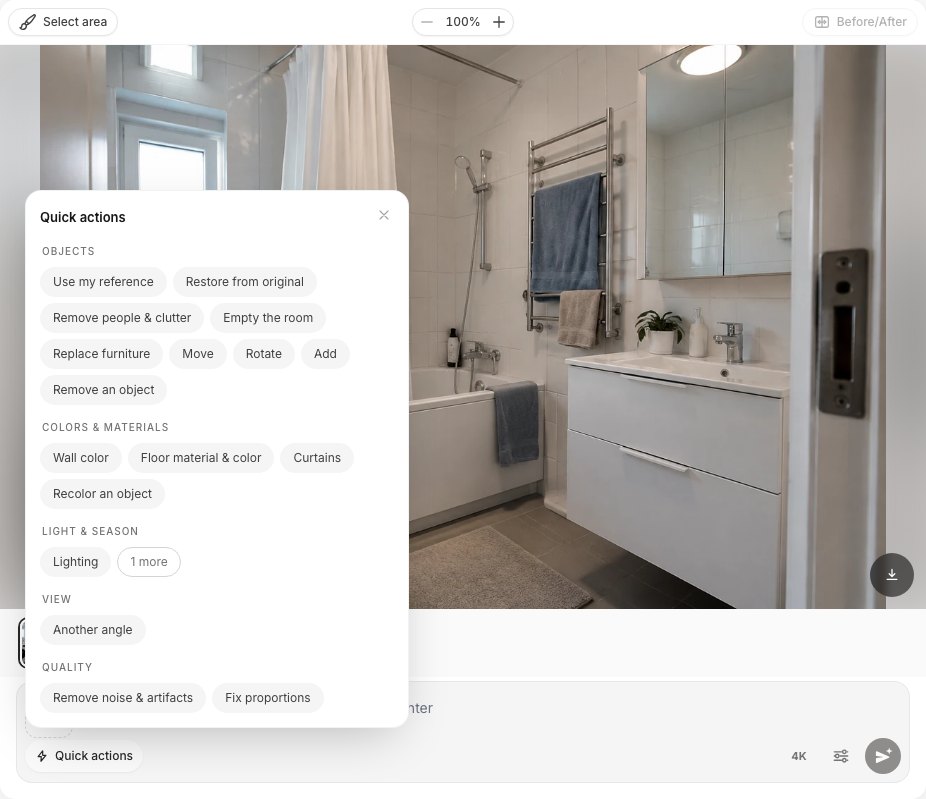 Quick actions in the editor. All the removal tools are in the Objects group.
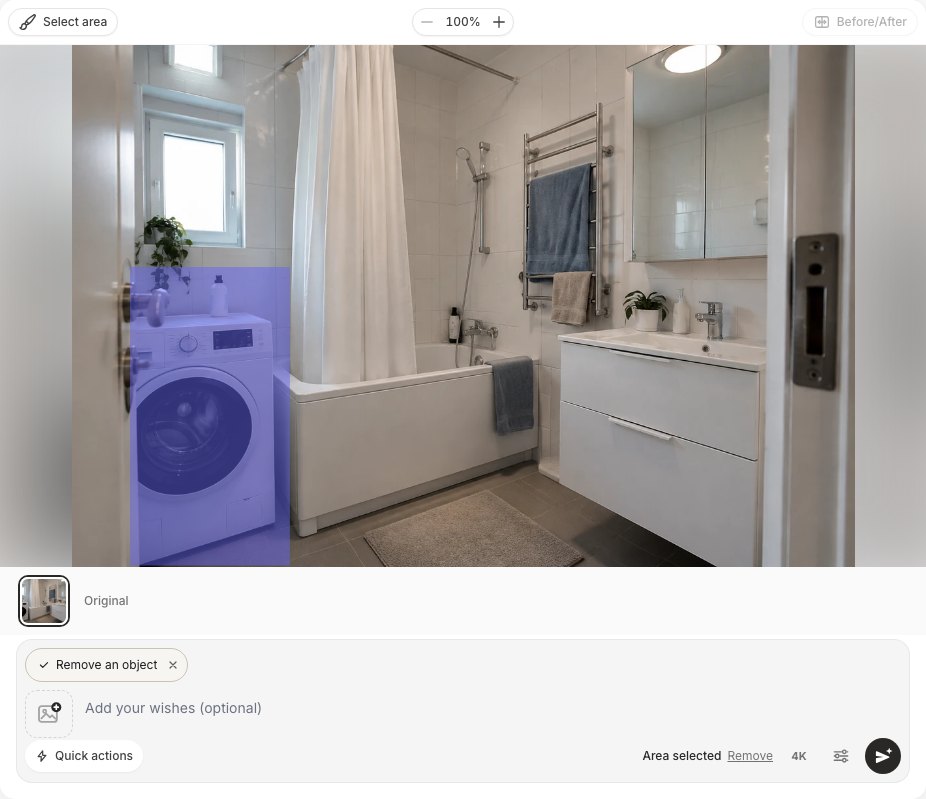 The lasso around the washing machine and the "Remove an object" chip. "Area selected" confirms the edit is limited to the selection.
You can also skip the selection and just name the object: Remove an object opens a "What to remove" field, for example "the towels hanging on the towel rail". Naming works well for objects that are easy to tell apart. Selecting is better when there are several similar things and you only want one gone.
Test 2: A small bathroom with a washing machine and drying towels
Two of the most common real requests, "remove the washing machine" and "remove the towel drying above the toilet", happen in the same kind of room. We did them one after the other on the same photo.
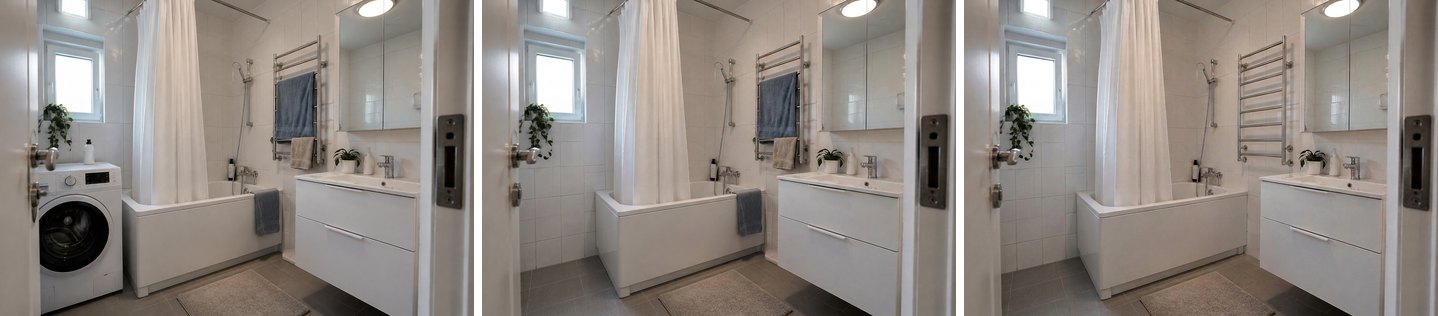 Left: the original. Middle: lasso + "Remove an object" removed the washing machine and the bottle on top (25 seconds). Right: typing "the towels hanging on the towel rail and on the bathtub" removed the towels (31 seconds).
What it got right. In place of the washing machine there is now a white tiled wall and grey floor tiles that continue the room's own tiles, and the bath panel runs on to the corner. The door handle in front of the machine and the plant on the windowsill stayed, even though the lasso crossed them. Outside the selection the photo barely changed: in our pixel check the average difference outside the selected area was about 6 out of 255, compared with 47 inside it. The towel edit cleared both towels and drew the full heated rail that was hidden behind them.
What to watch. Up close, the new tile joints behind the machine are not perfectly regular. And the AI can only paint a plausible plain wall: in a real bathroom there would be a tap and a drain behind a washing machine. It doesn't know they are there, so it doesn't draw them.
How to Clean Up a Facade or Yard Photo
The same one-tap mode works outdoors. On a house front, "Remove people & clutter" removes people, pets, parked cars, bins, ladders and temporary clutter, and keeps the building and landscaping. On a yard photo it removes toys, hoses, tools and bins and restores the ground and planting.
Test 3: A house front with a car, bins, a hose and a passer-by
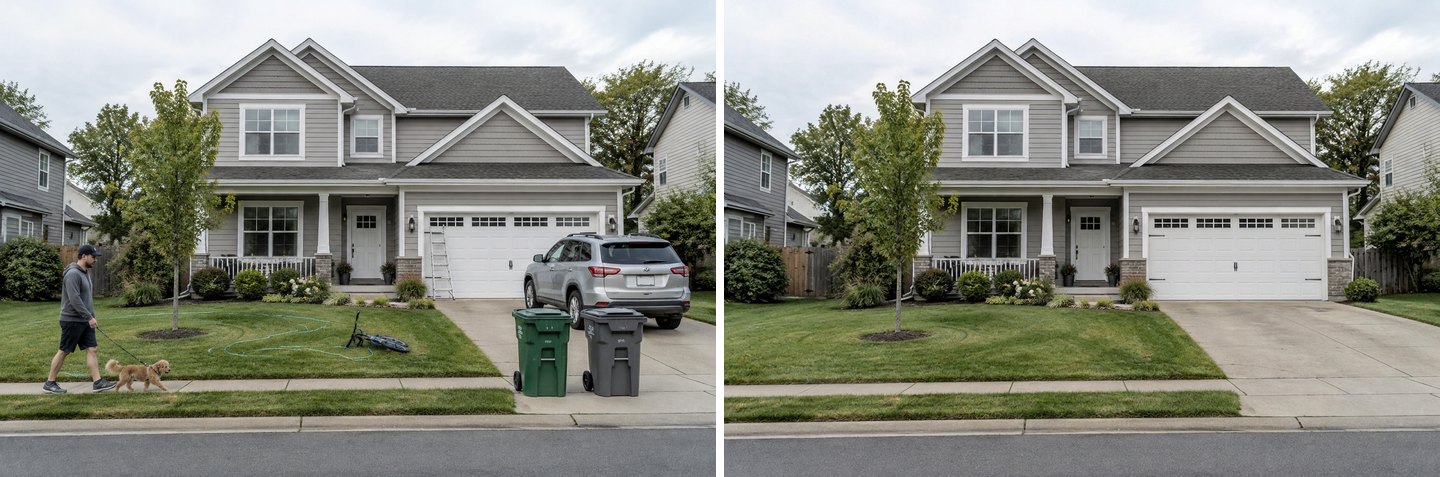 One tap, 24 seconds. The man and his dog, the SUV, both bins, the ladder, the hose and the bicycle are gone. The house, the windows, the porch planters and the young tree are unchanged.
This is the classic listing problem: the photo was taken on a normal day, not on a shoot day. The result is clean. The driveway concrete continues under where the car stood, the garage door is whole, and the lawn under the bicycle is filled in.
Two honest notes. First, if you look closely at the lawn, you can see faint curved marks where the hose lay, like light mowing lines. Second, the mode takes away everything temporary, including the car. If you only want the bins gone and the car to stay, use Remove an object with a selection on the bins instead.
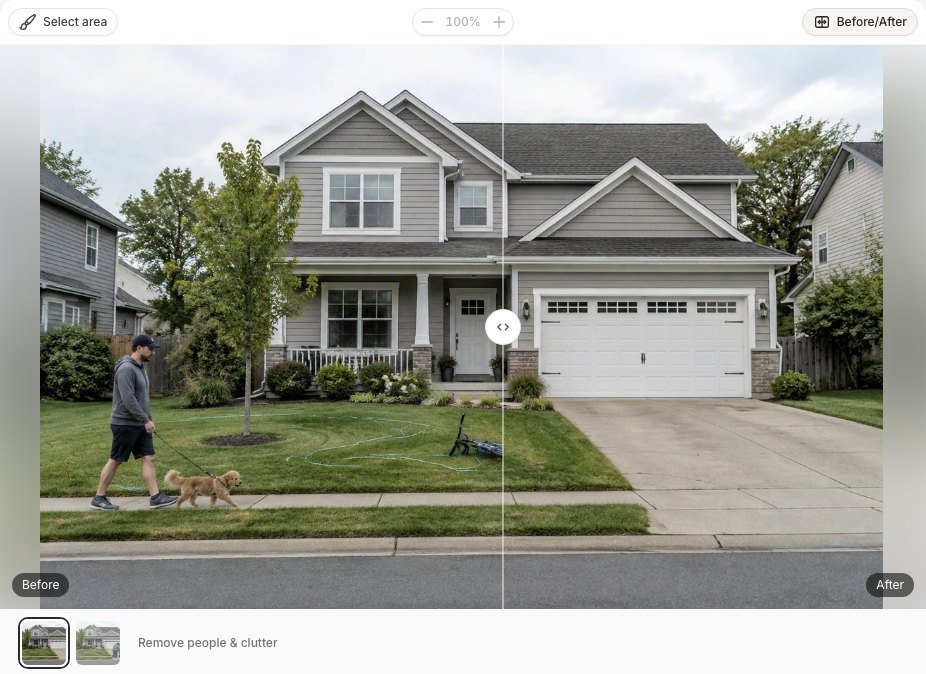 Drag the Before/After slider across the edges of what was removed. That's where traces usually show.
For other outdoor jobs there are two more tools. On facades, the Remove cars, wires, clutter ready task lets you choose one target: parked cars, overhead wires, scaffolding, trash and debris, or AC units. For yards, the Clean-up mode goes further than removal: it mows the lawn, prunes shrubs, mulches beds and clears weeds without changing the layout.
When the Mess Is on the Counters: "Remove Clutter"
For kitchens and desks, use the Remove clutter ready task, not the people mode. "Remove people & clutter" targets personal items. Dirty dishes, jars, mail and appliances on a counter are a different job, and the request "this desk looks cluttered, make it look tidy" is exactly what Ready tasks → Furniture & decor → Remove clutter is for.
Test 4: A cluttered family kitchen
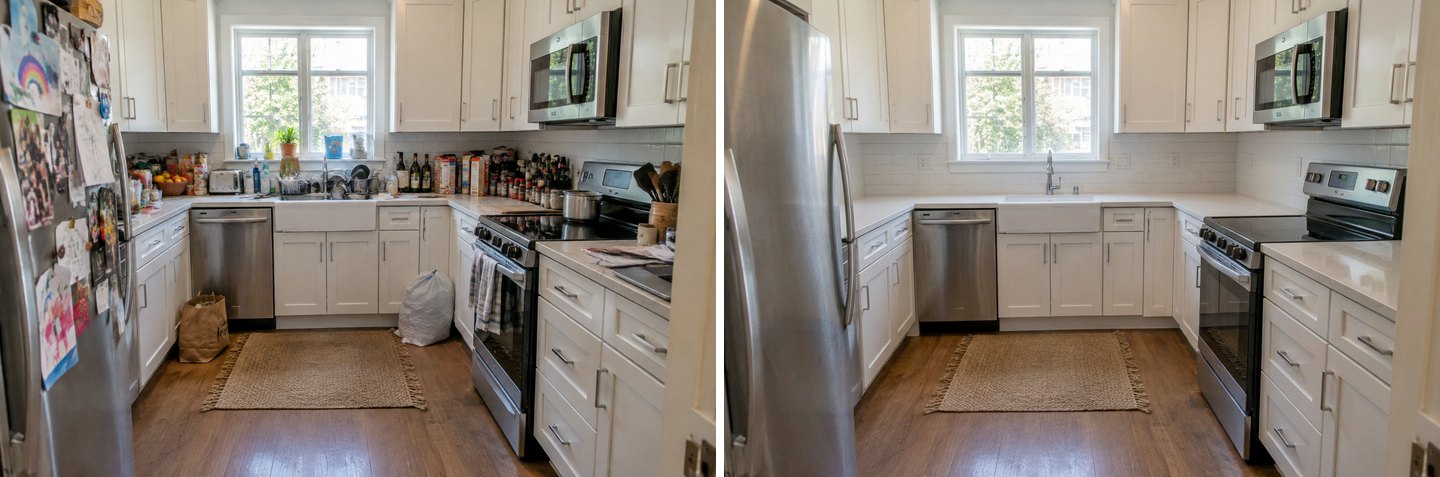 "Remove clutter", 37 seconds. Counters, sink, windowsill, fridge door and floor are clear. The cabinets, appliances, rug and window are the original ones.
The task is deliberately thorough. Its instruction is to leave "at most two or three neat items" in the whole room. So besides the dishes and bottles, it also took away the toaster, the plant on the windowsill and the dish towel on the oven handle. For a listing photo that's usually what you want. If you'd rather keep a few things, write the request yourself in the editor. Our text version ("make it look tidy: clear the countertops, the sink, the windowsill and the fridge door, and remove the bags from the floor; keep the cabinets and appliances") kept the toaster and the towel, but it redrew the fridge door a little and made the rug slightly smaller.
Create interior design with AI
Upload a photo of your room and get a professional design in 30 seconds. First generation is free.
What AI Object Removal Still Gets Wrong
It guesses what was hidden, and sometimes it guesses too much. Everything below happened in our own test runs for this article:
- Small invented fillers. A removed jacket became a knit throw. A removal should leave empty space, but the model sometimes "furnishes" it.
- Light and framing drift. Our living room came back slightly brighter and warmer, and shifted by a few pixels. If you put the result next to other photos from the same shoot, check that the colors still match.
- Restore is area-based, not object-based. Restoring the dog also brought back the toys next to it.
- Faint traces. A hose on a lawn left light curved marks. Check the edges with the Before/After slider.
- It can't know what is really behind an object. Behind the washing machine it drew a plain tiled wall, not the tap and drain a real bathroom would have.
- Edits pile up. Each edit starts from the current version, so three or four edits in a row drift further from the original. For a new variant, go back to the "Original" thumbnail and start from there.
- The mode decides what counts as clutter. "Remove people & clutter" removed a car. "Remove clutter" removed a toaster. When in doubt, select the exact object.
Our rule of thumb: one-tap modes for "make this photo presentable", a selection for "remove exactly this", and always one look at the slider before you download.
Can You Use a Cleaned-Up Photo in a Real Estate Listing?
Yes for temporary things, with disclosure; never for defects or permanent features. Removing a parked car, bins, toys or the owner's laundry shows the home as a buyer would see it on a viewing. Removing a crack, a power line, an electrical box or a neighbour's wall misrepresents the property.
The rules are getting stricter:
- The NAR Code of Ethics requires REALTORS® to "present a true picture" in their advertising (Article 12). Standard of Practice 12-10 adds that this includes images and bans misleading ones (2026 Code of Ethics).
- California's AB 723 (Chapter 497, Statutes of 2025) requires licensees who use a digitally altered image to advertise a property for sale to say so, and to give access to the unaltered version (bill page).
- State associations give practical guidance. For example, NC REALTORS® advises a conspicuous disclosure of altered photos and says it is not appropriate to edit out defects or "eyesores" inside or outside the home.
Rules differ by country, state and MLS, so check yours. In practice: keep the original next to the edited photo, write a short note such as "photos digitally edited to remove personal items and vehicles", and remove only what the buyer won't get anyway. Some real requests we see, like removing an electrical box or wall vents, are fine for a redesign mock-up but should not end up in a sale listing.
After the Cleanup: From a Clean Photo to a Redesign
A clean photo is also the best starting point for the next step, and you don't need to upload it again. From the same work in the Studio you can:
- Rearrange the furniture once the floor is clear and you can see the layout.
- Try paint colors on the walls. With no clutter in front of them, walls repaint more cleanly.
- Put a new sofa or table in the room from a product photo.
- Empty the room completely for virtual staging, covered step by step in our furniture removal guide.
Each of these is a separate edit or mode on top of the cleaned version, at 2 credits each.
GenRoom vs General-Purpose Object Removers
Search "remove objects from photo" and most results are general erasers built for product shots and portraits, for example Photoroom, which is aimed at e-commerce catalogs. They work well when the background is simple. Home photos are harder because the fill has to continue tiles, floorboards, siding and lawn in the right perspective.
| General object eraser | GenRoom | |
|---|---|---|
| Made for | Any photo: products, portraits, travel | Rooms, facades and yards |
| Remove people and clutter in one tap | Typically you brush each object | Yes, room, facade and yard versions |
| Remove one specific object | Brush | Brush, lasso, or name it in words |
| Bring an area back | Varies by tool | Restore from original for a selected area |
| What comes next | Download | Redesign, repaint, rearrange, empty or furnish the same photo |
If you only need to erase a stranger from a holiday snapshot, a general eraser is fine. If the photo is of a home and you might redesign it next, a home-specific tool saves a round trip.
How Much Does It Cost?
Every removal, restore or redesign is one generation of 2 credits. A free account comes with 6 credits and no card. Free results carry a watermark. Paid packs are one-time purchases, not subscriptions: Start $9.99 for 36 credits, Basic $19.99 for 100, Pro $39.99 for 300. Purchased credits are valid for 180 days. If a generation fails, the credits are returned automatically. Full details are on the pricing page.
For scale: everything in this article (four scenes, two runs of the kitchen task, a text-only kitchen edit, the restore and the follow-up fixes) took 9 generations, or 18 credits.
FAQ
Can AI clean my room in a photo for free?
Yes. A free GenRoom account includes 6 credits, which is 3 removals. Free results carry a watermark; paid packs remove it. Upload the photo in the Studio and choose "Remove people & clutter", or "Remove clutter" from the ready tasks for counters and desks.
Will an AI room cleaner remove my furniture too?
Not with "Remove people & clutter" or "Remove clutter". Both keep the furniture, finishes and built-in appliances. In our tests the sofa, rug, coffee table, shelves and kitchen appliances stayed. Removing all the furniture is a separate mode, "Empty the room".
Can I remove people from a photo of my house?
Yes. On a facade photo, "Remove people & clutter" removes people and pets along with parked cars, bins and ladders, and restores the surfaces behind them. If you only want the person gone, select them with the brush and use "Remove an object".
How do I remove one object without changing the rest?
Select it with the brush or lasso, then choose Quick actions → Remove an object and press Apply. Only the selected area is edited. In our bathroom test the rest of the photo changed by only about 6 out of 255 on average.
Is it okay to use AI-cleaned photos in a listing?
Removing temporary things like cars, bins and personal items is common, but disclose that photos were edited and keep the originals. Never remove defects or permanent features. NAR's Code of Ethics requires a "true picture", and California's AB 723 requires disclosure of altered images in sale advertising.
Can I undo a removal?
Yes. Every edit is saved as a new version, and the original photo stays in the version strip, so you can go back at any time. To bring back just one area, use "Restore from original" on a selection.
The Bottom Line
An AI room cleaner is the quickest way to get a presentable home photo without moving anything: one tap for people, pets and everyday clutter, a brush or lasso for a single object, and "Remove clutter" for counters. It works outdoors too, on cars, bins, hoses and passers-by. It's not pixel-perfect. Expect the occasional invented filler, a slight shift in light and the odd faint trace, and always check the result with the slider. For listings, remove only what the buyer won't get anyway, and say that you did. Try it on your own photo in the Studio.