How to Try Paint Colors on Your Own Room Photo With AI (2026)
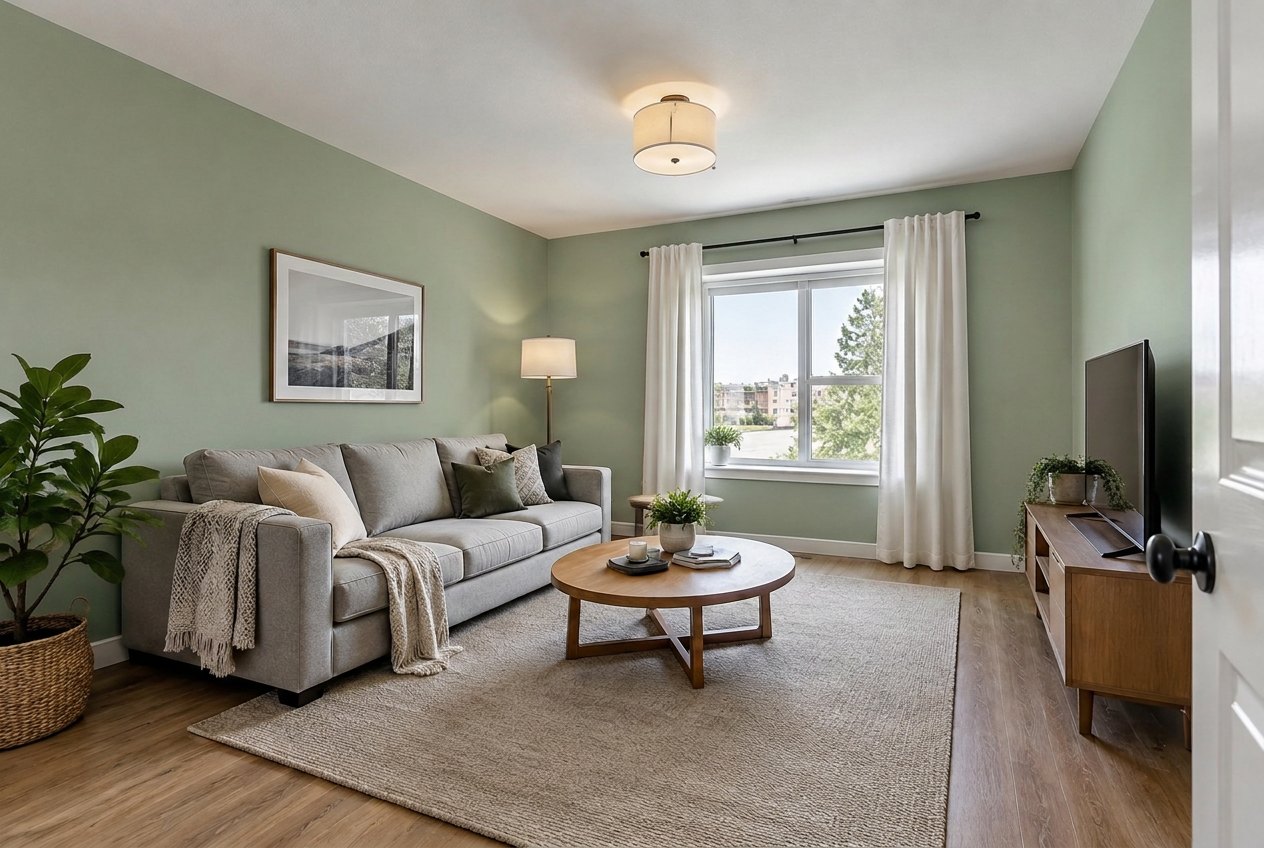
A real result from the GenRoom Studio: only the walls changed. The sofa, rug, floor, ceiling and trim are the ones in the original photo.
To try paint colors on a photo of your own room, upload the photo to an AI editor, say which walls to paint and in what color, and compare the result with the original. In the GenRoom Studio that is one quick action, Wall color: type "warm white", "sage green", "RAL 5024", "NCS S 2010-Y30R", a HEX code like #1F2A44 or a brand name, press Apply, and about 20–40 seconds later you get the same room, same camera, same furniture, with new walls. One edit costs 2 credits, and a free account starts with 6.
This guide is built on what people actually ask for. Between March and October 2026, 2,377 GenRoom users described a wall-color change in their own words — not "redesign my room", just "change the paint". Below we show the exact Studio path for each kind of request, real before/after results from two rooms we shot for this article, how color codes and brand names are handled, and where the AI still gets it wrong.
What Do People Actually Ask For When They Repaint a Room Photo?
Most requests fall into five patterns, and each needs a slightly different instruction. Here they are, paraphrased and anonymized from real requests:
| What people write | What they really want | Best Studio tool |
|---|---|---|
| "Make the walls a warm off-white" | Whole room, a named color | Wall color quick action |
| "Paint the walls Vivechrom 30GG 61/010" or "all of it in 60YR 54/028" | Whole room, an exact color from a fan deck | Wall color + code (or HEX from the brand's page) |
| "The headboard wall should be entirely beige" | One wall only | A sentence naming the wall, or Select area |
| "Change the headboard wall color, keep the rest of the room white" | Accent wall + a base color | Select area + a color swatch |
| "Make the ceiling light blue again and the beams white" | Ceiling and trim, walls untouched | A sentence naming the ceiling and trim |
The pattern matters because a whole-room color is the easiest job for the AI, while "only this wall" and "the ceiling but not the walls" need you to be specific. The good news: every one of these worked on our test photos, as you'll see below.
Why Brand Paint Visualizers Are Not Enough
Search "room paint color visualizer" and the first page is almost entirely paint companies: Behr, Sherwin-Williams, HGTV Home by Sherwin-Williams, PPG, Valspar, Dulux. They are useful, free, and made by people who know paint. But they share three limits that send many people looking for an AI tool instead.
They are locked to one brand. A Sherwin-Williams visualizer shows Sherwin-Williams colors. If your contractor quoted a Benjamin Moore shade, your architect specified RAL 7044, or you are in Europe with an NCS fan deck, you have to translate between systems yourself.
You mask the walls by hand. Most of these tools ask you to tap or trace each wall, and the paint fills the area you marked. Dulux, for example, asks you to stand 1.5–2.5 m (5–8 ft) from the wall when you take the photo, so its tool can find the wall. Edges around curtains, plants and picture frames are where it usually looks fake.
The result is a flat color overlay. The color sits on the wall, but light and shade do not always behave like real paint on a real wall.
An AI image editor works the other way around: it repaints the photo as a whole image, so shadows, lamp glow and the falloff of daylight across the wall come out like a photograph. The trade-off is that you describe the change rather than paint it pixel by pixel. That makes precision a question of instructions, which is what the rest of this guide is about.
How to Try Paint Colors on Your Room Photo, Step by Step
The fastest path is the AI editor with the Wall color quick action. It changes paint only: the furniture, floor, ceiling, windows and camera angle stay as they are.
Step 1: Take a usable photo
Shoot in daylight, from a corner or doorway, at standing eye level, with as much wall visible as possible. Two walls in the frame are better than one, because you will see how the color turns at the corner. Avoid strong colored light (a red sunset, an RGB strip) — the AI keeps the light of the photo, so a warm evening shot will make every color look warmer.
Step 2: Open the AI editor and upload
In the Studio, choose AI editor and upload the photo (JPG, PNG, WEBP or HEIC, up to 50 MB). The photo opens with a prompt field underneath and a Libraries panel on the right.
Step 3: Quick actions → Wall color → type your color
Open Quick actions, pick Wall color under Colors & materials, and either tap a ready shade (Warm white, Ivory, Cream, Beige, Greige, Light gray, Gray, Graphite, Sage green) or type your own: a color name, a RAL or NCS code, a HEX value or a paint brand color. Press Enter and the request turns into a chip like Walls: RAL 5024 above the prompt.
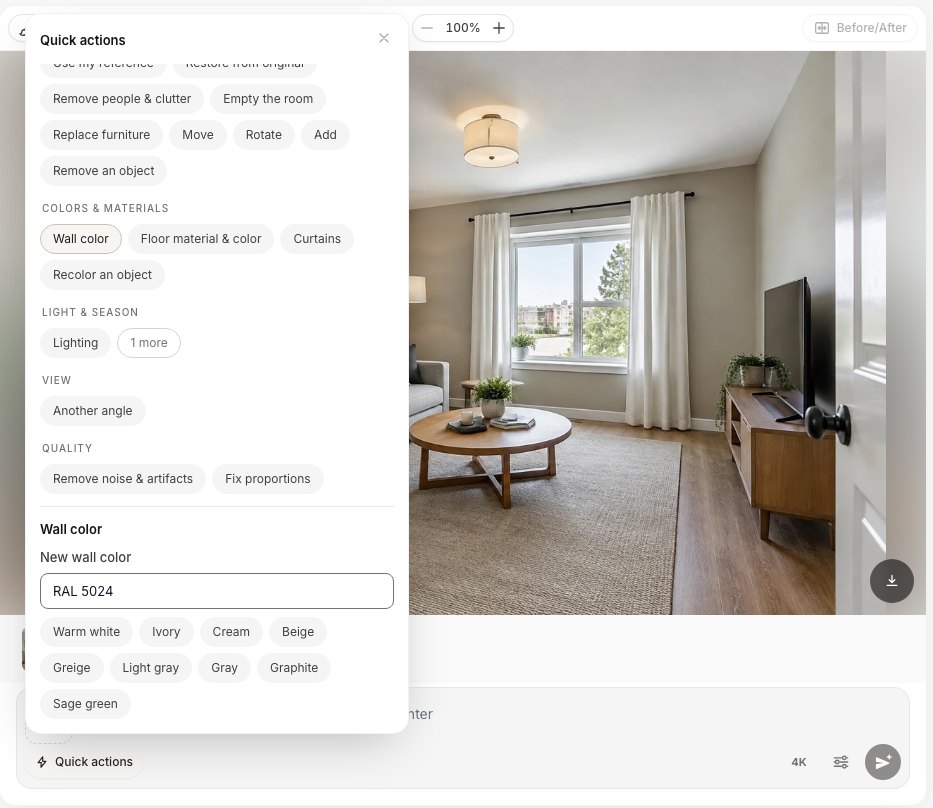 The Wall color quick action: tap a ready shade or type a name, a RAL/NCS/HEX code or a brand color.
Step 4: Apply and wait
Press Apply (2 cr). In our tests the edits took about 20–40 seconds each. Every result is saved as a new version in the strip under the photo, so you can keep trying colors and switch between them.
Step 5: Branch every color from the original
This is the one habit that keeps results clean: select the Original thumbnail before each new color, instead of painting on top of the last result. Each edit regenerates the image, and stacking five edits on top of each other slowly softens detail. Starting each color from the original keeps every variant as sharp as the first one.
Here is our living room photo with three colors, each made from the original with one quick action:
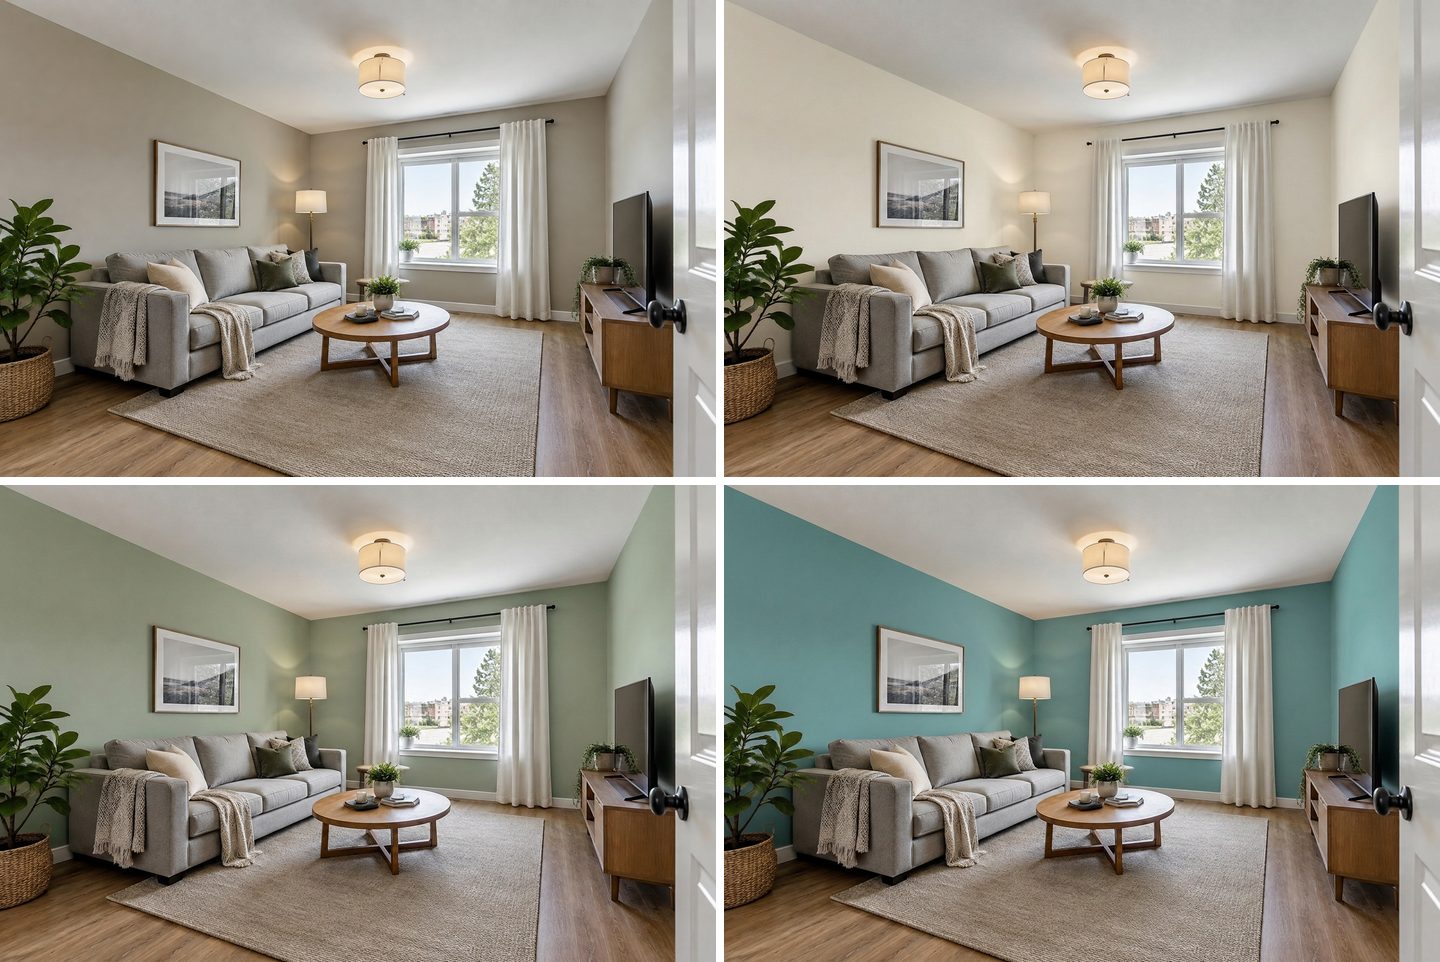 Top left: the original photo. Top right: "Warm white" chip. Bottom left: Sage (#A8B5A0) from the color library. Bottom right: "RAL 5024" typed into Wall color. Same sofa, same rug, same white ceiling and baseboards in all four.
What stayed the same in all three runs: the sofa and cushions, the coffee table, the rug, the oak floor, the TV console, the plants, the picture in its frame, the white ceiling, the white baseboards and the white window trim. What changed: the paint, and the light bouncing off it — the room looks brighter in warm white and cooler in pastel blue, which is exactly what happens with real paint.
How Are RAL, NCS, HEX and Paint Brand Codes Handled?
Short answer: RAL, NCS and HEX codes are turned into an actual color swatch that the AI sees next to your photo; brand names are passed by name only, so brand shades are an approximation. We checked this in the GenRoom code and in the prompts of our own test edits.
| What you type | What the AI receives | How close to expect |
|---|---|---|
| A name ("warm white", "sage green") | Words only | The AI's idea of that color; fine for exploring |
| RAL code ("RAL 5024") | A ready RAL swatch with its official name, e.g. RAL 5024 (Pastel blue) | Close: a real reference shade |
| HEX ("#1F2A44") | A swatch drawn in exactly that color | Close: the most precise input |
| NCS ("NCS S 2010-Y30R") | A swatch computed from the NCS notation | Approximate: no licensed NCS table is used |
| Brand + code ("Benjamin Moore HC-154", "SW 7008") | The brand and code as text, no swatch | Approximate: the model's own knowledge of that shade |
Two practical consequences:
- If you have a brand color, look for its HEX or RGB value. Many paint companies list it on the color's page. Typing that HEX gives the AI a real swatch; typing only the brand name relies on the model's memory of it. GenRoom recognizes Sherwin-Williams, Benjamin Moore, Behr, Farrow & Ball, Dulux, Jotun, Caparol and a few other brands by name, but it deliberately does not invent HEX values for them, because those shade tables belong to the manufacturers.
- RAL is the easiest code to get right. The color library has all 213 RAL Classic shades, with names, so you can browse instead of typing.
The color library: Palette, RAL, NCS, HEX
The Colors library on the right of the editor has four tabs: Palette (curated interior and facade shades with their HEX values), RAL (popular shades plus the full RAL Classic catalog), NCS (a selection of common NCS codes, or enter your own) and HEX (type any 3- or 6-character code). Tap a shade and it is attached to your request as a color sample — the small swatch next to the prompt field — then write what to repaint: "paint the walls in this color".
The library itself says it plainly: the shades on screen are approximate, and you should check a physical sample before buying paint. We agree, and the measurements below show why.
How close did the colors come out?
We sampled the same shaded upper corner of the left wall in each result and compared it with the swatch we asked for:
| Requested | Swatch | Rendered, shaded corner | Verdict |
|---|---|---|---|
| HEX #1F2A44 (deep navy) | #1F2A44 | #232E41 | Very close |
| RAL 5024 Pastel blue | #5D9B9B | #5B7E7C | Same hue, darker in shade |
| Palette Sage | #A8B5A0 | #81846E | Same family, darker and warmer |
| NCS S 2010-Y30R (bedroom) | #D7C8B2 | noticeably more yellow on the lamp-lit wall | Warmer than the swatch |
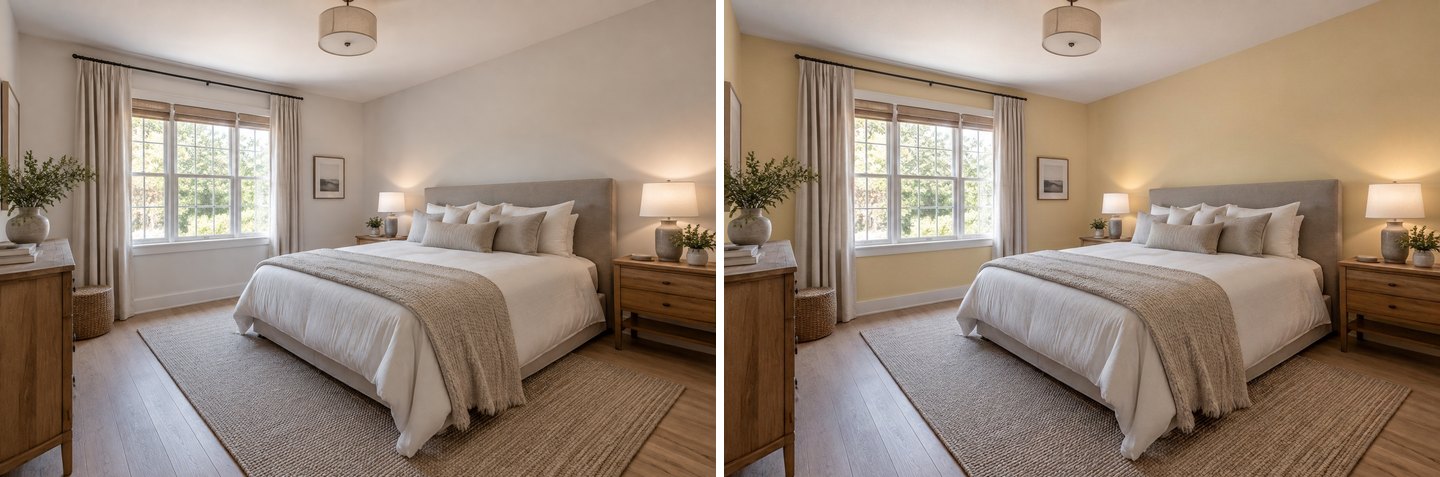 NCS S 2010-Y30R typed into Wall color. The walls changed and nothing else did, but the shade came out warmer and more yellow than the NCS swatch — a reminder to confirm with a real sample.
A wall in shadow always reads darker than the paint chip, so a darker number does not mean the AI got it wrong — the same thing happens on a real wall. The NCS run is different: the result read more yellow than a warm greige should. Treat AI renders as a way to choose between candidates, then confirm the final one with a sample pot on two walls.
How to Paint Only One Wall (an Accent Wall)
You have two ways to do it, and both worked on our photos.
Option 1: name the wall in words. For "the headboard wall should be entirely beige" we simply wrote: Paint only the wall behind the bed headboard beige. Keep the other walls and the ceiling as they are. The headboard wall turned beige and the window wall stayed off-white. Naming the wall by what is against it — "behind the sofa", "behind the bed", "the wall with the window" — works better than "the left wall".
Option 2: select the wall. For full control, press Select area, switch to Lasso and trace the wall, then confirm with the check mark. Anything outside the selection is protected. Then attach a color and write what to do.
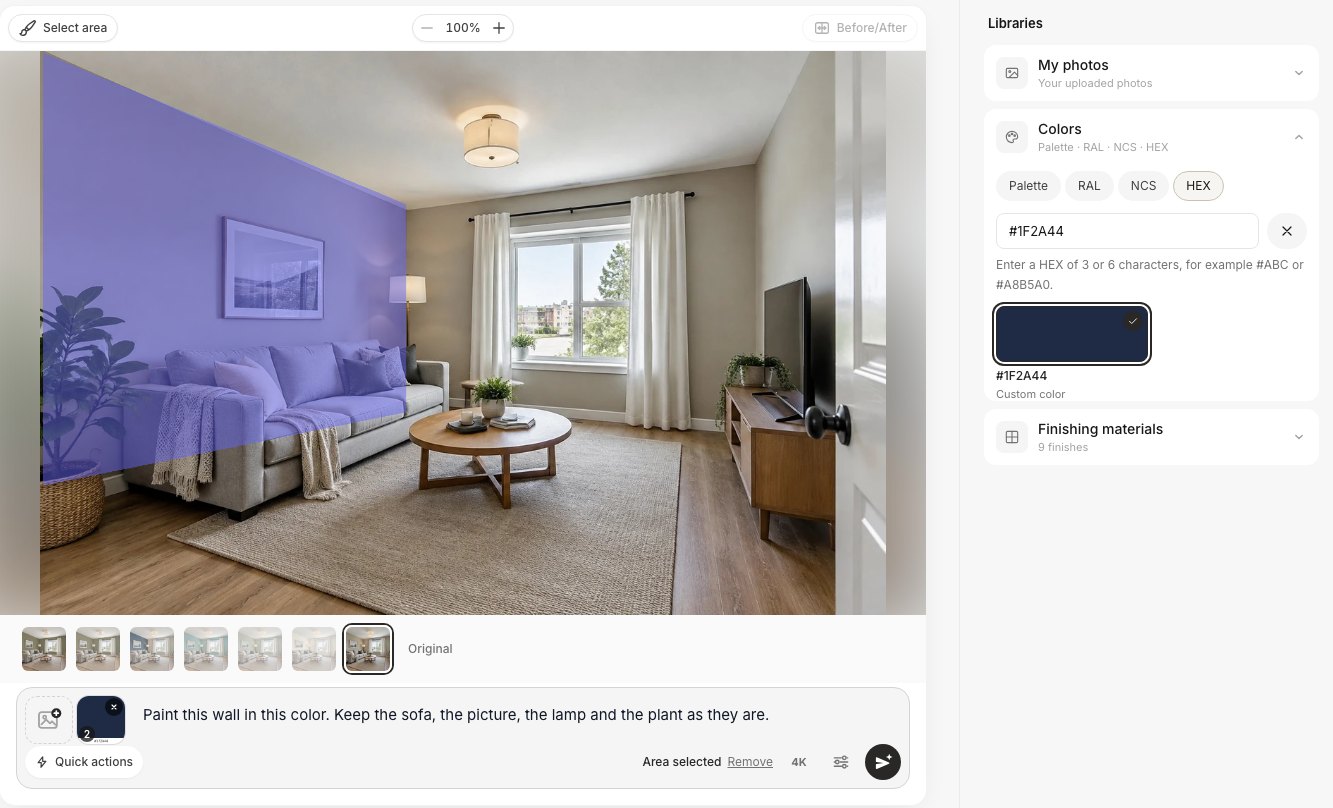 Select area → Lasso around the sofa wall, HEX #1F2A44 picked in the Colors library, and the instruction "Paint this wall in this color. Keep the sofa, the picture, the lamp and the plant as they are."
The selection does not have to be neat. Ours covered part of the sofa and the plant; the AI repainted only the wall surface inside the area and kept the sofa, cushions, picture frame and plant in place:
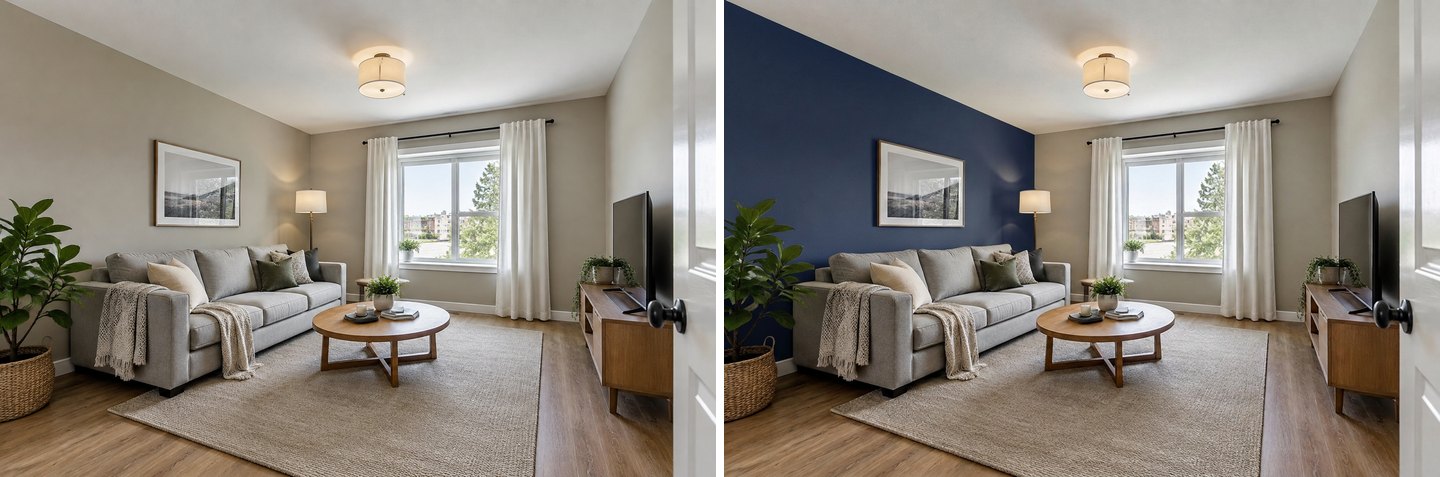 Left: the original. Right: a deep navy (#1F2A44) accent wall behind the sofa. The side wall, window wall, ceiling and furniture are untouched.
For accent walls in wallpaper or panels rather than paint, see our wallpaper and accent wall guide — the selection workflow is the same.
Ceilings, Trim and Mixed Requests
The Wall color quick action deliberately paints walls only, and its instructions keep the ceiling, floor and doors as they are. In all of our wall runs the white ceiling and white baseboards stayed white.
When you do want the ceiling or trim changed, say so in a sentence. "Paint the ceiling light blue. Keep the walls, the trim and everything else as they are" gave us a pale blue ceiling with the walls, curtains and bed unchanged. Name each surface and its color in one request — "ceiling light blue, beams white, walls unchanged" — rather than in three separate edits.
Here is the bedroom with three real-style requests, each made from the original photo:
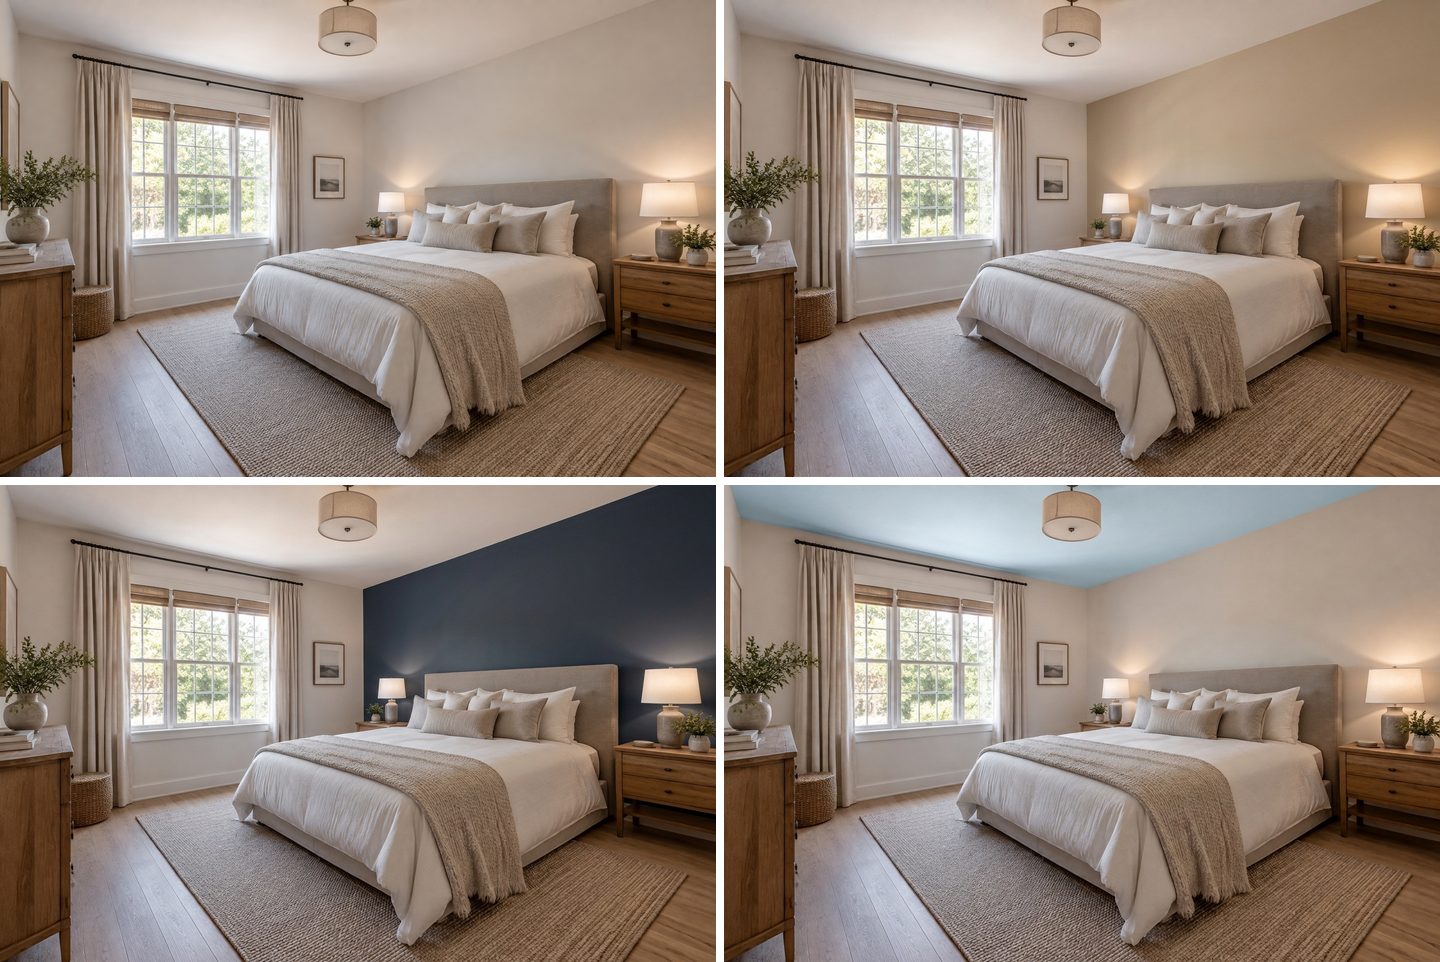 Top left: original. Top right: "only the headboard wall beige" (words only, no selection). Bottom left: headboard wall in "Benjamin Moore Hale Navy HC-154" (brand by name, approximated). Bottom right: "ceiling light blue, keep the walls".
The Hale Navy version shows what "approximate" means in practice. The AI produced a convincing deep navy, but without a swatch it is the model's idea of that shade, not a measured match. If you are about to buy two gallons of it, hold the real chip against your wall.
Create interior design with AI
Upload a photo of your room and get a professional design in 30 seconds. First generation is free.
Wall Color vs New Finishes: Which One Should You Use?
GenRoom has two routes to new walls, and they behave differently.
- Wall color (AI editor quick action) changes the paint and nothing else. Use it when you like the room and only want to see a color.
- New finishes (a design mode when you choose Design from a photo) renews the surfaces: walls, floor and ceiling — paint or wallpaper, panels and flooring — while your furniture and its arrangement stay. It has an optional Exact color or sample field that accepts the same names and codes.
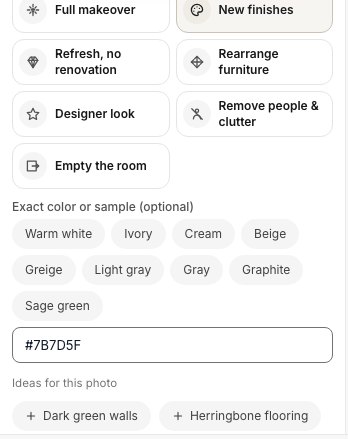 New finishes with an exact color (#7B7D5F, olive). The mode also suggests ideas for the photo, here "Dark green walls" and "Herringbone flooring".
We ran New finishes with olive #7B7D5F on the same living room. The walls came out a muted olive, but the mode also did its job on the other surfaces: the floor became lighter, wider oak planks, the ceiling fixture changed shape slightly, and the floor lamp was switched off.
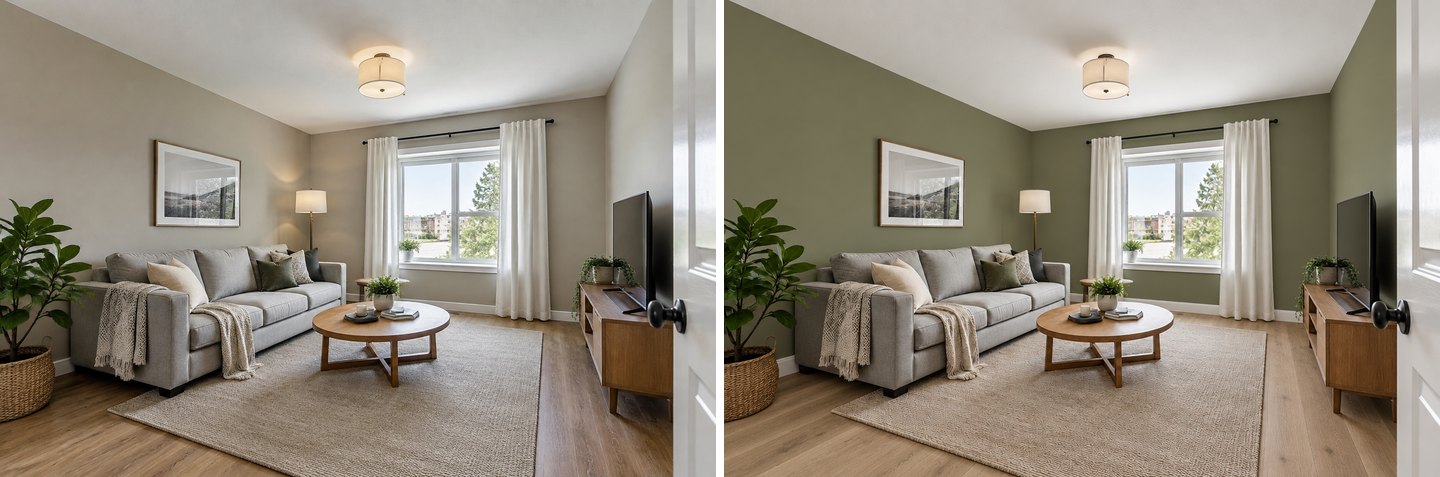 New finishes changes more than paint: olive walls plus a lighter floor. Great for a renovation preview, too much if you only want a paint color.
If you like a New finishes result but want your old floor back, use the Restore from original quick action and choose Floor. In our test it pulled the floor tone back toward the original, though not plank for plank — so for a pure paint preview, the Wall color quick action is still the cleaner choice.
Check the Result With the Before/After Slider
Every version can be compared with the photo it was made from. Press Before/After above the image and drag the handle across the wall. It is the quickest way to catch the problems that matter: a curtain that changed color, a picture frame that moved, a ceiling that picked up a tint.
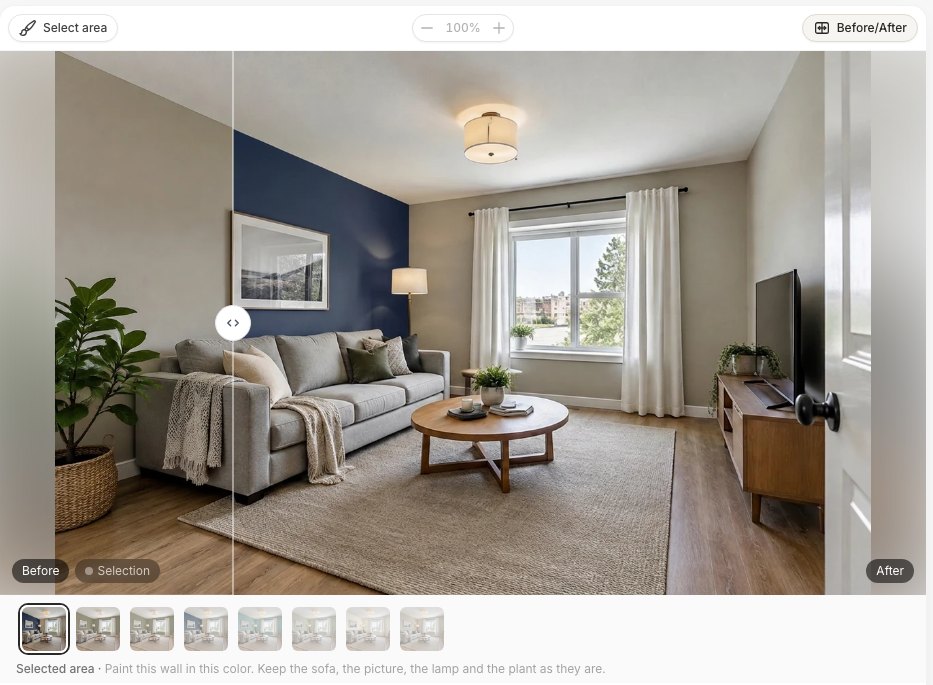 The compare slider: before on the left of the handle, after on the right.
When a variant is a keeper, you can download it, or upscale it to 4K for printing or sending to a painter. The quick edits in our tests came back at about 1264 px wide, which is fine on a phone but soft on a big screen, so 4K is worth it for the final candidate.
What AI Wall Color Previews Still Get Wrong
AI previews are good at the question "which of these three colors do I like in my room?" They are not a replacement for a paint sample. Here is what we saw while shooting this article, and what to watch for:
- Exact shade. Codes get you close, but the color you see is the color in your photo's light. A shaded corner reads darker, a lamp-lit wall reads warmer. Our NCS run came out yellower than its swatch.
- Brand names are approximations. "Sherwin-Williams Alabaster" or "Benjamin Moore Hale Navy" are understood by name only. Use the brand's published HEX when you need to be closer.
- Sheen is not reliable. Flat, eggshell and satin look different on a real wall; the AI does not reliably show the difference.
- Your screen is part of the result. A phone in night mode and a calibrated monitor will show the same image differently.
- The mode matters. New finishes changes floors and fixtures as well as paint; the Wall color quick action does not. Pick the tool that matches the question.
- Stacked edits soften the image. Branch each color from the original version instead of editing the last result over and over.
The practical routine: shortlist two or three colors with AI, then buy sample pots (or peel-and-stick samples) of only those and put them on two walls. Look at them in the morning and in the evening before you commit.
A Quick Way to Choose Colors Worth Testing
If you are starting from a blank page, the 60-30-10 rule is a sensible frame: about 60% of the room in a main color (usually the walls), 30% in a secondary color (large furniture, curtains, an accent wall) and 10% in an accent (cushions, art, a lamp). Test it on your photo:
- Try three wall colors from the original: one light neutral, one mid-tone, one dark. You will learn fast whether the room wants light or depth.
- Look at the fixed things in the room. Your floor, sofa and kitchen cabinets are not changing. A warm oak floor sits well next to warm whites and greens; a cool gray sofa next to blue-grays.
- Try an accent wall only after you have a base color. One dark wall behind the sofa or bed is the most common request we see, and it reads very differently next to white than next to beige.
- Do the ceiling last. A tinted ceiling can make a room feel lower or cozier; preview it on top of your chosen wall color.
For cabinets in a kitchen or bathroom, the same method applies with the Recolor an object quick action — see our cabinet color visualizer guide. For the outside of the house, read the exterior house paint color visualizer guide.
How Much Does It Cost?
GenRoom sells one-time credit packs, not a subscription:
| Plan | Price | Credits | Wall color edits (2 credits each) |
|---|---|---|---|
| Free | $0 | 6 on sign-up, no card | 3 (watermarked) |
| Start | $9.99 | 36 | about 18 |
| Basic | $19.99 | 100 | about 50 |
| Pro | $39.99 | 300 | about 150 |
Every plan includes the Wall color quick action, Select area, the color library (Palette, RAL, NCS, HEX) and before/after comparison. If a generation fails, the credits come back automatically. Purchased credits are valid for 180 days. A focused session — three wall colors, one accent wall and a ceiling test on one room — costs 10 credits. You can start from the AI paint visualizer page or go straight to the Studio.
FAQ
Can I upload a picture of my room and try paint colors?
Yes. Upload the photo to the GenRoom AI editor, open Quick actions → Wall color, type a color name or code and press Apply. You get the same room with new walls in about 20–40 seconds, with your furniture, floor and ceiling unchanged.
Is there an app that can change my wall color?
GenRoom runs in the browser on a phone or a computer, so there is nothing to install. Brand apps such as the Sherwin-Williams or Behr visualizers also change wall color, but only with that brand's colors, and you often mark the walls by hand.
Can I use a Benjamin Moore or Sherwin-Williams color?
Yes, type the brand and the color name or code. Be aware that brand colors are passed to the AI by name, without a swatch, so the shade is approximate. If you find the color's HEX or RGB value on the brand's site, type the HEX for a closer match.
Can I paint just one wall?
Yes. Either name the wall in your request ("only the wall behind the bed") or use Select area → Lasso to trace it. Everything outside the selection stays as it is.
Will the AI change my furniture or floor?
The Wall color quick action is built to change only the walls; in our tests the sofa, rug, floor, ceiling and trim stayed the same. The New finishes mode is different: it renews walls, floor and ceiling, so the floor may change too.
How accurate are AI paint color previews?
Close enough to choose between candidates, not exact enough to skip a sample. RAL and HEX codes come out closest because the AI gets a real swatch; NCS is computed and brand names are approximated, and the photo's own light shifts every color.
Is it free?
A free account gets 6 credits without a card, which is three wall-color edits (with a watermark). Paid packs start at $9.99 for 36 credits.
The Bottom Line
Trying paint colors on a photo of your own room is now a one-minute job: upload, choose Wall color, type a name or a code, compare. Use a RAL or HEX code when you need precision, name the wall or lasso it for an accent wall, and say "ceiling" or "trim" explicitly when those should change. Then take your two favorite colors to the store as sample pots — the AI narrows the choice, the real wall makes the final call. Try it on your room in the Studio.