Rearrange Furniture With AI: Test a New Room Layout From a Photo
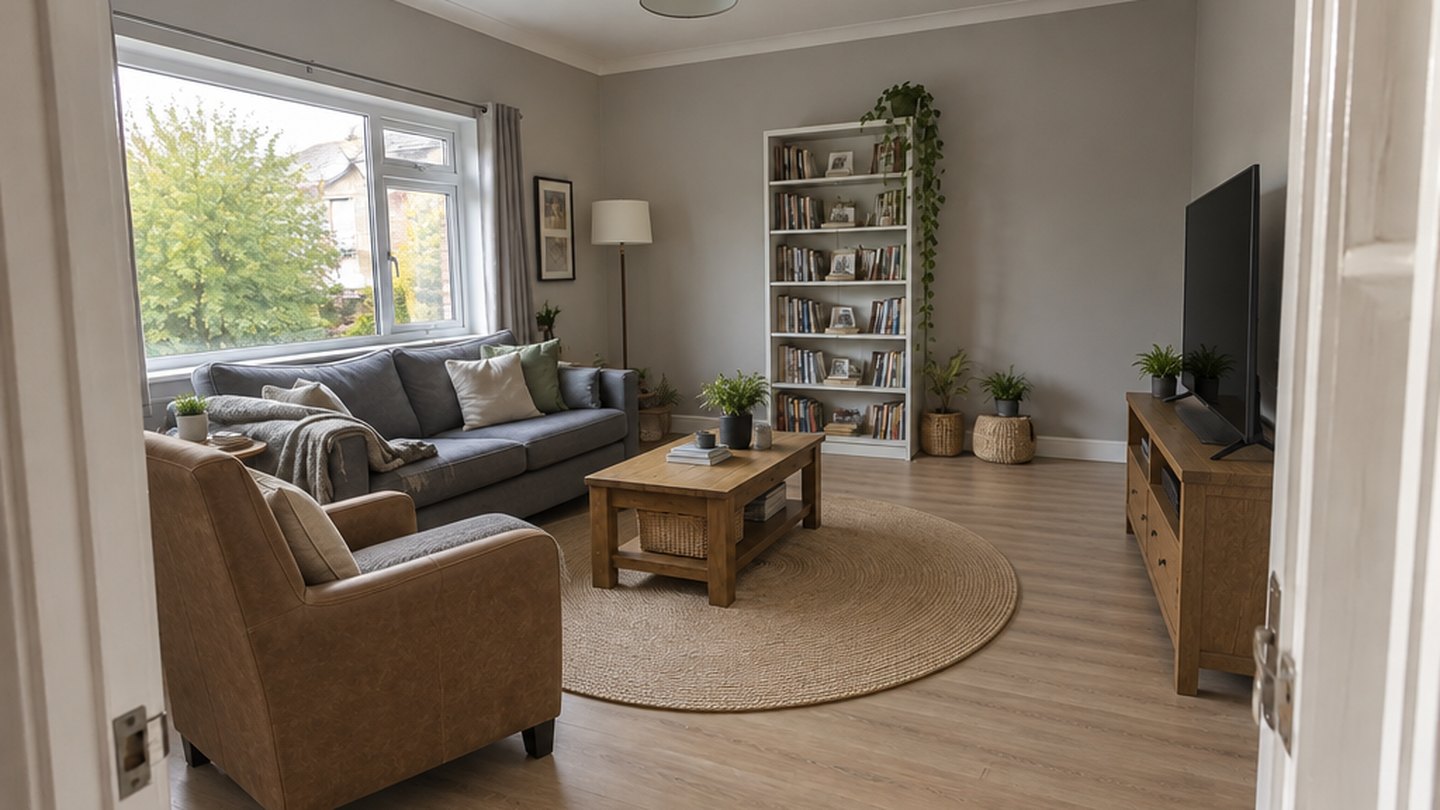
A real GenRoom result: the same sofa, armchair, coffee table and bookcase, arranged differently. Nothing new was bought.
You can rearrange furniture with AI by uploading one photo of your room and asking for a new arrangement of the pieces you already own. The AI keeps the walls, windows, doors and camera angle, moves the sofa, bed, TV stand or desk to new places, and shows the result as a photo in about 20 seconds. You then check it against a few simple layout rules and move the real furniture once, instead of three times.
This guide shows exactly how that works in the GenRoom Studio, with real before/after results from a cluttered living room and two small bedrooms: the default "Rearrange furniture" mode, results driven by a precise written instruction, single-piece fixes with Move and drag-the-selection, and the cases where the AI got it wrong. You also get the clearances (walkways, bed access, TV distance) to check every layout against, with sources.
What do people actually ask an AI to rearrange?
Most people do not want a new interior. They want the room they already paid for to work better. Between March and mid-October 2026, 2,285 GenRoom users typed a rearrangement request in their own words, and the requests are strikingly practical. Paraphrased and anonymised, they look like this:
- "Rearrange the furniture so there is more free space in the room."
- "Put the big bed on the opposite wall."
- "Turn the sofa so the armrest is against the wall, and put the pouf by the window."
- "Sofa along the long wall, TV on a stand in front of it."
- "Move the sofa toward the door, the TV opposite it, and the desk where the TV was."
- "Rotate the bed 90 degrees so the headboard is on the left wall."
- "I have a twin bed, a long wooden dresser, a corner shelf and a desk. Where should they go?"
- "Keep the style and the furniture, but arrange it like the layout I attached."
Two patterns stand out. First, people name their real pieces (a twin bed, a long dresser), so the tool must not swap them for new furniture. Second, many requests are precise ("90 degrees", "the left wall"), so the tool must follow an instruction, not just "make it nicer". Those are the two things we tested.
How to rearrange furniture with AI in GenRoom, step by step
The short version: upload a photo, choose the Rearrange furniture mode, optionally write where specific pieces should go, and press Create design. Here is each step with what to watch for.
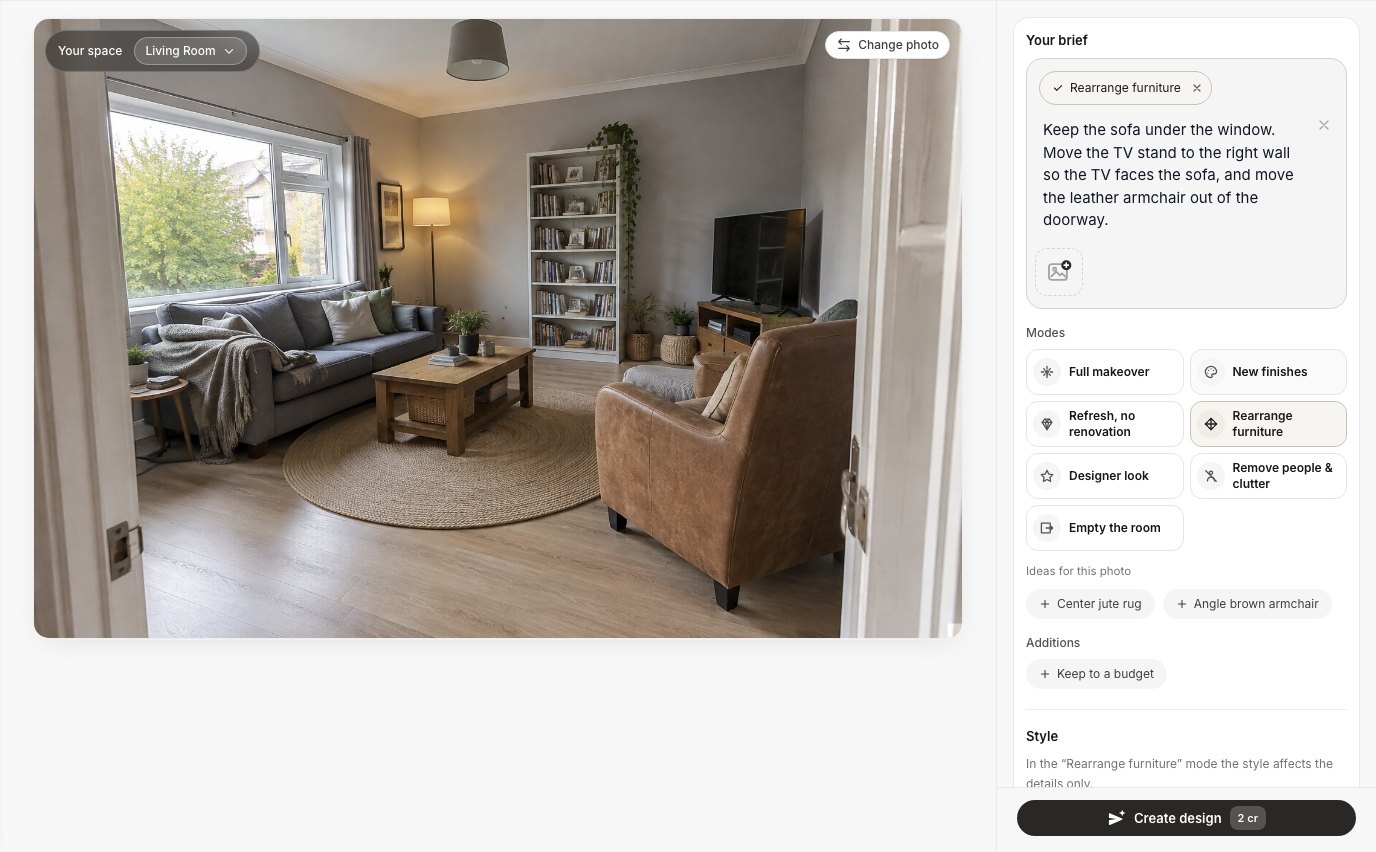 The Studio after upload: the Rearrange furniture mode is selected and the brief holds a precise instruction. "Ideas for this photo" suggests extra tasks for this specific room.
- Take one wide photo. Stand in the doorway or a corner at eye level and get as much of the floor and as many walls in the frame as you can. The AI can only rearrange what it sees; a piece cut off at the edge of the frame may disappear or get invented.
- Upload it in the Studio. GenRoom analyses the photo and recognises the type of space (living room, bedroom and so on); in our tests this took 15–20 seconds. You can correct it with the "Your space" selector.
- Pick "Rearrange furniture". This mode appears only for furnished rooms. Its job is narrow on purpose: the same pieces in a new arrangement, with nothing added and nothing replaced. For an empty room, use furnishing or virtual staging instead.
- Add your wish (optional but powerful). Type where the important pieces should go: "Bed with the headboard on the left wall, window free." Without a wish, the AI analyses the room itself (wasted space, blocked walkways, imbalance) and moves at least two large pieces.
- Leave the style alone. In this mode the style only affects small details, so the default is fine.
- Press Create design. A result takes about 20 seconds and costs 2 credits. Create more gives another variant of the same task, also 2 credits. Compare variants with the Before/After slider.
The Studio also shows Ideas for this photo: short task suggestions generated for your specific room. For our living room it offered "Turn the armchair", "Center coffee table" and "Open window access". They are a useful sanity check of what is wrong with the current layout.
Living room: three new layouts from one photo
Our test living room had a classic problem: the sofa was pushed under the window, the TV sat squeezed into the far corner at an angle, and a big leather armchair stood right next to the doorway, so you had to walk around it to enter.
The default result: no instructions
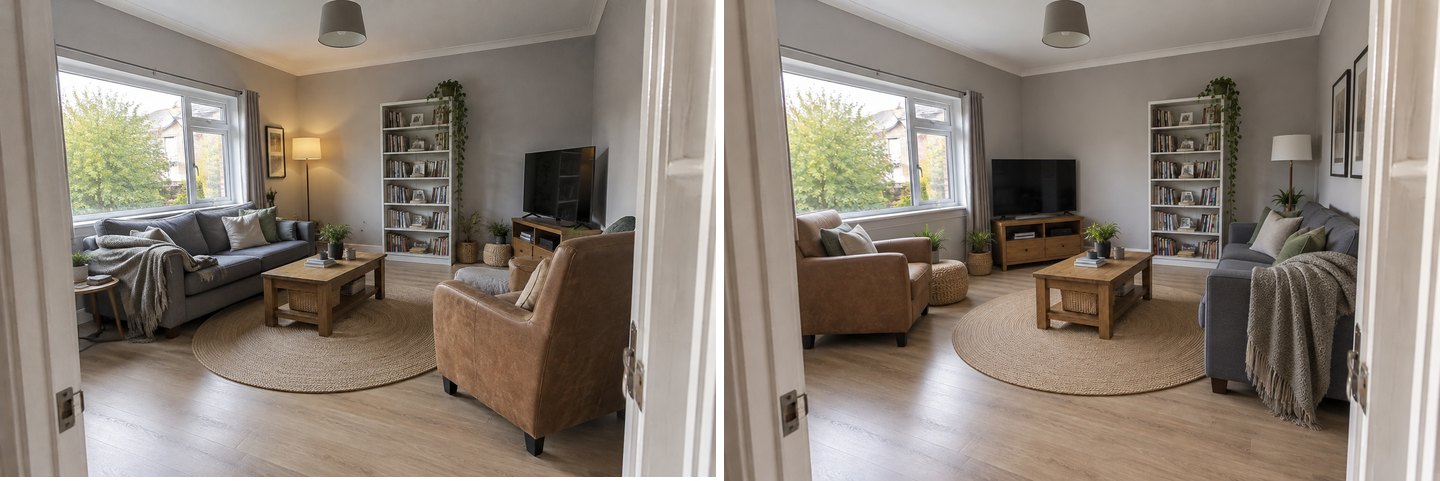 Before (left) and the default "Rearrange furniture" result (right). The entrance is now clear.
With no wish at all, the AI moved the sofa to the right wall, put the armchair by the window, and set the TV stand against the far wall. The walls, window, ceiling lamp, rug and coffee table stayed recognisably the same, and the path from the door is now free.
It was not perfect. A small side table next to the sofa disappeared, two framed pictures appeared on the right wall that were not in the original photo, and the floor lamp got a different shade. These are typical slips: the layout is right, the small decor is approximate.
A result driven by a precise instruction
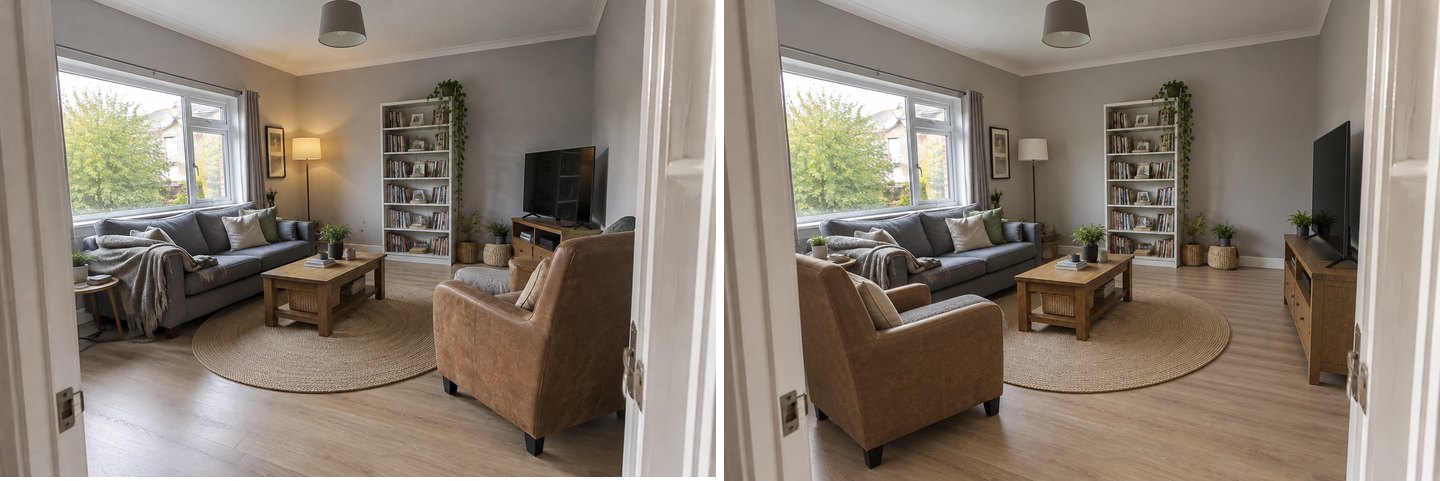 Instruction: "Keep the sofa under the window. Move the TV stand to the right wall so the TV faces the sofa, and move the leather armchair out of the doorway to the side of the coffee table."
Every part of the instruction was followed: the sofa stayed, the TV now faces it from the right wall, and the armchair moved out of the doorway next to the coffee table. This is the layout we would actually build. One honest note: the TV stand came out longer than the original short unit, so measure your real stand before assuming it fits.
Variants: why you should generate more than one
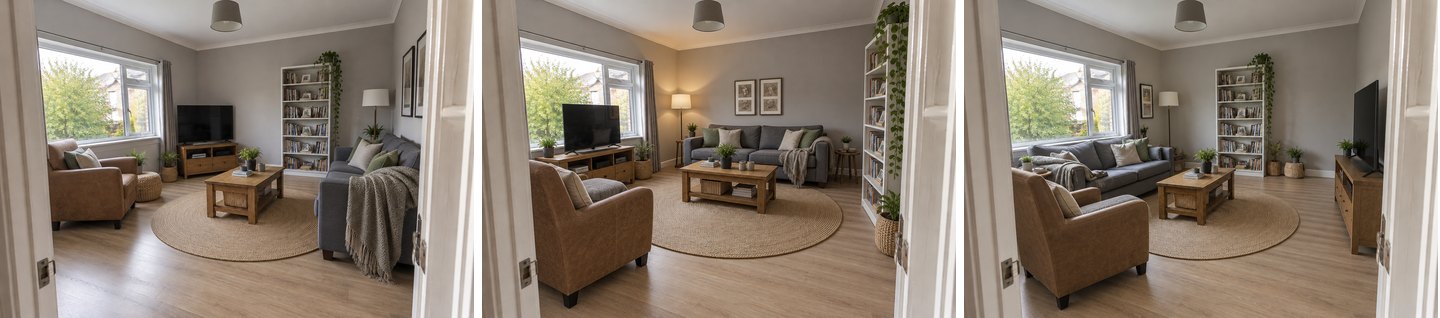 Three results from the same photo: default (left), a second variant (centre), the instruction-driven layout (right).
The middle variant looks tidy but puts the TV directly in front of the window. That blocks daylight and means watching a screen against bright glare: a layout rule the picture cannot "feel". It also moved the bookcase to the wall by the door and added a second framed print above the sofa. This is why the variant button exists. Generate two or three, then reject the ones that break the rules below.
Small bedroom: move the bed without lifting it
Bedrooms are where rearranging is hardest in real life: a bed is heavy, and in a small room every move changes how you reach the wardrobe, the window and the desk.
The default result
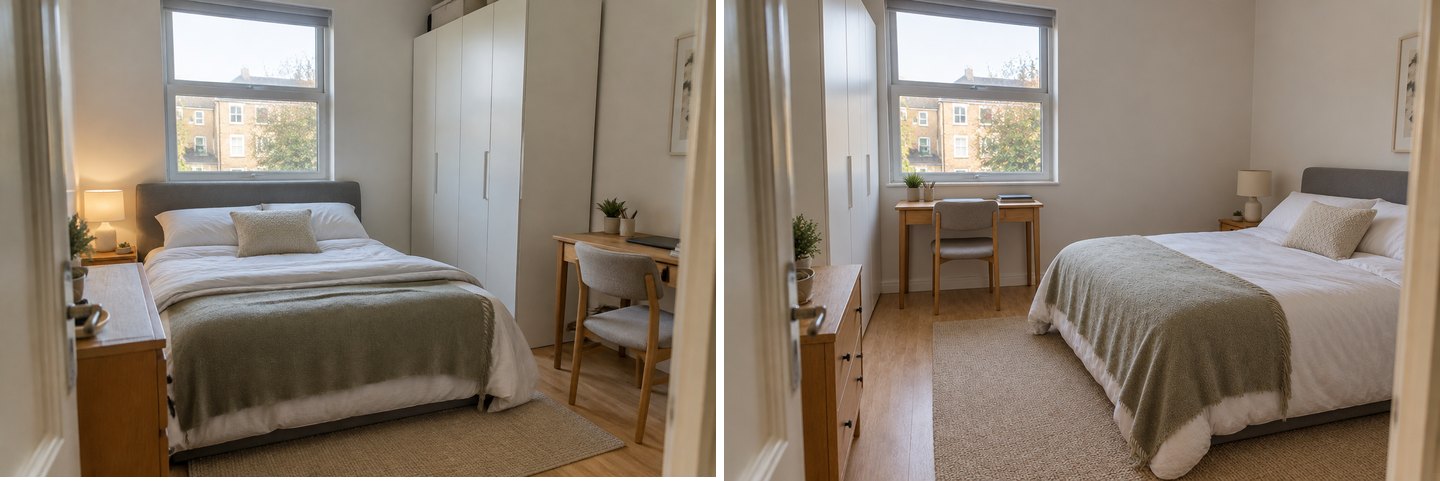 Before (left): the headboard blocks the window. After (right): the bed is on the side wall and the desk takes the window.
The original layout had the headboard pushed against the window, which blocks light and makes opening the window a climb across the mattress. The AI moved the bed to the side wall, shifted the tall wardrobe to the other side of the window, put the desk under the window (the best light for work) and kept the chest of drawers by the door. Moving a wardrobe is the kind of job nobody wants to try twice in real life, which is exactly why it is worth previewing. The bedside table and lamp travelled with the bed.
"Rotate the bed 90 degrees": an instruction people really write
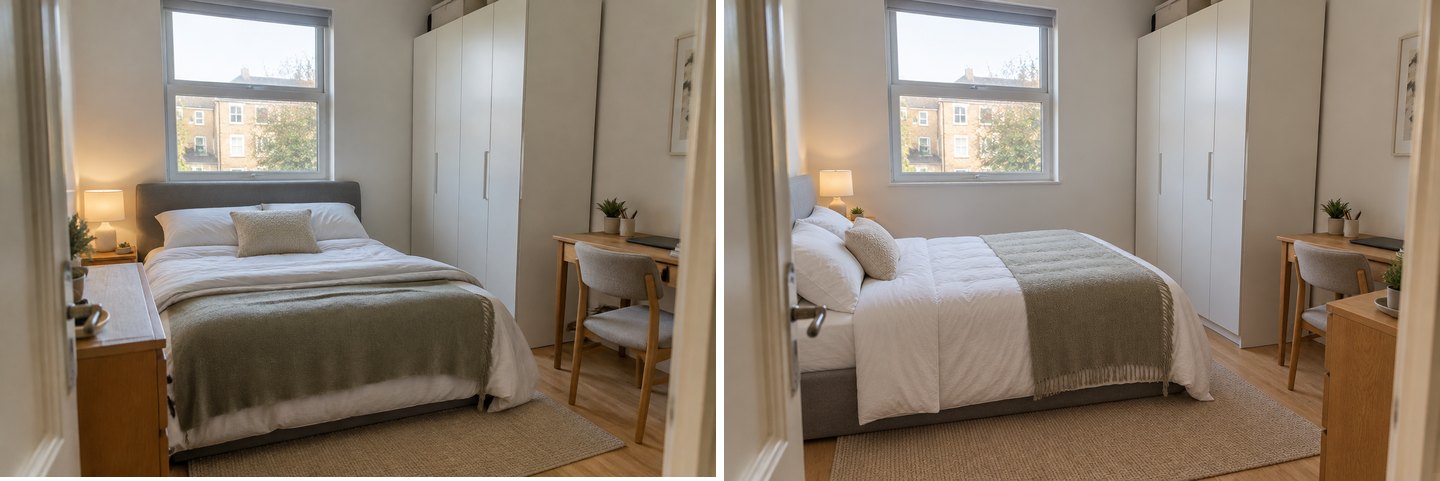 Instruction: "Rotate the bed 90 degrees so the headboard is against the left wall and the window is free."
This one is lifted almost word for word from real user requests. The AI turned the bed, freed the window and left the wardrobe and desk where they were. The camera moved very slightly, which happens; the room itself is the same.
A twin bed, a long dresser, a corner shelf and a desk
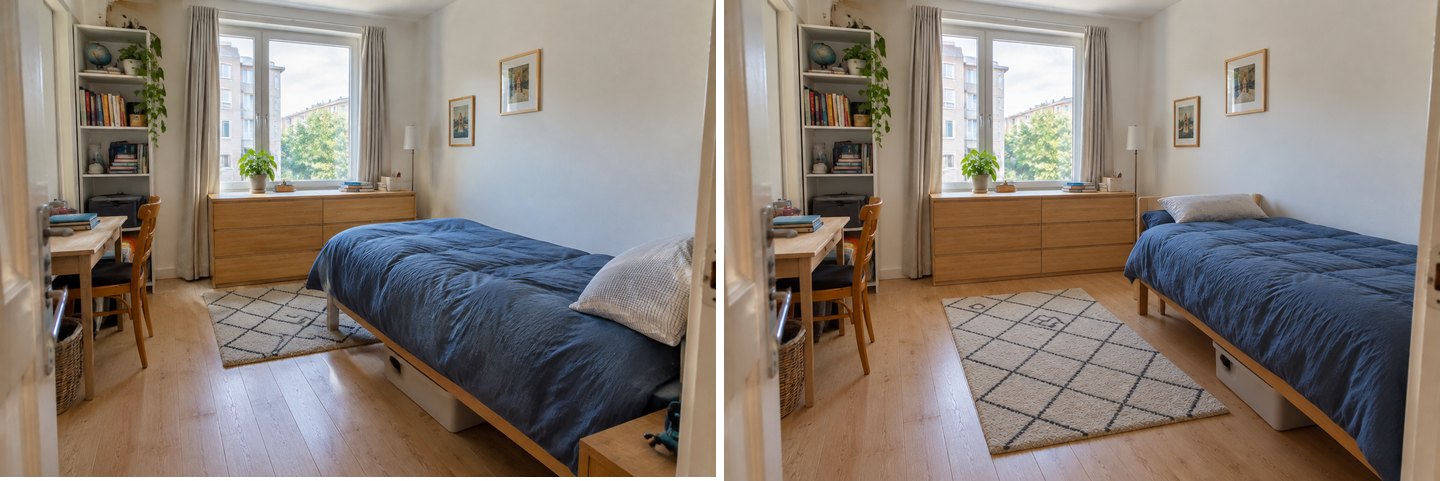 Instruction: "Put the bed lengthwise against the right wall to free the middle of the room. Keep the dresser under the window."
A twin bed sticking out from the wall chops a small room in half. Pushed lengthwise against the wall, it frees a single open floor area, which in a kids' or teen room is the play or exercise space. The dresser, the corner shelf and the desk stayed in place, and the rug moved into the freed middle. For a small room, this is often the single most effective change.
Fine-tuning one piece: Move, Rotate, drag and Another angle
The mode rearranges the whole room. Often you like the result except for one piece. For that, open Edit on the result and use the editor: every edit costs 2 credits and only touches what you ask for.
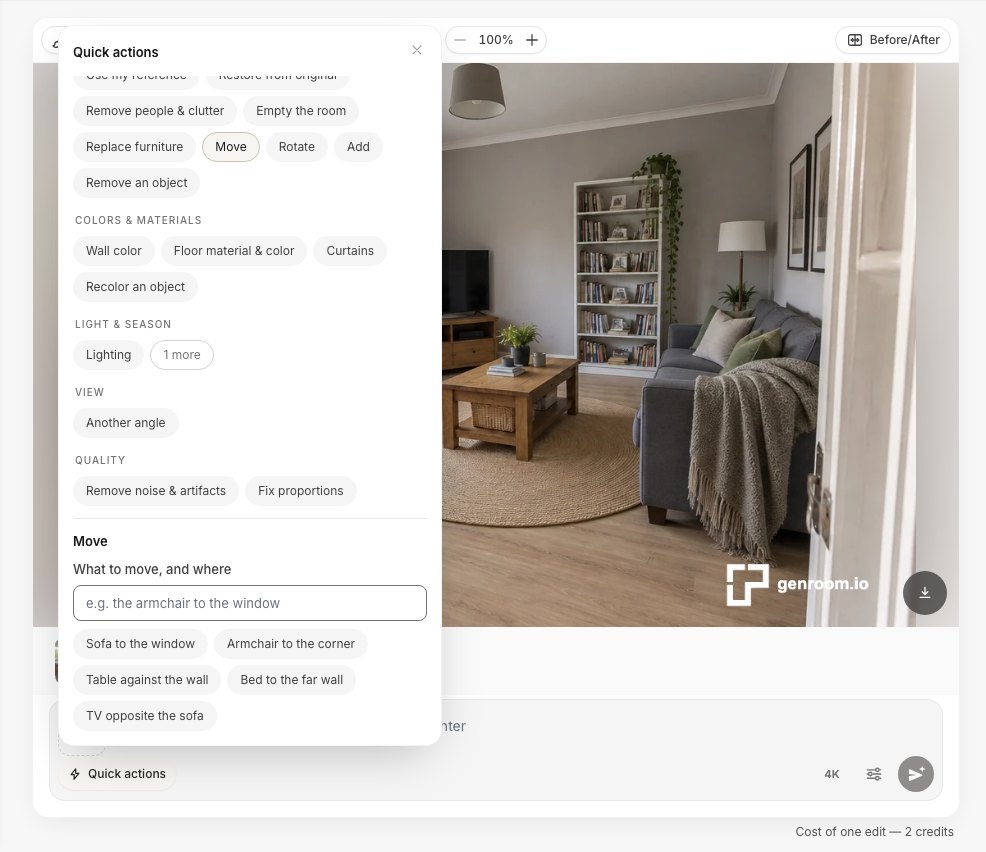 Quick actions in the editor. Move asks "What to move, and where" and offers ready suggestions; Rotate and Another angle sit in the same panel.
- Move (quick action): write "what to move, and where", for example "the floor lamp to the corner between the sofa and the bookcase", or tap a suggestion like "TV opposite the sofa".
- Rotate: "the bed by 90 degrees", "the sofa to face the window", "the desk to face the window".
- Select area + drag: trace a piece with the lasso, grab it by the hand icon and drop it where you want it.
- Another angle: see the same design from the opposite corner, from the left or right, closer, wider or from above.
Drag the selection: the most direct way to move a piece
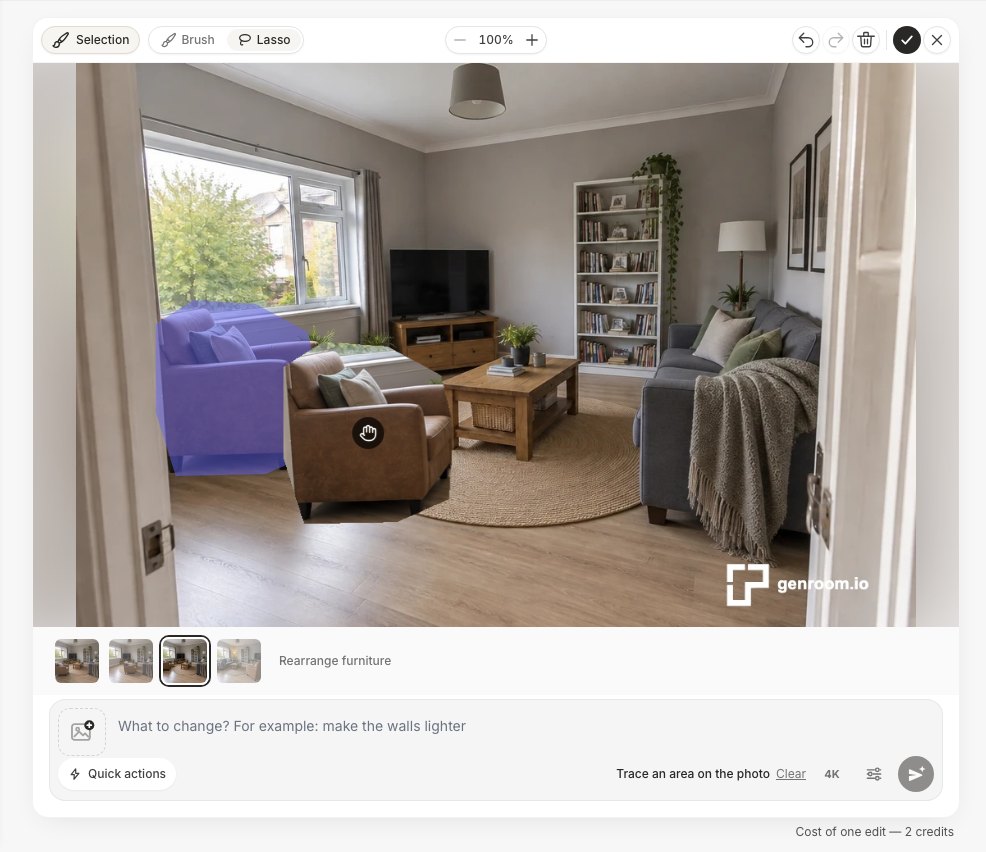 Trace the piece with the lasso, then drag it by the hand icon. Releasing it sends one edit.
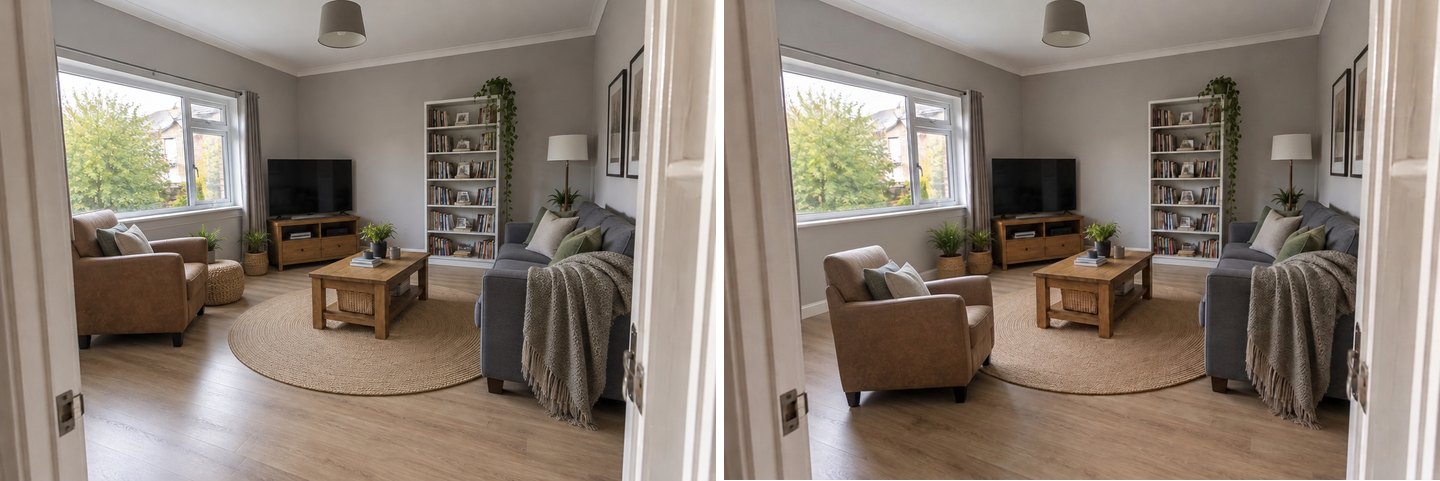 The armchair now forms a conversation group with the sofa. The wicker pouf that stood right behind it disappeared.
The drag worked: the armchair moved closer to the coffee table and now forms a seating group with the sofa. But the small pouf that stood just behind the armchair vanished. Our takeaway: trace tightly around the piece you move, and check the area it leaves behind.
Small moves are the most reliable
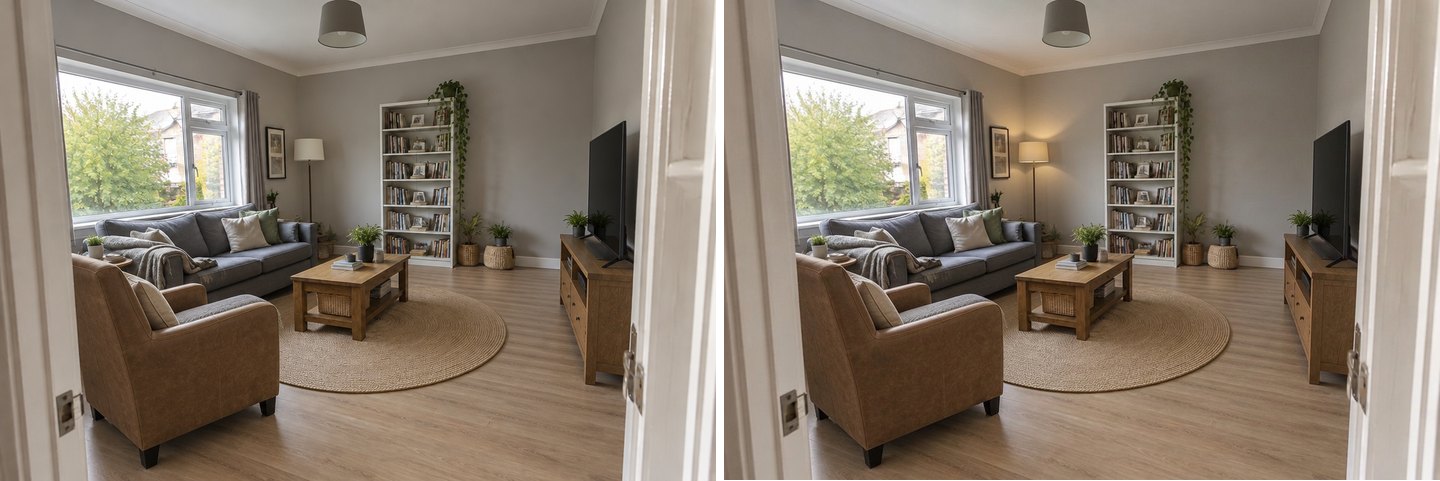 Move: "the floor lamp to the corner between the sofa and the bookcase". Everything else stayed put.
Moving the floor lamp was a clean, precise edit: the lamp went exactly where we asked and nothing else changed. In our tests, moving one light, a chair or a plant almost always works; turning a large piece in place was less dependable. The "Bed by 90 degrees" quick action on an already rearranged bedroom returned an almost identical picture, while the same request written inside the Rearrange furniture mode (above) rotated the bed properly. If a quick action ignores you, rerun the mode with a wish instead.
Another angle: a feel for the space, not a survey
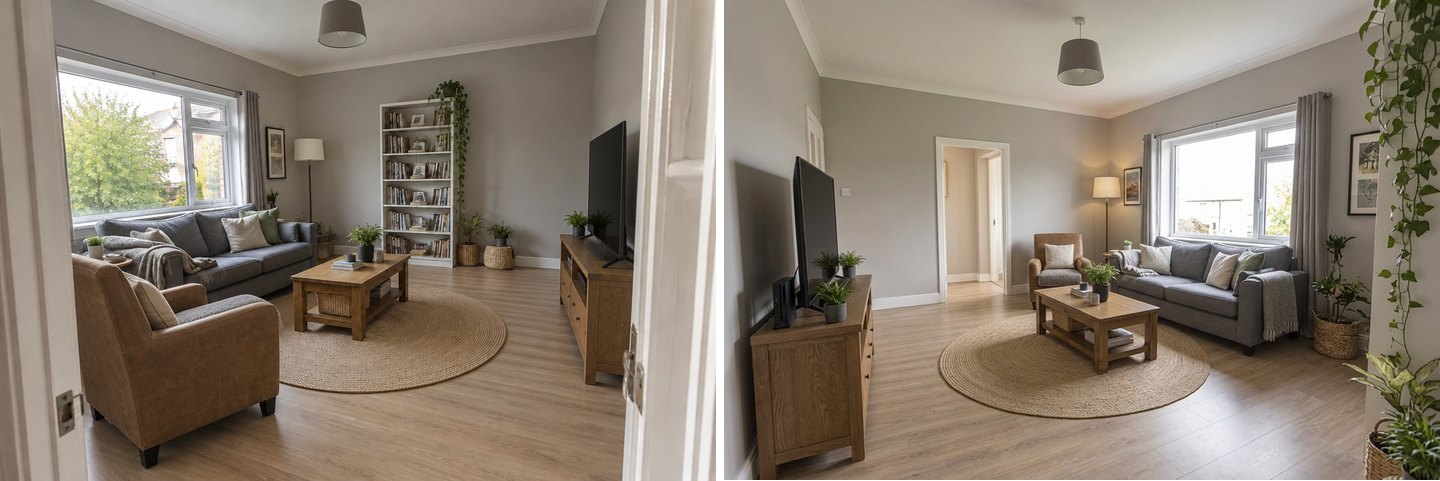 "From the opposite corner": a generated view. The bookcase did not make it into the new angle.
Another angle helps you imagine standing on the sofa side of the room. Remember it is a new image, not a 3D scan: here the bookcase is missing from the reverse view. Use it to judge mood and sightlines, not to confirm what fits.
How to write a rearrangement request the AI follows
The clearer the instruction, the closer the result. These phrasing rules come from our runs and from the real requests above.
| Weak request | Strong request | Why it works better |
|---|---|---|
| "Make the room better" | "Free the walkway from the door to the window" | Names a goal the AI can check |
| "Move the bed" | "Bed with the headboard on the left wall, window free" | Says which wall and what must stay clear |
| "Fix the TV" | "TV stand on the right wall, facing the sofa" | Gives place and orientation |
| "Change the sofa" | "Same sofa, along the long wall" | "Same" stops it from replacing the piece |
| "More space" | "Push the twin bed lengthwise against the right wall" | One concrete move with a visible result |
| "Make it cozy" | "Armchair beside the coffee table, facing the sofa" | Builds a conversation group |
Three habits help: name each piece the way it looks in the photo ("the leather armchair", "the grey sofa"), say which wall ("left", "right", "the window wall", "opposite the door"), and say what must stay ("keep the dresser under the window"). For deeper prompt advice, see our guide to editing AI room designs with text.
Create interior design with AI
Upload a photo of your room and get a professional design in 30 seconds. First generation is free.
Layout rules to check every AI result against
An AI layout is a picture, so it cannot guarantee clearances. Check each result against these practical rules before you move anything heavy.
| What to check | Rule of thumb | Source |
|---|---|---|
| Main walkway (door to window, door to bed) | 36 in / 91.5 cm clear width; 32 in / 81.5 cm only for short pinch points | ADA Standards, 403.5.1 |
| Circulation in a bedroom | At least 3 ft / about 90 cm | Houzz bedroom dimensions |
| Side of the bed you get out of | About 24 in / 60 cm | Houzz, same guide |
| In front of a wardrobe | 36–48 in / 90–120 cm, so doors open fully | Houzz, same guide |
| Seats in one conversation group | Within about 4–7 ft / 1.2–2.1 m of each other | Edward T. Hall's close "social distance", see proxemics |
| TV viewing distance | 1.2× to 1.9× the screen diagonal (a 55-inch TV: about 1.7–2.7 m) | Dynabook (Toshiba TV) viewing guide |
| TV and windows | Not in front of a window; sideways to it is best | Glare: practical rule, not a standard |
The ADA figure is an accessibility standard for public buildings, not a law for your living room, but it is the most widely cited measure of a comfortable passage.
How to use the table with AI results: in our living room, the default and the instruction-driven layouts passed the walkway and TV rules; the second variant failed the window rule and went in the bin. In the bedrooms, both the "bed on the side wall" and the "rotate 90 degrees" layouts kept the window and wardrobe reachable, but in a small room you should still measure: a double bed is about 140 cm wide, and 60 cm beside it plus 90 cm in front of the wardrobe add up quickly.
Where the AI slips (and how to catch it)
We kept every result, including the bad ones. Here is the clearest failure.
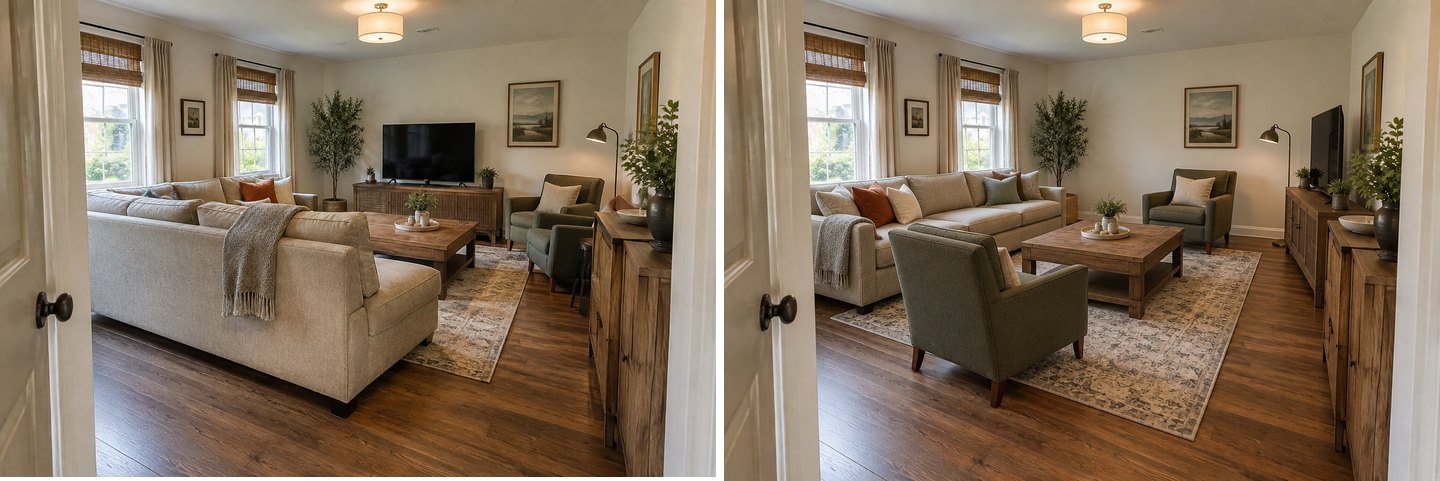 The instruction asked to move the sectional under the windows. The AI turned it into a straight sofa, dropped the TV cabinet and swapped the rug.
The layout idea is fine, but the furniture is no longer yours: the L-shaped sectional became a straight sofa, the TV cabinet vanished (the TV now sits on the sideboard), and the rug grew and changed pattern. Across our runs, these are the slips to look for:
- A piece changes shape or size. Sectionals, long TV stands and storage units were the most affected. Compare each large piece with the "before" photo.
- Small things appear or vanish. Framed prints, side tables, poufs and plants are the usual suspects, even though the mode is told to add nothing.
- Rugs get resized. The AI likes a bigger rug under a new seating group. Nice idea, but it is a purchase, not a rearrangement.
- Hidden constraints are ignored. Radiators, sockets, door swings and anything outside the frame are invisible to the AI.
- Proportions are approximate. It is a photo, not a measured plan. A layout that looks roomy may be 20 cm short in reality.
The fix is the same each time: generate a variant, add "same sofa" or "keep the TV cabinet" to the wish, or use Restore from original in the editor's quick actions to bring a piece back.
AI rearranging from a photo vs. a room planner
Photo-based AI and classic room planners answer different questions.
| AI from a photo (GenRoom) | 2D/3D room planner | |
|---|---|---|
| Input | One photo of your room as it is | Room dimensions and a furniture catalogue |
| Your own furniture | Kept from the photo | Approximated with catalogue items |
| What you see | A realistic photo of your room | A plan or 3D model |
| Exact measurements | No, check with a tape measure | Yes |
| Time to first result | About 20 seconds | Usually longer, you draw the room first |
| Best for | "Will this look and feel better?" | "Will this fit to the centimetre?" |
The two combine well: test five layouts with AI in a few minutes, keep the one you like, then measure that single layout. If you are planning a whole apartment rather than one room, GenRoom also builds every room from a floor plan; see AI interior design from a floor plan. For a wider comparison of tools, read 5 Best Free AI Room Design Tools.
What does it cost?
Rearranging uses the same credits as any design. A new free account gets 6 credits with no card, enough for three rearrangements (results carry a watermark). A design or an edit costs 2 credits; paid packs are one-time, not subscriptions: Start $9.99 for 36 credits, Basic $19.99 for 100, Pro $39.99 for 300. If a generation fails, the credits come back automatically. Details are on the pricing page.
A realistic budget for one room: one default result, two variants, one instruction-driven result and two single-piece edits, which is 12 credits.
FAQ
Can I take a picture of my room and rearrange it with AI?
Yes. Upload the photo in the Studio, choose "Rearrange furniture" and press Create design. The AI keeps the walls, windows, doors and camera angle, and moves the furniture that is already in the photo. A result takes about 20 seconds.
Is there a free AI that can rearrange my room?
GenRoom gives 6 free credits at sign-up without a card, which covers three rearrangement results. Free results carry a watermark; the features are the same as on paid packs, including edits with words and a brush.
Will the AI keep my actual furniture?
The Rearrange furniture mode is instructed to add nothing and replace nothing, and in most of our results the large pieces stayed recognisable. It is not perfect: a sectional once became a straight sofa and small decor sometimes appeared or vanished. Compare every result with your original photo.
Can I tell the AI exactly where each piece goes?
Yes. Write it in the brief, for example "Rotate the bed 90 degrees so the headboard is on the left wall" or "TV stand on the right wall, facing the sofa". Name the wall and the piece. Precise requests were followed more reliably than vague ones in our tests.
How do I move just one piece of furniture in the result?
Open Edit, then Quick actions, then Move and write "what to move, and where", or trace the piece with Select area and drag it to a new spot. Each edit costs 2 credits and leaves the rest of the room alone.
Does the AI know if the furniture will fit?
No. It works from a photo, not measurements. Use the result to choose a layout, then measure: keep about 90 cm for main walkways, about 60 cm beside the bed and 90–120 cm in front of a wardrobe.
Does it work for small bedrooms and studio apartments?
Yes, and small rooms often gain the most, because one move (a bed against the wall, a desk under the window) frees a whole strip of floor. For more ideas, see small room design with AI.
The Bottom Line
Rearranging furniture with AI turns "let's try the sofa over there" from an afternoon of lifting into a few minutes of clicking. Upload one wide photo, use the Rearrange furniture mode, write precise wishes for the pieces that matter, generate a couple of variants and fix single pieces in the editor. Then check the winner against the walkway, bed and TV rules and measure once before you move anything.
Open the Studio and try your own room, or start from the living room and bedroom design pages.