Bathroom Tile Visualizer: Try New Tiles on Your Own Photo
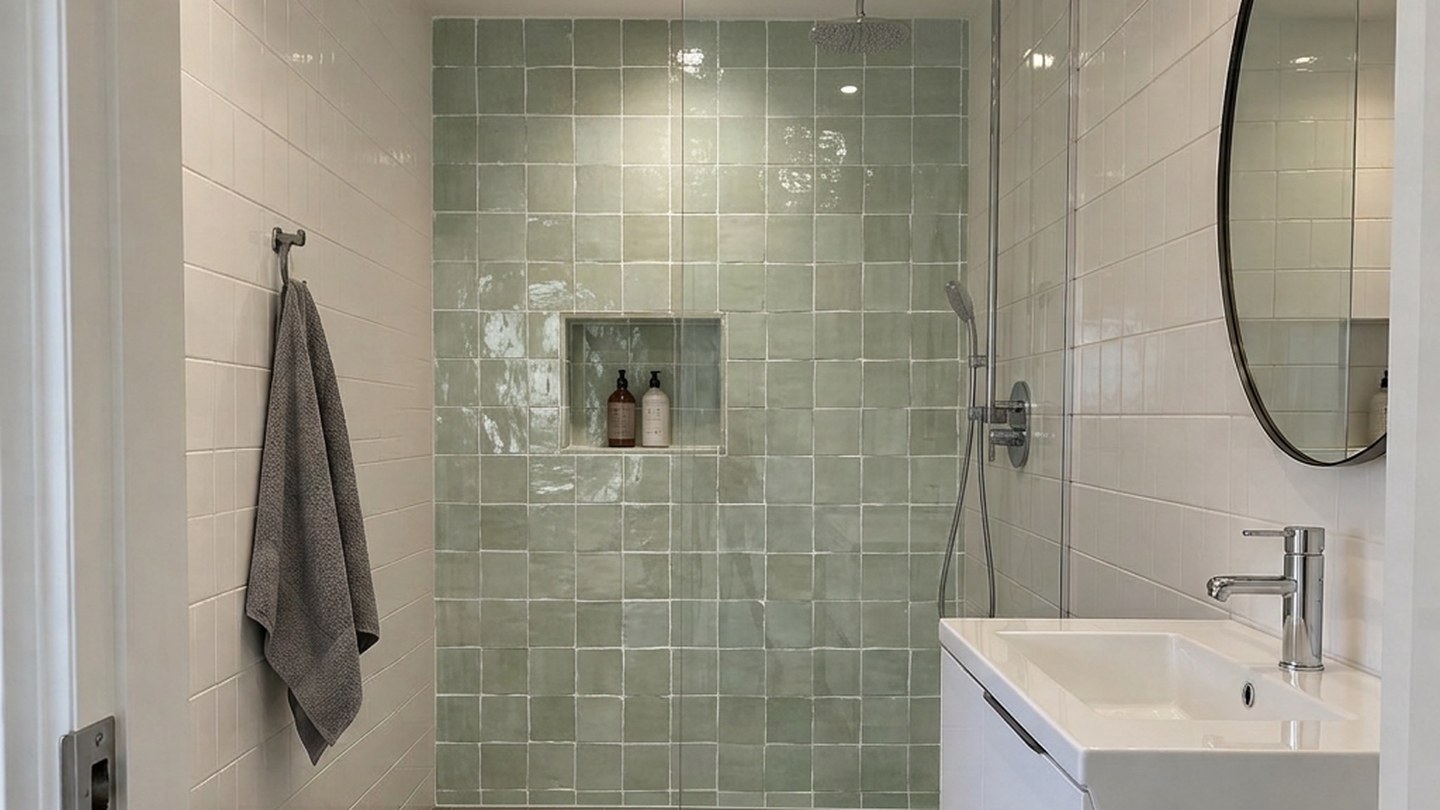
A real result from the GenRoom Studio: one shower wall changed to green zellige with a brush selection. The niche, the glass, the shower and the vanity are the ones from the original photo.
A bathroom tile visualizer shows new tiles on a photo of your own bathroom before you buy a single box. You upload one picture, describe the tile or attach a photo of a tile sample, and the AI retiles the walls, the floor, one shower wall or just the niche, while the bathtub, the vanity, the window and the camera angle stay where they are.
That is what the GenRoom Studio does. For bathrooms it has a ready task called Bathroom tiles with five starting points (large beige porcelain, marble look, terrazzo, green zellige, microcement), a Floor material & color edit for the floor alone, Select area for one wall or a niche, and Use my reference for a tile you photographed in a showroom. Every design or edit costs 2 credits, and in our tests a result took about 20–40 seconds.
This guide is built on real requests. Between March and October 2026, 828 GenRoom users asked for new tiles in their own words: not "redesign my bathroom", but "keep my bathroom, change the tiles". Below you will find what they ask for, the exact Studio path for each request, real before/after results from two bathrooms we shot for this article, the tile rules worth checking before you buy, and the places where the AI still gets tiles wrong.
What Do People Ask a Bathroom Tile Visualizer For?
Most people do not want a new bathroom. They want to see one surface changed and everything else left alone. Typical requests (anonymized and paraphrased) look like this:
| What people write (paraphrased) | What they really want | Best Studio tool |
|---|---|---|
| "Above the sink and at the end of the shower, the narrow beige strips from my photo" | A specific tile they saw, on two specific walls | Use my reference + a sample photo |
| "Replace the tiles with a warmer marble look" | All tiles swapped, layout kept | Bathroom tiles → Marble look |
| "White wood-look tile on the floor" | Floor only | Floor material & color |
| "The shower floor should be the same as the rest of the bathroom" | One continuous floor | Floor material & color, or a reference |
| "Plain walls, white bath, a horizontal band of small light stone tiles" | A feature band, not a full retile | Select area on the band + text |
| "Only a calm mosaic on the bath, like the reference" | One area, one tile | Select area + Use my reference |
| "Change the tub surround to terrazzo" | One surface in a new material | Select area + text |
| "New sand-colored tiling, a floating vanity, white taps" | Tiles plus a few fixtures | Bathroom remodel mode + wishes |
The pattern is clear: the job is "try a tile", and the most common worry is that the AI will redo the whole room. That is why the tool you pick matters more than the words you type.
Which GenRoom Tool Should You Use for Bathroom Tiles?
Use the Bathroom tiles task when you want all wall and floor tiles replaced and everything else kept. Use Bathroom remodel only when you also want a new vanity, fixtures or lighting. For one surface, open the photo in the AI editor and use Floor material & color, Select area or Use my reference.
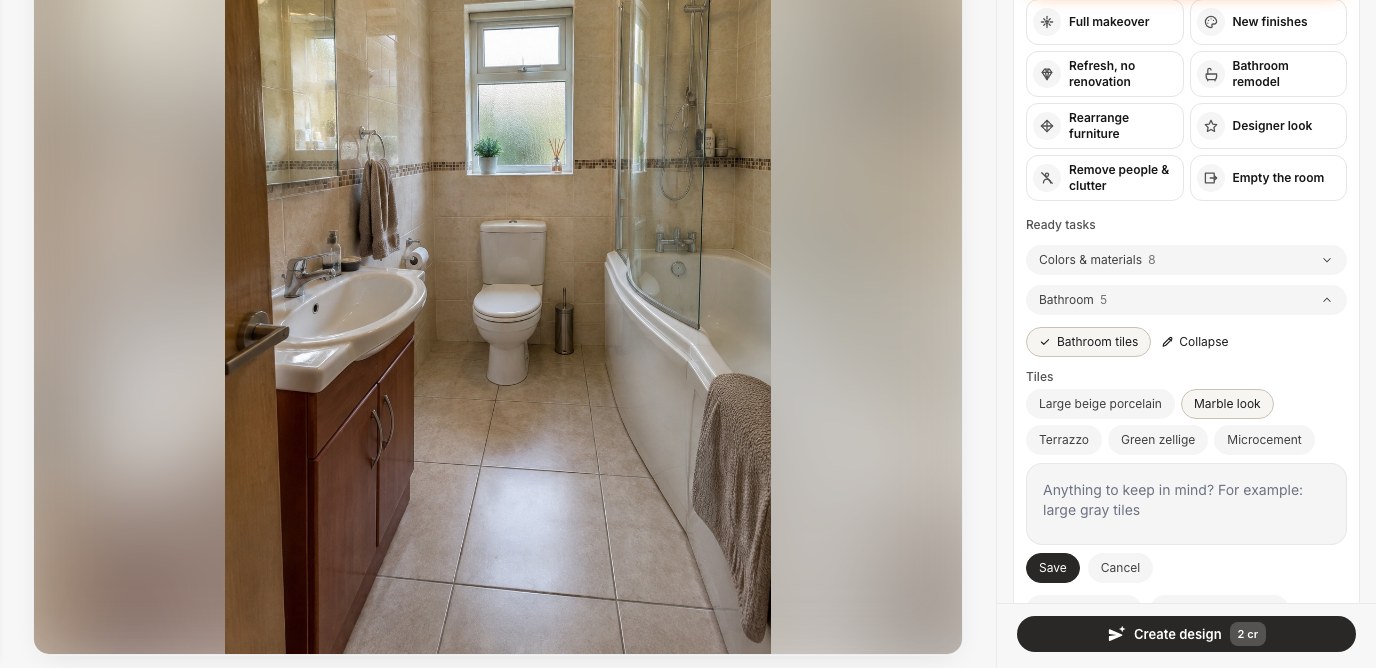 Ready tasks → Bathroom → Bathroom tiles → Refine. Pick one of the five tiles or describe your own in "Anything to keep in mind?", then Save and Create design.
| Tool | Where | What it changes | What stays | Use it for |
|---|---|---|---|---|
| Bathroom tiles (ready task) | Studio design screen → Ready tasks → Bathroom | Wall and floor tiles | Bath or shower, vanity, toilet, window, camera | A full retile preview |
| Bathroom remodel (mode) | Studio design screen → Modes | Tiles, vanity, shower or tub, fixtures, mirror, lighting | Walls, window, plumbing positions | A new bathroom in the same shell |
| Floor material & color | AI editor → Quick actions | The floor | Walls and everything on them | Floor-only changes |
| Select area | AI editor, top left | Only the area you outline | Everything outside it | One shower wall, a niche, a band |
| Use my reference | AI editor → Quick actions | What you describe, taken from your photo | The rest of the room | A tile you saw in a store |
The difference between the task and the mode is easiest to see side by side. Same photo, same day:
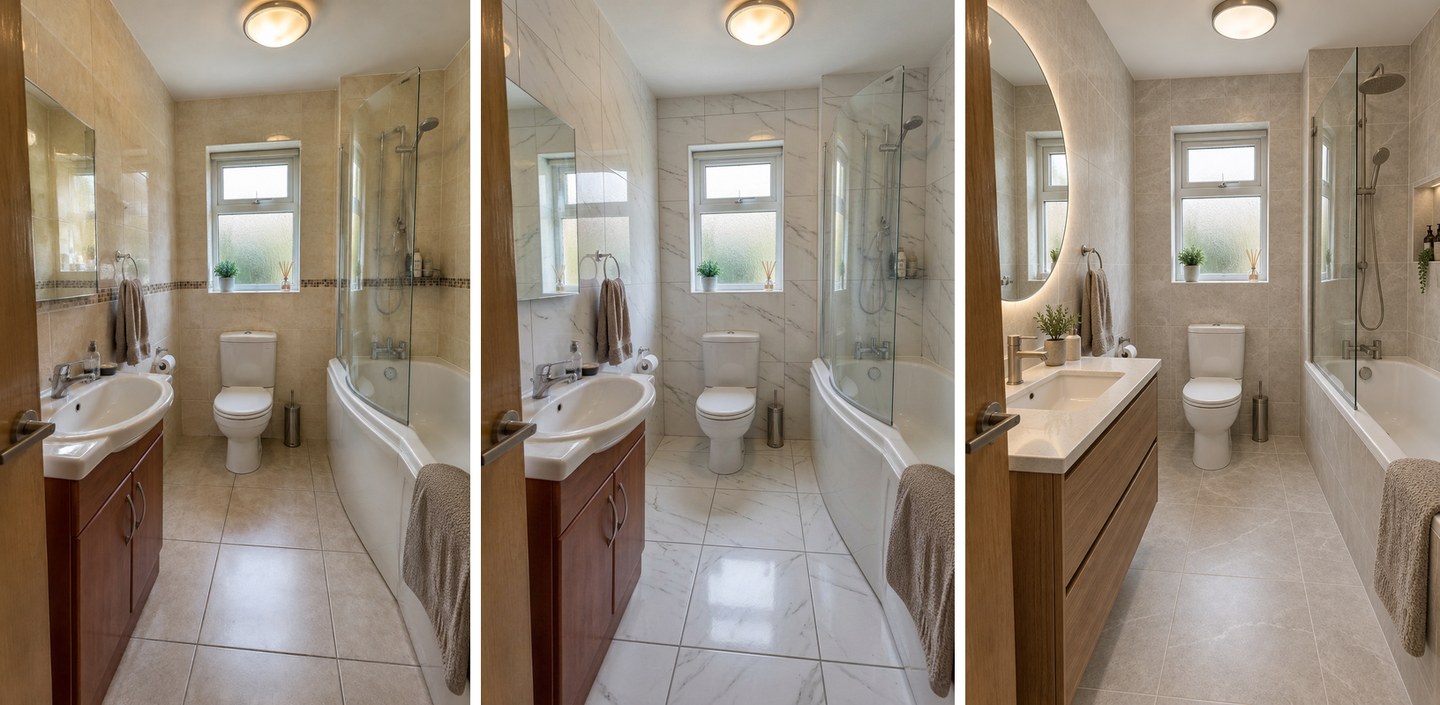 Left: the original. Middle: Bathroom tiles → Marble look; only the tiles changed. Right: Bathroom remodel with no wishes; the vanity, the mirror, the bath, the shower and the tiles are all new.
The remodel mode is described in the Studio as "tiles, vanity, shower or tub, fixtures, mirror and lighting", and it does exactly that: our curved bath became a straight one, the cherry vanity became a new wood vanity, the mirror turned round and a shower niche appeared. That is great for a full remodel (our AI bathroom design guide and the bathroom design page cover it in detail), and the wrong tool if you only want to see a tile.
Case 1: How to Retile a Dated Beige Bathroom Step by Step
Our first bathroom is a typical mid-2000s room: glossy beige wall tiles with a brown mosaic border at mid height, beige floor tiles, a curved bath with a glass screen and a cherry-wood vanity. The owner wants to keep the bath, the vanity and the toilet and only change the tiles.
Step 1: Take a usable photo
Shoot from the doorway at eye level, with the lights on and the door open as wide as it goes. Show at least two walls and the floor, so the AI can see how the tiles meet in the corners. Remove towels and bottles from the surfaces you want to retile: anything that covers a tile is kept as it is, and the AI has to guess what is behind it.
Step 2: Try a full retile with the Bathroom tiles task
In the Studio, choose Design from a photo and upload. The room was recognized as a bathroom automatically. Under Ready tasks, open Bathroom, click Bathroom tiles, then Refine and pick Marble look. We left the style on My own style and wrote no wishes.
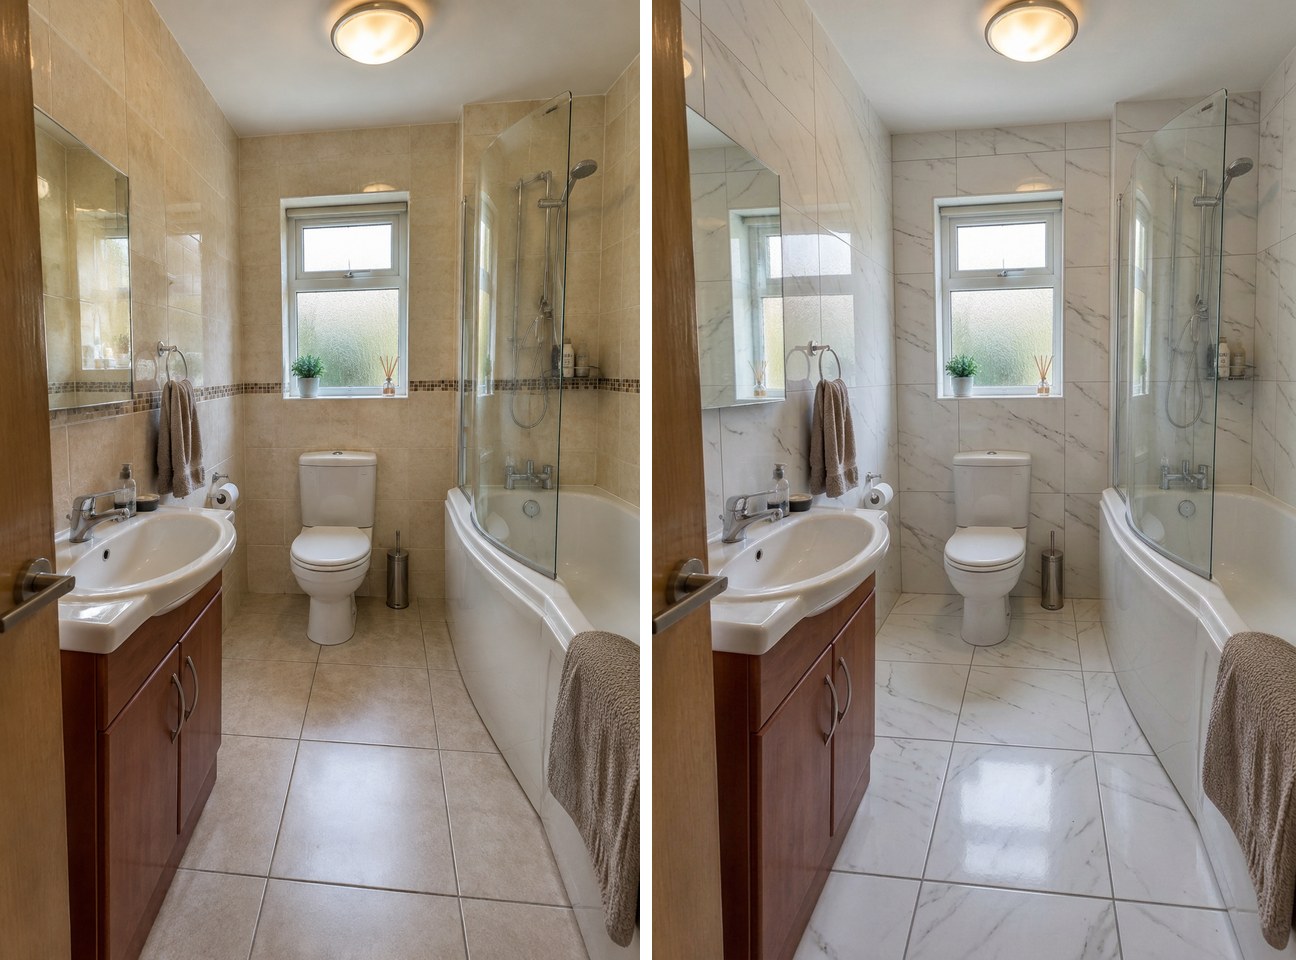 Bathroom tiles → Marble look. The cherry vanity, the curved bath, the glass screen, the toilet and the window are the originals.
This is what most people expect from a tile visualizer. The border strip is gone, the walls and floor read as one material, and the room looks brighter because white veined tile reflects more light than beige. The tiles came out noticeably larger than the originals, which you can steer with a size in the "Anything to keep in mind?" field. One thing to notice: the floor came back polished. That is a look, not a recommendation; for a bathroom floor you want a matte or textured finish (see the slip-resistance rule below).
Step 3: Change only the floor
People often like their wall tiles and hate the floor. Open the photo in the AI editor (the pencil icon in the left bar), click Quick actions → Floor material & color, and type the floor you want. We wrote "white wood-look porcelain plank tiles, matte, 20×120 cm".
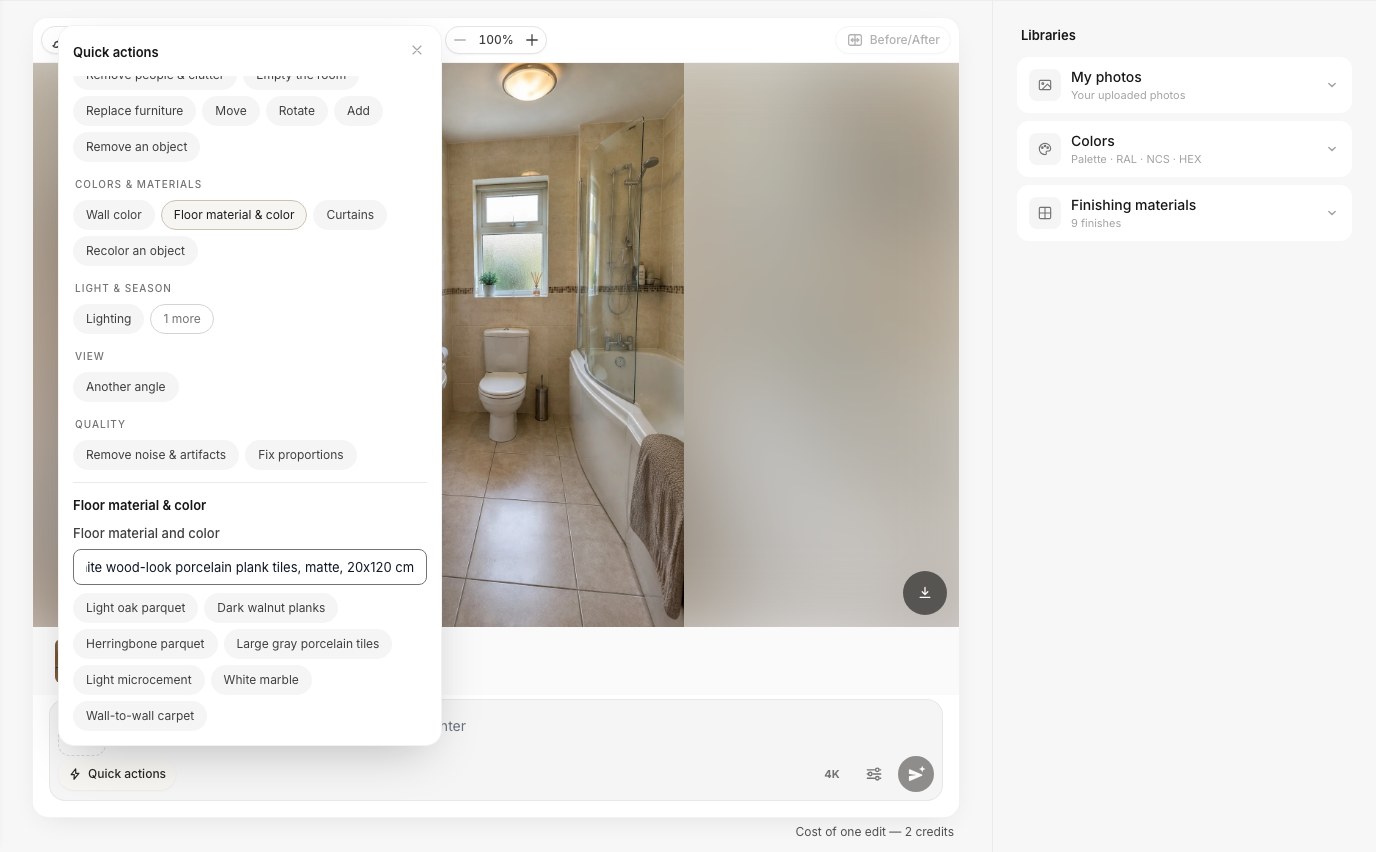 Quick actions → Floor material & color. Type your own floor or start from a chip such as "Large gray porcelain tiles", "Light microcement" or "White marble".
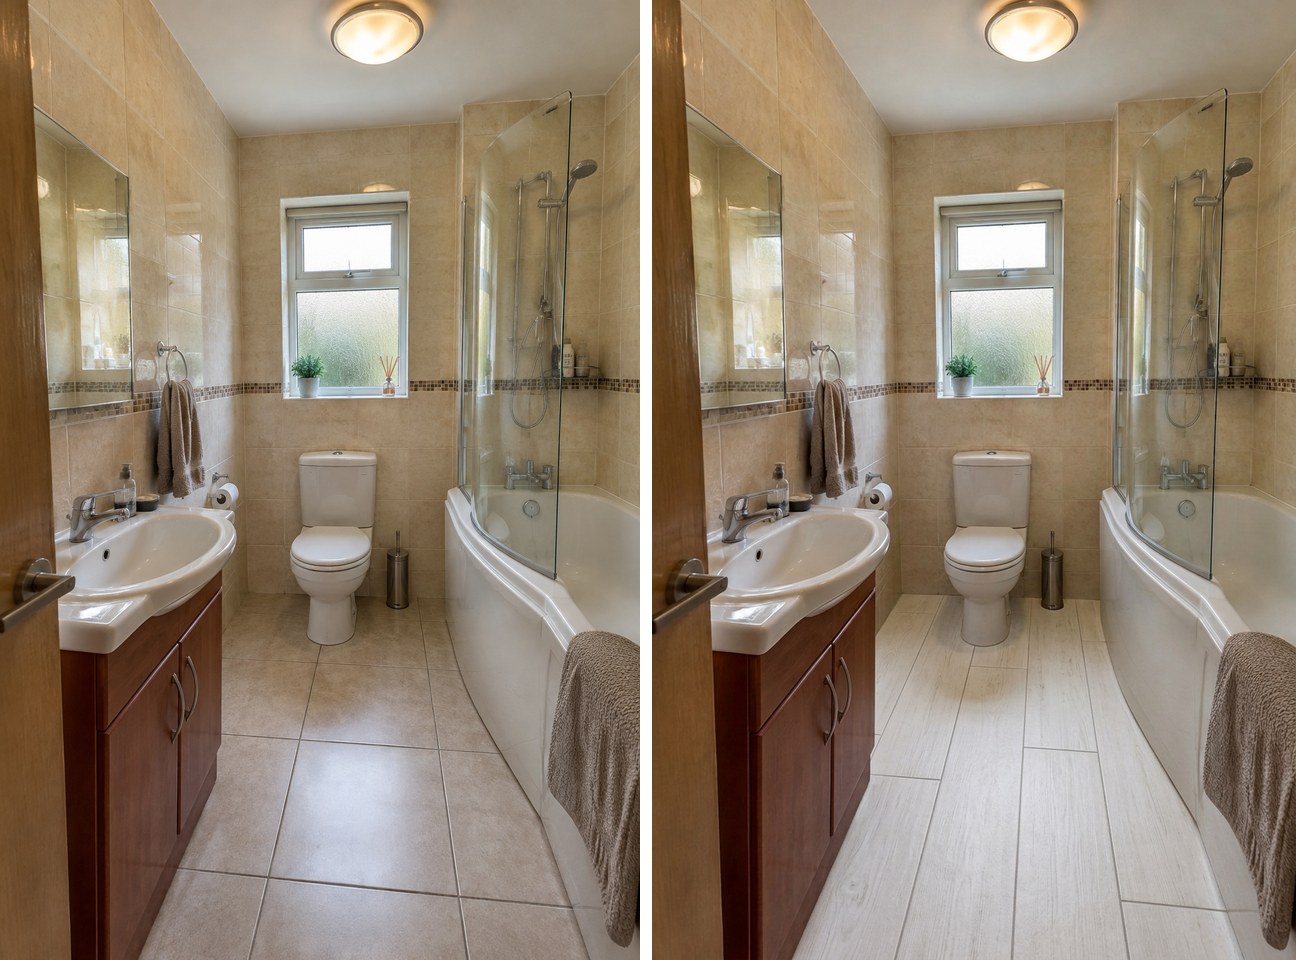 Floor material & color only. The walls, the border strip and every fixture are untouched; the planks run along the length of the room.
This is the most useful single test for a dated bathroom: one change, everything else identical, so you can judge the floor on its own. If the floor looks good but the beige walls now look worse, that tells you what to test next. For more floor ideas, including LVP and hardwood looks for other rooms, see our AI flooring visualizer guide or the flooring visualizer page.
Step 4: Try a tile you photographed in a showroom
The most specific request in our data was "the narrow beige strips from my uploaded photo, above the sink and at the end of the shower". To test it, we photographed a sheet of narrow glazed finger tiles (about 2 × 15 cm) on a table. In the AI editor, click the photo button in the composer to add it as a reference; it becomes "photo 2". Then open Quick actions → Use my reference and fill in "What to take and where":
the narrow beige finger tiles from photo 2 on the wall above the sink and on the shower walls around the bath; keep the other walls and the floor as they are
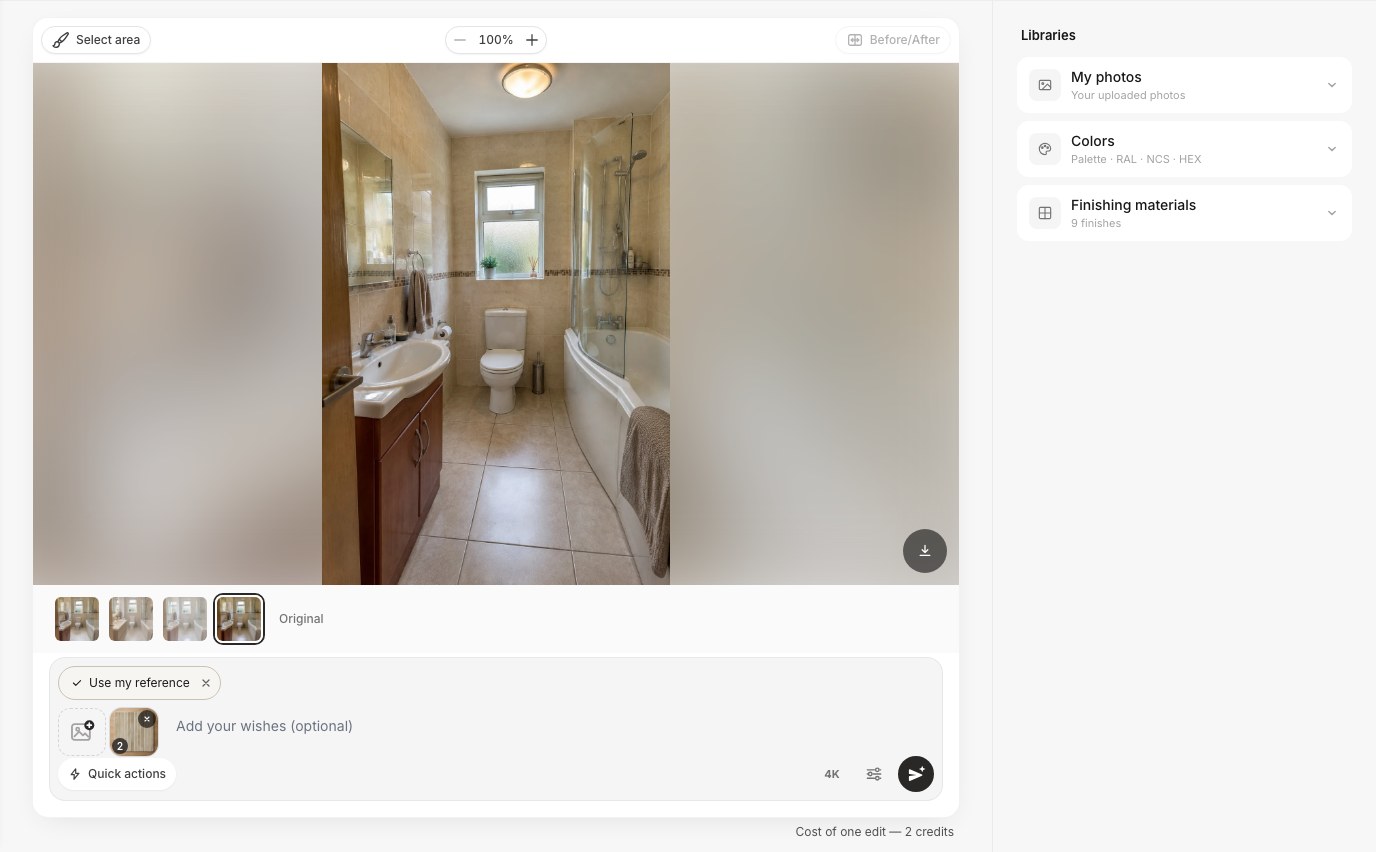 Use my reference: the tile photo appears as a numbered thumbnail in the composer. Say which photo, what to take and where to put it.
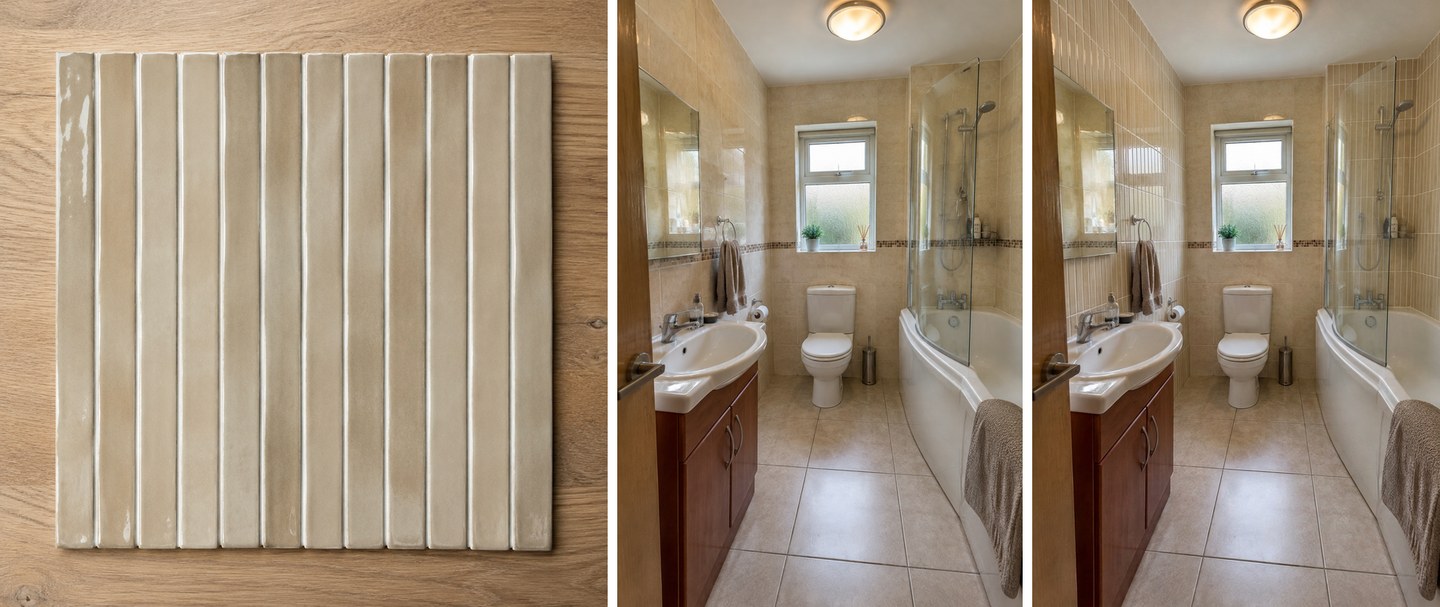 Left: the tile sample photo. Middle: the original. Right: the result. The finger tiles went exactly where we asked; the window wall and the floor kept the old tiles.
The AI followed the placement precisely and kept the glaze color and the vertical direction. The strips came out slightly shorter than the sample in proportion to the room, so treat the result as a check of color and direction, not of exact size. A clear, straight-on photo of the sample in daylight gives the best match; a photo of a tile on a busy showroom wall gives the AI more to misread.
Case 2: A Small White Bathroom — Accent Wall, Niche and Patterned Floor
The second bathroom is small and very white: plain white wall tiles from floor to ceiling, grey floor tiles, a walk-in shower with one glass panel, a recessed niche and a wall-hung vanity. Here the questions are different: how much tile change can a small room take, and what happens if you change only one surface?
Large-format porcelain on every surface
First, the full retile with Bathroom tiles → Large beige porcelain.
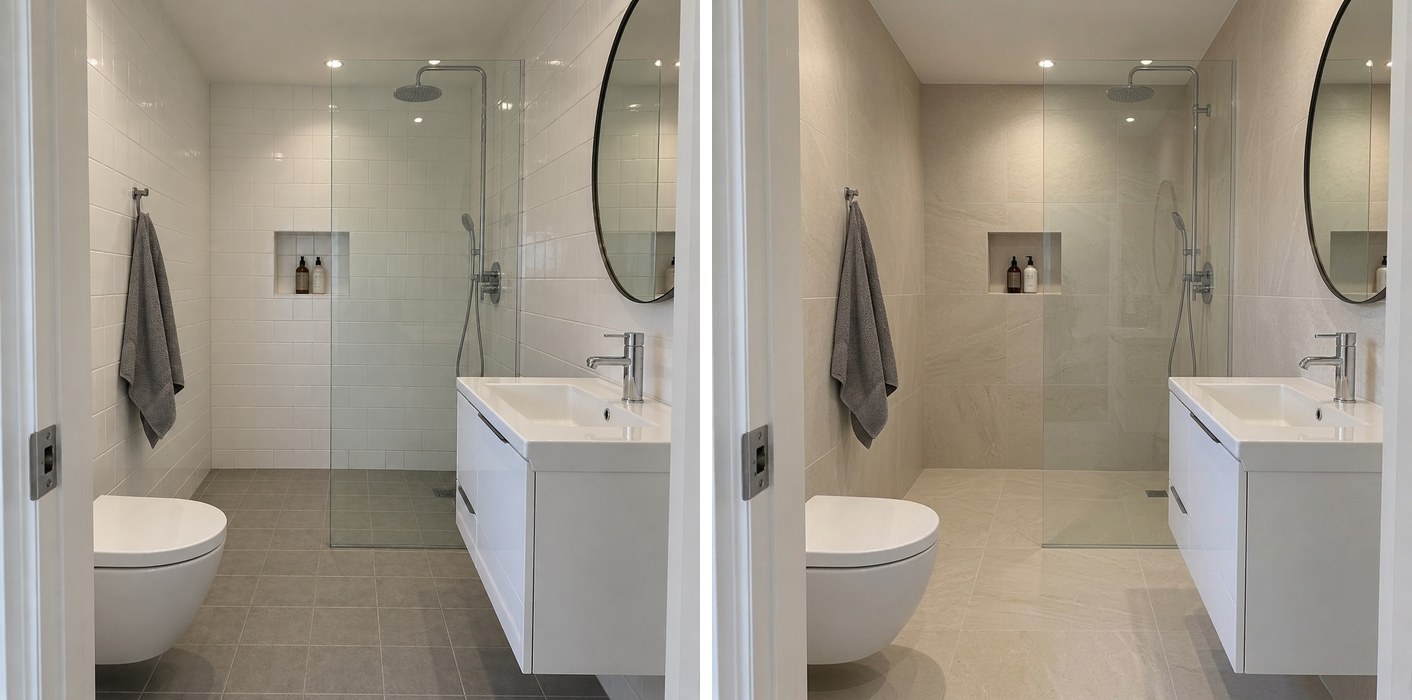 Bathroom tiles → Large beige porcelain. Fewer grout lines make the walls read as one calm surface; the linear drain and the niche stay where they were.
With far fewer grout lines, the walls and floor read as one continuous surface and the room looks calmer. This is the "large tiles in a small bathroom" idea that designers often recommend, and the preview shows why. It also shows the catch: the grout lines are so faint that the result looks almost like slab. Real large-format tile has visible joints, and real installation has rules (see below).
One shower wall in zellige with a brush
To change one wall only, open the photo in the AI editor, click Select area, choose Lasso, outline the shower's back wall and click Done — keep the selection. Then type the tile. We wrote: "Replace the tiles on this wall only with glossy sage-green zellige tiles, 10×10 cm, slightly irregular handmade surface, white grout. Keep the niche, the shower and the glass."
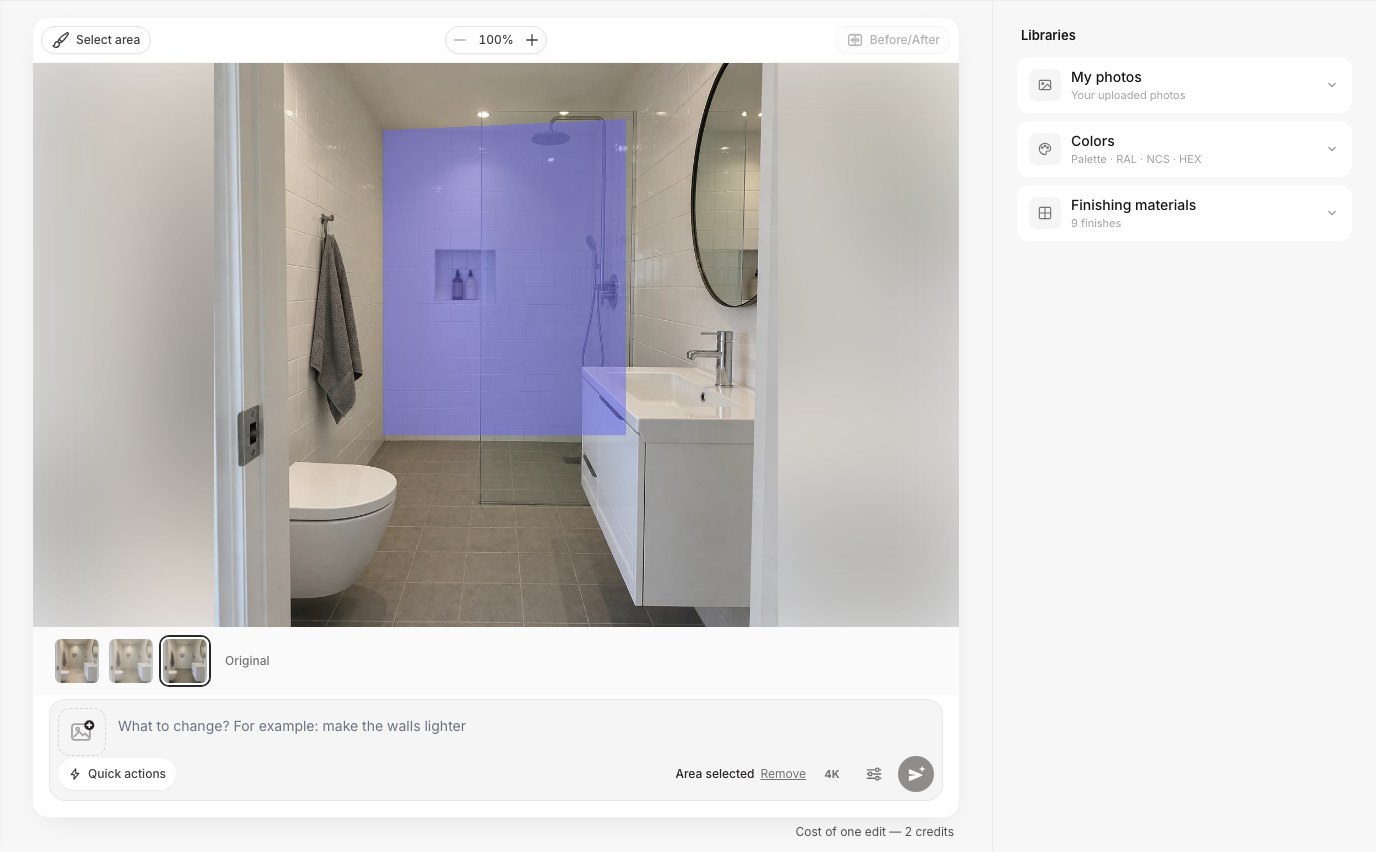 Select area → Lasso around the shower's back wall. "Area selected" in the composer confirms the edit will stay inside the outline.
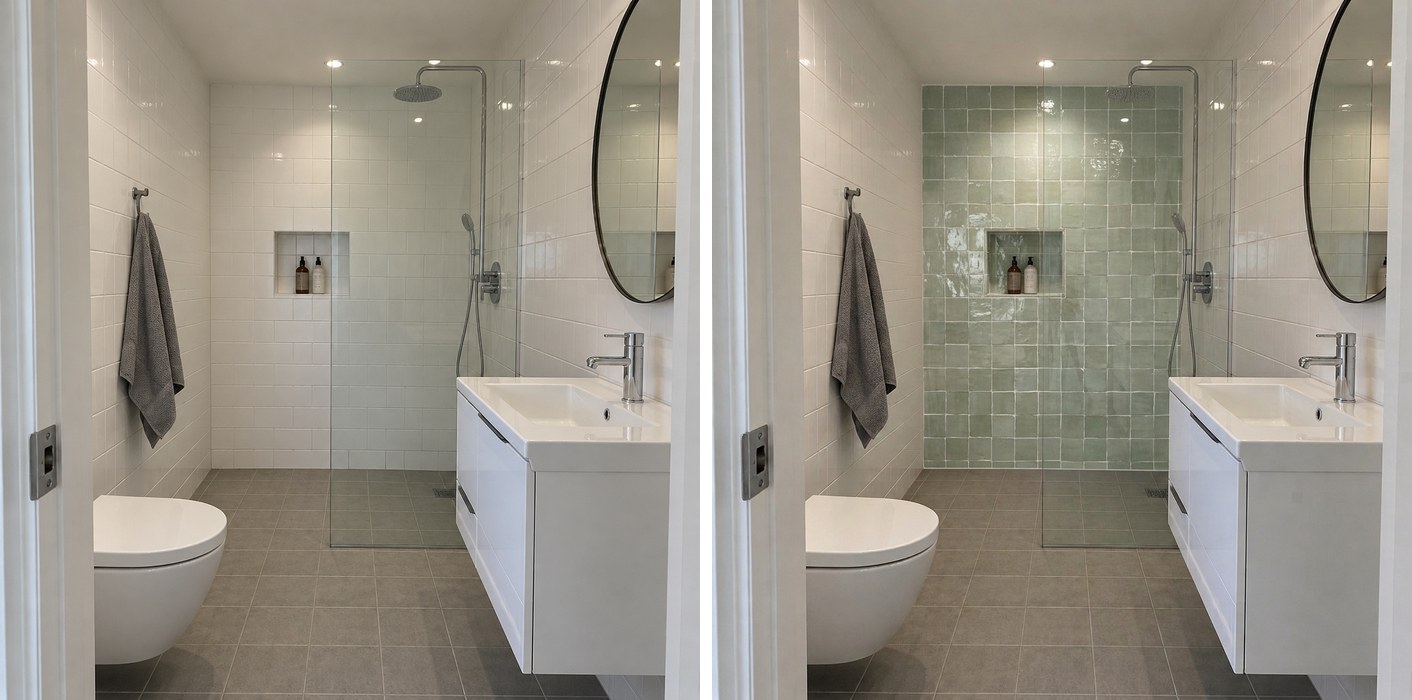 One wall, one tile. The rain shower, the glass panel and the niche are the originals; the side walls stay white.
This is the cheapest way to change the character of a white bathroom: one feature wall instead of a full retile. The zellige came out with the glossy, uneven surface handmade tile is known for, and the selection was respected to the edge. The niche kept its white lining, which is a choice you can reverse in the next edit.
Only the niche
A niche is small, but in a white shower it is the first thing you see. We outlined just the niche and asked for "small matte black hexagon mosaic tiles, about 2.5 cm, with dark grout. Keep the two bottles."
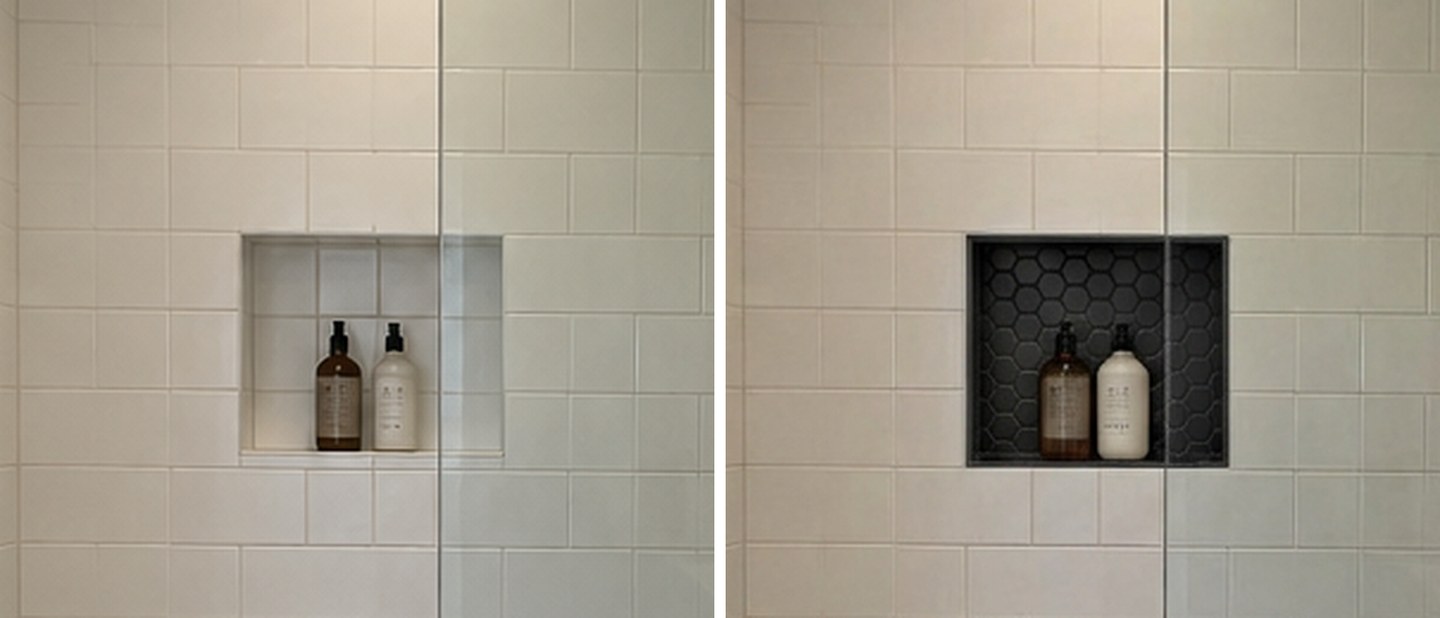 A brush selection around the niche only. The bottles and the surrounding white tiles are untouched.
This kind of detail is hard to imagine from a 10 × 10 cm sample in a store, and it takes one edit to preview. If you plan a niche, mosaic or a contrasting tile is also a practical choice: HomeAdvisor notes that mosaics take more time to set, so labor costs climb, and a niche is small enough that this hardly matters.
A patterned floor from a photo of four tiles
"The shower floor should be the same as the rest of the bathroom" is a real request, and it tests pattern continuity. We photographed four patterned cement tiles (navy, off-white and grey) and asked via Use my reference for "the patterned cement tiles from photo 2 on the whole floor, including the shower floor; keep the walls, the drain and everything else as it is".
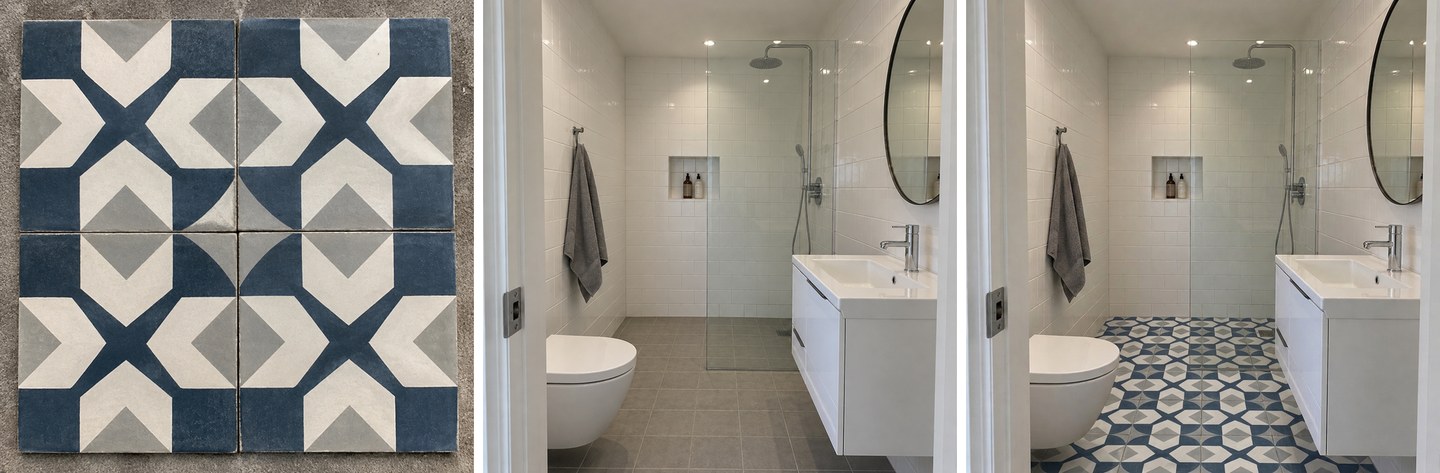 Left: the sample photo. Middle: the original. Right: the result. The pattern runs from the door into the shower without a break, and the drain is kept.
The pattern continues under the glass and into the shower, the grout lines follow the perspective, and the drain stayed in place. Two honest notes: the motif was reinterpreted, not copied (the colors and the geometric character match, the exact shapes do not), and the tiles look smaller than the real 20 × 20 cm. Use this to judge the color and how busy the floor feels, then confirm the exact pattern with a real sample laid on your floor.
Terrazzo everywhere: a preview that says "too much"
Finally, Bathroom tiles → Terrazzo on every surface.
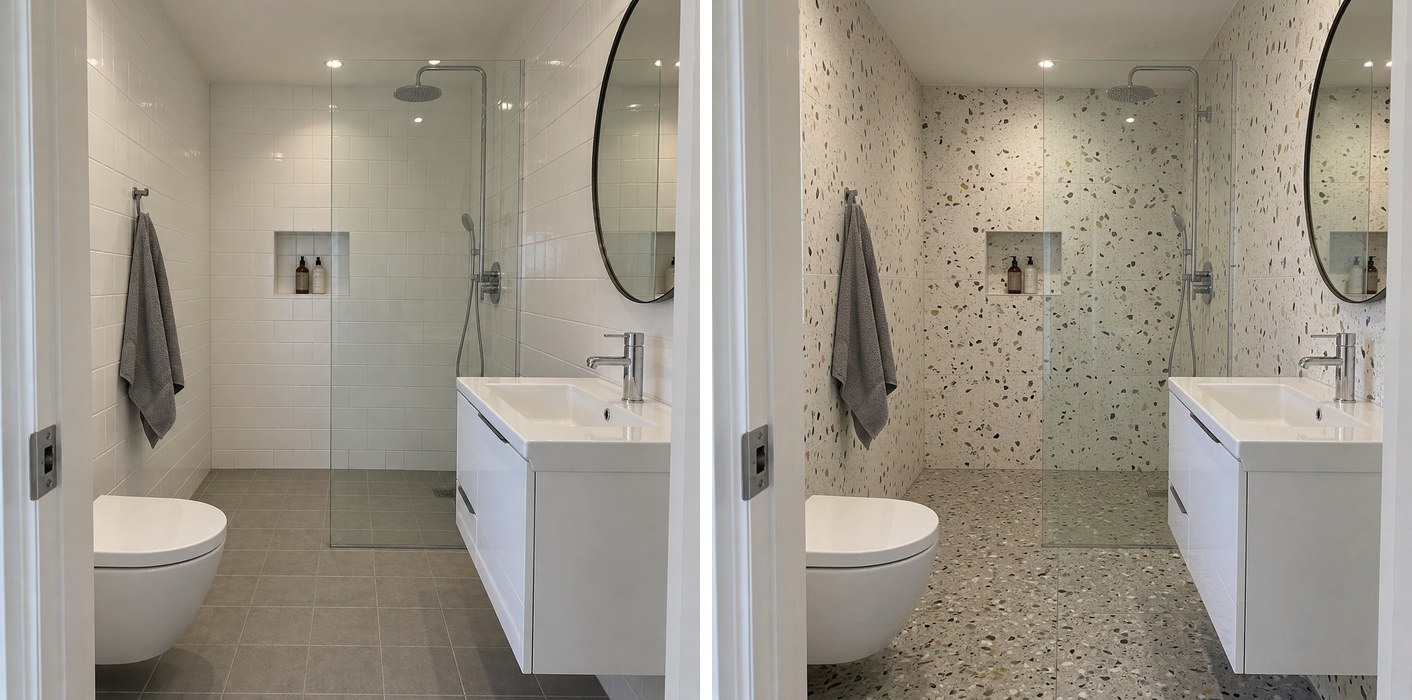 Bathroom tiles → Terrazzo. Technically clean (the niche, the drain and the glass are kept), but terrazzo on every surface of a small room is busy, and the AI drew it almost without joints.
This is a useful result precisely because it is not the one you want. In a small bathroom, a bold speckle on every surface is a lot; terrazzo on the floor only, or on one wall, is usually easier to live with. A preview costs 2 credits; a wrong order of tile costs a lot more.
Bathroom Tile Rules to Check Before You Buy
A preview shows how a tile looks. It does not check whether the tile suits the surface. These four rules come up most often.
1. Shower floors need more grip than bathroom floors. Tile slip resistance in North America is measured as wet DCOF under ANSI A326.3. According to Crossville's summary of the standard, a wet DCOF of 0.42 or more is the benchmark for level interior floors walked on when wet, such as home bathrooms (category "Interior Wet"). Shower floors belong to "Interior Wet Plus", which calls for an elevated wet DCOF, enhanced texture and/or frequent grout joints. That is why small mosaics are popular on shower floors, and why the polished marble in our first preview belongs on the walls, not underfoot. Check the manufacturer's declared category for the exact tile.
2. Big tiles need a flat base. Under the ANSI A108.02 tolerances quoted by tile consultant Scott Carothers (CTaSC), tiles with any edge of 15 inches (38 cm) or more need a substrate that varies no more than 1/8 inch in 10 feet (3 mm in 3 m); smaller tiles allow 1/4 inch. The same article notes that "large format" in the current standards (ANSI A108.T, 2023) means a tile with a side longer than 23 inches (58 cm). If your floor is uneven, the leveling work is part of the price of the big-tile look.
3. Grout color changes the whole wall. Grout that matches the tile lets the surface read as one plane and hides small spacing errors; contrasting grout draws the grid and turns the layout into a pattern. Light grout shows dirt sooner. Test both on your preview before you choose, but remember that the AI may redraw the tiles while doing it (see the grout example below).
4. Order extra. HomeAdvisor advises ordering 10% to 15% extra tile for breakage and future repairs, because a tile or a color batch can be discontinued.
Create interior design with AI
Upload a photo of your room and get a professional design in 30 seconds. First generation is free.
What Does the AI Get Wrong With Tiles?
The AI is good at material, color and placement. It is weaker at the numbers a tiler cares about: exact size, exact joint width, exact pattern repeat. Here is what we saw across 10 results.
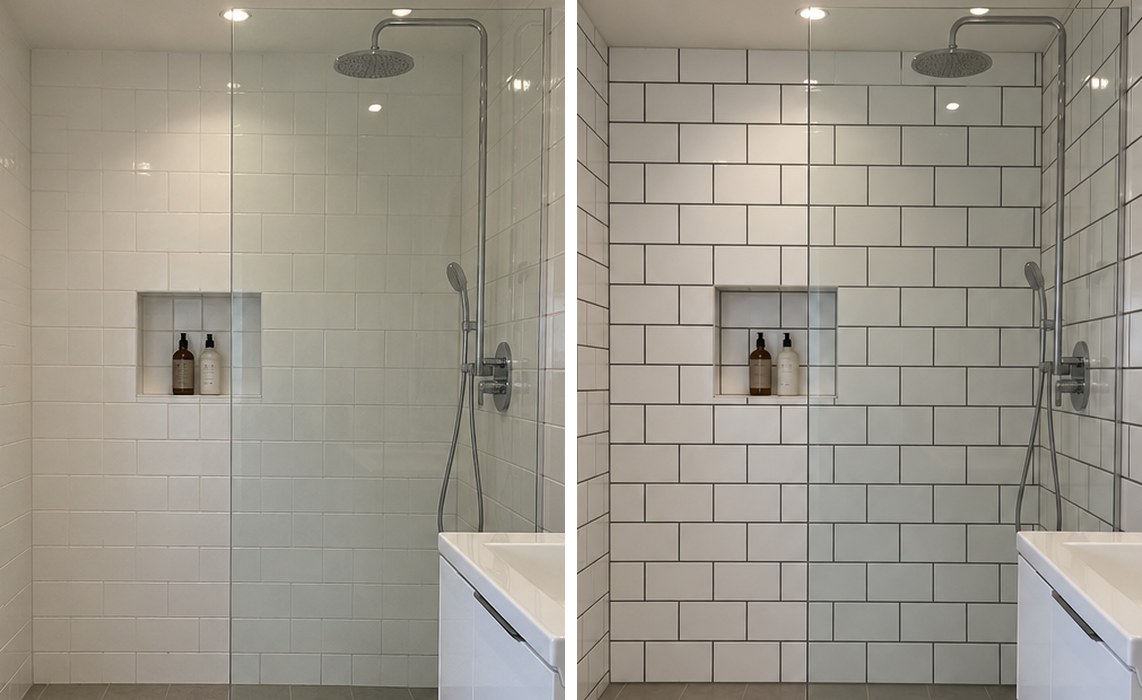 We asked for "the same white wall tiles and their size, only charcoal grout". The grout changed, but the AI also redrew the tiles larger and in a neat brick pattern.
- It redraws tiles instead of editing them. Asked only for dark grout, the AI changed the grout and also re-laid the wall in larger tiles with a regular brick pattern. Fine for judging the look of dark grout; not proof of how your tiles look with it.
- Tile size drifts. Marble came back larger than the original tiles, the patterned cement tiles came back smaller, the finger tiles a little shorter. Put the size in your request, and still treat size as approximate.
- Large tiles, terrazzo and microcement lose their joints. The AI tends to draw them almost seamless. Real installations always have visible joints, even with large tiles laid tight.
- Patterns are reinterpreted. A patterned sample keeps its colors and character, not its exact motif.
- Finishes are optimistic. Floors often come back glossy. Decide the finish (matte, textured) from the rule above, not from the render.
- Reflections lag behind. Mirrors may still show the old tiles from another wall.
- Resolution drops on tall photos. Our portrait photo came back at about 850 × 1,260 px from the tiles task and 690 × 1,020 px from the remodel mode. Enough to decide, not to print; use 4K quality if you need a larger file.
None of this broke a result, but all of it is a reason to finish with a physical sample: one box on the floor, one board against the wall, in your bathroom's light.
How Much Does a Bathroom Tile Preview Cost Compared With Real Tiling?
In GenRoom, a design or an edit costs 2 credits. A free account gets 6 credits (no card), enough for three previews; results on Free carry a watermark. Paid packs are one-time, with no subscription: Start $9.99 for 36 credits (about 18 previews), Basic $19.99 for 100 credits, Pro $39.99 for 300 credits. Purchased credits are valid for 180 days, and a failed generation returns its credits. Details are on the pricing page.
The real work costs far more, which is the point of previewing first. National averages from HomeAdvisor (all updated June 2026):
| Job | Typical cost | Source |
|---|---|---|
| Tiling a shower | $1,800–$5,000, average $2,700 | HomeAdvisor |
| Tile a bathroom floor | $300–$1,300 | HomeAdvisor, ceramic & porcelain tile |
| Remove old tile | $1.50–$4.50 per sq ft (shower) | HomeAdvisor, shower tiling |
| Regrout a shower | $600–$2,500, average $1,500 | HomeAdvisor, regrout a shower |
| Full bathroom remodel | $6,651–$17,660 | HomeAdvisor, bathroom remodel |
Our whole test for this article was 10 designs and edits, 20 credits. If one preview saves you from a floor you would have hated, it has paid for itself many times over.
How to Write a Tile Request the AI Follows
The best requests in our data had four parts: where, which tile, size and layout, and what must stay. A template:
[Surface] → [tile material and color], [size], [layout], [grout color]. Keep [what stays].
Examples that worked in our tests:
- "Replace the tiles on this wall only with glossy sage-green zellige tiles, 10×10 cm, white grout. Keep the niche, the shower and the glass." (with a brush selection)
- "White wood-look porcelain plank tiles, matte, 20×120 cm." (Floor material & color)
- "The patterned cement tiles from photo 2 on the whole floor, including the shower floor; keep the walls and the drain." (Use my reference)
Three habits help. Name every surface you want to keep, because unnamed surfaces are fair game. Change one surface per edit, so you can compare and undo. And start each new idea from the original photo, not from the previous result: chains of edits drift further from your real room each time. The Before/After button in the editor shows each result against the original.
If you are also choosing a wall color for the untiled part of the room, our guide to trying paint colors on a room photo uses the same editor. For kitchens, the same approach works for backsplashes in our kitchen backsplash tile visualizer guide.
FAQ
Is there a free bathroom tile visualizer?
Yes. A free GenRoom account gives 6 credits without a card, which is three previews (each design or edit is 2 credits). Free results carry a watermark. Tile brands and retailers also offer free visualizers built around their own products; GenRoom works with any tile you describe or photograph.
How do I visualize new tiles in my bathroom from a photo?
Upload the photo to the Studio. For a full retile, open Ready tasks → Bathroom → Bathroom tiles, pick a tile or describe your own, and click Create design. For one surface, open the AI editor and use Floor material & color, or outline the wall with Select area and describe the tile.
Can I upload a photo of a tile I saw in a store?
Yes. In the AI editor, add the tile photo as a reference with the photo button in the composer, then use Quick actions → Use my reference and say where it goes, for example "the tiles from photo 2 on the shower walls". The AI keeps the color and character of the tile; check exact size and pattern with a real sample.
Can I change only the shower wall, the niche or the floor?
Yes. Floor material & color changes the floor only. For a single wall, a niche or a band, use Select area, outline the area with the lasso and describe the tile. In our tests the AI stayed inside the outline and kept the shower, glass and bottles.
Will the preview show grout lines and tile size correctly?
Approximately. Grout color and tile direction are shown well; exact tile size, joint width and pattern repeat are not. In our tests sizes drifted, large tiles came back almost seamless, and a grout-only request also re-laid the tiles. Write the size in your request and confirm with a physical sample.
What tile is safe for a shower floor?
Look for a tile its manufacturer classifies as "Interior Wet Plus" under ANSI A326.3, or a small mosaic with many grout joints. A wet DCOF of 0.42 is the benchmark for ordinary bathroom floors; shower floors call for more grip. Avoid polished tile underfoot, however good it looks in a preview.
The Bottom Line
A bathroom tile visualizer is most useful when it changes only the tiles. In the GenRoom Studio that means the Bathroom tiles task for a full retile, Floor material & color for the floor, Select area for one wall or a niche, and Use my reference for a tile you photographed. In our two bathrooms, the floor-only edit and the single accent wall were the most decisive previews, and the terrazzo test showed what not to do in a small room. Use the preview to choose the look, then check size, grout and slip rating on a real sample. Upload your bathroom to the Studio and try your tile before you buy it.