Kitchen Cabinet Visualizer: Try New Cabinet Doors on Your Photo
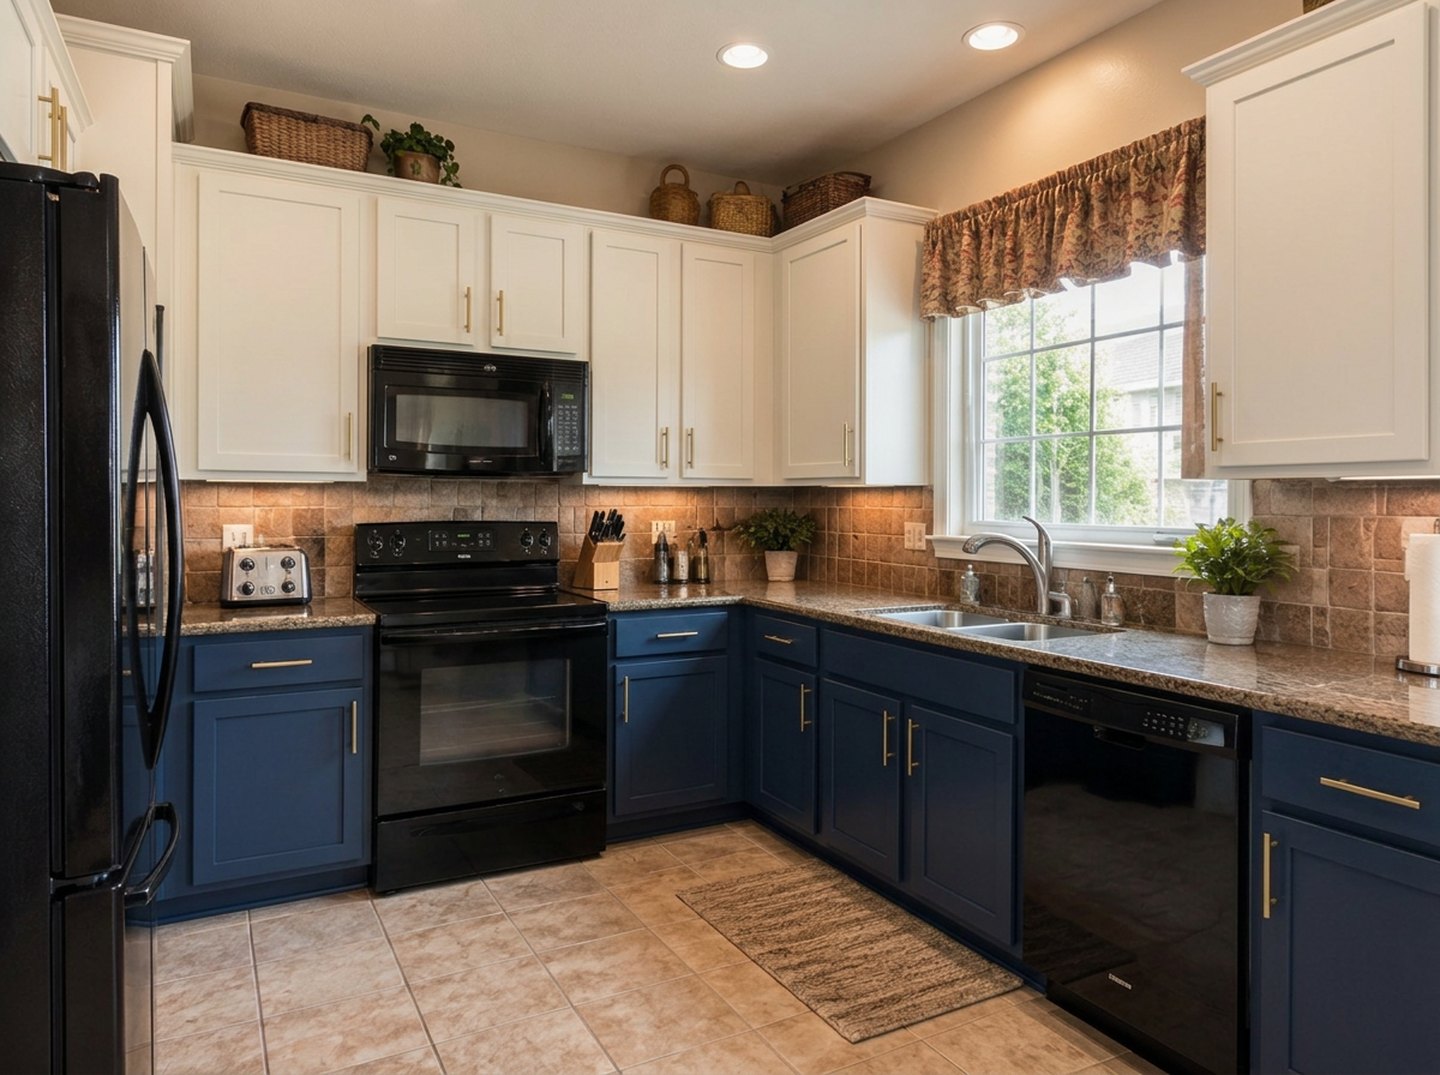
A real result from the GenRoom Studio: two-tone Shaker fronts on the original cherry cabinet boxes. The appliances, countertop, backsplash, window and floor are the ones from the photo.
A kitchen cabinet visualizer lets you see new cabinet doors on a photo of your own kitchen before you pay for refacing or new cabinets. You upload one photo, describe the fronts you are considering — Shaker, flat slab, fluted, glass, two-tone, oak or laminate — and get the same kitchen back with only the doors changed, usually in less than a minute.
In the GenRoom Studio that takes one edit: open your photo, choose Quick actions → Replace furniture and write "the cabinet doors with white Shaker fronts". For a bigger change, the Kitchen remodel mode replaces fronts, counters and backsplash together, and the brush, Add and Use my reference handle one run of cabinets, cabinets to the ceiling and a door sample you photographed in a showroom.
Between March and October 2026, 1,565 GenRoom users asked for new kitchen cabinets in their own words. This guide is built on those requests. Below: what people actually ask for, what refacing and replacing cost, the exact Studio path, 15 real results from two kitchens we shot for this article, standard sizes to check, and the places where the AI still gets cabinets wrong.
What Do People Ask For When They Want New Kitchen Cabinets?
Most cabinet requests are about the fronts, not the whole kitchen. People want a different door style or material on the cabinets they already have, sometimes more storage, and almost never a new layout. Here are typical requests, paraphrased and anonymized, with the Studio tool that fits each one:
| What people write | What they really want | Best Studio tool |
|---|---|---|
| "Change the model or the color of the cabinets" | New door style, same boxes | Replace furniture (quick action) |
| "Modern kitchen, light oak countertops, white modern cabinets" | New fronts and new counters | Kitchen remodel → Refresh fronts & counters |
| "Beige laminate on my cabinets" | A new material, same doors | Recolor an object, or the Cabinet color task |
| "Extend the upper cabinets to the ceiling" | More storage in the same footprint | Add, or a brush selection + text |
| "A modern kitchen with more storage" | Possibly a new layout | Kitchen remodel → New kitchen, same walls |
| "As much storage as possible, simple, practical" | Taller or extra cabinets | Add, then check the result honestly |
| "I can't add cabinets — just floating shelves and organizing" | Storage without new cabinets | See our storage ideas guide |
Two patterns stand out. First, people describe the look in a few words ("white modern", "beige laminate") and expect the AI to keep everything else. Second, "more storage" means different things: taller uppers, a pantry column, or open shelves. A good preview has to keep the kitchen recognizable and change only what was asked.
If all you want is a new paint color on the existing doors, our cabinet color visualizer guide covers that in depth. This article is about the doors themselves: their style, material, hardware and how many cabinets there are.
Reface, Replace or Repaint: What Does Each Option Cost?
Refacing — new doors, drawer fronts and veneer on the existing boxes — is the middle option between painting and new cabinets. According to HomeAdvisor's cabinet refacing cost guide (updated June 2026), refacing costs $7,230 on average, with most projects between $4,234 and $10,226, and it runs 30% to 50% less than replacing the cabinets.
| Option | What changes | Typical cost (US) |
|---|---|---|
| Refinishing (sanding, then painting or staining) | Color only, same doors | $1,800–$4,200 |
| Refacing | New doors, drawer fronts and veneer, same boxes and layout | $4,234–$10,226, average $7,230; $150–$450 per linear foot |
| DIY refacing (materials) | Same as refacing, your labor | $1,645–$6,570 |
| Full replacement | New boxes, new layout possible | $10,000 or more |
Source: HomeAdvisor, cabinet refacing cost guide, updated June 2026. Your local quotes will differ; use the table for the order of magnitude.
The material of the new fronts moves the refacing price a lot. HomeAdvisor lists rigid thermofoil (RTF) at $80–$125 per square foot, wood veneer at $100–$250 and solid wood or plywood at $200–$500, with laminate as the most budget-friendly option. That is why it pays to compare a laminate, a veneer and a painted front on your own photo before you ask for quotes.
The rule of thumb that follows: if the cabinet boxes are solid and the layout works, preview refacing first. If the boxes are failing or you want a different layout, refacing will not fix that, and you are in replacement territory. For a full remodel plan from a photo, see our AI kitchen design guide.
Which GenRoom Tool Changes Cabinet Fronts?
Answer first: for a pure door swap use Replace furniture in the editor's Quick actions; for new fronts plus counters use the Kitchen remodel mode with Refresh fronts & counters; for a material or a color use the Cabinet color task or Recolor an object. Every design or edit costs 2 credits.
| Tool | Where it is | What it changes | What it keeps |
|---|---|---|---|
| Replace furniture | Editor → Quick actions | The fronts you name, in the style you write | Everything you do not mention |
| Kitchen remodel → Refresh fronts & counters | Studio → Modes | Fronts, countertops, backsplash, handles, lighting | Cabinet boxes, layout, appliance and sink positions |
| Kitchen remodel → New kitchen, same walls | Studio → Modes | Cabinet layout, fronts, counters, appliances; may add an island | Walls, windows, doors, camera angle |
| Kitchen remodel → Kitchen from scratch | Studio → Modes | Plans the whole kitchen around a work triangle | Walls, windows, doors, camera angle |
| Cabinet color | Studio → Ready tasks → Kitchen | Color and finish of the fronts (5 presets or your words) | Cabinet layout |
| Recolor an object | Editor → Quick actions | The color or finish of one object you name | Shape of the object |
| Add | Editor → Quick actions | Adds what you describe, e.g. a row of cabinets | The rest of the photo |
| Use my reference | Editor → Quick actions + a photo | Copies a door, handle or material from your photo | The rest of the photo |
| Select area | Editor, above the photo (Brush or Lasso) | Limits the edit to the area you trace | Everything outside, mostly |
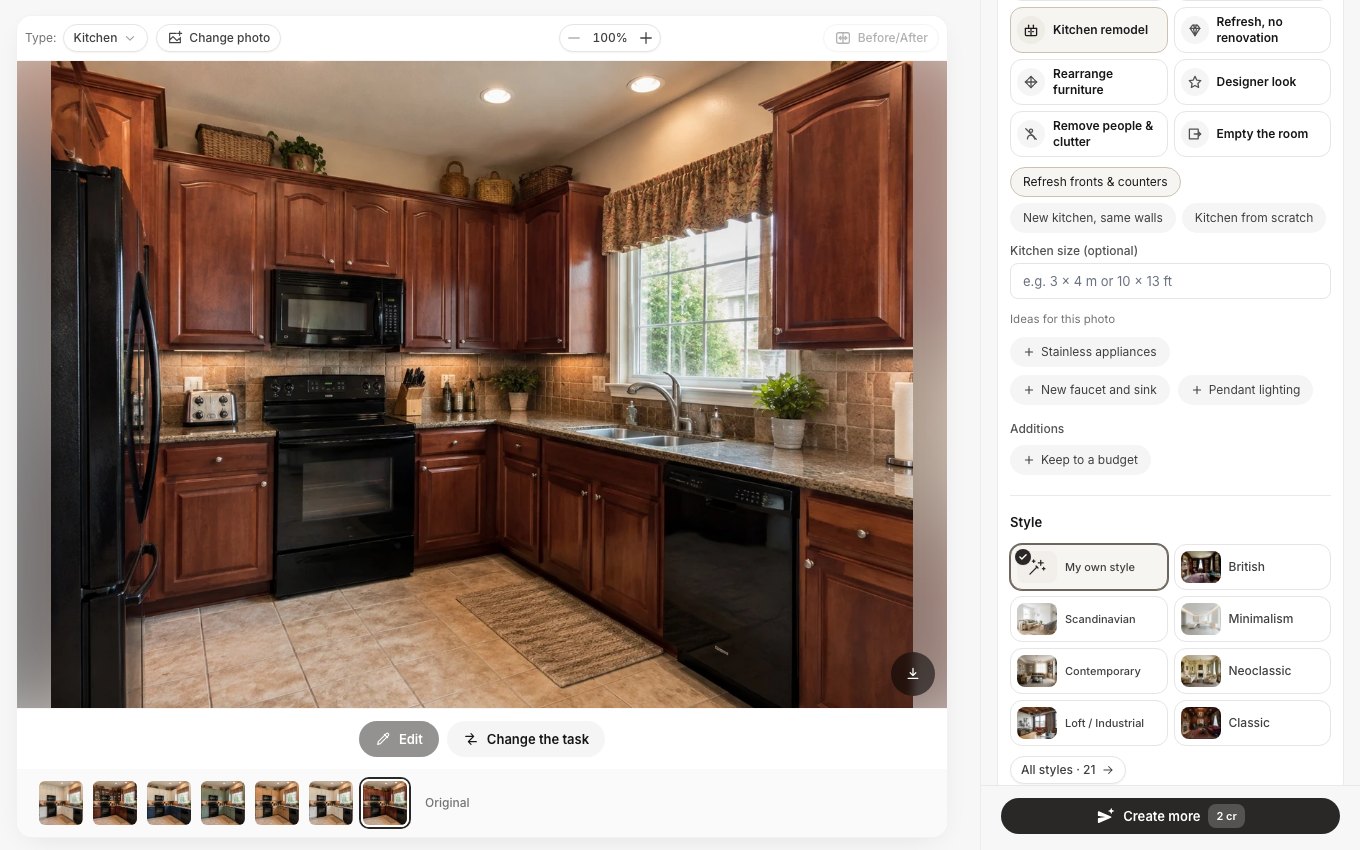 The Studio recognized the photo as a kitchen. Kitchen remodel has three variants; Refresh fronts & counters is the default and keeps the cabinet boxes.
Case 1: One Cherry Kitchen, Six Front Styles
The first kitchen is a typical early-2000s L-shape: reddish cherry cabinets with arched raised-panel doors, speckled granite, a tile backsplash, black appliances and an empty dusty gap between the upper cabinets and the ceiling. It is exactly the kitchen where people ask "reface or replace?" — the boxes are fine, the look is dated.
Step 1: Take a photo that shows the whole run
Stand in the doorway or a corner at eye level and get every cabinet in the frame, including the space above the uppers. Daylight and the ceiling lights on work best. Avoid a wide-angle phone lens if it bends the cabinet lines; straight verticals make the new doors line up better.
Step 2: Open the editor and use Replace furniture
Upload the photo in the Studio, press Edit, open Quick actions and pick Replace furniture. In the "What to replace, and with what" field, name the fronts, the new style, and what must stay. We used the same sentence pattern for every style:
the cherry cabinet doors and drawer fronts with warm white Shaker fronts on the same cabinet boxes, same sizes and positions; keep the countertop, backsplash and appliances
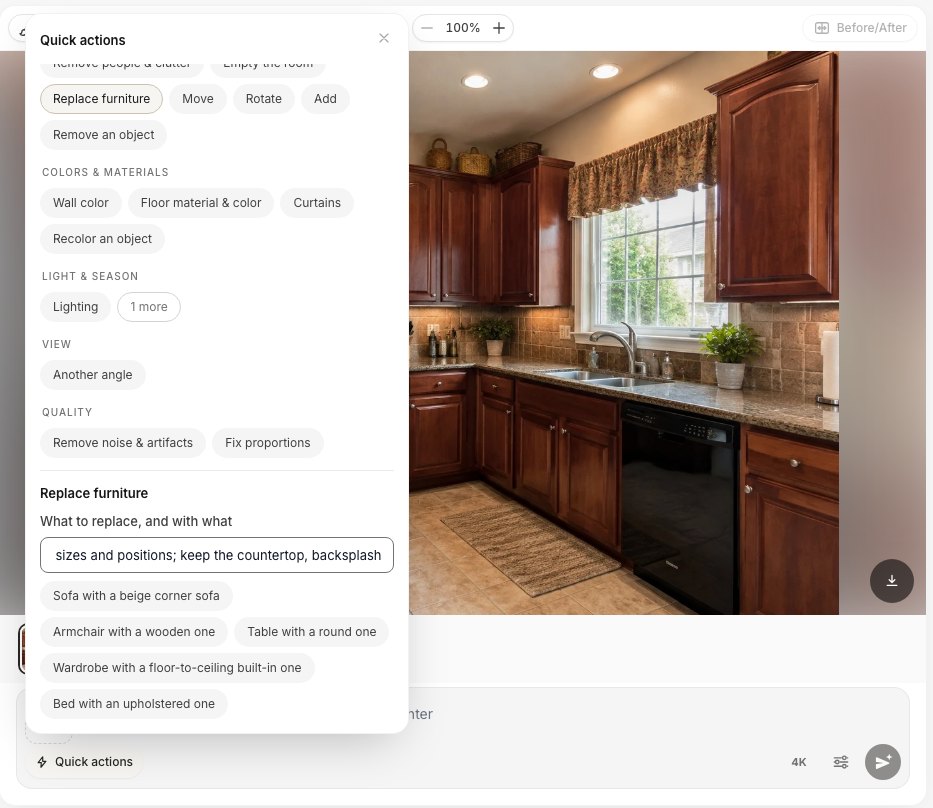 Quick actions in the editor. The field takes a short sentence; long instructions get cut, so lead with the fronts and the style.
One practical detail: the field has a length limit. In our test, the end of a long sentence ("…window and floor exactly as they are") was cut off. Put the door style first and the "keep" list second, and keep the whole request to one or two lines.
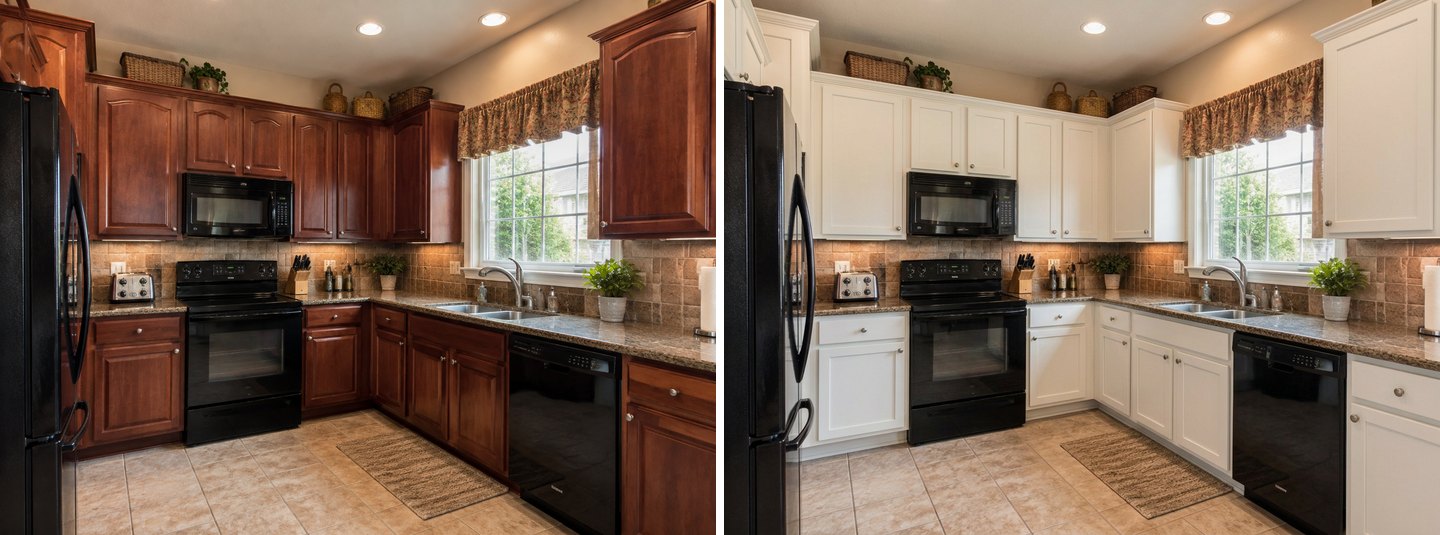 Left: the original photo. Right: Replace furniture → warm white Shaker fronts. 2 credits, about 20 seconds of generation.
Step 3: Compare door styles on the same kitchen
Running the same edit from the original photo with a different style gives you a fair comparison: same camera, same light, same counters. We tried five styles on this kitchen.
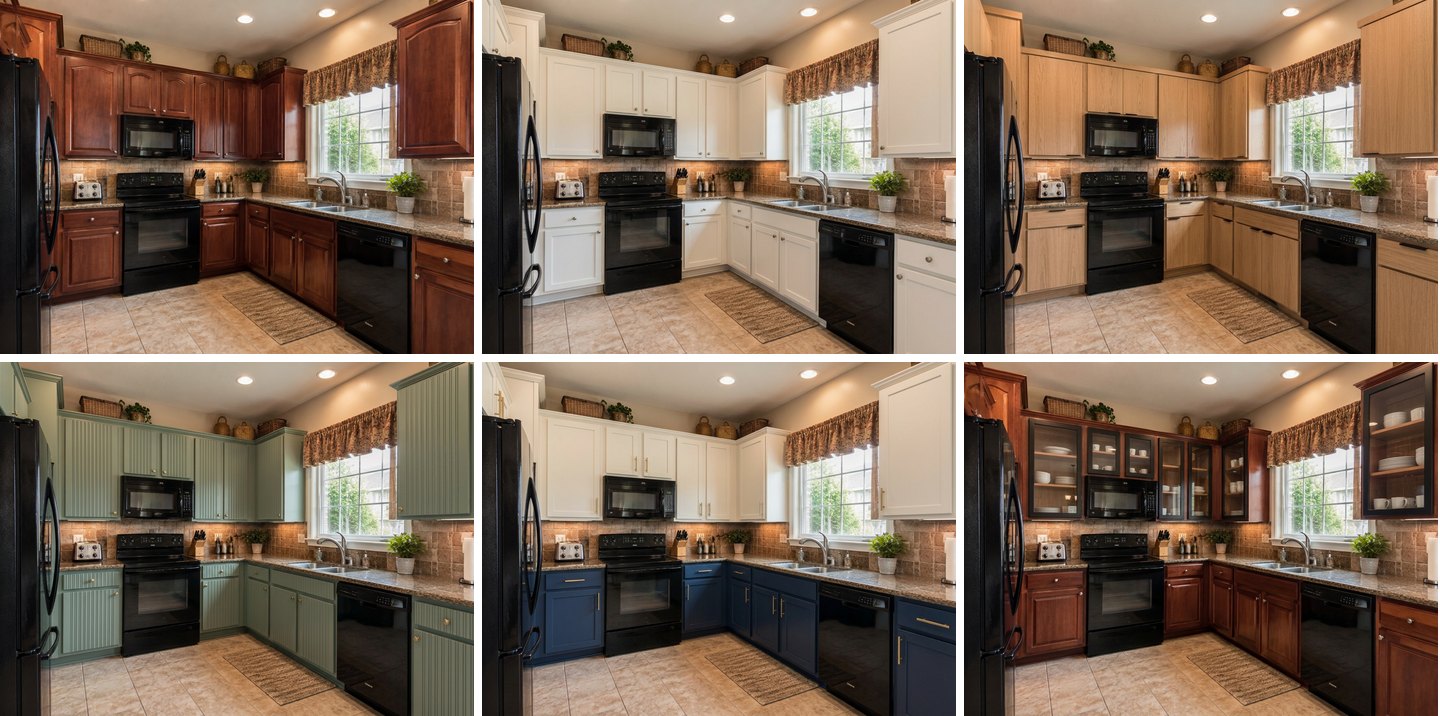 Top row: original, warm white Shaker, light oak slab. Bottom row: sage fluted, two-tone white and navy, glass uppers. Each is a separate edit from the original photo.
What each style did to this kitchen:
- Shaker (warm white). The safest change. The flat recessed panel reads as classic in a traditional house, and the room instantly looks brighter. The granite and the brown backsplash now stand out more — worth knowing before you keep them.
- Flat slab (light oak veneer). The most modern result. Slab doors make the kitchen look simpler and wider. The AI added slim black edge pulls as asked, but on the upper doors they are so thin that some doors seem to have none — check hardware on every door.
- Fluted (sage green). Vertical reeding adds texture without a pattern. It looks good on the uppers and busy on a long run of base cabinets, which is easy to see only on your own photo.
- Two-tone (white uppers, navy lowers). Light on top keeps the room open; the dark base hides scuffs. With black appliances this was the most balanced version.
- Glass uppers. Only the upper doors changed: slim black frames, dishes inside. Glass makes a kitchen feel lighter but shows everything on the shelves.
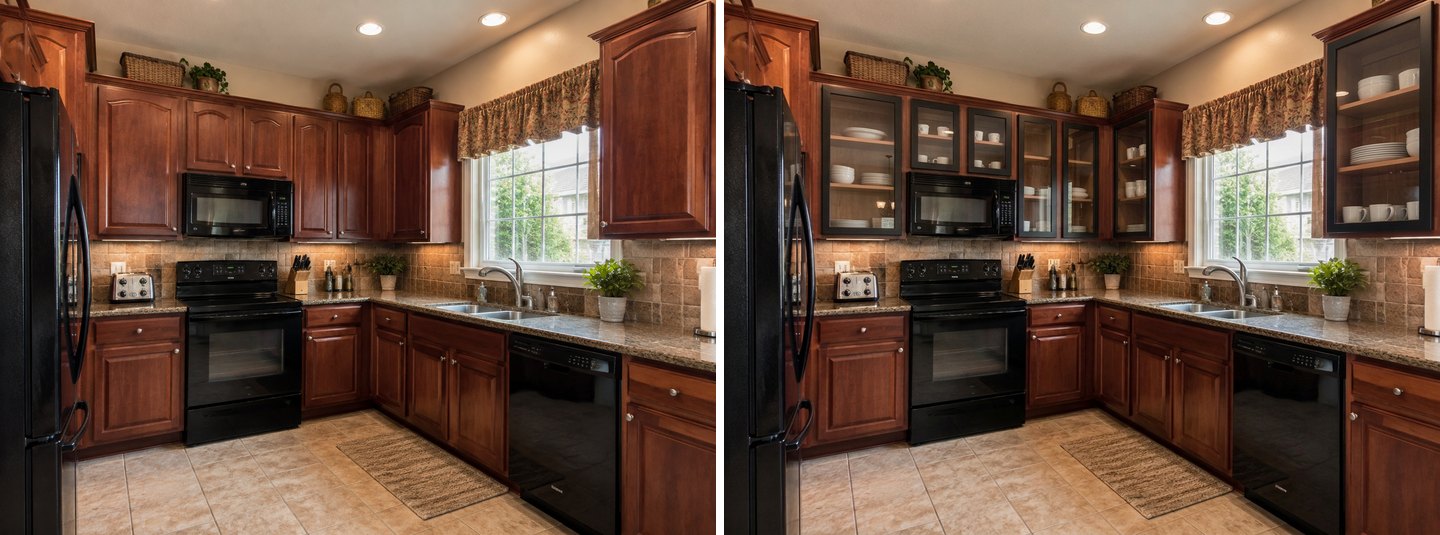 Glass uppers only. The lower cherry cabinets, the granite and the appliances were left as they were, because the request said so.
Step 4: Try the Kitchen remodel mode with your own words
When you want new fronts and new counters together, go back to the design screen and pick Kitchen remodel → Refresh fronts & counters. We typed one of the real requests word for word into the wishes field: "modern kitchen, light oak countertops, white modern cabinets". The Studio passed it on exactly as typed.
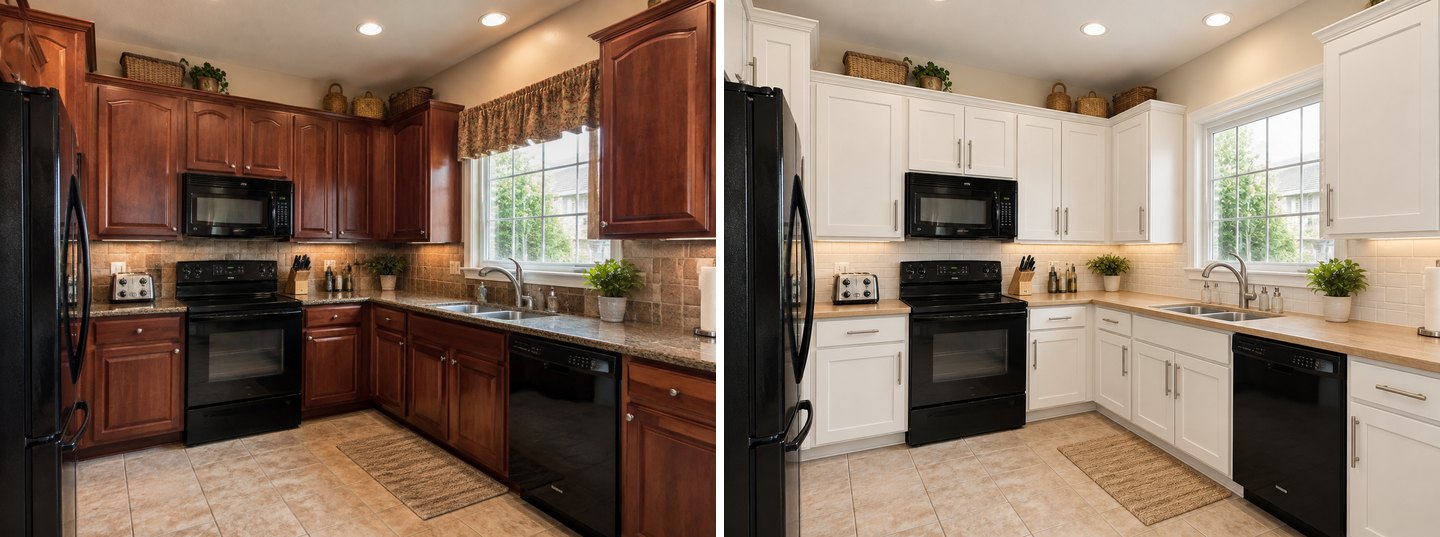 Refresh fronts & counters with the request typed as is. Fronts, counters, backsplash and handles changed; the appliances and the sink stayed where they were.
The mode did what its name says: new fronts, oak counters, a white subway backsplash, bar pulls, under-cabinet light. It kept the black appliances, the double sink and their positions. It also removed the fabric valance and added white trim around the window — reasonable for a "modern" brief, but not something we asked for. If the curtains or the window trim matter, say "keep the valance" in the wishes.
How Do You Show Upper Cabinets Going to the Ceiling?
Answer first: use Add for a new row of cabinets on top of the existing uppers, or trace the uppers and the gap above them with Select area and describe the extension. Both kept the base cabinets, counters and appliances in our tests.
With a brush: one run of cabinets
On the white Shaker version of the cherry kitchen, we chose Select area, traced the upper cabinets on the left wall together with the empty strip above them, pressed the check mark, and wrote: "Extend these upper cabinets up to the ceiling with a second row of short white Shaker doors and a simple crown moulding; remove the baskets."
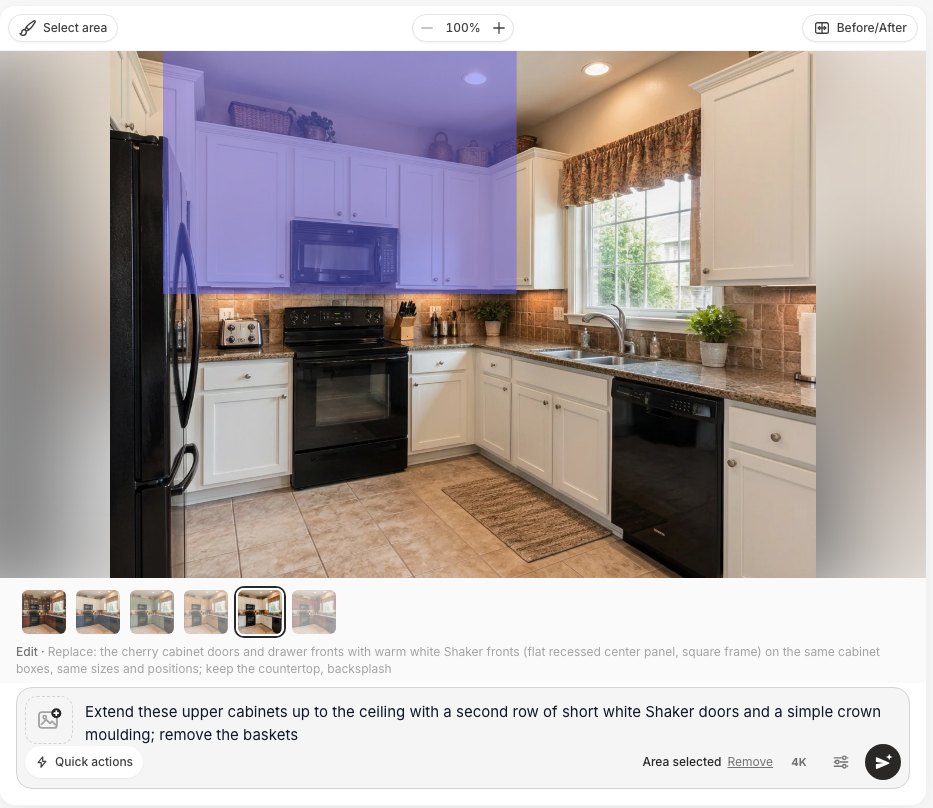 Select area offers a Brush and a Lasso. The selected zone shows in purple; the request goes into the regular field.
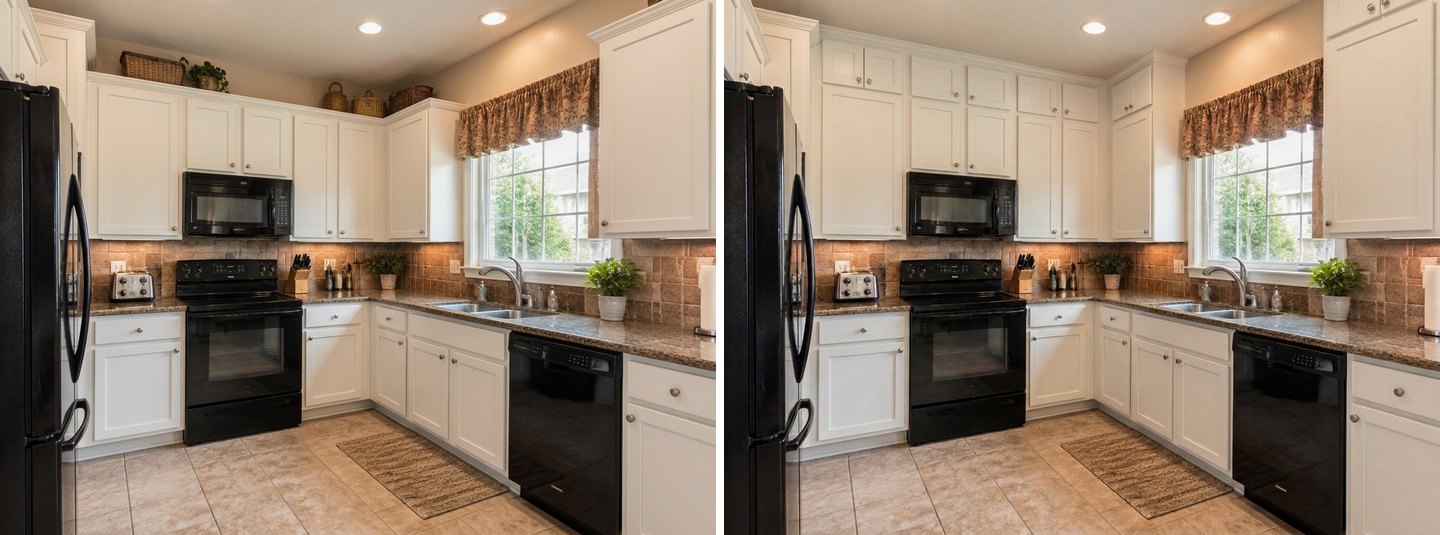 The dusty gap is gone: a row of short cabinets now reaches the ceiling. The AI also added one small box above the tall cabinet next to the window, which was outside the selection.
That last detail is worth remembering: the selection is a strong hint, not a hard wall. Here the AI extended a neighboring cabinet for consistency, which happened to look right. If you need one area untouched, say so in the text as well.
With Add: a rental kitchen with short uppers
The second kitchen is a plain white rental: one straight wall, flat laminate doors, short upper cabinets and a wide empty strip above them. We used Quick actions → Add with "a row of short white flat-front cabinets on top of the upper cabinets, filling the gap up to the ceiling, aligned with the doors below".
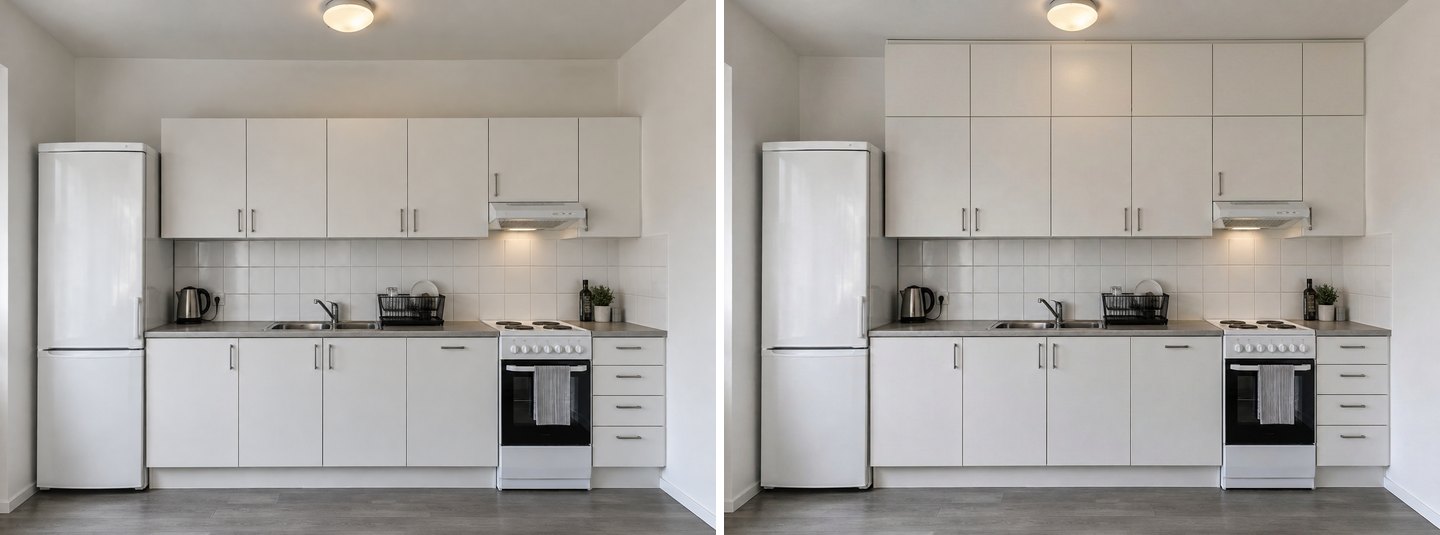 Add → a row of cabinets up to the ceiling. The new doors line up with the ones below; the fridge, stove, sink and tiles are untouched.
Should your uppers go to the ceiling?
Standard upper cabinets are sold in 30, 36 and 42-inch heights and are usually hung with their bottom 54 inches above the floor, which leaves the standard 18-inch gap above a 36-inch counter, according to Bob Vila's upper cabinet height guide. On an 8-foot (96-inch) ceiling, a 42-inch cabinet hung that way reaches the ceiling; 30 and 36-inch cabinets leave a gap for trim or a top row.
The top row is not prime storage. The NKBA Kitchen Planning Guidelines count storage more than 84 inches above the floor as "miscellaneous" and recommend keeping frequently used items between 15 and 48 inches above the floor. In practice: the top row is for platters, seasonal items and spare supplies, and you will need a step stool to reach it.
Create facade design with AI
Upload a photo of your home and get a new facade in the chosen style in 30 seconds. First generation is free.
Case 2: Material, Reference Photo and Hardware on a Rental Kitchen
The plain white rental kitchen is a good test for materials, because the doors are simple flat slabs. Changing the material is mostly about color, grain and sheen, and the AI does not have to invent a new door shape.
The Cabinet color task: five presets or your own words
On the design screen, open Ready tasks → Kitchen → Cabinet color and press Refine. You get five presets — Warm white matte, Sage green, Deep navy, Natural oak and Matte graphite — and a note field for anything else. We picked Natural oak.
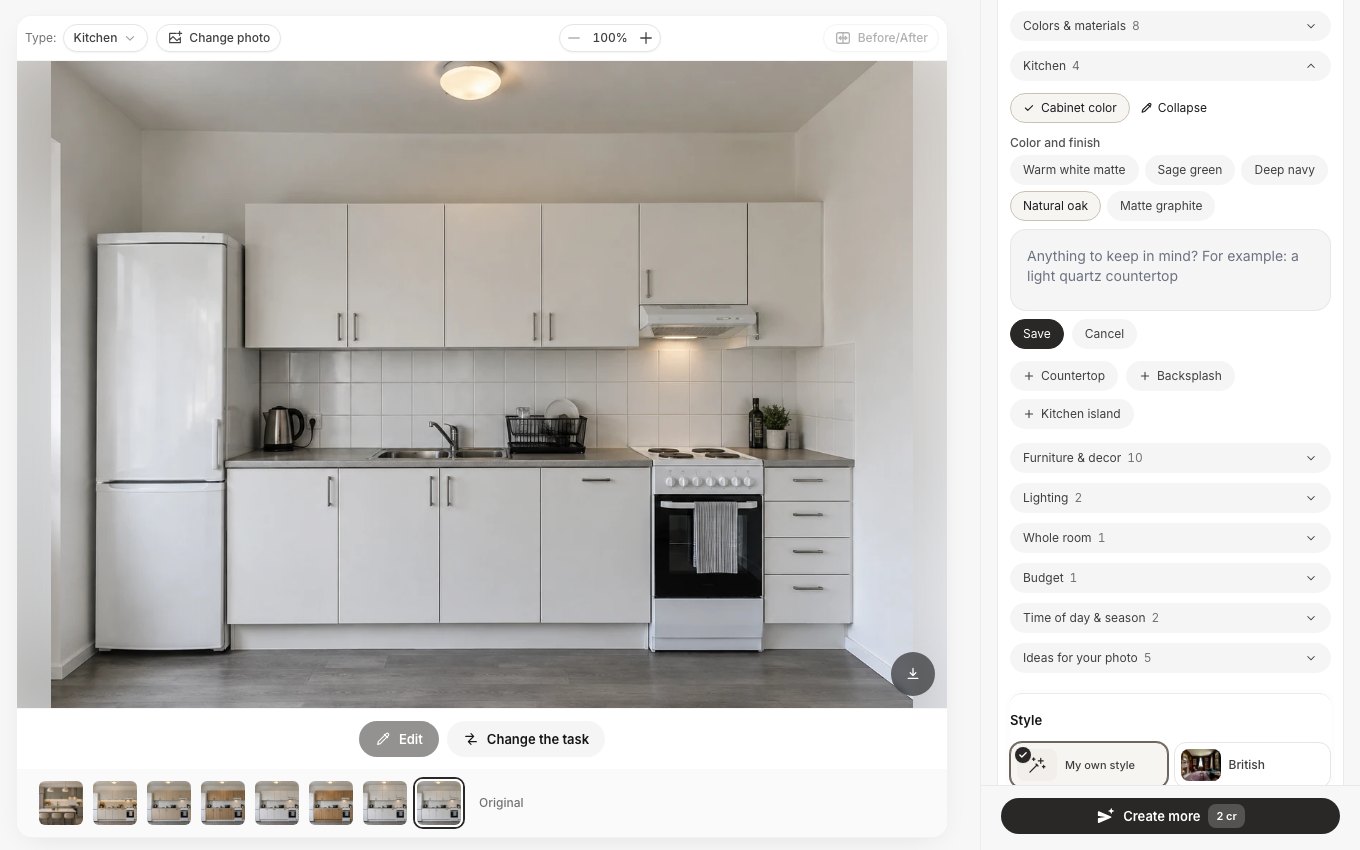 Ready tasks → Kitchen → Cabinet color. The note field accepts your own finish, for example "high-gloss lacquer" or a brand color.
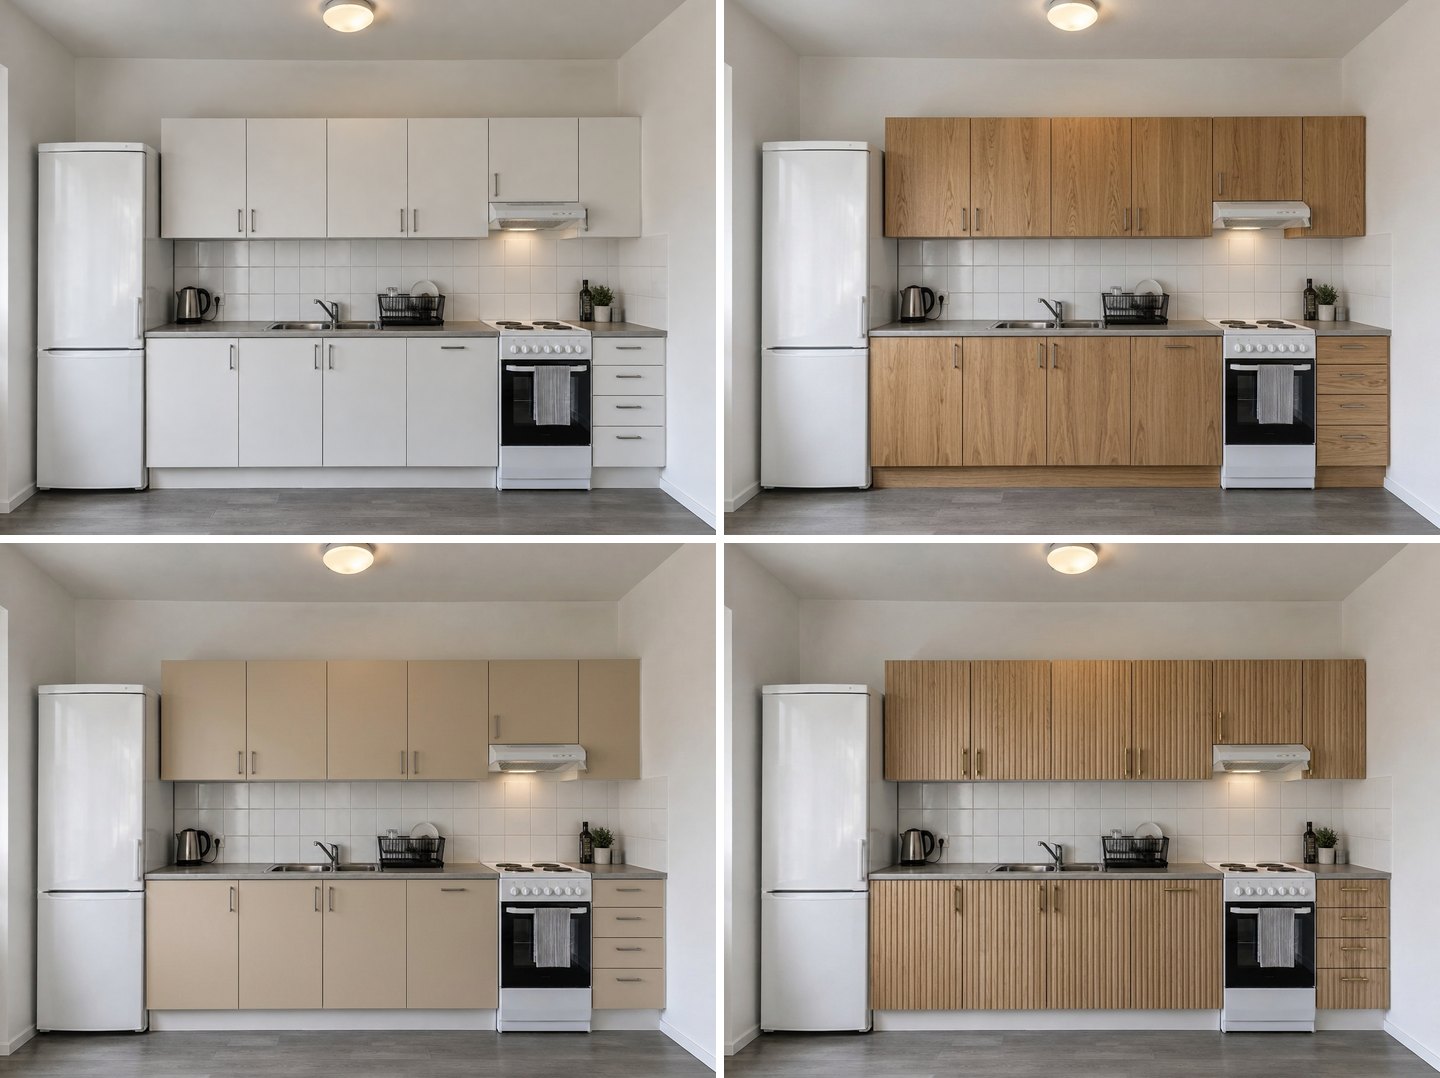 Top: original, Cabinet color → Natural oak. Bottom: Recolor an object → "warm beige matte laminate", and Use my reference with a fluted oak door sample.
For the real request "beige laminate on my cabinets" we used Recolor an object in the editor with "all the cabinet fronts to a warm beige matte laminate". The fronts changed; the handles, the counter, the tiles and the white appliances did not. Recolor keeps the shape of the object, which is exactly what you want when only the finish changes.
How to describe each front material so the AI gets it right:
| Material | Words that work | What to watch on the result |
|---|---|---|
| Laminate | "matte laminate", "beige laminate", "wood-look laminate" | Flat, even color; no visible grain depth |
| Rigid thermofoil (RTF) | "white thermofoil Shaker", "satin finish" | Molded edges look soft; fine for Shaker |
| Wood veneer | "light oak veneer slab", "walnut veneer" | Grain direction: vertical on doors is the usual choice |
| Painted or lacquered | "matte painted", "high-gloss lacquer" | Gloss reflects the window — check the light |
| Solid wood | "solid oak Shaker", "natural oak" | Visible frame and panel; grain on the rails |
Use my reference: a door sample from the showroom
When you already have a sample or a product photo, the reference does the describing for you. In the editor, press the photo button next to the text field, choose Add as a reference, then Quick actions → Use my reference and write what to take and where: "the fluted oak door from photo 2 on all cabinet fronts, with its brass pulls".
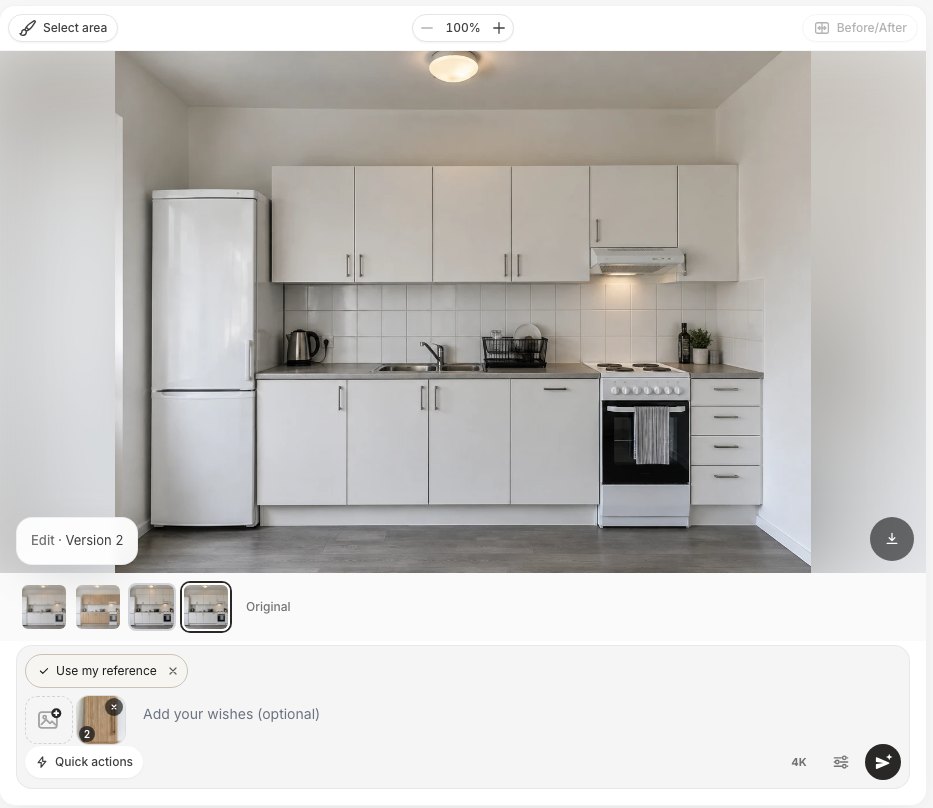 The reference appears as photo 2 next to the text field. One reference works on any plan; Pro allows up to five.
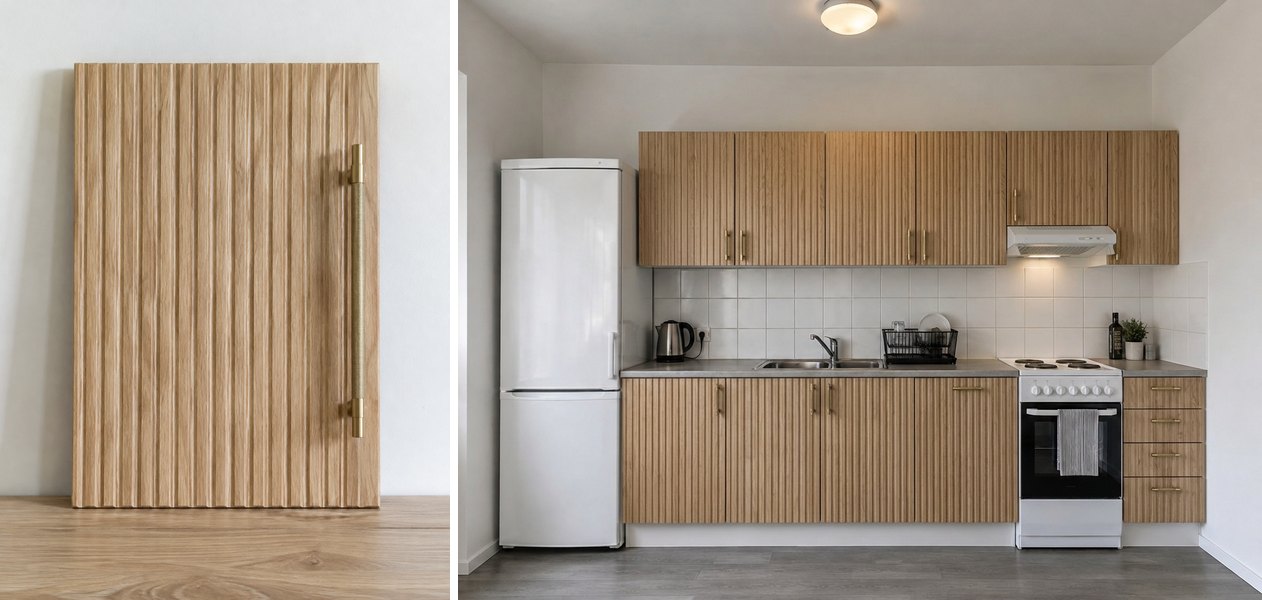 Left: the door sample used as the reference. Right: the result. The flutes, the oak tone and the brass bar pulls came from the sample; the drawer fronts were left smooth.
The reference carried over the flute, the oak tone and the brass bar pull. It did not flute the drawer fronts by the stove, which is how many real fluted kitchens are built anyway — but if you want them fluted, say "including the drawer fronts".
New hardware without new doors
Hardware is the cheapest upgrade and the hardest one to judge from a catalog. We used Replace furniture with "the silver bar handles with round brushed brass knobs on the doors and brass cup pulls on the drawers, same positions".
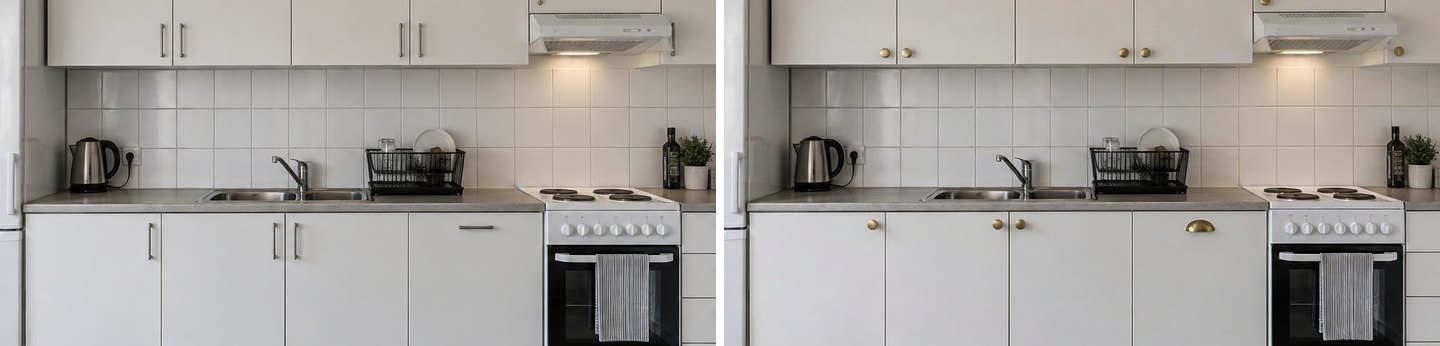 A crop of the full result. The knobs sit near the opening corner of each door; the doors, tiles and appliances did not change.
Before you drill, check the placement against a real guide. KraftMaid's hardware placement guide recommends installing the knob or the end of a pull two to three inches from both edges of a slab door, centering hardware on drawers, and sizing a drawer pull at about one-third of the drawer width — a 4-inch pull on a 12-inch drawer. On 30 or 36-inch drawers, it suggests two pulls instead of one.
What Does the AI Still Get Wrong With Cabinets?
AI previews are good at style and material and weaker at structure. These are the problems we saw while shooting this article, and how to work around them.
"From scratch" also changes the appliances, the sink and the window
We ran Kitchen remodel → Kitchen from scratch on the cherry kitchen with the same request ("modern kitchen, light oak countertops, white modern cabinets"). The cabinets came out as asked, but the AI also swapped every black appliance for stainless steel, replaced the double sink with a single one, replaced the valance with a bamboo shade.
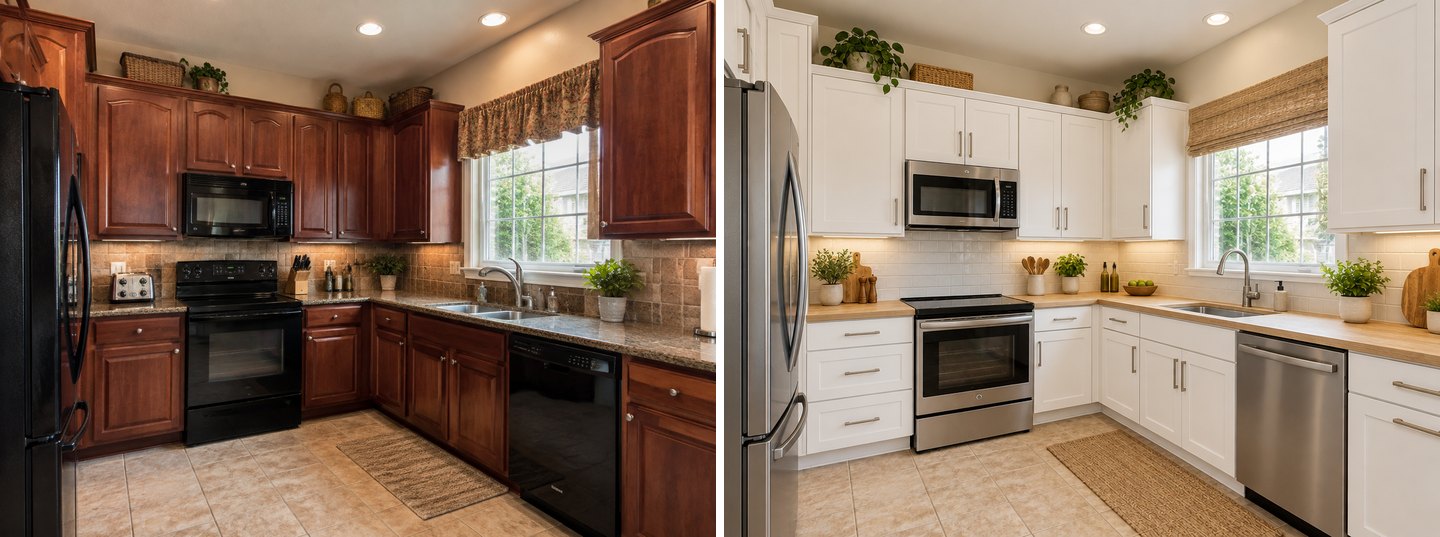 Kitchen from scratch: new cabinets, but also new appliances, a new sink and a new window treatment. Useful for a full remodel, misleading for a refacing budget.
That is correct behavior for a full remodel and wrong for a refacing preview. If you keep your appliances, use Replace furniture or Refresh fronts & counters, which keep appliance and sink positions.
"Same walls" can add an island that does not fit
On the small rental kitchen, New kitchen, same walls with "a modern kitchen with more storage" produced a new kitchen with a tall pantry column, a stainless fridge set into a wall of cabinets and a large island with three stools. In a one-wall rental, an island like that would block the room. The Refresh variant, by contrast, kept the boxes and simply did not add storage — it is designed to keep the cabinet boxes.
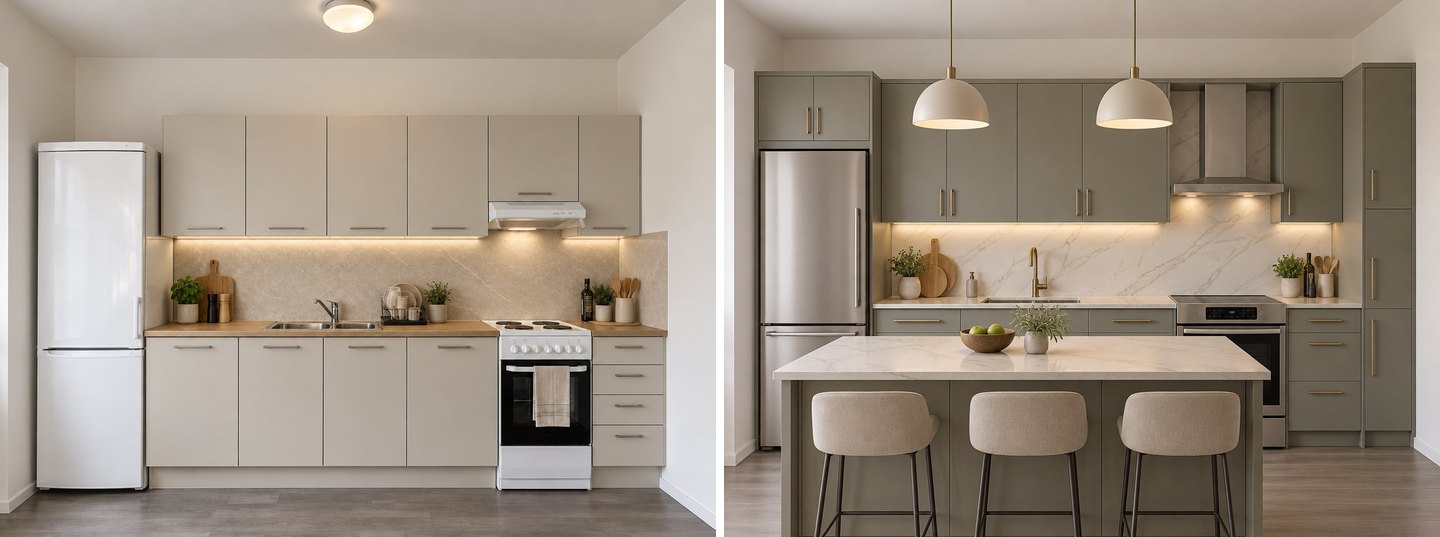 Left: Refresh fronts & counters, same layout. Right: New kitchen, same walls, with an island the room is too small for. Check walkways before you trust a new layout.
Smaller things to check on every result
- Handles appear or disappear. On the slab version some upper doors seem to have no pull at all; Refresh fronts & counters picked bar pulls on its own. Name the hardware if it matters.
- Door and drawer layouts can drift. In the from-scratch version, the base cabinet left of the range became a stack of three drawers. Count doors and drawers on the result against the original.
- Window treatments change. In the Kitchen remodel mode the valance was the first thing to go, in both variants we tried.
- Nothing is to scale. The AI does not measure. A row of cabinets "to the ceiling" is a picture, not a cut list — measure the height and the depth before ordering.
- The brush is not a hard boundary. Neighboring cabinets may be adjusted for consistency, as in the ceiling example.
Practical Rules Before You Order New Fronts
A preview helps you choose a style; these checks keep the real project from going wrong.
- Decide reface vs replace on the boxes, not the doors. If the boxes are sound and the layout works, refacing costs 30–50% less than replacement (HomeAdvisor). If you want to move the sink or add an island, refacing cannot do it.
- Keep the standard heights in mind. Uppers come in 30, 36 and 42 inches, hung about 54 inches above the floor with an 18-inch gap above the counter (Bob Vila). A row "to the ceiling" on an 8-foot ceiling means 42-inch uppers or a second short row.
- Mind the cooktop. The NKBA guidelines cite the code requirement of at least 30 inches of clearance between the cooking surface and combustible material such as a cabinet above it, or 24 inches with an approved range hood. Do not let an AI preview talk you into a cabinet low over the range.
- Plan the top row for rarely used items. NKBA counts storage above 84 inches as miscellaneous. Everyday dishes belong between 15 and 48 inches above the floor.
- Place hardware by the guide, then check it on the photo. Two to three inches from the edges on slab doors, centered on drawers, pulls about one-third of the drawer width (KraftMaid).
- Bring a physical sample home. Laminate, thermofoil, veneer and lacquer read differently in daylight and under LEDs. The AI image narrows the choice; the sample confirms it. Our material swap guide shows how to test counters and floors the same way.
If new fronts are more than your budget allows, our guide to updating a kitchen without remodeling walks through painting, hardware, backsplash and lighting on two other kitchens.
How Much Does It Cost to Preview New Cabinets?
Each design or edit in GenRoom costs 2 credits, and failed generations return the credits automatically. A free account (no card) comes with 6 credits — enough for three door styles on your own kitchen. Paid packs are one-time purchases, not a subscription: Start is $9.99 for 36 credits, Basic $19.99 for 100, Pro $39.99 for 300; see pricing.
For this article we ran 15 generations on two kitchens — 30 credits in total. Generation took about 20–55 seconds per image. Compared with refacing at several thousand dollars, testing five door styles, two materials and new hardware on your own photo costs less than a single cabinet pull. More kitchen examples are on our AI kitchen design page.
FAQ
Is there a kitchen cabinet visualizer where I can upload my own photo?
Yes. In the GenRoom Studio you upload a photo of your kitchen and change the cabinet doors with a short sentence, for example "the cabinet doors with white Shaker fronts". The result keeps your camera angle, appliances and counters. A free account includes 6 credits, which is three edits.
Is it cheaper to reface or replace kitchen cabinets?
Refacing is usually cheaper. HomeAdvisor (June 2026) puts refacing at $4,234–$10,226 with an average of $7,230 and says it runs 30% to 50% less than replacing; full replacement often costs $10,000 or more. Refacing only makes sense if the cabinet boxes are in good shape and you keep the layout.
How can I see different cabinet door styles on my kitchen?
Use Replace furniture in the editor's Quick actions and run it once per style from the original photo: Shaker, flat slab, fluted, two-tone, glass uppers. Running every style from the same original, not from each other's results, gives you a fair side-by-side comparison.
Can AI show my upper cabinets extended to the ceiling?
Yes. Use Add with "a row of short cabinets on top of the upper cabinets, up to the ceiling", or trace the uppers and the gap above them with Select area and describe the extension. Check the real ceiling height afterwards: on an 8-foot ceiling, 42-inch uppers hung at the standard height reach the ceiling.
Will the AI change my appliances or the layout?
Replace furniture, Recolor an object and Refresh fronts & counters kept the appliances and the layout in our tests. Kitchen from scratch replaced the appliances, sink and window treatment, and New kitchen, same walls added an island to a small rental. Pick the tool by how much you want to change.
Can I copy a cabinet door from a showroom or a product photo?
Yes. Add the photo as a reference in the editor and use Use my reference with "the door from photo 2 on all cabinet fronts". In our test it carried over the fluted profile, the oak tone and the brass pull. One reference works on any plan; Pro allows up to five reference photos.
The Bottom Line
New cabinet fronts are the biggest visual change you can make to a kitchen without moving anything, and refacing them costs thousands. A kitchen cabinet visualizer turns that decision into a few minutes of comparison: the same kitchen in Shaker, slab, fluted, two-tone or glass, in laminate or oak, with new hardware or a row of cabinets to the ceiling. Use Replace furniture and Recolor for the doors, Refresh fronts & counters for a fuller update, and keep From scratch for a real remodel. Then measure, bring a sample home, and order. Try your own kitchen in the GenRoom Studio.