Tub to Shower Conversion Visualizer: See a Walk-In on Your Photo
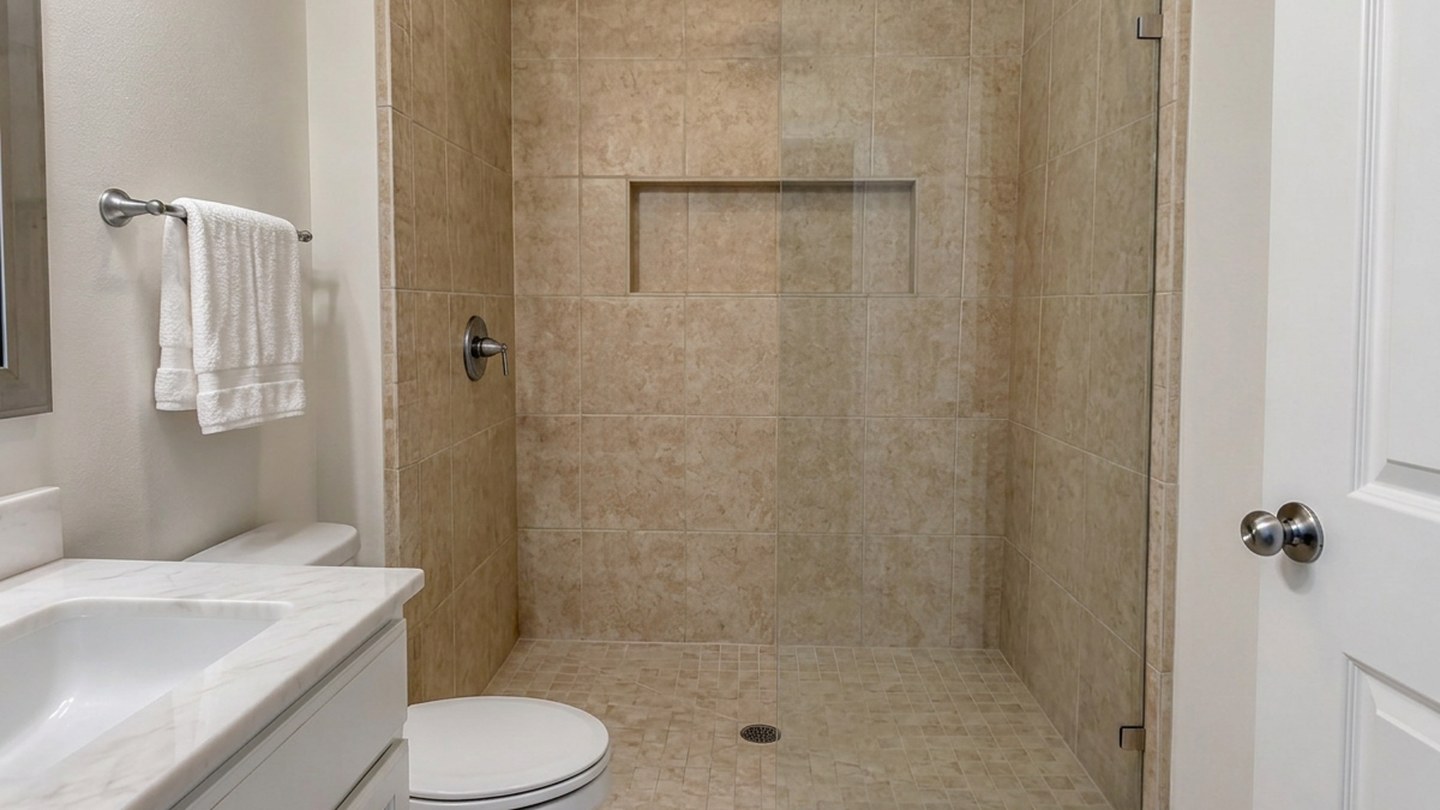
A real result from the GenRoom Studio: the Walk-in shower task plus one typed note ("a rain shower head from the ceiling and a recessed niche"). The beige tiles, the vanity, the toilet and the camera angle come from the original photo.
A tub to shower conversion visualizer shows a walk-in shower where your bathtub is now, on a photo of your own bathroom. You upload one photo, ask for the conversion, and the AI removes the tub and draws the shower in the same spot: a glass panel instead of a curtain, a tiled floor with a drain, a niche or a bench if you ask for them. The tiles, the vanity, the toilet and the window stay where they are.
That is what the GenRoom Studio does. For bathrooms it has a ready task called Walk-in shower, which replaces the bathtub with a curbless walk-in shower with a glass screen in the same place, and its opposite, Freestanding tub. For anything more specific, such as a bench on one wall, a niche, a rain head or a folding seat, you add a note to the task or use the AI editor with Select area. Each design or edit costs 2 credits, and in our tests a result took about 20 to 55 seconds.
This guide starts from real requests. Between March and October 2026, 508 GenRoom users asked for this in their own words: "remove the bathtub", "a walk-in shower instead of the tub", "a shower cubicle". Below are those requests, the exact Studio path, real results from three bathrooms we shot for this article (one of them went wrong), and the parts no picture can settle: drain slope, waterproofing and plumbing.
What Do People Ask For When They Replace a Tub With a Shower?
Most people want the tub gone and the rest of the bathroom kept. The details vary: a rain head, two shower heads, a seat, a deeper tray, no curb. These are typical requests from our data, anonymized and paraphrased:
| What people write (paraphrased) | What they really want | Best Studio tool |
|---|---|---|
| "Remove the bathtub, enlarge the shower, rain shower and two shower heads, warm and slightly rustic" | A bigger shower and a new look | Bathroom remodel mode + your wishes |
| "Replace the bathtub with a walk-in shower and remove the tiling around the tub frame" | The tub and its tiled deck gone | Walk-in shower task |
| "Replace it with a shower cubicle" | A shower in the tub's footprint | Walk-in shower task |
| "Shower instead of a bathtub, a deep shower tray and a folding seat" | A shower with specific parts | Walk-in shower + a note in Refine |
| "A curbless shower with a bench and a niche, keep my tiles" | A precise layout inside the old alcove | Select area (lasso) + text in the editor |
| "Swap the old corner tub for a freestanding one" | Still a tub, just a modern one | Freestanding tub task |
The pattern is the same as with new bathroom tiles or a new vanity: one big change, and a worry that the AI will redo everything else. So the first choice is the tool, not the wording.
Which GenRoom Tool Converts a Tub to a Shower on a Photo?
Use the Walk-in shower task for a straight tub-to-shower swap, add a note in Refine for a niche, a rain head or a seat, and use the AI editor with Select area when the shower must stay inside a marked zone. Use the Bathroom remodel mode only if you want the whole room redesigned around the new shower.
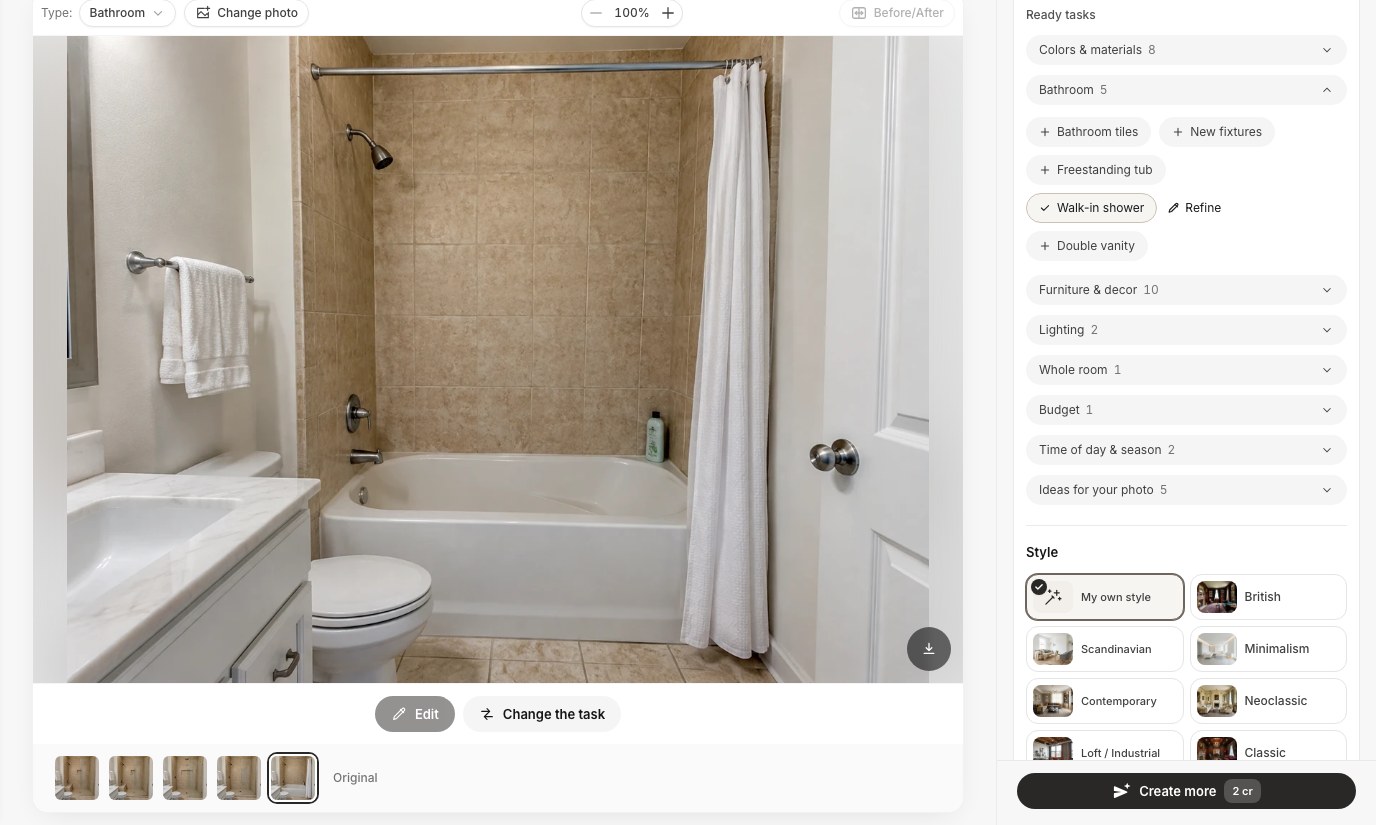 Ready tasks → Bathroom → Walk-in shower. Refine opens a box for your own note ("Anything to keep in mind?"). Then press Create design.
| Tool | Where | What it changes | Use it for |
|---|---|---|---|
| Walk-in shower (ready task) | Design screen → Ready tasks → Bathroom | The bathtub becomes a curbless walk-in shower with a glass screen, in the same place | The basic tub-to-shower preview |
| Refine on the task | The pencil next to the selected task | Adds your note to the task | A niche, a rain head, a seat, "keep the tiles" |
| Freestanding tub (ready task) | Same list | The bathtub becomes a freestanding oval white tub, in the same place | Keeping a tub, but a modern one |
| Select area (brush or lasso) + text | AI editor, top left | Only the area you outline | A bench on one wall, a niche, nothing outside the alcove |
| Bathroom remodel (mode) | Design screen → Modes | Tiles, vanity, shower or tub, fixtures, mirror and lighting | A new bathroom, not just a new shower |
Walk-in shower and Freestanding tub are alternatives: picking one drops the other. You can combine either with other bathroom tasks in the same run, for example Bathroom tiles, if you want new tiles at the same time.
Case 1: An Alcove Tub With a Tile Surround
This is the most common starting point: a standard alcove bathtub with a tiled surround, a curtain rod and a combined tub-and-shower valve. We used an ordinary photo, taken at eye level from the doorway, with the vanity and the toilet in the frame.
Step 1: Take a photo that shows the whole alcove
Stand in the doorway and include the full tub, the walls up to the ceiling and a bit of the floor in front. The AI keeps what it can see, so a photo that shows the vanity and the toilet also tells you whether they survive the change. Push the curtain aside, or leave it: the AI removed ours.
Step 2: Run the Walk-in shower task as it is
Pick Ready tasks → Bathroom → Walk-in shower and press Create design. No style, no note.
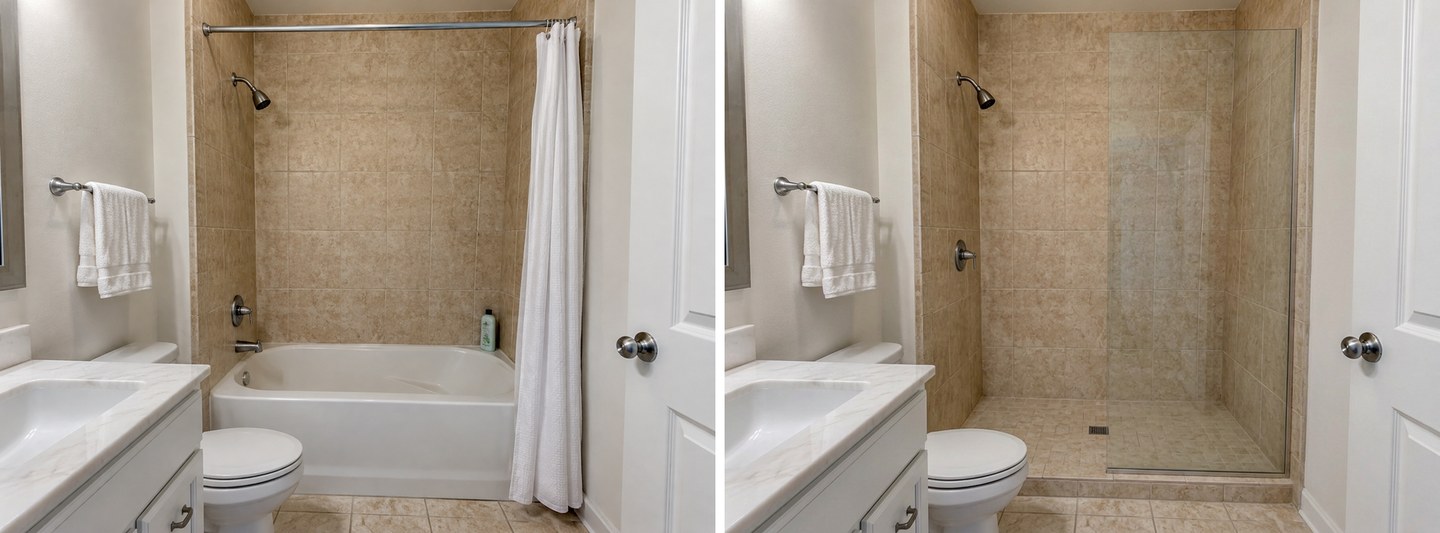 The task on its own: the tub, the tub spout and the curtain are gone; a glass panel, a mosaic shower floor and a drain appear in the same alcove. The wall tiles, the shower head, the vanity and the toilet are the original ones.
The result keeps the beige surround tile for tile and continues it down to where the tub used to be. The shower floor is a smaller mosaic with a single drain, which is how many real conversions are tiled. One detail is worth noticing: although the task asks for a curbless shower, the AI drew a low tiled edge at the front. In this alcove that is actually the realistic option, as you will see in the section on slope and waterproofing.
Step 3: Add a rain head and a niche with Refine
Open Refine next to the selected task and type your note. Ours was: "rain shower head from the ceiling and a recessed niche in the back wall, keep the beige tiles". Then Create design again.
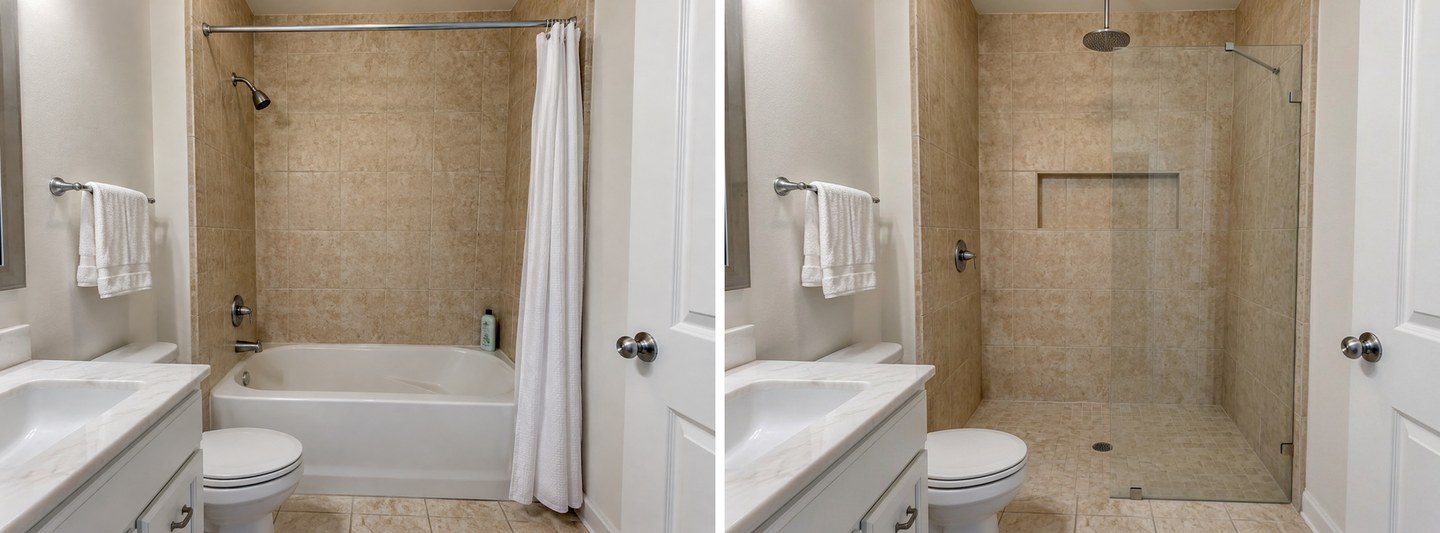 The same task with a typed note: a rain head from the ceiling and a recessed niche. This time the entry is flush with the floor. The tiles were kept, as the note asked.
Both requests from the note were followed: a ceiling-mounted rain head and a wide niche at a natural height. The AI removed the old wall-mounted head, so the rain head is the only one, and added a support bar for the glass panel. A real rain head needs its own supply line from the ceiling or the wall, which the picture does not show.
Case 2: A Bench and a Niche, Only Inside the Old Alcove
The ready task decides the layout for you. When you know exactly what you want, such as a tiled bench on the left wall, a niche and a fixed glass panel, the AI editor gives more control. Select area fences the change in, so the vanity and the toilet cannot move.
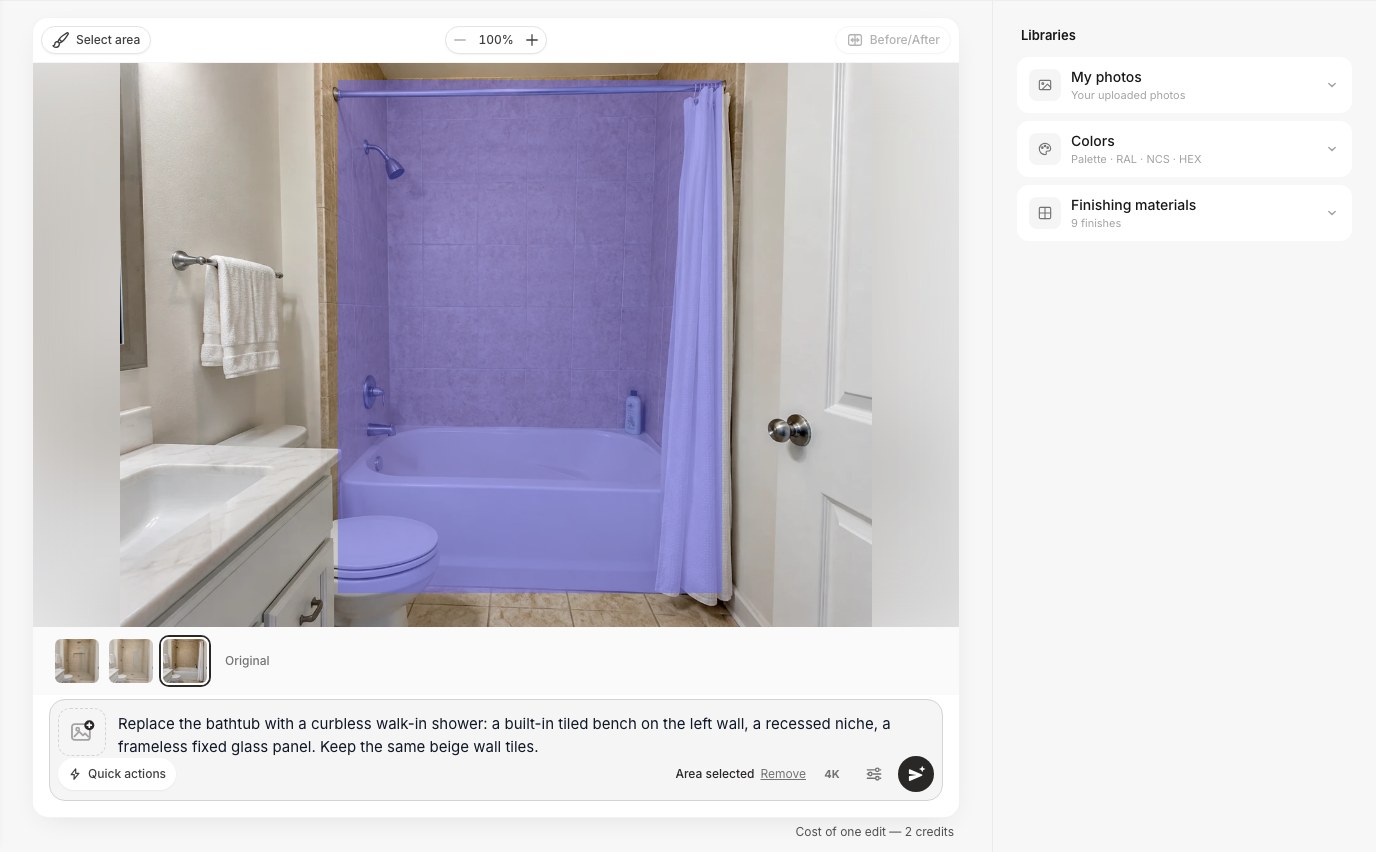 AI editor → Select area → Lasso around the alcove → "Done — keep the selection". Type the request and press Apply.
Our request: "Replace the bathtub with a curbless walk-in shower: a built-in tiled bench on the left wall, a recessed niche, a frameless fixed glass panel. Keep the same beige wall tiles."
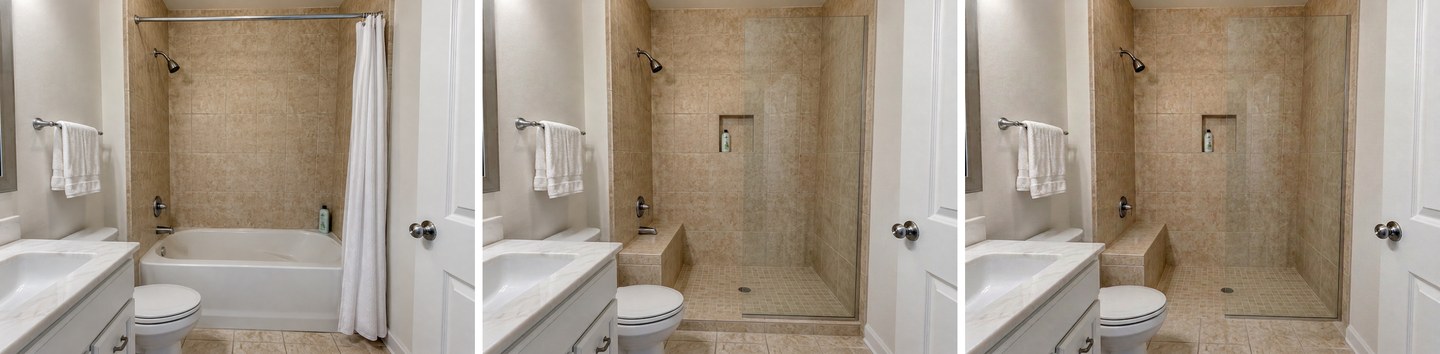 Original → first edit inside the lasso → a second, smaller edit to fix two mistakes.
The first result got the layout right: a bench along the left wall, a niche in the back wall, a fixed glass panel, the same tiles. Nothing outside the selection changed. But it also made two mistakes that a quick look can miss.
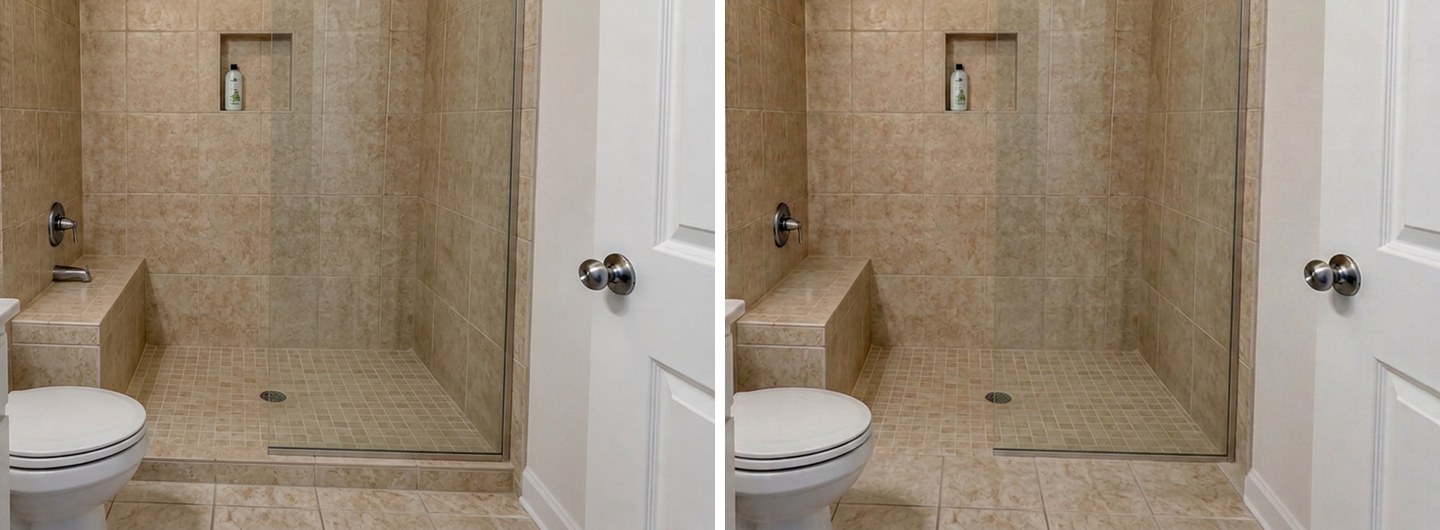 Left: the tub spout survived right above the bench, and there is a curb even though we asked for curbless. Right: one more edit with a smaller lasso fixed both.
The tub spout stayed on the wall, now hanging over the bench, and the entry got a curb although the request said curbless. We drew a smaller lasso over the lower half of the shower and asked: "Remove the old tub spout from the wall above the bench. Make the shower entry curbless: the shower floor runs flush with the bathroom floor, no step or curb." The second edit fixed both and left the bench, the niche and the tiles alone.
The lesson: zoom in on every result before you show it to anyone. The AI is good at the overall look and can leave old parts of the tub behind.
Case 3: A Small Bathroom With a Tub-Shower Combo
Small bathrooms are where people most often want the tub gone: the tub is used as a shower anyway, and stepping over its rim is the daily annoyance. Our second photo is a narrow apartment bathroom with a built-in tub, a hinged glass bath screen, a wall-hung sink and a toilet, and a small window above the tub.
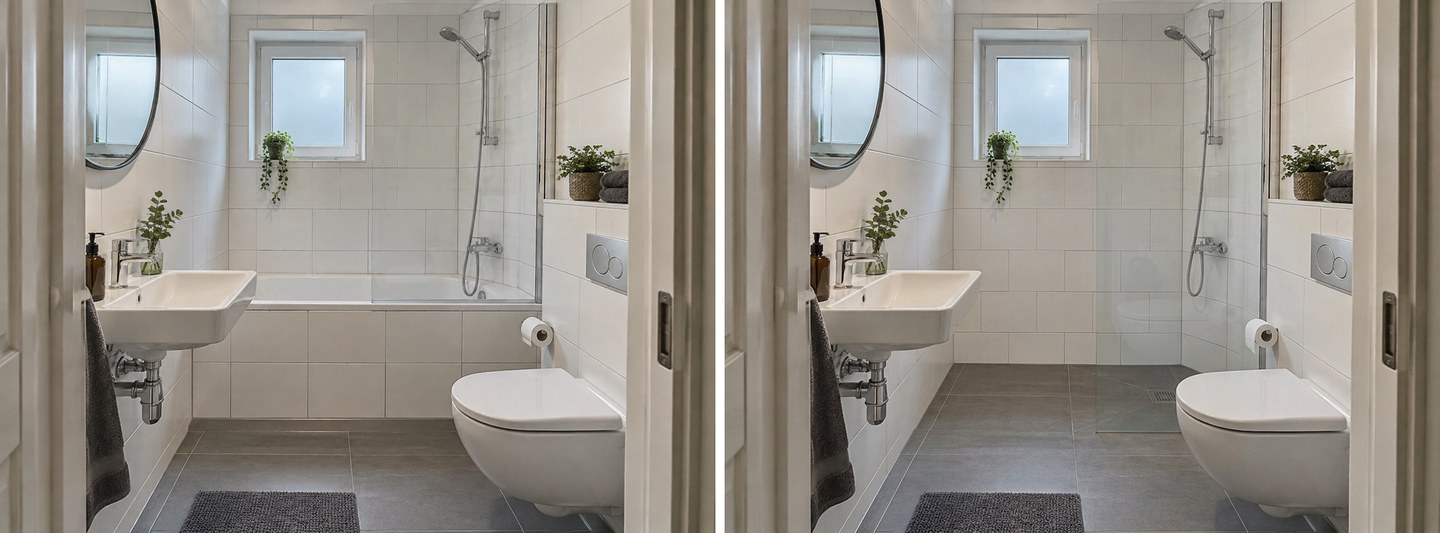 The Walk-in shower task in a small bathroom: the tub is gone, the grey floor runs straight into the shower, and the existing glass screen and shower riser now serve the walk-in. The window, sink and toilet are untouched.
This is the cleanest result of the test. The AI kept the existing glass screen and the shower riser, removed the tub and its front panel, and continued the grey floor tiles into the shower with a square drain inside the screen. The room immediately reads larger, which is the main reason people choose this conversion in a small bathroom.
Then we tried a real request from our data: "a deep shower tray and a folding wall-mounted seat".
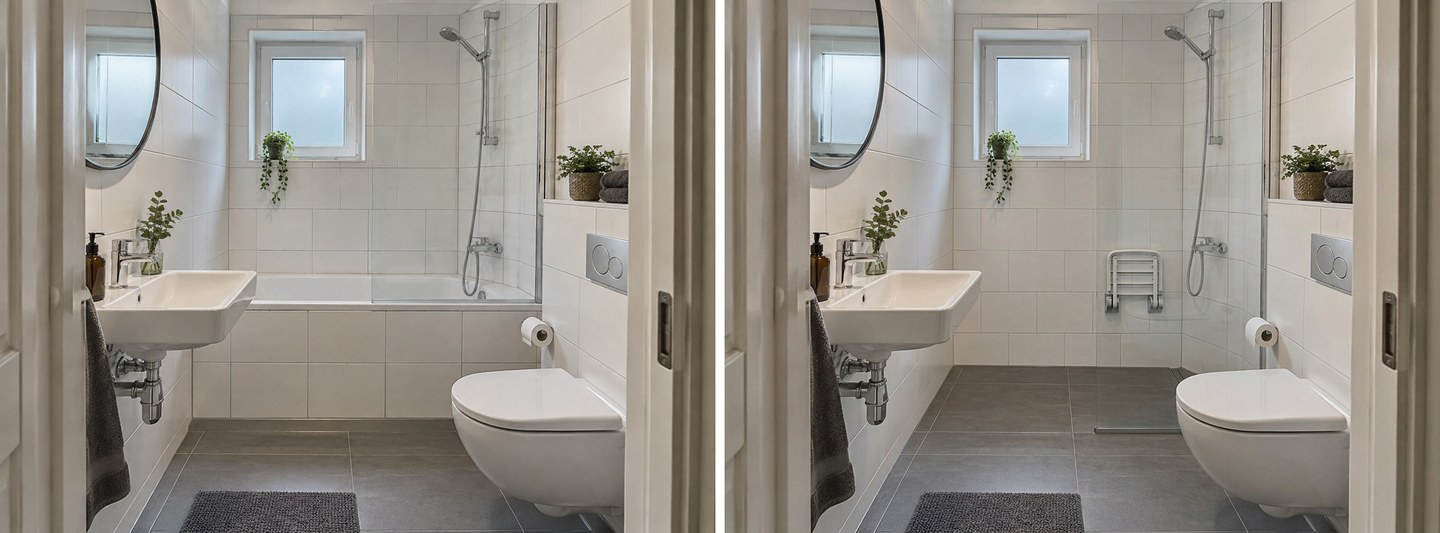 The folding seat appeared under the window. The deep shower tray did not: the floor stayed flush.
The folding seat is there, at a sensible height on the back wall. The deep tray was ignored: the task asks for a curbless shower, and the AI kept a flush floor. If a tray matters to you, write it in the editor instead of the task note, for example "a white shower tray about 10 cm high instead of a flush floor", and check the result.
Case 4: A Large Bathroom With a Corner Whirlpool
Our third photo is the classic 1990s primary bathroom: a big corner whirlpool tub on a raised tiled deck with two steps, under a large window, and a long double vanity on the other wall. One of the real requests in our data asked exactly for this: remove the tub and the tiling around its frame.
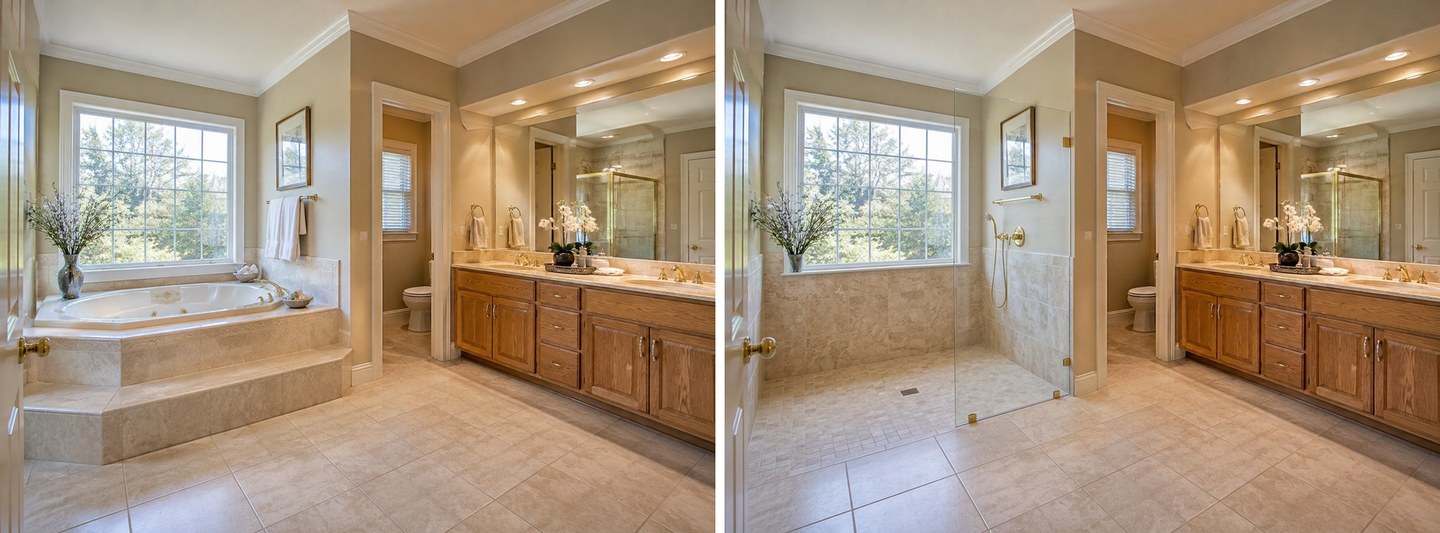 The Walk-in shower task removed the whirlpool and the whole tiled deck. The brass hand shower matches the existing faucets. But the large window is now inside the shower.
The AI did the hard part well: the deck and both steps are gone, the floor is continuous, the new shower fixtures are brass to match the vanity, and the double vanity, mirror and floor were not touched. It also shows the limit of "in the same place". The shower now sits under the big window, so the window is inside the wet zone, at body height, with clear glass. That may be fine for a private garden view, but a real project would need water-resistant window materials and some privacy plan, or a different shower position. The picture also leaves one side of the shower open toward the room, with no slope or barrier to keep the water in.
For comparison, we ran the opposite task on the same photo.
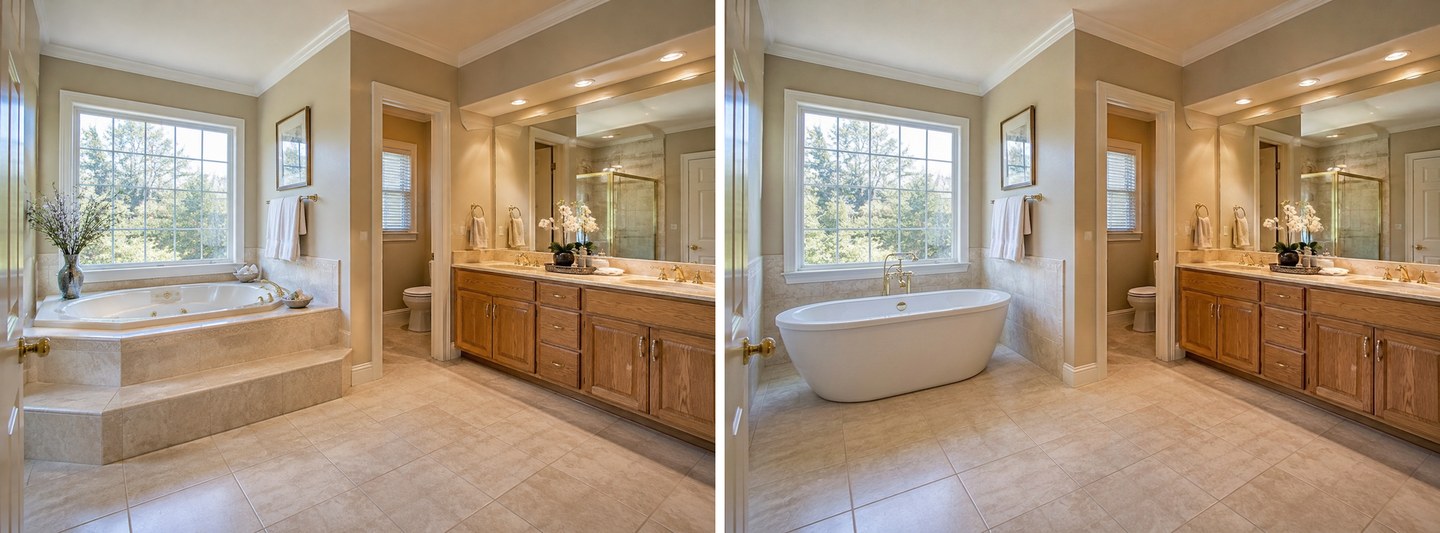 Freestanding tub on the same photo: the deck is gone and an oval tub with a floor-mounted filler sits under the window.
If your household still wants a bath, this is the version to show next to the shower one. It keeps the view, gets rid of the deck and the steps, and needs no new waterproofed shower floor.
When the whole bathroom should change too
Finally, we ran the long request from the start of this article, "remove the bathtub, a larger walk-in shower with a rain shower and dual shower heads, contemporary, warm, slightly rustic", with the Bathroom remodel mode.
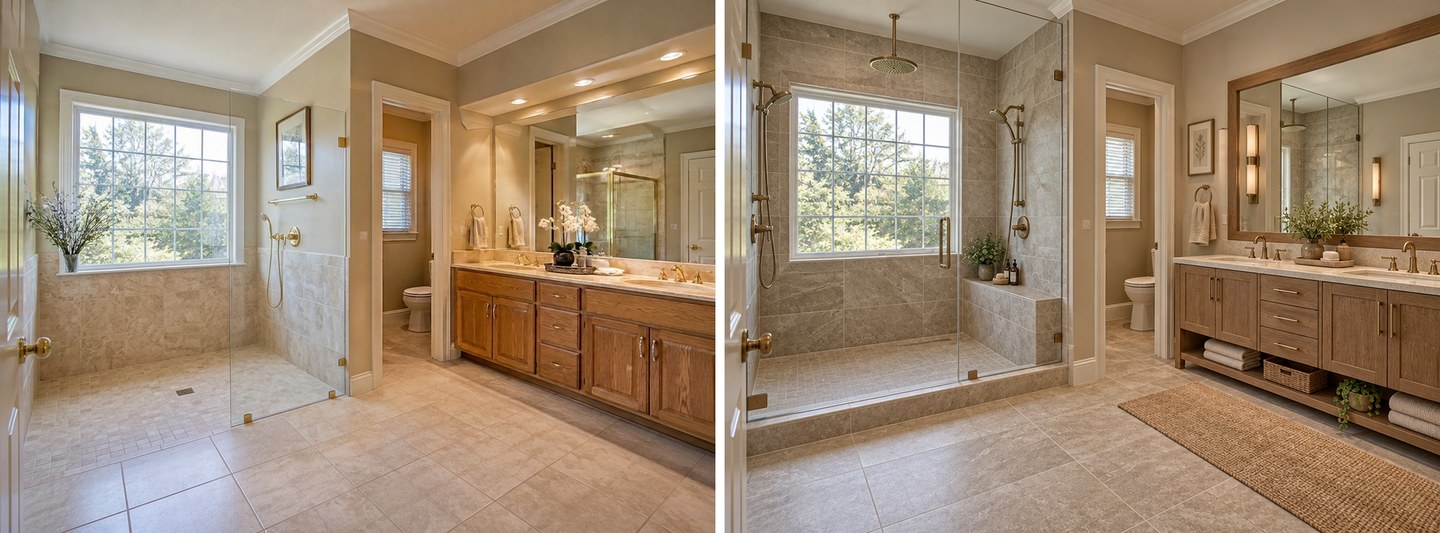 Left: the Walk-in shower task changes the tub zone only. Right: the Bathroom remodel mode with the same wish builds a glass enclosure with a rain head, two wall heads and a bench, and also replaces the vanity, mirror, lights and decor.
The mode followed every part of the wish: a large glass enclosure, a rain head plus two wall heads, a bench, warm wood and stone tones. It also replaced the vanity, the mirror and the lights, which you may or may not want. Use the task to see the conversion alone, and the mode when you are planning a full remodel. Our AI bathroom design guide and the AI bathroom remodel page cover the full redesign.
Walk-In, Curbless or Freestanding Tub: Which One Fits?
A curbed walk-in shower is the simplest conversion, a curbless shower is the most accessible and the most demanding to build, and a freestanding tub keeps a bath while modernizing the look. The table sums up what we saw and what the cost guides say.
| Option | Looks like in the AI result | What it needs in reality | Good for |
|---|---|---|---|
| Walk-in with a low curb | A glass panel and a small tiled edge at the front | A shower pan or tray on the existing floor | Most alcove tubs, the lowest effort |
| Curbless walk-in | The floor runs straight into the shower | A recessed or sloped floor and full waterproofing | Aging in place, small rooms that should look bigger |
| Walk-in with bench and niche | A built-in seat and a recessed shelf | Framing for the bench and niche, waterproofed like the rest | Shaving, seating, storage |
| Freestanding tub | An oval tub on the floor, no deck | A floor drain position and supply for the filler | Households that still want a bath |
Create interior design with AI
Upload a photo of your room and get a professional design in 30 seconds. First generation is free.
What Can't a Picture Decide? Slope, Waterproofing and Plumbing
A photo preview answers "how will it look". It does not answer whether the floor can slope to the drain, whether the shower is waterproof, or whether the plumbing can stay where it is. These are the questions to bring to a contractor.
Drain slope. In the US model code, a shower floor must slope uniformly toward the drain, at least 1/4 inch per foot (2%) and at most 1/2 inch per foot (4%), and a curb, where there is one, must be at least 2 inches above the drain (International Residential Code 2021, P2709.1). The AI draws a flat floor with a drain somewhere in it. It does not draw a slope.
Curbless is a floor job. Without a curb, the slope has to happen below the level of the bathroom floor, which usually means recessing the subfloor or building up the rest of the room. Angi notes that a curbless design costs more because sections of the shower floor have to be removed (Angi, updated August 2026). In our second alcove edit, removing the curb took one sentence. On site it can mean cutting into the floor structure.
Waterproofing. A tub only gets wet inside; a walk-in shower wets the floor, the walls and every corner. The same code section requires a liner or a bonded waterproof membrane under site-built shower floors, extended at least 2 inches above the threshold. Angi also warns that a conversion may need walls opened back to the studs to waterproof the area, which can reveal hidden plumbing problems.
Plumbing. Keeping the shower in the tub's footprint keeps the existing drain and supply lines nearby, which is why the Walk-in shower task puts the shower "in the same place". Moving the drain, adding a second head, or moving the valve (as the AI did in the whirlpool bathroom) is plumbing work. In the US, a shower drain must be at least 1 1/2 inches, and the shower valve must be a pressure-balanced or thermostatic type with a temperature limit (IRC P2708). Most cities require a plumbing permit when plumbing lines change.
Codes differ by country and city, so treat these as an example of what gets checked, not as your local rule.
Shower Measurements to Check Before You Commit
The AI does not measure your room. Before you fall for a picture, check that the shower in it can actually be built in your space:
| What to check | Number | Source |
|---|---|---|
| Minimum shower size (US code) | At least 900 sq in inside, and at least 30 inches in the smallest dimension | IRC 2021, P2708.1 |
| Comfortable shower size | 36 × 36 inches recommended for comfort | Bob Vila, citing NKBA guidance (updated May 2024) |
| Entry opening | At least 22 inches clear | IRC 2021, P2708.1.1 |
| Fold-down seat | Allowed if the 900 sq in minimum remains with the seat folded up | IRC 2021, P2708.1 |
| Shower control height | 38–48 inches from the floor, depending on the user | Bob Vila, citing NKBA guidance |
| A typical tub you replace | About 60 inches long and 30–36 inches wide | Angi |
A standard 60-inch alcove gives you a shower of roughly the tub's footprint, which is well above the code minimum and wide enough for a bench at one end, as in Case 2. In a narrow room, the bench, the niche and the glass panel all eat into the space, so measure first and then write the request.
What Does the AI Get Wrong?
The AI is good at removing the tub, keeping your tiles and drawing a believable shower. It is weak at construction details. Across 9 results on three bathrooms we saw:
- It leaves parts of the tub behind. The old tub spout survived above the new bench. Zoom in on valves, spouts and the floor line.
- Curb or no curb is not guaranteed. The task asks for curbless, yet two results had a low curb, and one note asking for a deep tray was ignored.
- "Same place" can be the wrong place. In the large bathroom the shower landed under a big clear window.
- No slope, no membrane, no plumbing. Floors are drawn flat; the drain sits wherever it looks right. Nothing checks whether a drain can go there.
- A mode changes more than the shower. Bathroom remodel replaced the vanity, mirror and lights along with the tub.
- Resolution is preview size. Our 1472 × 1104 photos came back at 1200 × 896 from the tasks, at full size from the editor edits, and at 1024 × 768 from the Bathroom remodel mode. Use 4K if you need a larger file.
What it did not do in our tests is just as useful: it did not retile the walls when we asked to keep the tiles, and it did not touch the vanity, the toilet or the door in any task or editor result.
What Does a Shower Preview Cost Compared With the Real Thing?
In GenRoom a design or an edit costs 2 credits. A free account gets 6 credits (no card), enough for three previews; Free results carry a watermark. Paid packs are one-time, with no subscription: Start $9.99 for 36 credits (about 18 previews), Basic $19.99 for 100 credits, Pro $39.99 for 300 credits. Purchased credits are valid for 180 days, and a failed generation returns its credits. Details are on the pricing page. Our whole test for this article was 9 designs and edits, 18 credits.
The real conversion, according to Angi's tub-to-shower cost guide (updated July 2026):
| Item | Typical cost |
|---|---|
| Tub-to-shower conversion, national average | About $3,000 (from about $1,200 up to $15,000) |
| Custom tiled walk-in shower | $3,500–$15,000 |
| Prefab curbless or barrier-free shower stall kit | $2,000–$4,100 (kit only) |
| Walk-in, stepless or curbless entry | $1,000–$4,000 |
| Frameless glass door | $600–$2,500 |
| Built-in or fold-down seat | $100–$600 |
| Plumbing repairs or layout changes | $300–$2,400 more |
| Bathroom permit | $200–$2,000 |
| Tub removal and disposal | $150–$300 |
The gap between a curbed and a curbless shower, or between keeping the drain and moving it, is easily a few thousand dollars. A few previews of each version are a cheap way to decide which one is worth paying for.
How to Write a Tub-to-Shower Request the AI Follows
The best requests in our data named four things: what goes, what replaces it, the parts you want inside the shower, and what must stay. A template:
Replace the bathtub with a [curbless / low-curb] walk-in shower: [glass panel type], [bench, niche, seat, heads]. Keep [tiles, vanity, window, everything else].
Requests that worked in our tests:
- "Rain shower head from the ceiling and a recessed niche in the back wall, keep the beige tiles." (Walk-in shower task → Refine)
- "Deep shower tray and a folding wall-mounted seat." (Walk-in shower task → Refine; the seat worked, the tray did not)
- "Replace the bathtub with a curbless walk-in shower: a built-in tiled bench on the left wall, a recessed niche, a frameless fixed glass panel. Keep the same beige wall tiles." (Select area + text)
- "Remove the old tub spout from the wall above the bench. Make the shower entry curbless." (a second, smaller Select area)
Three habits help. Keep the shower in the tub's footprint unless you are ready to move plumbing. Fix mistakes with a small second selection instead of re-running the whole thing. And compare each version with the original using the Before/After button in the editor. If you also want to clear bottles, towels and clutter from the photo first, see our guide to removing clutter from a room photo.
FAQ
Is there a free tub to shower conversion visualizer?
Yes. A free GenRoom account (no card) gets 6 credits, which is three previews at 2 credits each, with a watermark on the results. Upload a bathroom photo in the Studio, pick Ready tasks → Bathroom → Walk-in shower, and press Create design. Paid packs remove the watermark.
Can I see what my bathroom would look like with a walk-in shower instead of a tub?
Yes, on your own photo. The Walk-in shower task removes the tub and draws a walk-in shower with a glass screen in the same spot, keeping your tiles, vanity and toilet. Add a note in Refine for a niche, a rain head or a seat, or use Select area in the editor for a precise layout.
Can I replace my bath with a walk-in shower?
In most bathrooms, yes: the shower usually goes into the tub's footprint, where the drain and supply lines already are. A standard tub is about 60 inches long, well above the US code minimum for a shower (900 sq in, at least 30 inches wide). Moving the drain, going curbless or waterproofing a larger area adds work, and changes to plumbing usually need a permit.
How much does it cost to convert a tub to a shower?
Angi puts the national average at about $3,000, with projects from about $1,200 up to $15,000. A custom tiled walk-in costs $3,500–$15,000, a curbless or stepless entry adds $1,000–$4,000, and a frameless glass door costs $600–$2,500. Local labor rates and plumbing changes move the number most.
Is a curbless shower a good idea?
It is the most accessible option and makes a small bathroom look larger, as our small-bathroom result shows. It is also the hardest to build: the floor has to slope to the drain below the level of the room, and the whole area needs waterproofing. Ask a contractor whether your floor can be recessed before you commit.
Do you need a permit to convert a bathtub to a shower?
Often, yes. Most cities require a plumbing permit when plumbing lines change, even for small jobs, and Angi estimates bathroom permits at $200–$2,000. Rules differ by country and city, so check with your local building department.
The Bottom Line
A tub to shower conversion visualizer is most useful before you call a contractor: it shows whether a walk-in, a curbless shower or a freestanding tub suits your bathroom, on your own photo, for 2 credits a version. In the GenRoom Studio the Walk-in shower task handles the basic swap and keeps your tiles and vanity, a note in Refine adds a niche, a rain head or a seat, and Select area fences in a precise layout. Check every result for leftover tub parts, then take the picture you like to a pro who can check the slope, the waterproofing and the drain. Try it on your bathroom.