Accent Wall Panel Ideas: Try Slats and Wainscoting on Your Photo
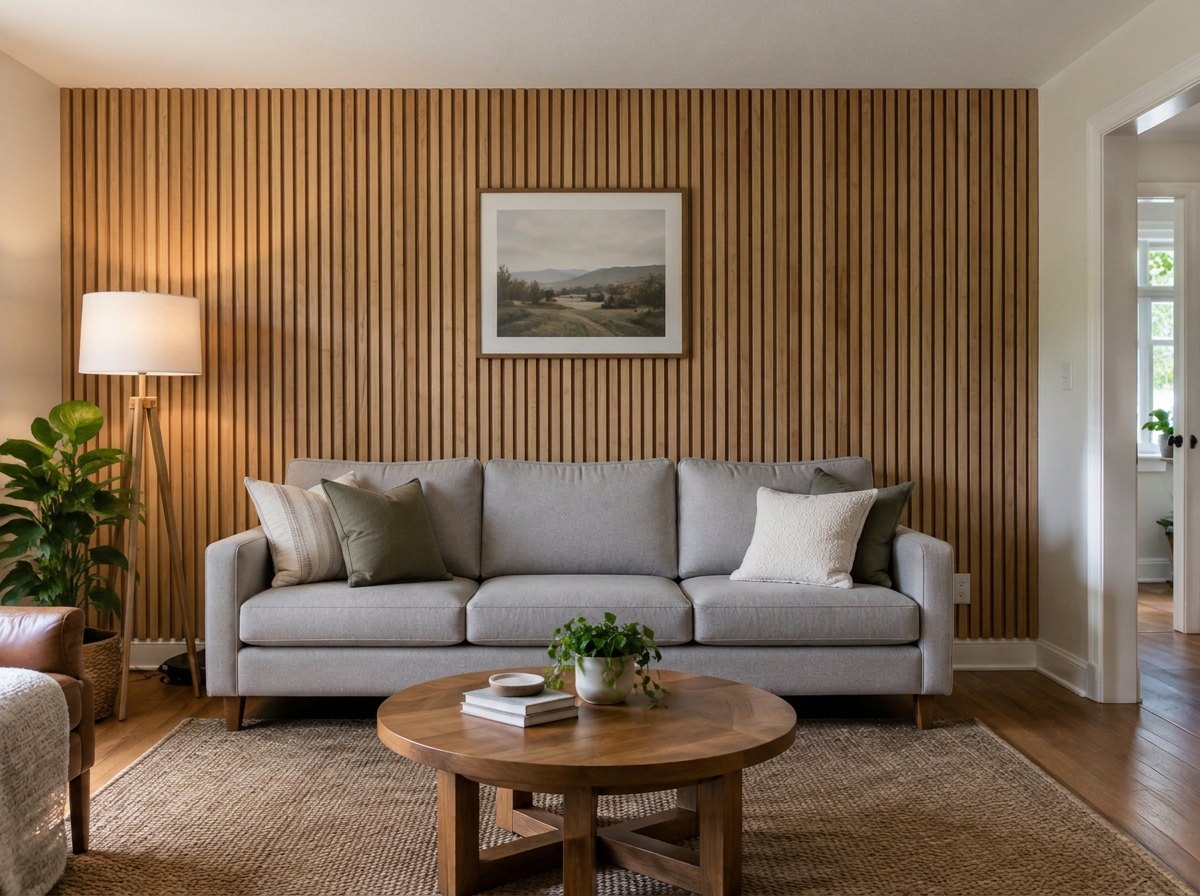
A real result from the GenRoom Studio: the ready task "Accent wall" with "Wood slats" behind the sofa. Everything except the wall comes from the original photo.
The fastest way to choose accent wall panels is to try them on a photo of your own wall before you buy a single slat. Take one straight-on photo, upload it, pick a panel type, and the AI shows that exact wall clad in wood slats, fluted panels, wainscoting, board and batten, 3D panels, limewash or microcement. Each version takes well under a minute, and the bed, sofa or desk stays where it is.
That is what people bring to GenRoom. Between March 2 and October 14, 2026, 799 people asked for a panel or feature wall in their own words. The requests are specific. A wood panel to the left of a desk, Scandinavian style, "not up to the ceiling so it doesn't block the air conditioner". A fireplace wall "in the material I selected". A background of natural wood slats, "a bit creative, but I don't want the wall built out". Or simply: "replace the acoustic panel on the wall".
Below: which Studio tool fits each kind of request, real results on three test rooms (a bedroom, a living room and a home office), how to get a panel that stops at a third of the wall, and the three places where the AI got it wrong. Wallpaper has its own guide, and plain paint is covered in our paint color article. This one is about texture: slats, panels and mineral finishes.
What Do People Actually Ask For?
Most people don't ask for "an accent wall". They name a wall, a material and a limit. We grouped the real requests by what they need the AI to do:
| What people write (paraphrased) | What it really means | Studio path |
|---|---|---|
| "Wood slats behind the sofa / bed" | One wall, one common panel type | Ready task "Accent wall" → Wood slats, or "Wall panels" |
| "A wood panel next to the desk, not up to the ceiling" | Panel with a set height or width | "Wall panels" + a note in "Anything to keep in mind?" |
| "The fireplace wall in the selected material" | A specific texture on one surface | Editor: Select area + Finishing materials |
| "Natural wood slats, a bit creative, but don't build the wall out" | A pattern, not a standard panel | Editor: your own words |
| "Replace the acoustic panel on the wall" | Swap an existing panel | Editor, on the photo or on a result |
| "Wainscoting / board and batten on the lower wall" | Partial height | "Wall panels" → Wainscoting + a height note |
Other recurring requests: fluted panels behind a TV, a limewash or microcement feature wall, 3D panels in a bedroom, and acoustic panels in a home office or a gaming corner.
Which Studio Tool Fits Your Wall?
Use a ready task when the panel type is on the list, and the editor when you want an exact material, a pattern or one marked area. Every design and every edit costs 2 credits; a free account (no card) gets 6 credits.
| Tool | Where | What you choose | Best for |
|---|---|---|---|
| Accent wall | Design → Ready tasks → Colors & materials | Which wall: Back wall, Behind the sofa, Behind the bed, TV wall. Color or material: Muted olive, Deep navy, Terracotta, Patterned wallpaper, Limewash, Wood slats | A quick feature wall: slats, limewash or a bold color |
| Wall panels | Same group | Which wall (same four). Panel type: Light wood, Fluted, Wainscoting, 3D panels | Cladding a whole wall with one panel type |
| "Anything to keep in mind?" | Opens under either task when you click Refine | Free text that is added to the chips | Height, width, color, style, "stop below the AC" |
| Finishing materials | Editor → Libraries | 9 finishes: Klinker brick, Handmade brick, Smooth stucco, Thermowood, Painted board (dark), Natural stone, Slate, Porcelain stoneware, Architectural concrete | A real texture on a wall you select |
| Editor text | Editor → "What to change?" | Your own sentence, with or without a selected area | Patterns, partial panels, replacing an existing panel |
"Accent wall" and "Wall panels" cover the same wall, so a design run uses one of them, not both. If you want two materials (say, slats with a painted wall above), describe it in the note or in the editor.
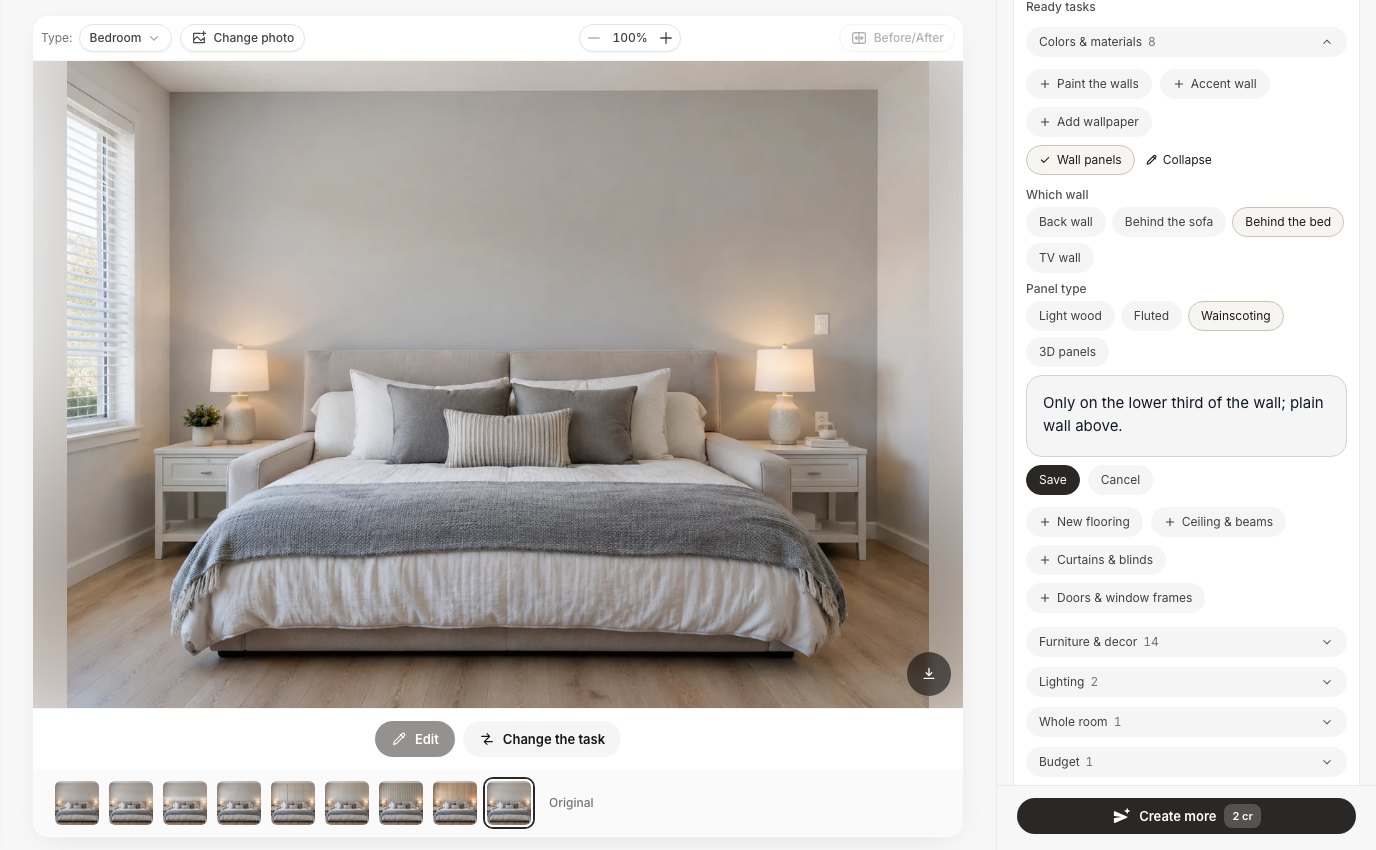 The ready task "Wall panels" after Refine: pick the wall and the panel type, then add anything the chips can't say, such as a height.
Example 1: A Bedroom Wall Behind the Bed, Four Ways
Our first test room is an ordinary bedroom: a beige upholstered headboard against a plain light grey wall, two white nightstands, and a light switch and an outlet above the right nightstand. The Studio recognized it as a Bedroom on its own.
Light wood panels in one click
Ready task Wall panels, wall Behind the bed, type Light wood, then Create design. The result came back in about 20 seconds.
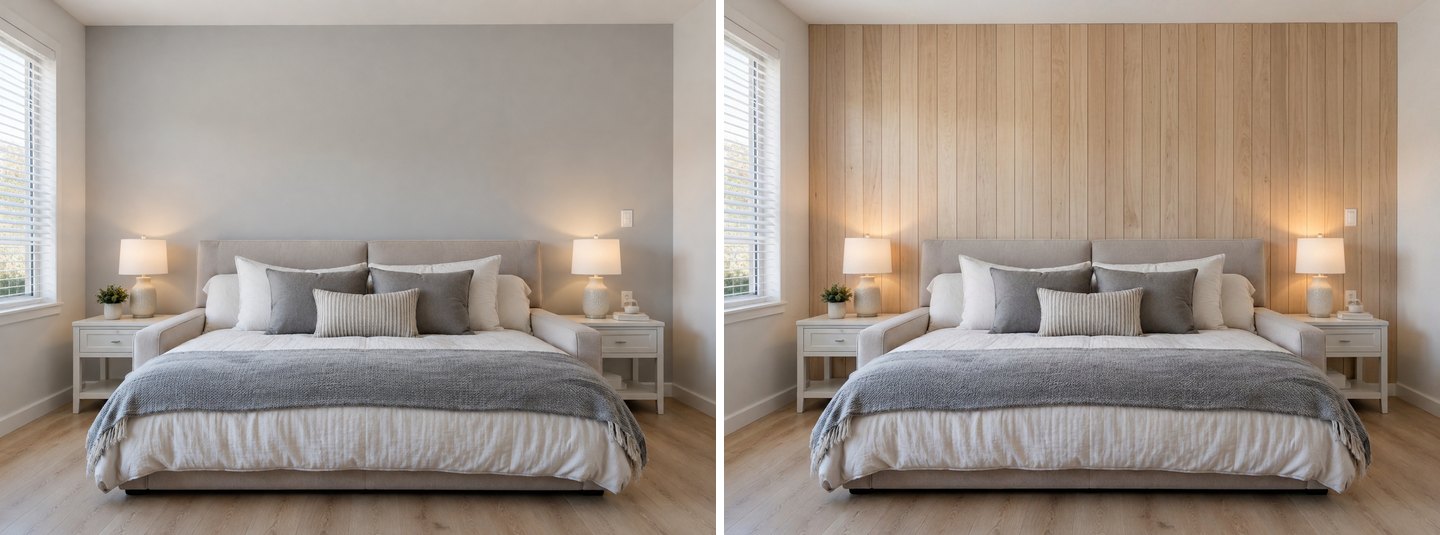 Before (left) and after (right). The wood stops at the corners of the bed wall; the window wall stays white.
Look at the details that usually go wrong. The light switch and the outlet are still there, in the same spots. The panels run behind the headboard and the lamps instead of over them. The side walls are untouched. Wide boards like these read as calm and Scandinavian; they suit a bedroom where you want warmth without a busy pattern.
Fluted, wainscoting or 3D: same wall, same camera
We ran the same task three more times and changed only the panel type. That is the real use of an AI wall visualizer: one wall, several finishes, side by side.
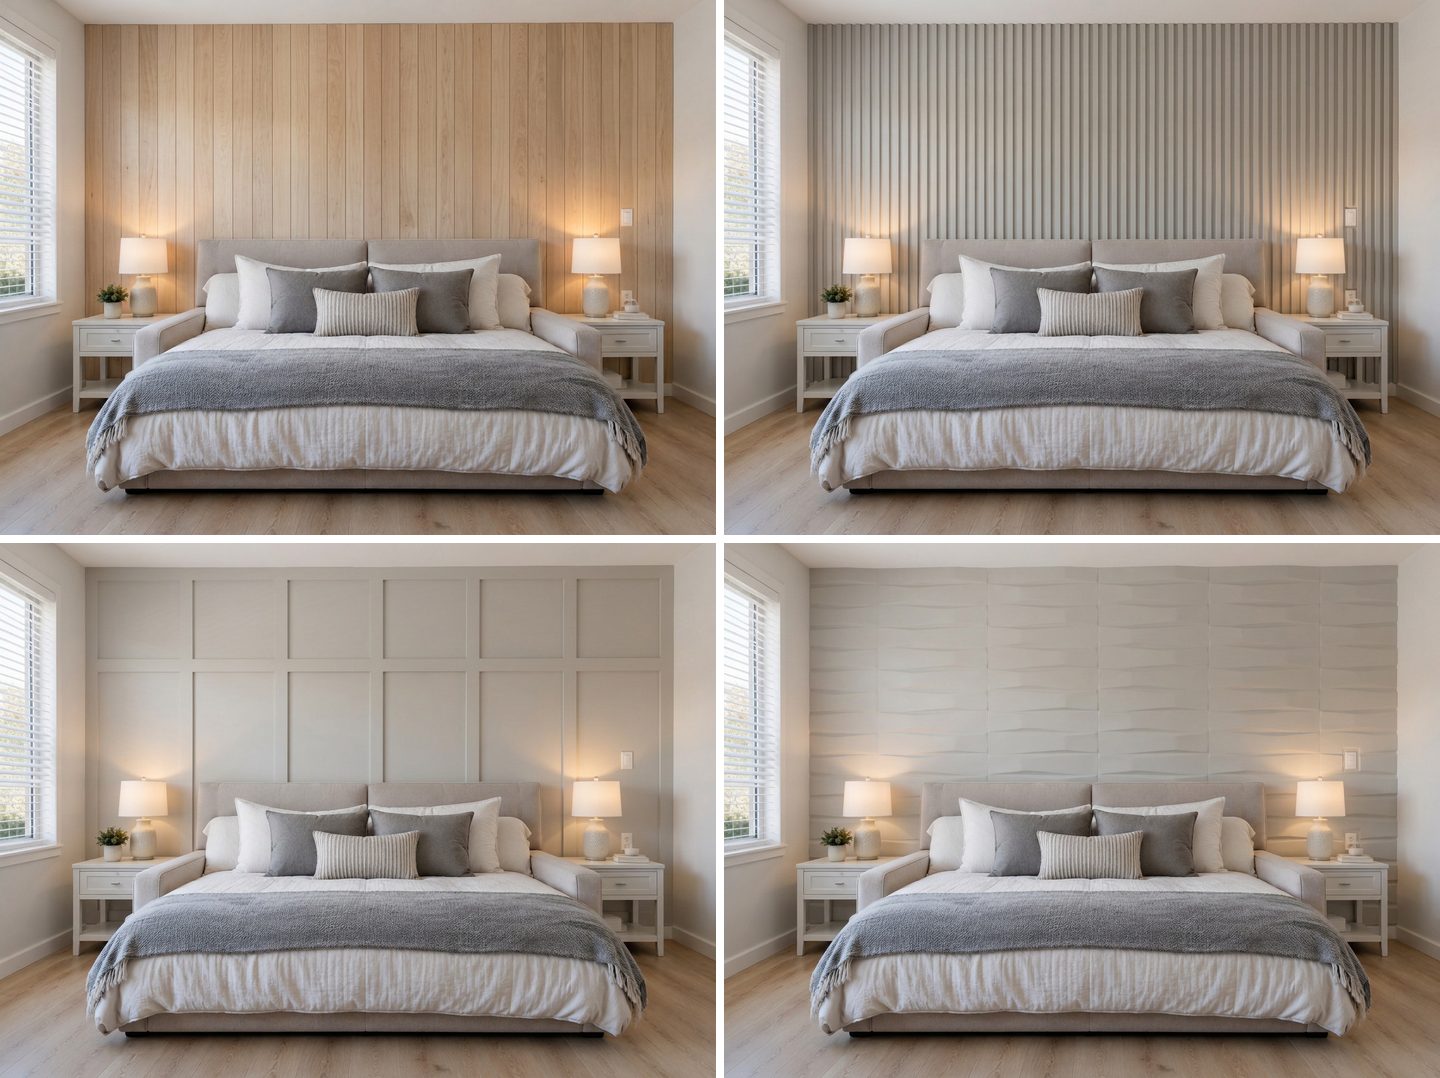 Top: Light wood, Fluted. Bottom: Wainscoting, 3D panels. All four come from the same original photo.
What each one did:
- Fluted gave narrow, pale grey-painted flutes that match the existing wall color. It is the quietest option of the four, and the vertical lines make the ceiling look higher.
- Wainscoting produced a full-height grid of painted moulding, closer to a "picture frame" or grid accent wall than to classic lower-wall wainscoting. If you want it only on the lower part of the wall, say so in the note (see the height section below).
- 3D panels made white wave-pattern panels. They catch the lamp light nicely in the photo; in real life they also catch dust, so think about who will clean them.
Microcement from the Finishing materials library
For a mineral look instead of wood, open the editor, press Select area, draw around the wall with the lasso, open Finishing materials and pick Architectural concrete. Then type what it is: "Light grey microcement finish on this wall only, seamless and matte." The material tile is sent along with your words as a reference, so the AI copies its texture instead of guessing.
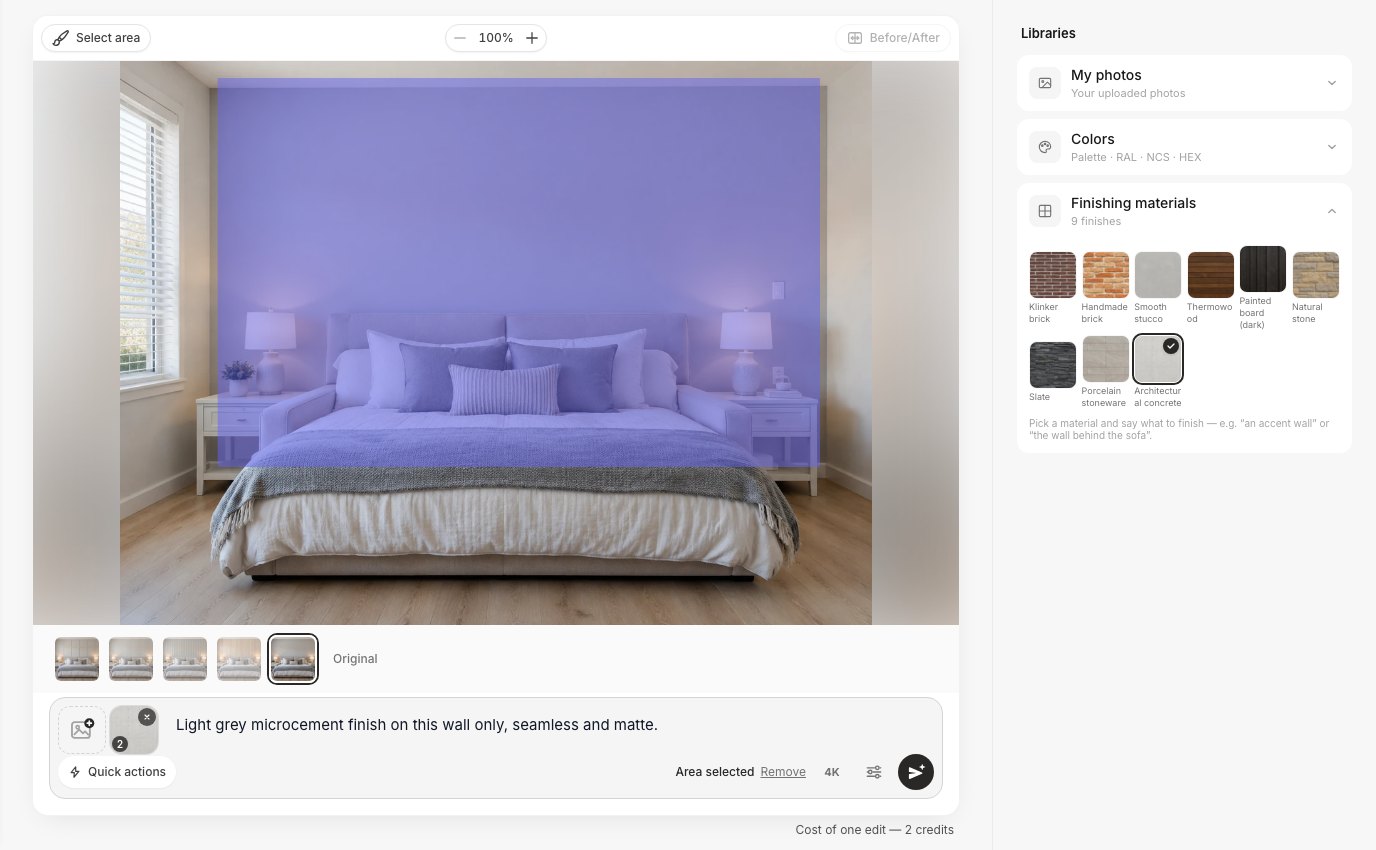 Select the wall, pick a finish in the library, and say what it should be. This is the path for "the wall in the material I selected".
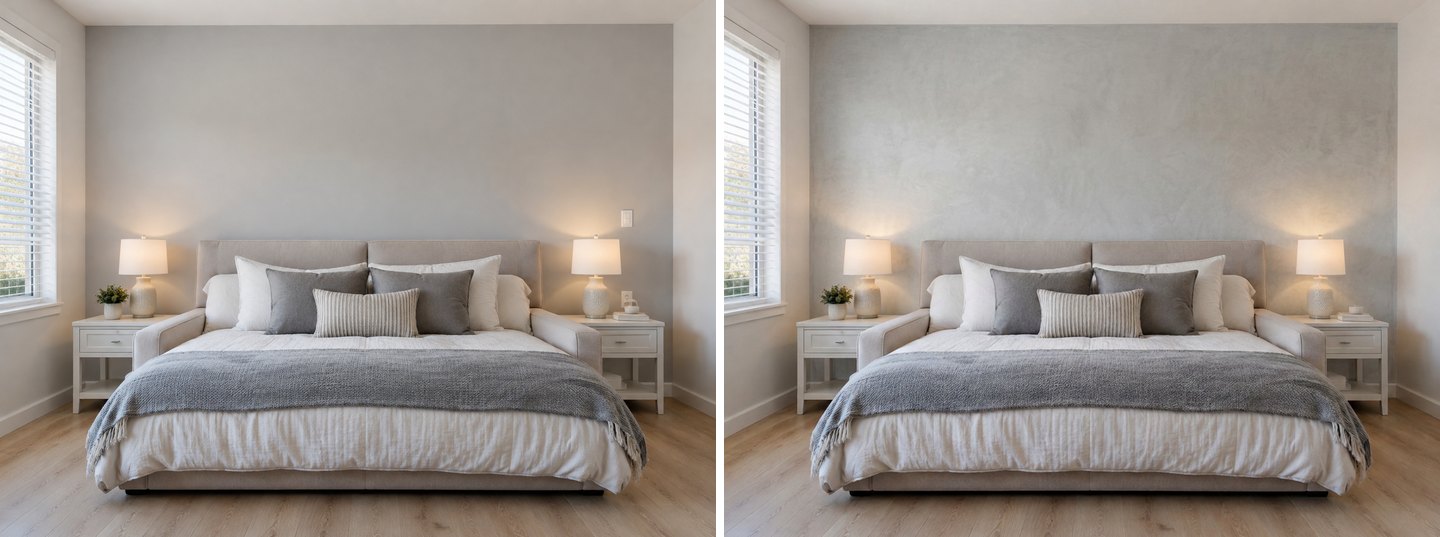 The microcement wall looks convincing at full size. Zoom in, though: the switch and the outlet are gone (see "Where the AI Gets Accent Walls Wrong").
Example 2: A Living Room Wall Behind the Sofa
The second room is a living room with a light grey three-seat sofa against an off-white wall, one framed print above it, a floor lamp, a plant and a doorway on the right. Detected as a Living Room.
Wood slats with the ready task "Accent wall"
Ready task Accent wall, wall Behind the sofa, finish Wood slats. This is the result on the cover.
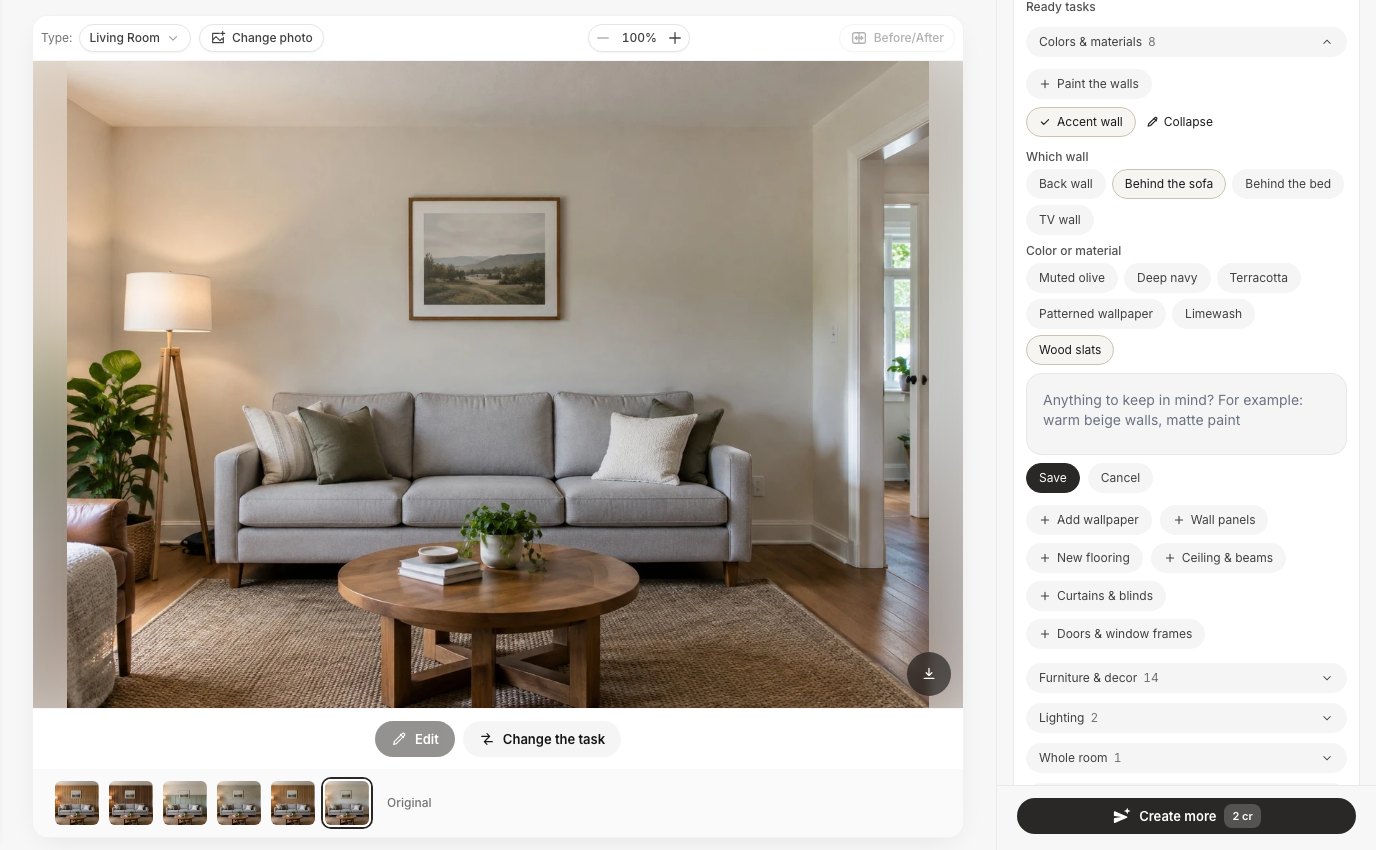 "Accent wall" mixes paint colors and textures in one list. Wood slats and Limewash are the two texture choices.
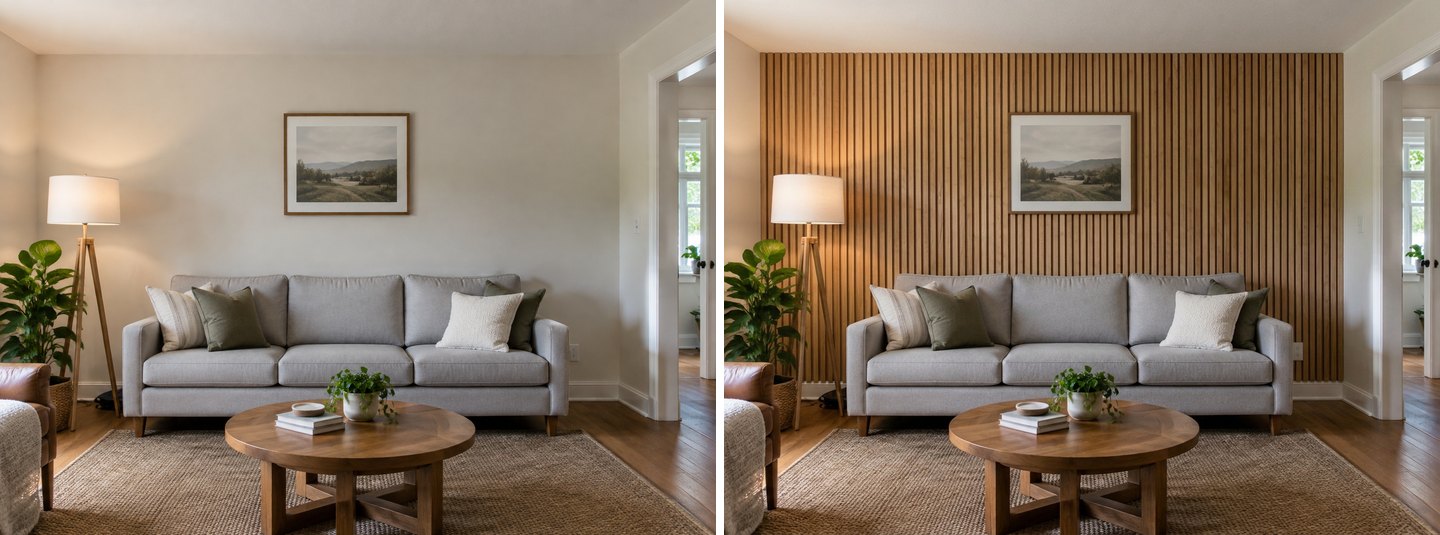 Before and after. The print now hangs on the slats, and the outlet at the right end of the sofa is still there.
The AI chose narrow slats with dark gaps, the look of ready-made acoustic panels. The slats stop at the doorway trim on the right and at the corner on the left, so the wall reads as one framed feature rather than a room wrapped in wood.
Limewash, board and batten, Thermowood and a "creative" pattern
Then we tried four more directions on the same wall, each from the original photo:
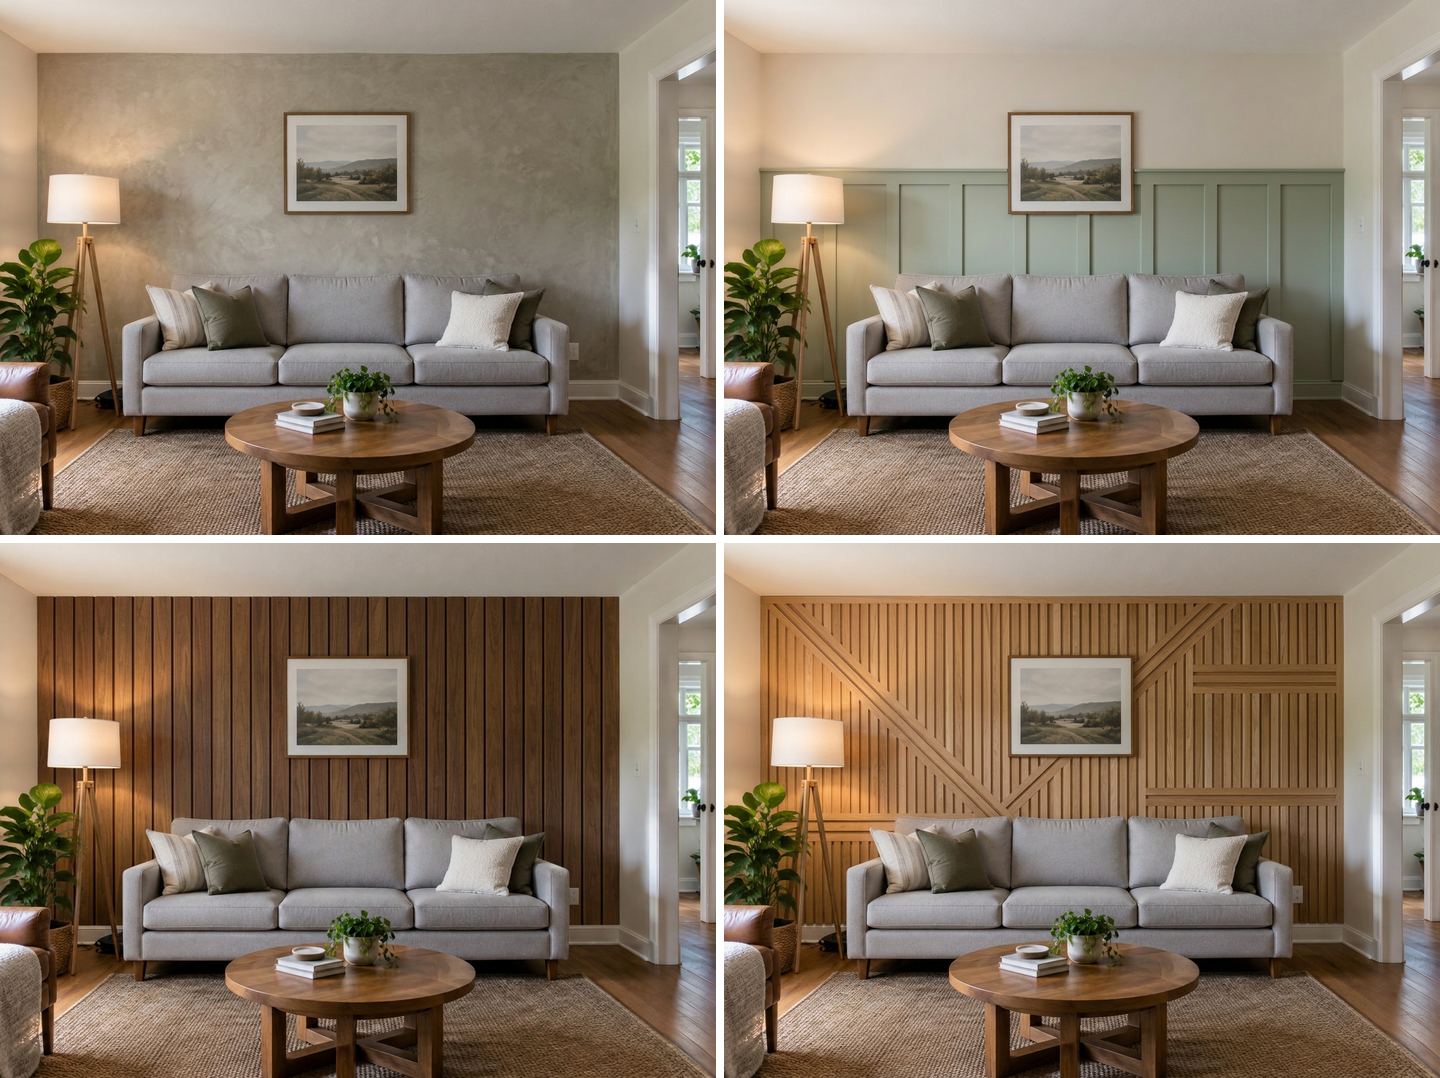 Top: Limewash (Accent wall task); sage board and batten (Wall panels + note). Bottom: Thermowood from Finishing materials; "natural wood slats, a bit creative, but keep the wall flat" in the editor.
- Limewash (Accent wall → Limewash) gave a cloudy, brushed beige wall. It is the softest way to add texture, with no panels at all.
- Board and batten: Wall panels → Behind the sofa → Wainscoting, plus the note "Board and batten in a soft sage green, up to about two thirds of the wall height, plain wall above." The color, the batten layout and the height all followed the note: the top rail sits at about two thirds of the wall, well above the sofa back. One thing slipped: the outlet beside the sofa arm disappeared under the new panelling.
- Thermowood: we selected the wall in the editor, picked Thermowood in Finishing materials and wrote "Vertical slats in this wood on the wall behind the sofa." The boards took the dark, warm tone of the library tile.
- "A bit creative": the real German request, typed almost word for word in the editor. The AI kept the wall flat, as asked, and made a pattern of vertical slats crossed by diagonal and horizontal runs. It is a good way to see whether a custom layout is worth paying a carpenter for.
If your sofa wall is also the TV wall, the TV wall design guide shows slatted media walls and TV heights. If the wall has a fireplace, the fireplace makeover guide covers plaster, tile and wood around the firebox.
Example 3: A Home Office Panel That Stops Below the AC
The third room is the real request from the introduction, rebuilt as a test: a white desk against a plain white wall, a split air conditioner high on the wall above the left end of the desk, and a switch and an outlet on the right. Detected as a Home Office.
"Not up to the ceiling, so it doesn't block the airflow"
Ready task Wall panels, wall Back wall, type Light wood, and in "Anything to keep in mind?": "Scandinavian style. Stop the panel well below the air conditioner, not up to the ceiling, so it does not block the airflow."
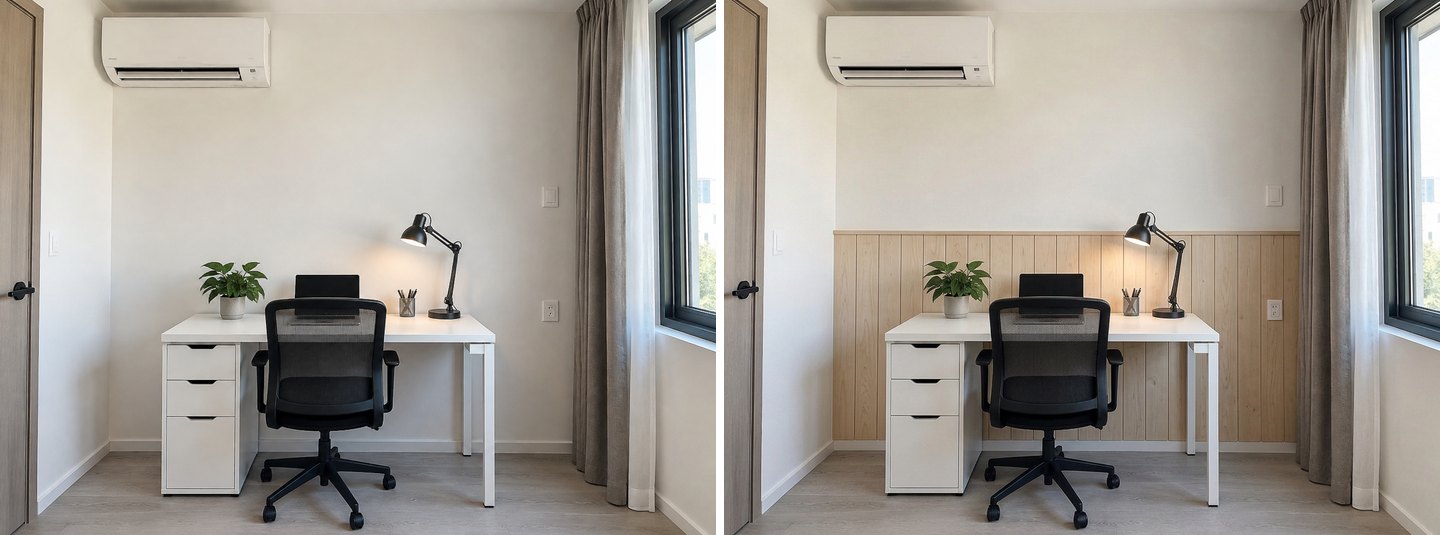 The panel ends at about half the wall height, far below the air conditioner. The outlet stays visible on the panel.
The note did its job. The panel became a wainscot-height band of light boards with a thin top rail, and the air conditioner kept a large clear zone around it. This works because the limit is tied to something the AI can see ("below the air conditioner"), not to a number of centimeters.
Acoustic slat panels, then "replace the acoustic panel"
Acoustic slat panels are the most common request for home offices: real wood veneer slats on a felt backing. We asked for "acoustic slat panels: dark walnut slats on black felt, only behind the desk, the same width as the desk, from the floor up to about 2 meters". Then, on that result, we used the editor to answer the real request "replace the acoustic panel on the wall": "Replace the acoustic panel on the wall with light oak slats on light grey felt, same size and position."
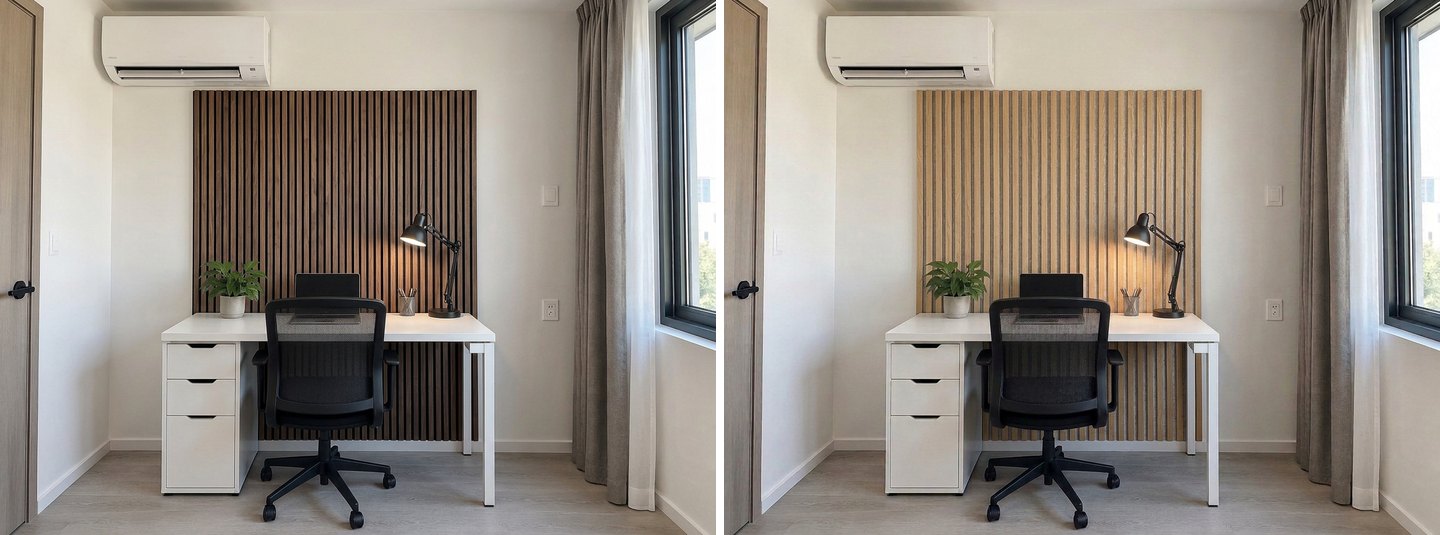 Left: dark walnut acoustic panel, the width of the desk. Right: the same panel swapped to light oak in one edit.
Both versions kept the panel the width of the desk and well below the air conditioner. The swap changed only the panel; the desk, chair, lamp and curtains stayed put. This is also how you would test a panel you already own: upload a photo of the room as it is and ask for a different wood or felt color.
For the rest of the workspace (desk position, storage, lighting) see our AI home office design guide.
Create interior design with AI
Upload a photo of your room and get a professional design in 30 seconds. First generation is free.
How Do You Get Wainscoting at One Third of the Wall?
Ask for it with a reference the AI can see, and use the "Wall panels" task with a note rather than free text alone. The classic rule, according to Bob Vila, is that wainscoting should take about a third of the wall height including the cap: about 36 inches on 9-foot walls and about 32 inches on 8-foot walls. Taller wainscoting, around two thirds of the wall, is also a popular choice.
We tried three ways to get one third on the bedroom wall:
- "Wall panels" → Wainscoting with no note: a full-height grid of moulding (the bottom-left picture in Example 1).
- Editor text only: "white painted wainscoting with board and batten... only on the lower third of the wall height". The top rail landed about halfway up the wall, above the headboard. A second try, "top rail level with the tops of the nightstands", snapped the rail to the top of the headboard instead.
- "Wall panels" → Wainscoting + note: "Only on the lower third of the wall, top rail level with the nightstand tops; plain wall above." The height came out right, close to a third.
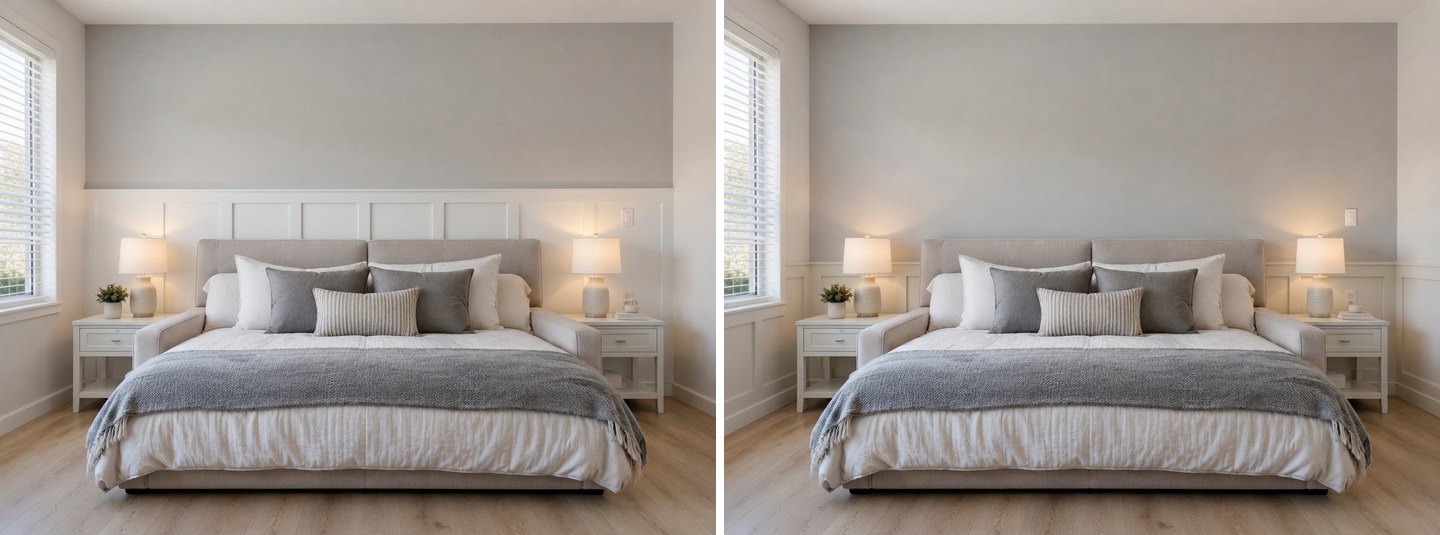 Left: editor text alone, rail about halfway up the wall. Right: task + note, close to a third, but it also wrapped onto both side walls.
The catch in the third version: the wainscoting continued onto both side walls, under the window and around the corner. That is what real wainscoting often does, but it is not what "behind the bed" means. If you want one wall only, add "only on this wall, the side walls stay as they are" to the note, or select the wall in the editor.
Where the AI Gets Accent Walls Wrong
In 16 generations on three rooms the Studio changed the intended wall every time and kept the furniture still. Three things went wrong, and each is easy to miss if you only glance at the result.
A selected wall can lose its switches and outlets
When we selected the bedroom wall with the lasso and applied Architectural concrete, the new microcement covered everything inside the selection, including the light switch and the outlet above the nightstand.
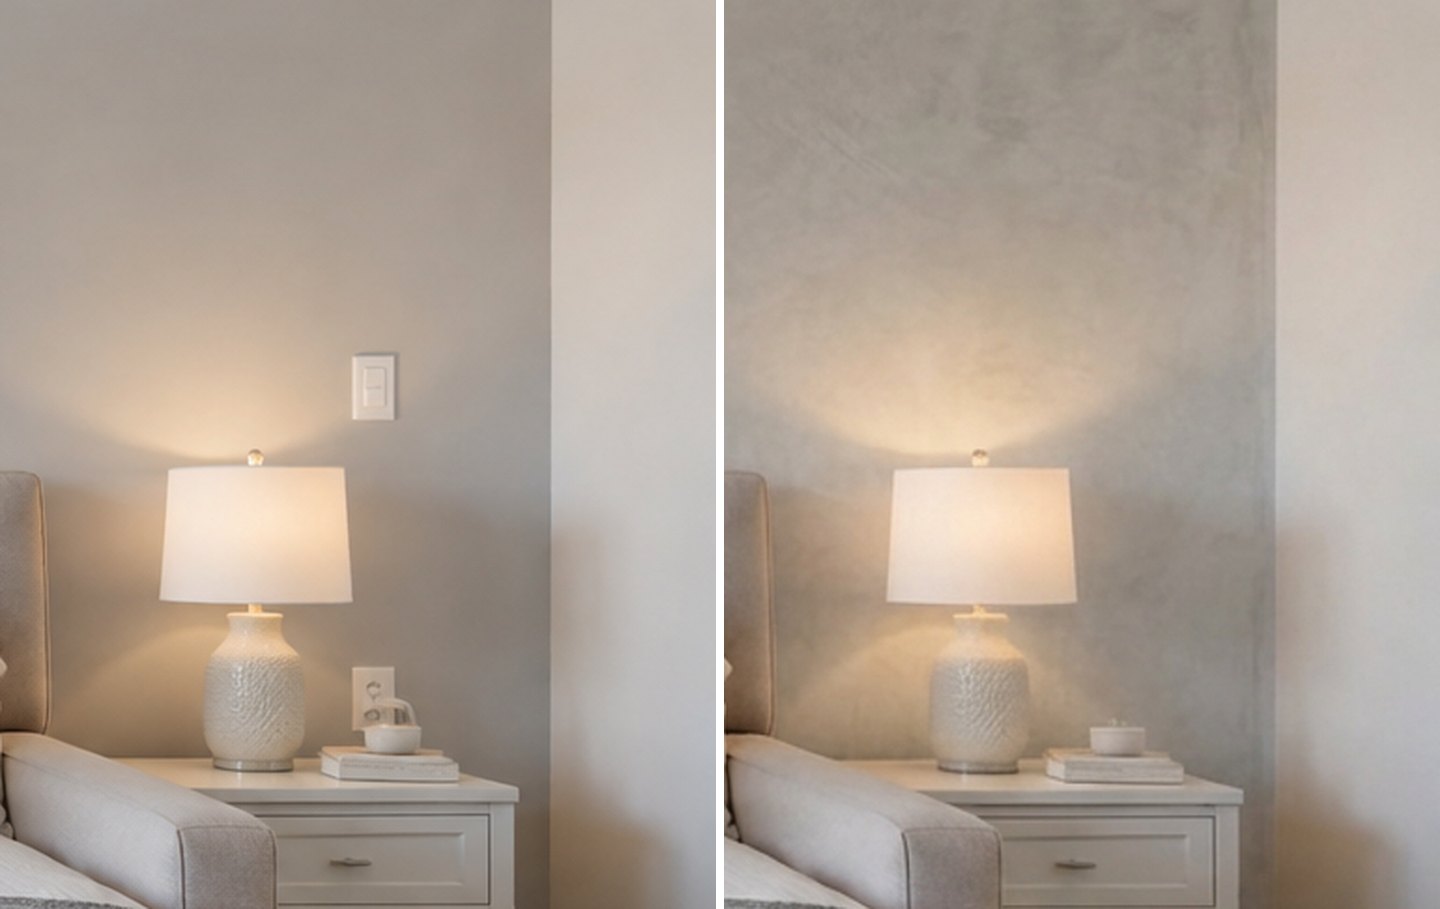 Left: original wall with a switch and an outlet. Right: after the material edit, both are gone.
The ready tasks did better: the Studio tells the model to keep sockets and switches in place, and 9 of our 10 task results kept them. The tenth, the sage board and batten in Example 2, lost the outlet next to the sofa. With a selection and a material you are asking the AI to repaint that whole area, so small fixtures inside it are at risk. Fix it either way: leave small fixtures out of the selection, or add "keep the light switch and the outlet" to your words. In real life, every slat or panel wall needs cut-outs or box extenders around them, so it helps to see where they fall.
Heights are approximate, and a panel can wrap around corners
Text like "a third of the wall" or "two thirds" moves the top rail, but not precisely. The AI tends to snap to a nearby line: the top of the headboard, the sofa back, the top of the nightstands. And, as the wainscoting test showed, a lower-wall panel can spread to the side walls. Treat the picture as a proportion check, then measure the real height on the wall with tape.
Slat count and gaps are not to scale
The AI decides how many slats fit and how wide the gaps are. Those numbers look right but are not measured. Use the image to choose the look (dense or open, wood tone, vertical or patterned), then plan the real layout with a tape measure or a slat calculator.
Practical Notes Before You Buy Panels
The picture chooses the look; the wall decides the install. A few points from manufacturer and how-to sources:
- Slat spacing. Most slat walls use a gap between half the slat width and about one slat width. Ready-made acoustic panels typically run 27 mm slats with 13 mm gaps, which reads as one dense fluted surface; wider gaps read lighter and more graphic (Wall Panel Planner). Cut a spacer block to the gap width instead of measuring each slat.
- Installing over drywall. Felt-backed acoustic slat panels can be screwed directly to the wall through the felt (with anchors in drywall), glued with construction adhesive for a permanent install, or mounted on furring strips. Barron Designs recommends construction adhesive for permanent installs and silicone adhesive for semi-permanent ones.
- Renting. Construction adhesive is the hard-to-undo option. Screws leave a few small holes, and silicone is the manufacturer's semi-permanent choice. Free-standing or leaning panels avoid the wall entirely. Check your lease before you drill.
- Limewash on painted drywall. Limewash needs a porous surface. On drywall or a painted wall it needs a PVA or latex primer first, which also prevents taped joints "ghosting" through (Earthaus).
- Switches, outlets and vents. Plan cut-outs before you buy. A panel that "almost" reaches a vent or an air conditioner, as in Example 3, is easier to adjust on paper than on the wall.
Tips for Better Accent Wall Results
- Shoot the wall straight on. Stand opposite the wall at eye level, with the whole wall and a bit of each side wall in the frame. A straight photo gives straight slats.
- Name the wall with a chip, not a guess. "Behind the bed", "Behind the sofa" and "TV wall" tell the model exactly which surface to change.
- Tie heights to an object. "Stop below the air conditioner", "top rail level with the nightstand tops" work better than numbers.
- Say "only this wall" when you add a note, or the panels may continue onto the side walls.
- Use Finishing materials for a specific texture. A tile from the library gives a more faithful wood, stone or concrete than a word like "oak".
- Compare on the same photo. Run three or four panel types from the original photo and flip between them with Before/After. Differences in tone and rhythm are obvious side by side.
- Check the small things. Zoom in on switches, outlets, vents and trim before you decide.
The Material swap tool uses the same approach for floors and countertops, and the material swap guide shows those results.
FAQ
What are the best accent wall panel ideas for a bedroom?
Behind the bed, wood slats, light wood boards, fluted panels and wainscoting work best because the headboard anchors them. In our test, light wood boards and fluted panels looked calmest, a full-height moulding grid looked the most formal, and 3D panels were the most decorative. Try all four on your own photo with the ready task "Wall panels".
Are slat walls still trendy in 2026?
Interest is still growing. In Google Trends, worldwide searches for "slat wall" over the last 12 months were about three times higher than five years ago, and "limewash" grew at a similar pace, while "wainscoting" stayed flat. Felt-backed slat panels are also sold as acoustic panels, which keeps them popular in home offices.
Is there an accent wall visualizer where I can upload a photo?
Yes. In GenRoom you upload a photo once, pick the ready task "Accent wall" or "Wall panels", choose the wall and the finish, and get the result on your own room. In the editor you can select one wall and apply one of nine Finishing materials, or describe a custom pattern in your own words.
How do I visualize wainscoting or board and batten on my wall?
Use "Wall panels" → Wainscoting, then write the height and style in "Anything to keep in mind?", for example "board and batten, top rail level with the nightstand tops, only on this wall". Without a note, the task makes a full-height grid. Classic wainscoting is about a third of the wall height, according to Bob Vila.
How far apart should wood slats be on a wall?
A common range is a gap between half the slat width and one slat width. Ready-made acoustic panels typically use 27 mm slats with 13 mm gaps. The AI picture shows the overall effect of dense versus open spacing, but it does not measure the gap, so plan the exact count with a tape or a calculator.
What is a renter-friendly alternative to a slat wall?
Felt-backed acoustic slat panels screwed into the wall leave only small holes, and some manufacturers list silicone adhesive as a semi-permanent option. A large panel leaned against the wall or a free-standing slatted screen avoids the wall completely. Ask your landlord before drilling, and try the look on a photo first.
Is there a free AI accent wall generator?
A free GenRoom account (no credit card) gives you 6 credits, enough for three designs or edits. Free results carry a watermark. Paid credit packs are one-time purchases, not a subscription.
The Bottom Line
Accent wall panels are an easy project to test on a photo first, because the difference between slats, fluted panels, wainscoting, 3D panels and limewash is obvious once it is on your own wall. In our tests the ready tasks "Accent wall" and "Wall panels" changed only the chosen wall and kept switches and outlets in 9 of 10 results. A short note controlled height, color and width. The editor with Finishing materials handled specific textures and custom patterns.
Check three things before you buy: the switches and outlets, the real height, and whether the panel wrapped around a corner. Then measure the wall. Upload a photo of your wall in the Studio and compare three panel types before you spend anything.