How to Clean Up an Overgrown Yard: See the Result With AI First
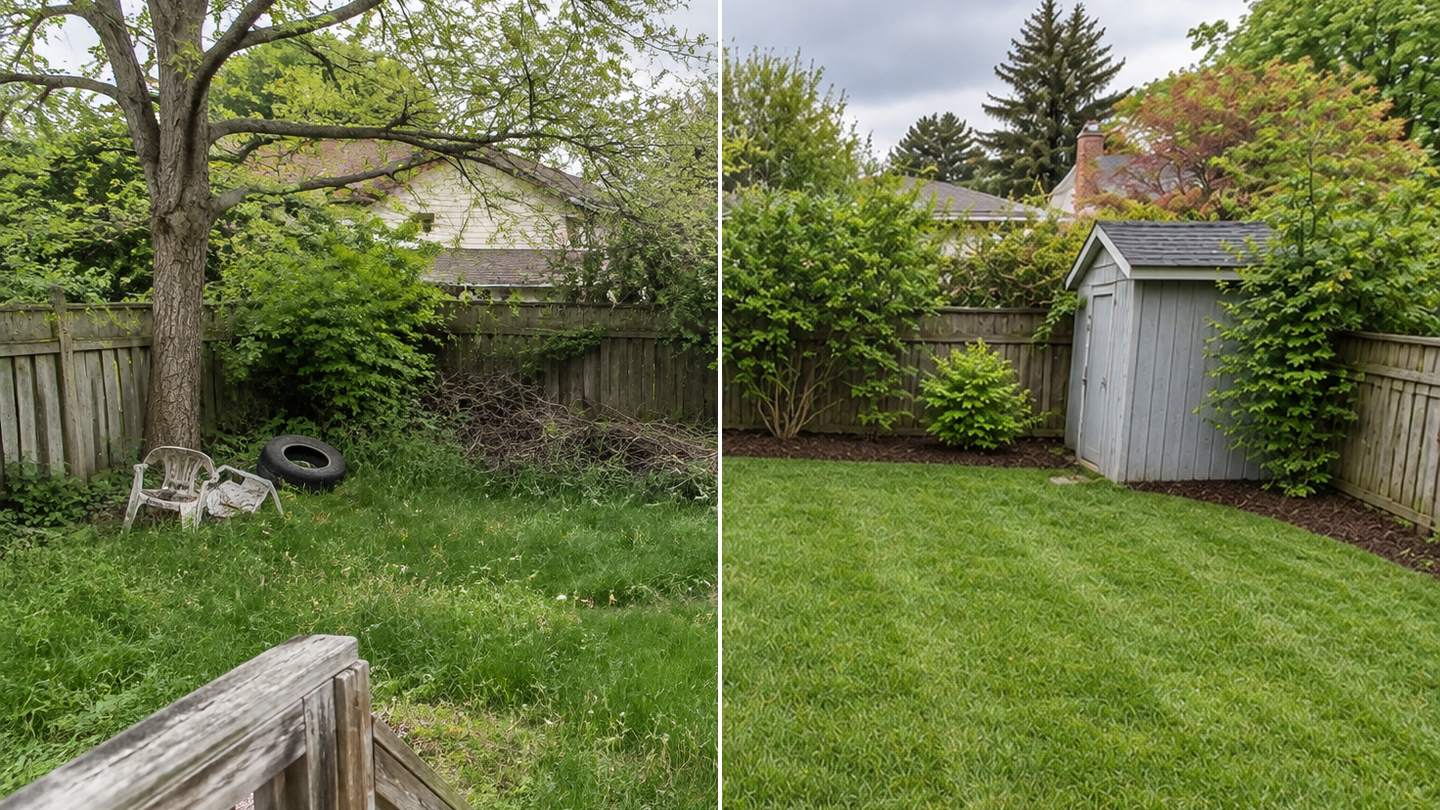
Same photo, same camera. Left: the yard as it is. Right: the unedited result of GenRoom's Clean-up mode. The fence, the tree and the shed are from the original photo.
To clean up an overgrown yard, clear the junk first, cut the grass down in stages, prune the shrubs, then edge and mulch the beds. The hard part is not the work. It is seeing, before you start, what the yard will look like once it is done and what is worth keeping. An AI picture answers that in about 30 seconds: upload one photo of the messy yard and get the same view mowed, pruned, mulched and free of junk.
People ask for this a lot. Between March and mid-October 2026, 292 people asked the GenRoom Studio in their own words to tidy up a weedy, cluttered or abandoned yard. Below is the exact path we used, real before/after pictures from three neglected yards, the order in which the real work should happen (from university extension services and the RHS), and the places where the AI got it wrong.
What Do People Mean by "Clean Up My Yard"?
Most requests are not about a new design. People want the same yard, minus the mess, so they can decide what to do next. Here is how GenRoom users put it, shortened and anonymised:
- "Remove all the leftover materials lying around and give the back a simple finish."
- "Clean up the leaves on the outside and touch up the mulch. Keep the layout."
- "Remove the overgrowth and hide the back fence with plants."
- "Make the corner more tidy and welcoming."
- "Remove the debris along the concrete path and add a garden bed."
- "Hide the three big barrels at the back."
- "Get rid of the chairs, the table and the things near the tree line and make it just grass."
Three needs sit behind these requests. You want to see the yard without the junk. You want to see it groomed: mowed, trimmed, edged. And you want one or two cheap upgrades, like a path or a bed, that make it look finished. GenRoom has a separate tool for each, and they stack.
Which GenRoom Tools Clean Up a Yard?
The main one is the Clean-up mode: it mows the lawn, prunes the shrubs, mulches the beds and clears clutter and weeds, while the layout, paths and buildings stay. The others handle the parts Clean-up deliberately leaves alone.
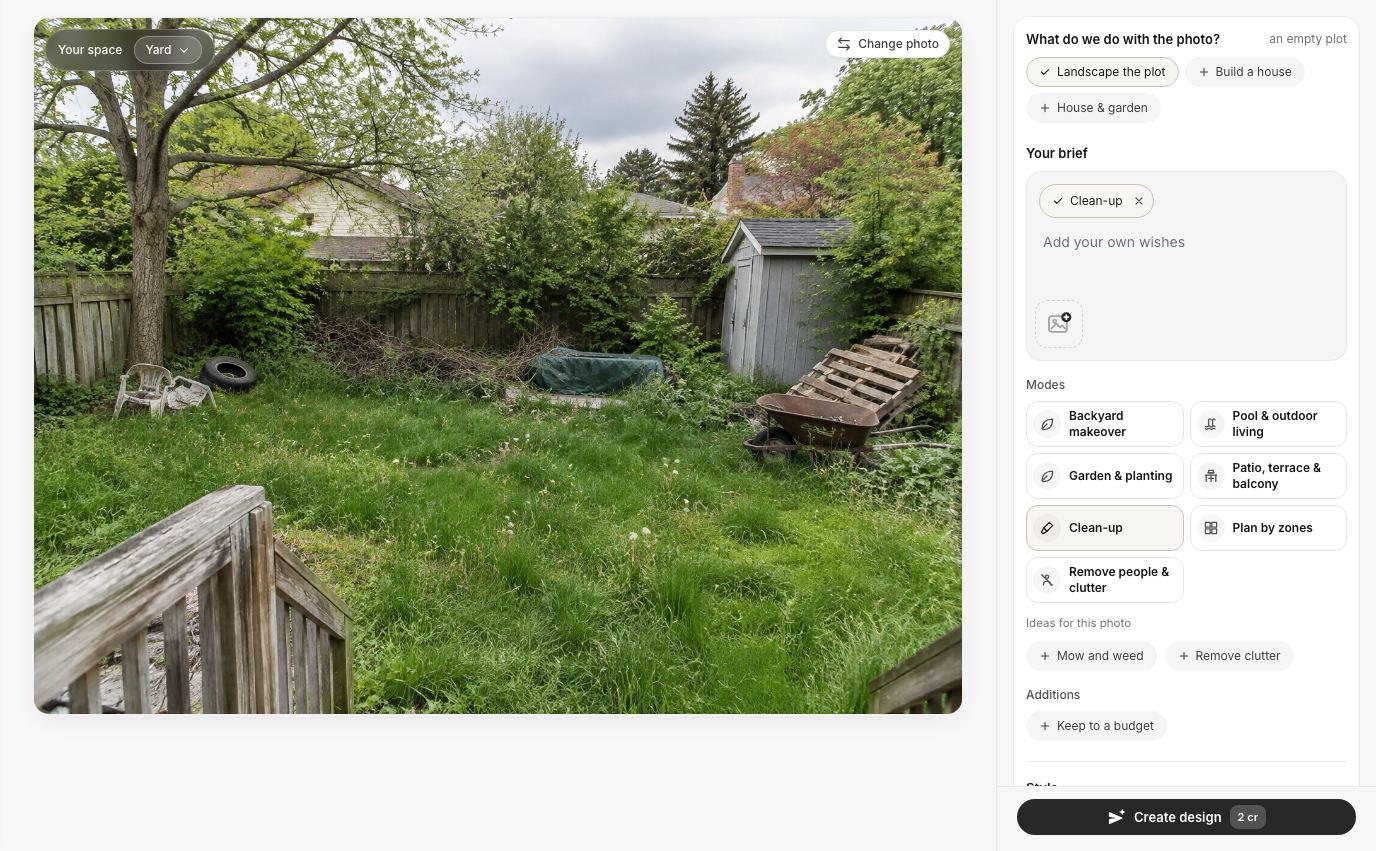 The Studio with a yard photo. "Your space" is set to Yard, the Clean-up mode is in the brief, and the Studio suggests two ideas for this photo: "Mow and weed" and "Remove clutter".
| Tool in the Studio | Where to find it | What it changes | What it keeps |
|---|---|---|---|
| Clean-up mode | Design → Modes | Mows the lawn, prunes shrubs, mulches beds, clears clutter, debris and weeds | Layout, paths, buildings, planting |
| Remove people & clutter mode | Design → Modes | Removes people, pets, toys, tools and junk and fills in what they covered | Planting and buildings, the grass as it is |
| Ideas for your photo | Design → Ready tasks | Suggestions written for your photo, e.g. "Clear yard debris", "Mow the grass", "Prune overgrown shrubs" | Whatever the idea does not mention |
| Remove objects | Editor → Quick actions (also a ready task) | Removes what you name: a shed, an old fence, a greenhouse, trash | Everything else |
| Add | Editor → Quick actions | Adds a path, a bed, a seating corner, whatever you type | Everything else |
| Select area (brush or lasso) | Editor, top left | Limits any edit to the part you circle | Everything outside the selection |
| Keep to a budget | Design → Ready tasks → Budget | Asks the design to favour cheap, high-impact changes | See the limits section, it is not strict |
Every design or edit costs 2 credits. A free account gets 6 credits without a card, so you can try a clean-up and two follow-up edits for free. Paid packs are one-time purchases, not a subscription (pricing).
How to See Your Yard Cleaned Up, Step by Step
Upload, check that the Studio sees a yard, pick Clean-up, create, then refine in the editor. The whole loop takes a few minutes.
Step 1: Take one honest photo
Stand where you would normally look at the yard: the back door, the deck steps or the sidewalk. Hold the phone at eye level and keep the fence line, the shed and the house edges in the frame. They anchor the picture, and the AI keeps them in place. Daylight without harsh noon shadows works best. Do not clean anything up before you shoot.
Step 2: Check "Your space"
After the upload, the Studio decides whether the photo shows an interior, a facade or a yard. A backyard is usually read as Yard. A front garden with the house in the middle may open as Facade, and then you see facade modes instead of yard ones. Our front garden did exactly that. Open the "Your space" menu on the photo and switch it to Yard. The yard modes appear at once.
Step 3: Pick Clean-up (or start with the photo ideas)
Click Clean-up under Modes. If you want to choose the jobs yourself, open Ideas for your photo under Ready tasks instead. The Studio writes these for each photo. For our junk-filled backyard it offered "Clear yard debris", "Mow the grass", "Prune overgrown shrubs", "Refresh storage shed", "Install garden path" and "Stain wooden deck".
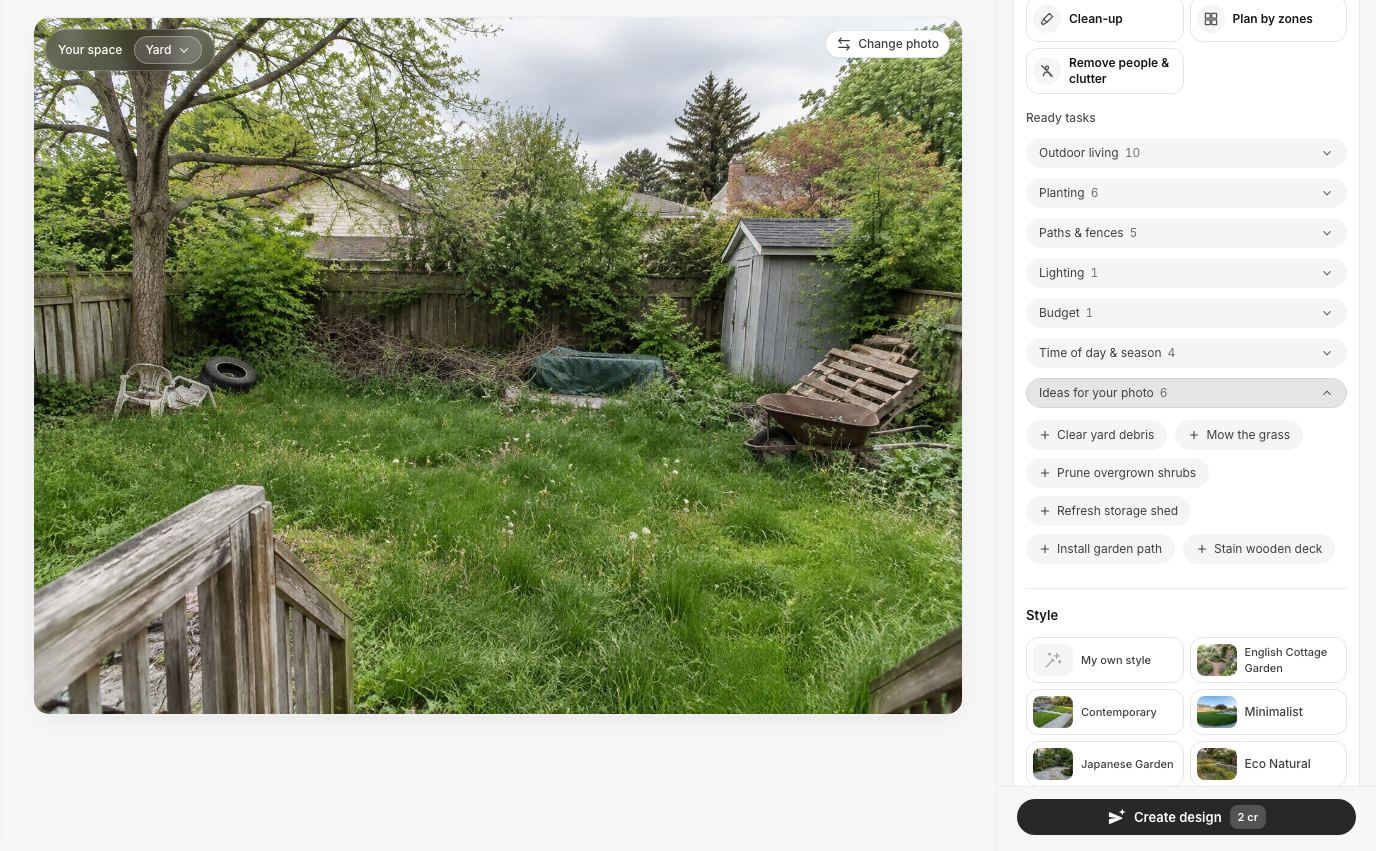 "Ideas for your photo" for the same backyard. The list is written for this picture, which is why it mentions the shed and the deck.
Step 4: Create the design
Press Create design. Our three Clean-up runs took 22–31 seconds from the click to the finished picture. Then open it in the editor and use Before/After to compare the two versions and check that nothing you care about has gone.
Step 5: Add the cheap upgrades one at a time
Open the result in the editor. Use Quick actions → Add for a path or a bed, Remove objects for something Clean-up kept, and Select area when only one shrub or one corner should change. Make one change per edit: it is easier to see what each one did, and each step costs only 2 credits.
Example 1: A Weedy Backyard Full of Junk
One click of Clean-up removed the tire, the chairs, the pallets, the wheelbarrow, the tarp and the brush pile, mowed the grass, pruned the shrubs and mulched a bed along the fence. The tree, the fence, the deck rail and the gray shed stayed where they were.
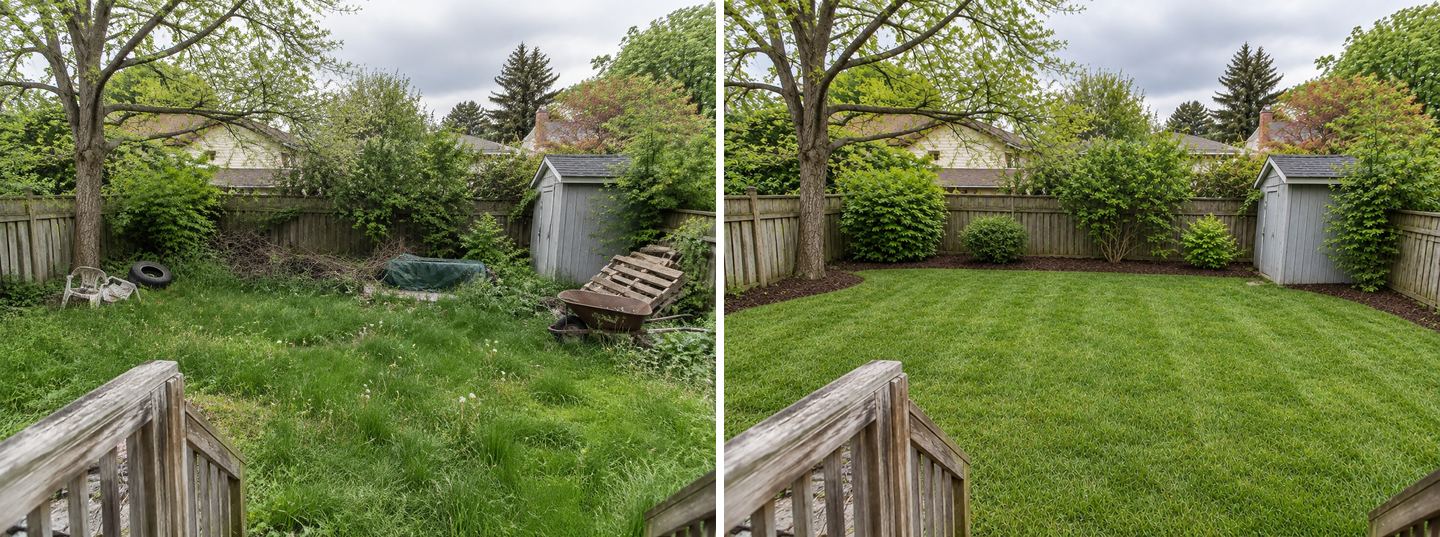 Left: the original photo. Right: Clean-up mode, unedited, 22 seconds.
This is the picture that answers "is this yard worth saving?" The fence looks sound once the shrubs no longer lean on it. The shed is in good enough shape to keep. The tree is the yard's best feature, not an obstacle.
Only the junk, or the full clean-up?
If you only want to see the yard without the junk, the Remove people & clutter mode does exactly that. It took out every loose object and left the grass and the shrubs as wild as they were. Clean-up goes further and also grooms the plants. (The same mode works indoors too, see how to remove clutter, people and objects from a room photo.)
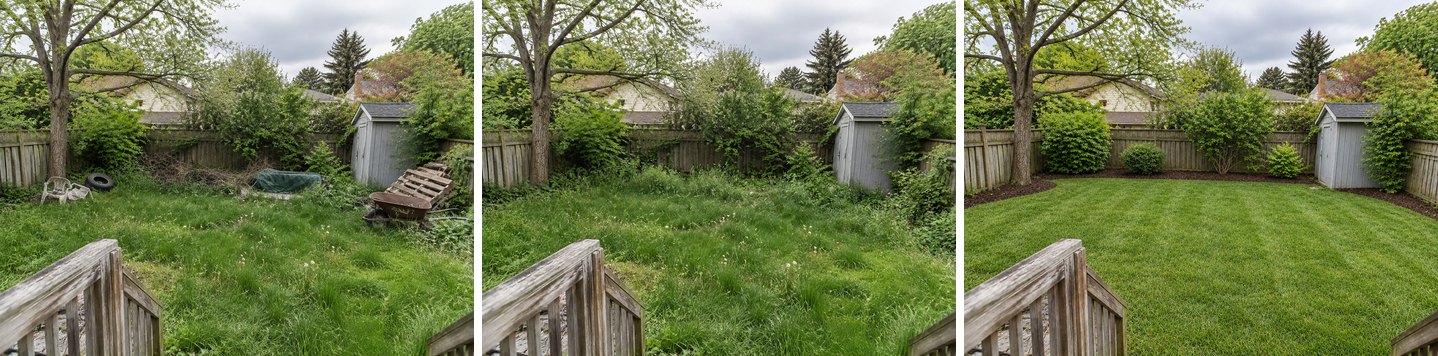 Left to right: the original, "Remove people & clutter", "Clean-up". Both modes started from the same photo.
The middle picture is useful in a practical way. It is what the yard will look like after the first weekend, when the junk has gone to the dump and nothing else has been done yet.
Two cheap upgrades on top
We then made two edits on the clean result, one at a time:
- Quick actions → Add: "a stepping-stone path across the lawn from the deck steps to the shed door".
- Quick actions → Add: "a small gravel seating area with two wooden chairs and a low table under the tree on the left".
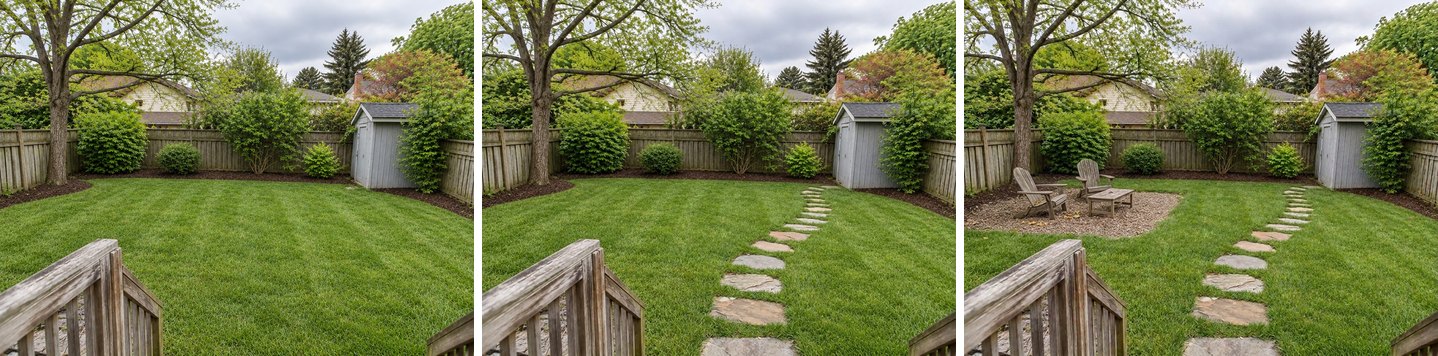 Clean-up, then a stepping-stone path (34 seconds), then a gravel seating corner (25 seconds). Each step is an edit of the previous picture.
A path and a sitting spot are the cheapest changes that make a lawn feel like a garden: a few flat stones, a load of gravel, two chairs. Now you have a picture to price them against.
Example 2: An Overgrown Front Garden
Clean-up turned a shaggy front lawn, a weed-choked walkway and leggy foundation shrubs into a tidy front garden, without touching the house. The windows, door, steps, brickwork and the big tree over the roof are all from the original photo.
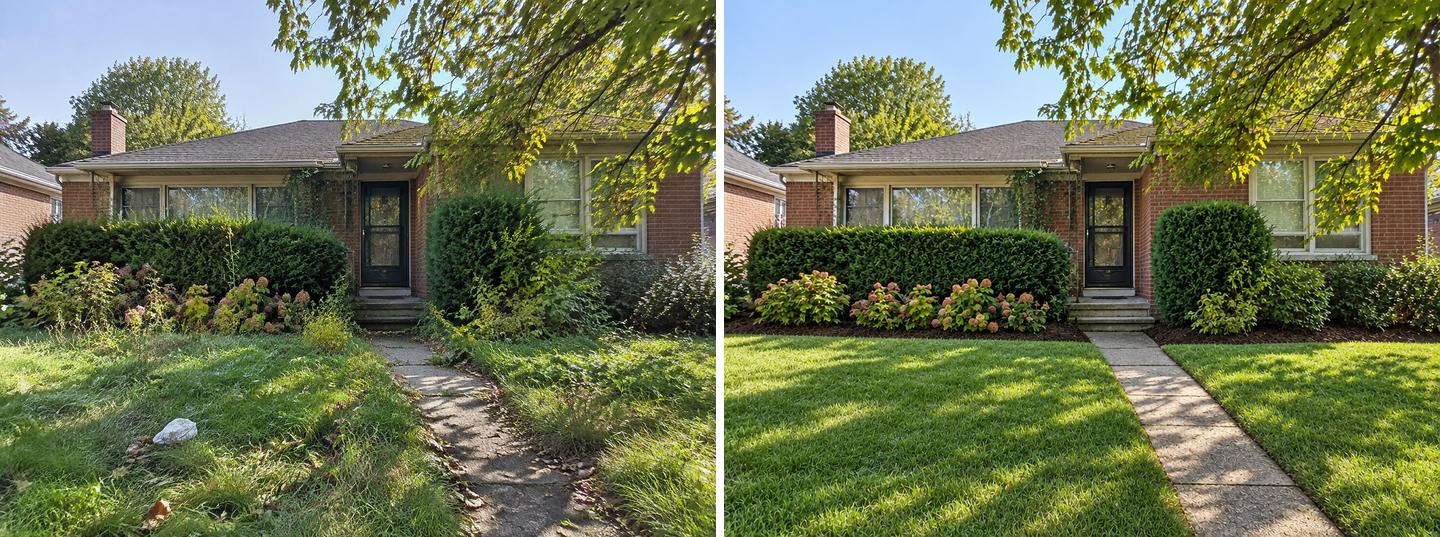 Left: the original. Right: Clean-up mode, unedited, 23 seconds. This photo first opened as "Facade"; we switched "Your space" to Yard before running it.
Clean-up kept the hedge under the left windows at roughly its old height. It was trimmed, but it still covered the bottom of the glass. That is a typical case for a selection edit: one shrub, one change.
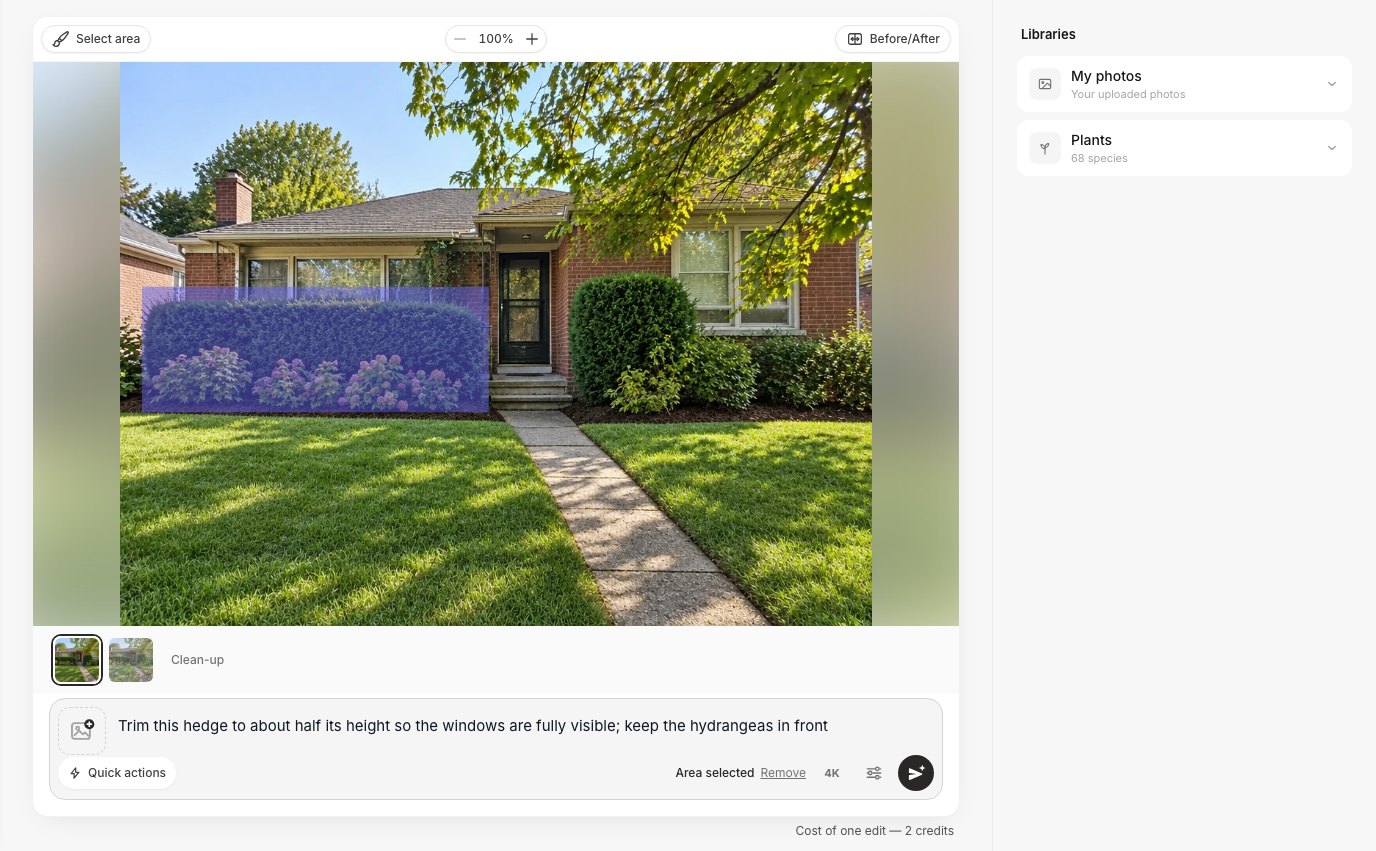 In the editor: "Select area" → Lasso around the hedge, a one-line instruction, "Area selected".
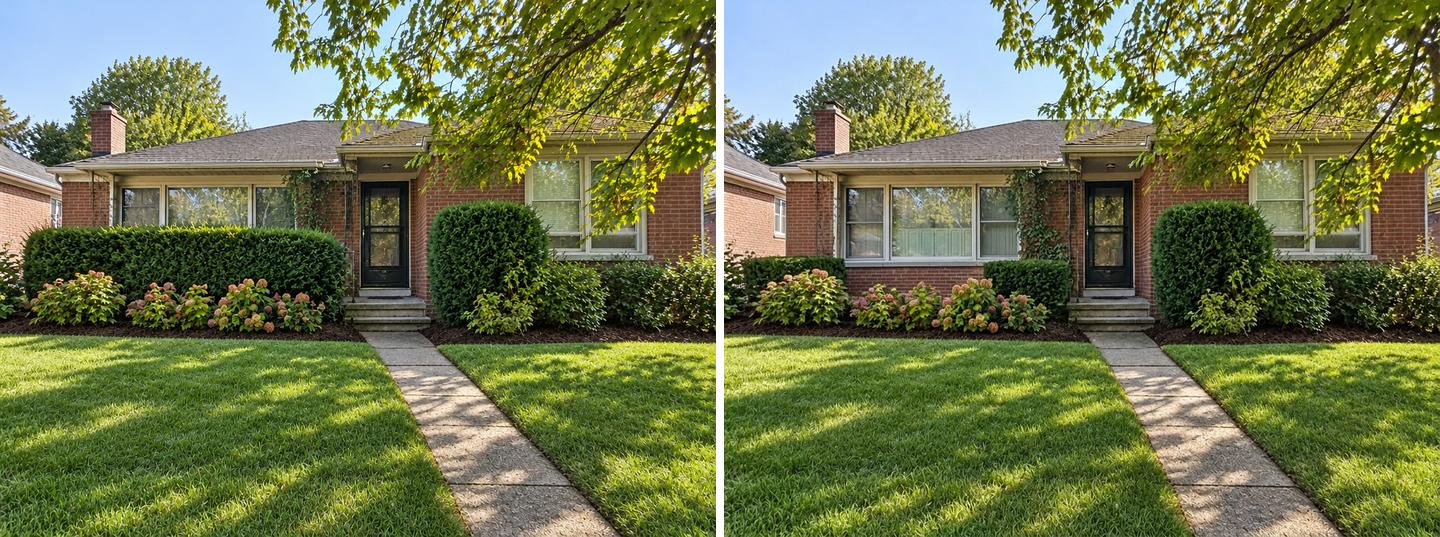 Left: after Clean-up. Right: the lasso edit, 60 seconds. Only the selected hedge changed.
Halving a hedge in one go is not just an AI trick. The RHS says many hedges, including beech, box, hawthorn, holly, hornbeam and yew, can be cut back by up to 50% in height and width at once. Most conifers other than yew do not regrow from old wood, so check what your hedge is before you copy the picture.
Create facade design with AI
Upload a photo of your home and get a new facade in the chosen style in 30 seconds. First generation is free.
Example 3: An Abandoned Plot Behind an Old House
On a truly abandoned plot, Clean-up cleared the brambles and the waist-high grass, but it kept the collapsed greenhouse, the rusty barrel and the bin. That is the mode doing what it promises: it tidies, and it does not remove structures.
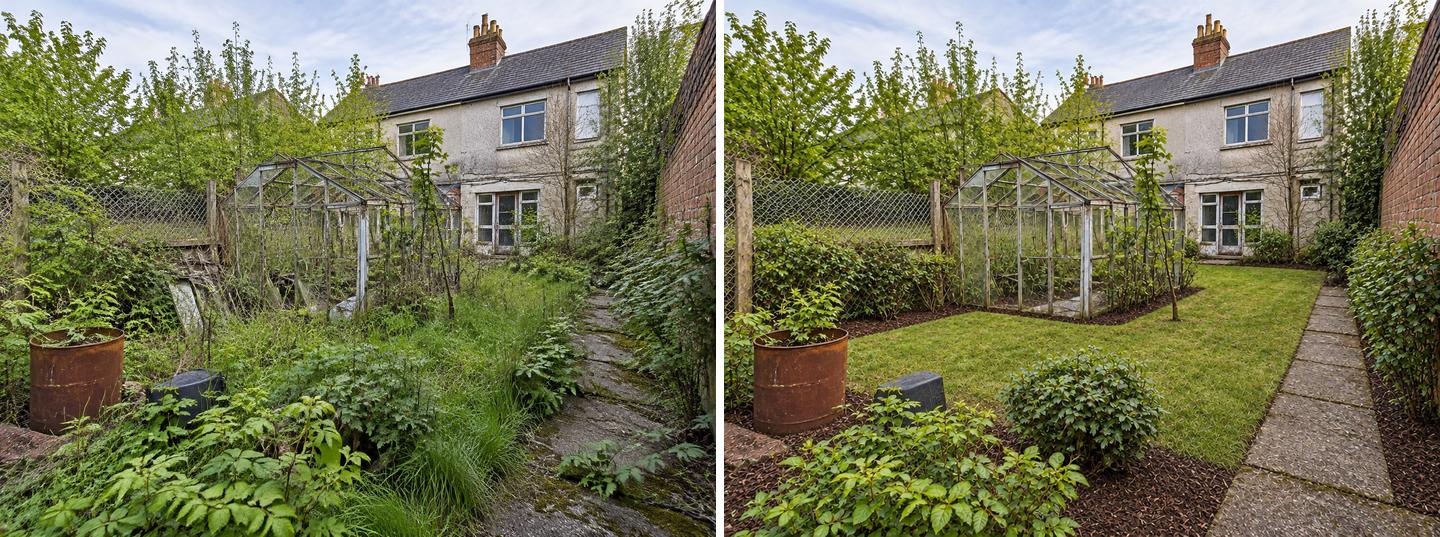 Left: the original. Right: Clean-up mode, unedited, 31 seconds. The greenhouse frame, the barrel and the bin survived.
To get rid of them, we named them in Quick actions → Remove objects: "the old greenhouse frame, the rusty barrel and the black bin". Then we used the freed sunny strip for the cheapest productive upgrade there is, raised beds.
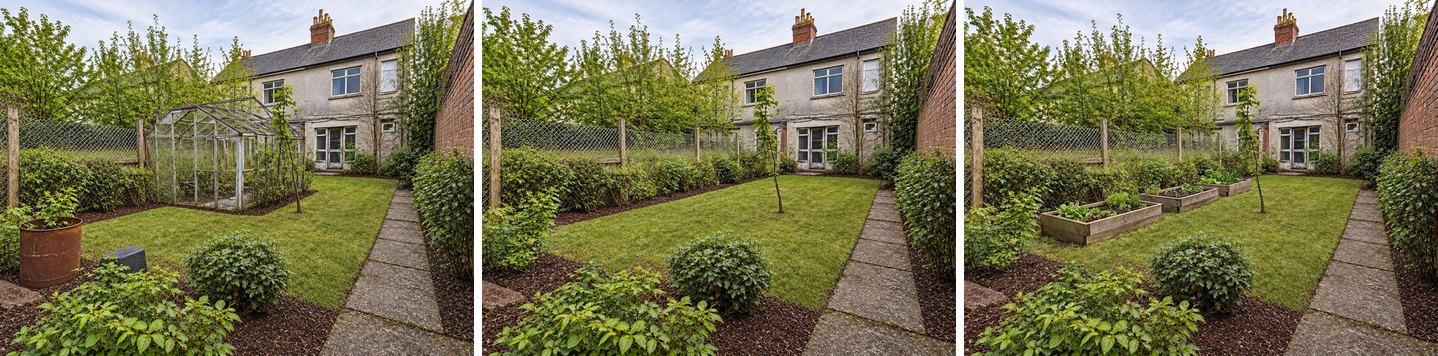 Clean-up → Remove objects (26 seconds) → Add "three wooden raised vegetable beds in a row on the lawn along the left fence" (24 seconds).
Notice what the model did not decide for you: the thin self-sown sapling in the middle of the lawn survived every step, because it looks like a young tree. On a real plot, you decide whether a seedling is a future tree or a weed.
In What Order Should You Clean Up an Overgrown Yard?
Debris first, then cut the vegetation back, then bring the grass down in stages, then prune, then mulch, and plant last. The AI picture compresses all of this into one frame. The real yard needs the work in this order, and some of it at the right time of year.
| Job | How | When | Source |
|---|---|---|---|
| 1. Clear junk and debris | Remove everything loose before you cut. Hidden tires, bricks and wire damage mowers | Any time | — |
| 2. Bring tall grass down gradually | Remove no more than one-third of the grass height at one mowing. If it is far too tall, raise the mower and lower it over several cuts | Growing season | Clemson HGIC |
| 3. Renew overgrown shrubs | Each year cut up to one-third of the oldest, thickest stems to the ground. Severely overgrown multi-stem shrubs can be cut almost to the ground in early spring | Early spring for the hard cut | University of Minnesota Extension |
| 4. Cut back hedges | Deciduous hedges in midwinter, evergreen hedges in mid-spring. Up to 50% in one cut for many species, harder cuts over two or three years. Check for nesting birds first | Winter / mid-spring | RHS |
| 5. Mulch the beds | 2–4 inches (about 5–10 cm) of organic mulch, kept away from trunks | After weeding | Penn State Extension |
| 6. Plant and add the upgrades | Paths, beds and new plants go in last, on cleared and mulched ground | Planting season for your climate | — |
Two things in this table change what you should expect from the picture.
The lawn will not look like the picture after one mowing. The AI shows an even, striped lawn straight after the clean-up. A real lawn that has been knee-high needs several cuts to come down safely, and bare or weedy patches may need reseeding or a full renovation afterwards.
Shrubs and hedges do not all bounce back in one season. The RHS stages drastic hedge cuts over two or three years, and the University of Minnesota spreads shrub renewal over several years, one-third at a time. Treat the picture as the goal for next summer, not for next weekend.
A Simple Low-Cost Plan From One Picture
The cleaned-up picture shows that most of the change comes from labor, not purchases: hauling, mowing, cutting and mulching. That is good news for the budget. Use the pictures to decide what to pay for and in what order:
- First weekend: junk out. The "Remove people & clutter" version is your target. Book a skip or a bulky-waste pickup for everything in the photo that is not a plant or a building.
- Next few weeks: grass and edges. Mow down in stages and cut a clean edge along beds and paths. The Clean-up picture is your target.
- Right season: shrubs and hedges. Prune in the window from the table above, and keep the Clean-up picture handy to remember which shrubs were worth keeping.
- Then one upgrade at a time. A stepping-stone path, a gravel seating corner or raised beds. Create each as a separate edit, so you can show the picture to a supplier or a contractor and get a quote for that one job.
GenRoom will not price the work for you. Prices depend too much on your region and on how much you do yourself, so get local quotes for the parts you will not do yourself. A clear "this, not more" picture also makes quotes easier to compare.
If you want to go further than a tidy-up, our guides on replacing a tired lawn with a green lawn, gravel or native plants, front yard curb appeal on a budget and choosing plants for your climate pick up where this one stops. For a full redesign of the plot, see AI backyard design from a photo and the yard design page.
Where Does the AI Get an Overgrown Yard Wrong?
The AI is good at "the same yard, but tidy". It is less reliable when you ask it to save money, and it cannot tell a weed from a keeper the way you can. Here is what we saw on these three yards.
"Keep to a budget · Small" is not a small budget
On the front garden, we tried the Backyard makeover mode together with Keep to a budget set to Small. The result is lovely and anything but small: a new paver walkway with path lights, a bench with cushions, a fire bowl, new hydrangeas and grasses. It also took out the foundation hedge under the left windows, which Clean-up had kept.
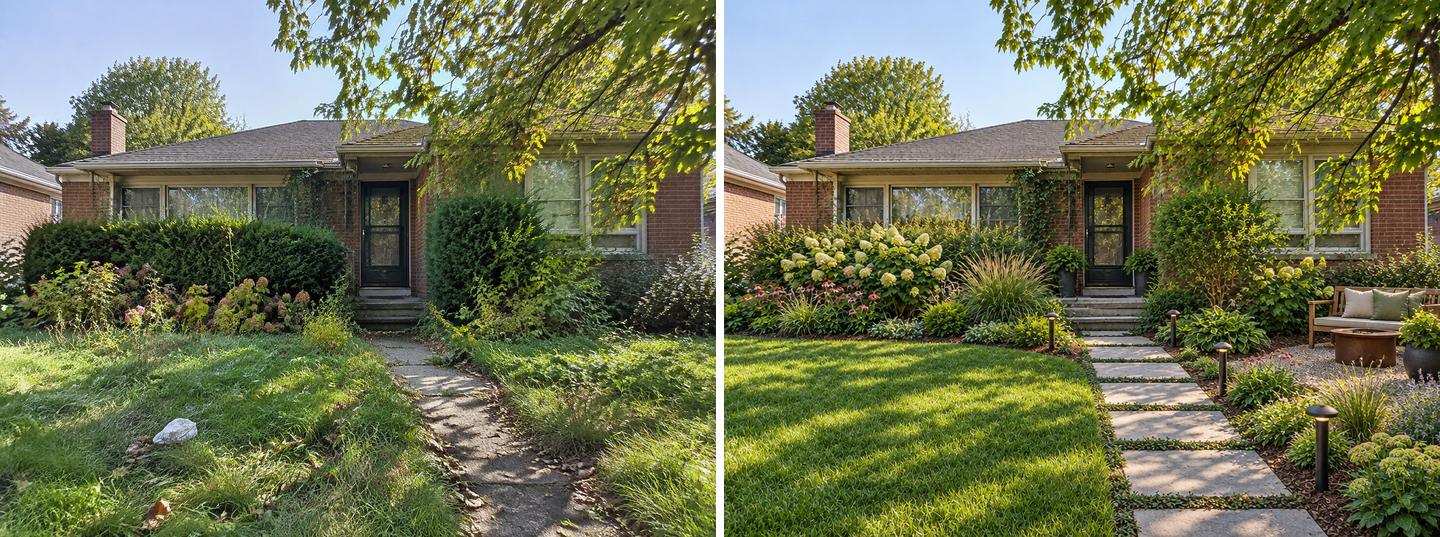 Left: the original. Right: "Backyard makeover" + "Keep to a budget · Small", unedited, 31 seconds. Nice to look at, but not a cheap clean-up.
If you want a low-cost result, use Clean-up and add upgrades one at a time, as above. The makeover modes redesign the plot, and the budget setting softens that only a little.
Every lawn comes out perfect
All three Clean-up results show a dense, even lawn, sometimes with mower stripes, even where the original was half weeds and bare ground. It is a fair picture of the goal and an unfair picture of next week. See the mowing and renovation notes above.
Clean-up keeps broken structures
The collapsed greenhouse frame survived Clean-up, because the mode is told not to change buildings. That protects your shed and fence, but it also protects junk that happens to be a structure. Name it in Remove objects when you want it gone.
Seedlings and weeds are judged by looks
The AI decides what to keep by how things look. On the abandoned plot, a self-sown sapling stayed in the middle of the lawn in every version. Before you copy a picture, walk the yard and decide for yourself what is a weed, what is a self-sown tree and what is a plant someone chose. For known invasive species in your area, ask your local extension office or a garden center.
Long edit chains get a little crisp
Each edit is made on top of the previous picture. After three or four steps, our pictures looked slightly sharper and more saturated than the original photo. If that bothers you, start the next idea from the original photo or from the first clean-up instead of stacking more edits.
FAQ
How do I clean up an overgrown yard fast?
Work in this order: haul out the junk, cut the tall grass down in stages, cut back shrubs and edge the beds, then mulch. Doing the debris first makes everything after it faster and safer. Seeing the end result first also helps: one photo in the Studio with the Clean-up mode shows the tidy version in about 30 seconds, so you know which plants and structures are worth keeping before you start cutting.
Is there a free AI tool that can clean up a photo of my yard?
Yes. A free GenRoom account gets 6 credits without a credit card, and a Clean-up design costs 2 credits, so you can make a clean-up and two follow-up edits for free. Free results carry a watermark; paid credit packs remove it.
What is the fastest way to clear an overgrown garden?
Clear it zone by zone, not all at once, and start with whatever blocks access: debris, brambles and fallen branches. Do not try to mow knee-high grass to its final height in one pass. Clemson HGIC advises removing no more than one-third of the grass height at a time and lowering the mower over several cuts.
Will the AI remove my shed, fence or trees?
Not in the Clean-up mode. It is set to keep the layout, paths, buildings and planting, and in our tests the shed, fences, trees and house stayed every time. The makeover modes can change more, as our budget example shows. If something must never change, keep it outside a selection and use the editor's Select area for targeted edits.
When is the best time to cut back an overgrown hedge or shrub?
For hedges, the RHS recommends midwinter for deciduous ones and mid-spring for evergreens, after checking for nesting birds. For overgrown multi-stem shrubs, the University of Minnesota Extension recommends hard rejuvenation pruning in early spring, or renewing one-third of the oldest stems each year.
Can GenRoom tell me which plants are in my yard?
The yard editor has an Identify plants quick action that names the plants it sees in the picture, and a Plants library you can use for new planting. Use it as a starting point. It does not know which plants are invasive where you live, so check anything you plan to keep or remove with a local expert.
The Bottom Line
Cleaning up an overgrown yard is mostly hauling, mowing, cutting and mulching. The hard part is deciding what the yard should look like when you are done. One photo and the Clean-up mode show you that in about 30 seconds, without removing the shed, the fence or the tree. From there, add one cheap upgrade at a time and do the real work in the right order and season. Expect the lawn and the hedges to take longer than the picture suggests. Upload a photo of your yard and see it tidy before the first weekend of work.